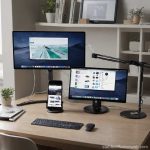
how to mount dual monitors on wall
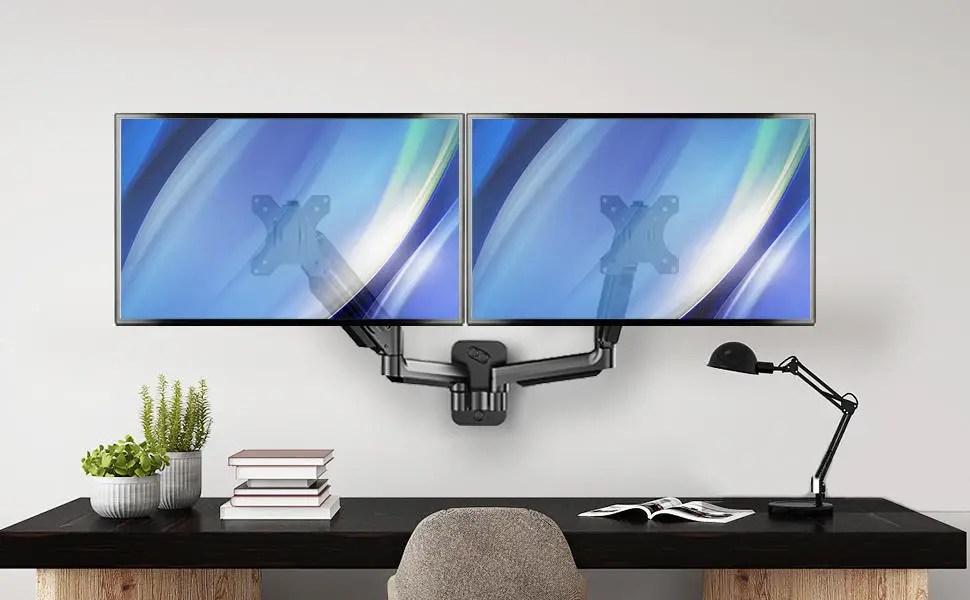
You’ve decided to free up desk space and get that clean, floating-screen look. But mounting two monitors on a wall isn’t just about picking a bracket and drilling holes. Get it wrong and you’re looking at damaged drywall, broken screens, or worse, a monitor falling on a person or pet.
The good news? With the right preparation and a few safety checks, it’s a weekend project you can handle yourself.
As of 2026, the vast majority of dual monitor setups use the VESA standard (Video Electronics Standards Association) for mounting. That means the mount and your monitors speak the same language, as long as you check two key numbers first. Let’s walk through exactly what you need to know before you pick up a drill.
Quick Answer
Mount dual monitors by measuring your wall, finding studs, and choosing a compatible VESA mount. First confirm each monitor’s weight and VESA pattern. Buy a mount that supports both monitors and attaches to at least one stud.
Use lag bolts into studs for safety. Level the mount, attach monitors, and route cables. Never mount into drywall alone without rated anchors.
Image source: Bing (Web (fair-use with source credit))
Why Getting This Right Matters (A Real Safety Issue)
It’s easy to underestimate the forces at play. A single 27-inch monitor weighs anywhere from 8 to 15 pounds. Two of them, plus the mount’s own weight and the leverage of articulating arms, can easily exceed 40 pounds pulling against your wall.
That’s not just a repair cost if it falls. According to the U.S. Consumer Product Safety Commission, tip-overs from televisions and furniture send thousands of people to emergency rooms every year.
Monitors aren’t TVs, but the physics is the same: a heavy object hanging on drywall can fail suddenly.
The most common mistake is trusting drywall anchors alone. Regular plastic anchors are rated for maybe 20 to 30 pounds in perfect conditions. That’s fine for a picture frame or a small shelf.
It’s not enough for a pair of monitors that someone might bump or pull forward.
You also need to think about the type of wall. Wood studs spaced 16 inches apart are standard in North America. Masonry or brick walls, common in Europe and parts of the UK, need different anchors and a hammer drill.
If you’re in a rental, you may need permission, and a plan to patch holes later.
Bottom line: this is a job where “good enough” isn’t good enough. You’re dealing with weight, leverage, and a risk of injury. Do it right the first time.
The Two Most Important Numbers Before You Buy
Before you even look at mounts, you need two numbers from each monitor: its weight and its VESA pattern. These will determine every other decision you make.
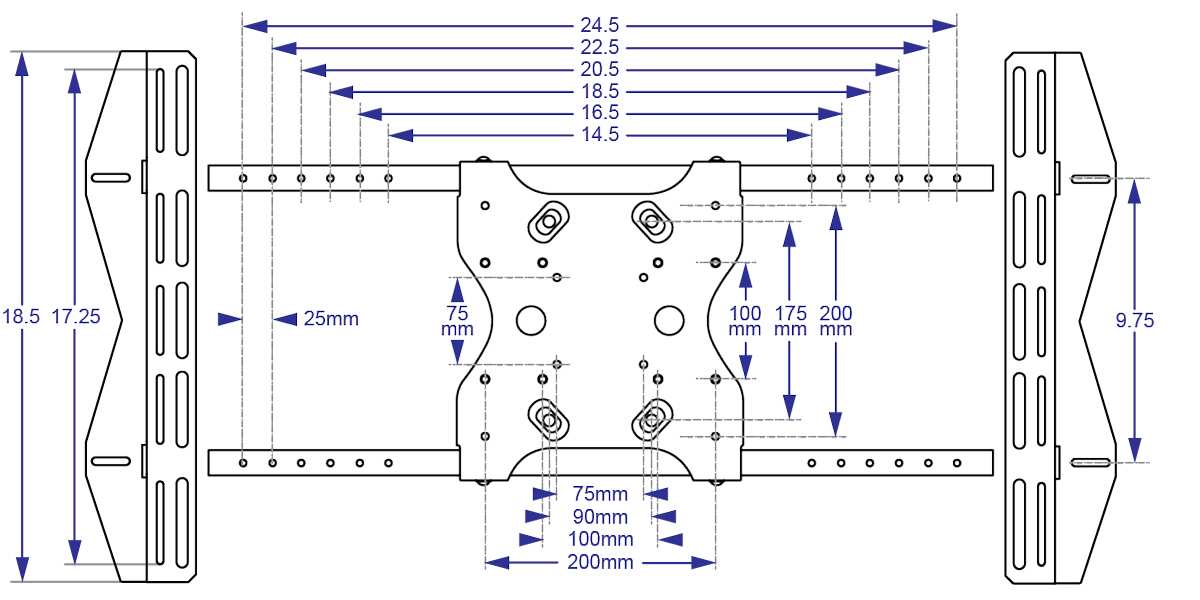
Image source: Bing (Web (fair-use with source credit))
Weight Limits — Don’t Guess
Every dual monitor mount has a maximum weight capacity per arm and a total capacity for the whole unit. You need to add up the weight of both monitors plus the mount itself, and make sure you’re under those numbers.
Check your monitor’s specs, look on the manufacturer’s page or the sticker on the back. If you can’t find it, weigh the monitor yourself on a bathroom scale (hold it carefully). Don’t rely on “it feels light.”
Aggregate user reviews show that the most common failure point is an overloaded gas-spring arm. When the weight exceeds the spring’s tension range, the arm sags or won’t hold position. That’s frustrating and unsafe.
A good rule: leave a 20% margin. If your two monitors total 35 pounds, get a mount rated for at least 42 pounds per arm or 50 pounds total.
VESA Patterns — Not All Monitors Fit
VESA is the four-screw hole pattern on the back of your monitor. The two most common sizes are 75x75mm and 100x100mm. Larger monitors, 30 inches and up, may use 200x200mm or even custom patterns.
Measure the distance between the center of the top-left and top-right screw holes, then the top-left to bottom-left. If both distances are the same, you’ve got a square VESA pattern. If they’re different, you have a rectangular pattern (less common but still supported by some mounts).
Your mount must explicitly support your monitors’ VESA sizes. Most quality dual mounts support 75×75 and 100×100 out of the box. For larger patterns, you may need an adapter plate.
Check the mount’s specs before buying.
If your monitor doesn’t have a VESA pattern at all, you’re out of luck with standard mounts. Some manufacturers sell VESA adapter kits for specific models, but they’re rare. In that case, you might need a monitor arm that clamps to the desk instead.
Choosing the Right Mount: Fixed, Tilt, or Full Motion
Now that you know your monitors’ weight and VESA, it’s time to pick the mount style. There are three main options, and each one fits a different setup.
Fixed mounts hold the monitors flat against the wall with no movement. They’re the cheapest and most stable, but you can’t adjust the angle after installation. Best for: a permanent setup where you know exactly where your eyes will be.
If you share the desk with someone much taller or shorter, skip this.
Tilt mounts let you angle the screens up or down by a few degrees. That’s useful for reducing glare or adjusting for height differences between you and the monitors. They’re still fairly simple and affordable.
Most people find tilt sufficient for home office use.
Full-motion (articulating) mounts use arms that extend, swivel, and rotate. You can pull the monitors toward you, push them back, switch between landscape and portrait, or turn one screen to share with a visitor. These are the most expensive and require the strongest wall attachment because the arms create more leverage.
Here’s a quick comparison to help you decide:
| Feature | Fixed | Tilt | Full-Motion |
|---|---|---|---|
| Price range | $30 – $60 | $40 – $80 | $60 – $150+ |
| Adjustment | None | Up/down | Full range |
| Best for | Permanent, known height | Shared desks, glare reduction | Flexible workflows, gaming |
| Wall stress | Lowest | Low | Moderate to high |
If you’re unsure, go with tilt. It gives you enough flexibility without the extra cost or installation complexity of full-motion arms. If you plan to rearrange your desk often, invest in a quality articulating mount with gas springs.
What You Actually Need (Tools and Parts Checklist)
Don’t start until you have everything on this list. Running to the hardware store mid-project is frustrating, and using the wrong fastener can compromise safety.
| Tool / Part | Why You Need It |
|---|---|
| Stud finder (electronic) | Locates wood or metal studs behind drywall |
| Tape measure | Measure wall space, monitor width, and height |
| Level (at least 24 inches) | Ensures the mount is straight |
| Power drill with bits | For pilot holes and driving lag bolts |
| Lag bolts (size per mount) | 1/4-inch diameter, 2.5 to 3 inches long, with washers |
| Toggle bolts (if no stud) | For drywall-only mounting (heavy-duty only) |
| Socket wrench or screwdriver | To tighten bolts securely |
| Pencil | Mark hole positions |
| Safety glasses | Protect eyes from drywall dust and debris |
| Cable management kit | Raceway, clips, or in-wall rated cable |
One more thing: confirm your mount comes with the right hardware. Many include lag bolts and screws, but some assume you’ll buy your own. Read the manual before starting.
Step-by-Step: How to Mount Dual Monitors Safely
This is the core of the job. Take your time and double-check every measurement. Rushing leads to mistakes.
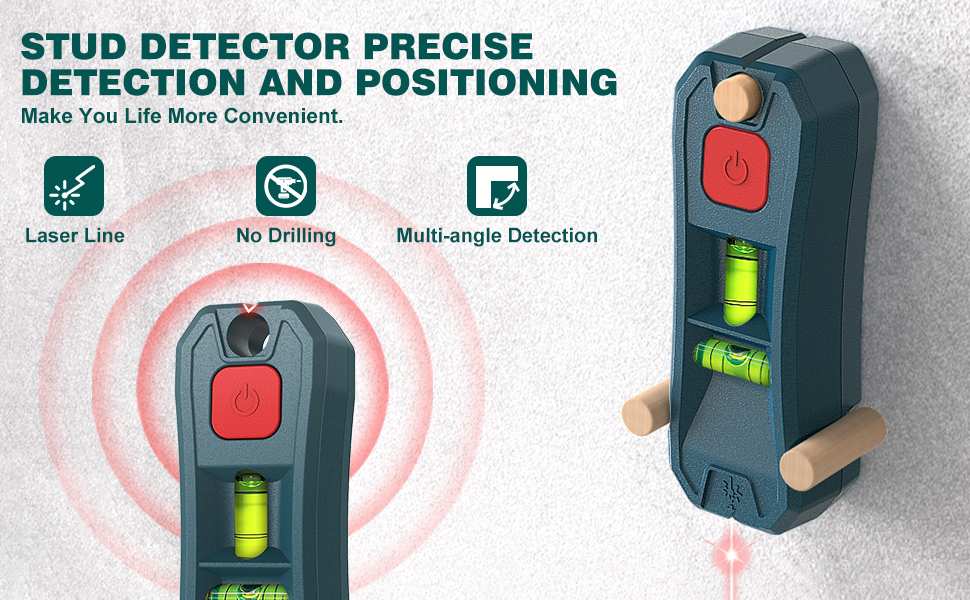
Image source: Bing (Web (fair-use with source credit))
Find and Mark the Studs
Use an electronic stud finder to locate the edges and center of each stud. Don’t rely on tapping the wall, that’s a guessing game. Mark the center of each stud with a pencil.
Most dual monitor mounts need a span of at least 24 to 30 inches. If your studs are 16 inches apart, that’s usually fine. If they’re 24 inches apart, you might still be okay depending on the mount’s bracket width.
Measure your mount’s wall plate and confirm it will reach at least one full stud.
If the mount can only attach to one stud, use heavy-duty toggle bolts on the other side. Never leave a side unsecured.
Position the Mount at the Right Height
Sit at your desk in your normal working posture. Close your eyes, relax your head, and open them. The center of your natural gaze is roughly eye level.
That’s where you want the top third of your primary monitor to sit.
For dual monitors side by side, the gap between them should be at the center point. If you’re stacking them vertically, the lower monitor should be at eye level and the upper one tilted slightly downward.
Mark the intended wall plate position with a level. Double-check it against your stud marks. Adjust left or right so the plate sits squarely on the stud centers.
Drill, Anchor, and Bolt
Drill pilot holes at your marks, use a bit slightly smaller than your lag bolt diameter. For studs, you want the bolt to bite into wood, not just slide in. For drywall anchor points, use the correct size bit specified on the anchor package.
Attach the wall plate. Use a socket wrench to drive lag bolts into the studs until they’re snug, don’t overtighten, which can strip the wood. If using toggle bolts, insert the toggle through the bolt, push through the drywall, then tighten until the plate is flush.
Now test the plate. Push, pull, and wiggle it. It should not move at all.
If it shifts, you have a problem, either the bolts aren’t seated in wood, or the drywall anchors aren’t rated for the load.
Attach Monitors and Fine-Tune Alignment
Most mounts let you attach the monitor brackets first, then hang the monitors onto the wall plate. Screw the brackets onto each monitor using the VESA screws that came with your mount. Tighten them firmly but don’t strip the threads.
Lift each monitor and hook it onto the wall plate. Most mounts have a safety latch or locking screw, engage it immediately. You don’t want one monitor slipping while you adjust the other.
Level each monitor using the mount’s tilt and swivel adjustments. For dual mounts on a single rail, level the rail first, then the individual screens. If one arm sags, check the tension adjustment, gas spring mounts usually have a hex key adjustment to increase or decrease lift force.
Once aligned, tighten all locking screws. Test by gently pulling the monitors forward and side to side. They should stay put with no wobble.
At this point, you’ve completed the first five critical steps. The remaining sections in the full guide will cover cable management, troubleshooting, and what to do when you can’t find a stud. But if you’ve followed this far, your monitors are securely mounted and your desk space is finally free.
Hidden Dangers: Drilling Into Electrical or Plumbing
You might assume the wall is empty inside. It’s not. Wires, pipes, and ductwork run behind drywall, and hitting one can cause serious damage or injury.
Electrical wires typically run horizontally through studs about 12 to 18 inches above the floor. They also run vertically from outlets and switches. Before you drill, check what’s on the other side of the wall.
An outlet, light switch, or plumbing fixture on the opposite side means there’s something in that cavity.
A stud finder with a built-in wire detector can help, but they’re not foolproof. The most reliable method is to examine the wall surface. Look for outlet boxes, pipe access panels, or baseboard water lines.
If your desk is near a bathroom or kitchen, assume there’s plumbing behind that wall.
If you feel resistance while drilling past the drywall, stop immediately. Don’t force it. Pull the drill out and inspect the bit.
Metal shavings mean you hit a metal pipe or an electrical conduit. Wood shavings are normal when drilling into a stud.
In that situation, patch the hole and relocate the mount. It’s better to shift your monitors a few inches than to deal with an electrical short or a slow water leak inside the wall.
When You Can’t Find a Stud (Drywall Anchors That Work)
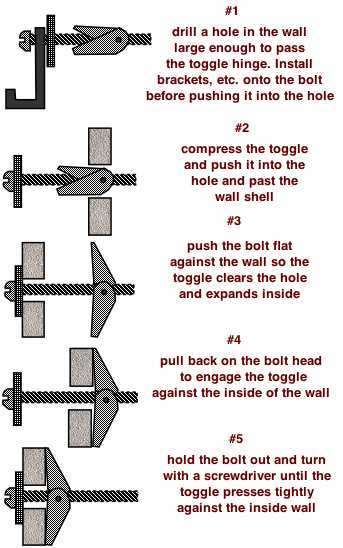
Image source: Bing (Web (fair-use with source credit))
Sometimes the ideal mounting spot doesn’t line up with any stud. Maybe your studs are 24 inches apart and the mount’s bracket is only 20 inches wide. Or you’re mounting on an exterior wall with irregular framing.
You have two choices: adjust the mount position to catch a stud, or use drywall anchors rated for the load. If you can shift the mount left or right even a few inches, do that. Stud mounting is always safer.
Image source: Bing (Web (fair-use with source credit))
If you can’t reach a stud, you need heavy-duty toggle bolts. Not plastic expansion anchors. Not the little threaded drywall plugs that come with picture frames.
Those will fail.
Toggle bolts work by folding a spring-loaded wing behind the drywall. When you tighten the bolt, the wing spreads the load across a larger surface area. A quality toggle bolt supports 50 to 100 pounds in 1/2-inch drywall, depending on size.
Here’s what to do:
- Drill a hole slightly larger than the toggle’s folded wings.
- Insert the toggle through the bolt, then push through the drywall.
- The wings spring open behind the wall.
- Tighten until the plate is snug. Don’t overtighten, or you’ll crush the drywall.
Aggregate user reviews show that toggle bolts fail in two ways. The most common is using too small a bolt for the weight. The second is drilling the hole too large, so the toggle can’t grip the edge of the drywall.
One more option: if your mount has a wide enough bracket, you can use a plywood backer board. Screw a 1/2-inch plywood board across multiple studs, then attach the mount to the plywood. This is common in home theaters and works well for monitors too.
Common Mistakes That Lead to a Dropped Monitor
Let’s talk about the errors that show up most often in user reports and verified buyer feedback. Avoid these and your setup will stay on the wall.
Skipping the stud finder calibration. Electronic stud finders need to be calibrated against the wall surface. Hold it flat, press the button, and wait for the light. If you don’t calibrate, it might tell you a stud is there when it isn’t.
Using drywall anchors for the full load. We covered this, but it’s worth repeating. If your mount attaches to one stud and one drywall section, the anchor side must still support half the weight plus leverage. Use a toggle bolt rated for the job.
Ignoring the mount’s weight limit per arm. Some mounts can hold 40 pounds total but only 20 pounds per arm. If one monitor is heavier than the arm’s limit, the arm will sag or fail. Always check per-arm ratings, not just the total.
Not tightening the VESA screws enough. Loose screws let the monitor wobble. Over time, the movement can strip the threads. Use the screwdriver that came with the mount and tighten until firm.
No need to gorilla-tighten.
Forgetting to engage the safety latch. Many mounts have a small tab or screw that locks the monitor onto the wall plate. If you don’t engage it, the monitor can lift off the bracket if bumped. Double-check this before letting go.
Mounting above a desk where you’ll hit your head. It sounds obvious, but people do it. Measure the clearance between your seated head height and the bottom of the monitor. Leave at least 4 inches.
Alternatives: Desk Clamps and Floor Stands (And When to Use Them)
Wall mounting isn’t the only way to get dual monitors off your desk. Two popular alternatives exist, and each has a specific use case.
Desk clamp mounts attach to the back edge of your desk using a C-clamp or grommet. They don’t touch the wall at all. These are ideal for renters who can’t drill into walls, or anyone with a solid wood desk.
The clamp distributes the weight across the desk surface. Most quality desk clamps support 30 to 50 pounds total. They also allow easy repositioning if you rearrange your workspace.
Downsides: they require a desk with a flat back edge and enough thickness (usually 1 to 3 inches). Glass desks are a no-go. And the clamp can damage soft wood if overtightened.
Floor stands are freestanding poles with monitor arms. They take up floor space but don’t touch the wall or desk. These work well for standing desks, adjustable-height desks, or situations where the wall material is unsuitable.
Floor stands are also the best option for multi-monitor setups that need to move between rooms. You can roll some models on casters.
Here’s a quick when-to-use table:
| Situation | Wall Mount | Desk Clamp | Floor Stand |
|---|---|---|---|
| Renters (no holes) | No | Yes | Yes |
| Heavy curved monitors | Yes (stud) | Maybe | Yes |
| Standing desk | No | Yes | Yes |
| Glass desk top | Yes (wall) | No | Yes |
| Frequent room moves | No | Yes | Yes |
| Cleanest appearance | Yes | No | No |
If you’re unsure, go with a desk clamp. It’s the middle ground that works for most people. You can always switch to a wall mount later if you own the space.
Cable Management: Keep It Clean and Code-Safe
You’ve got two monitors, which means two power cables and two video cables. Possibly USB cables too. That’s a lot of wire hanging from the wall.
The simplest method is a surface raceway. This is a plastic channel that sticks to the wall and hides cables inside. Paint it to match the wall and it blends in.
Surface raceways are easy to install and require no wall cutting.
For a cleaner look, you can run cables inside the wall. This requires cutting a small hole behind each monitor and another hole near the desk. Feed the cables through, and they disappear completely.
But there’s a fire safety factor.
If you run cables inside the wall, you must use in-wall rated cables. Standard power cords and HDMI cables aren’t rated for in-wall installation. They don’t have the right fire-resistant jacket.
For video, you can buy CL2 or CL3 rated HDMI and DisplayPort cables. For power, hire an electrician or use a power bridge kit.
The National Electrical Code (NEC) requires this for a reason. Unrated cables inside a wall can spread fire through the cavity. It’s not worth the risk.
One pro tip: bundle your cables with Velcro straps before routing them. This keeps them tidy and makes future changes easier. Avoid zip ties unless you never plan to adjust anything.
If you’re using a surface raceway, map the path before sticking anything. Measure twice. Raceway adhesive is strong and removing it can peel paint.
Use the included level to keep the channel straight.
Final step: plug everything in and power on. If a monitor doesn’t turn on, check that the power cable is seated fully. Loose connections are common when routing cables through tight spaces.
How to Verify Your Installation Is Secure
Once the monitors are mounted, don’t just walk away. Give the whole setup a thorough check.
Push each monitor firmly in all directions. If the wall plate shifts at all, stop. Remove the monitors and recheck the bolts.
A loose lag bolt needs to be tightened, not ignored.
Apply moderate downward pressure on each arm. Listen for creaking sounds. Creaking usually means the bolt is rubbing against wood or the drywall is compressing.
Neither is good.
Verify that all locking screws are tight. Check the VESA screws, the arm tension bolts, and the wall plate fasteners. If your mount has a safety latch, confirm it’s engaged.
Finally, step back and sight along the bottom edge of both monitors. They should form a straight line. If one is higher, adjust the tilt or slide the arm.
Quick Troubleshooting: Uneven Screens, Slipping, and Sag
One monitor sits higher than the other. On a dual-rail mount, loosen the arm’s height adjustment and slide it down. On separate arms, adjust the tension screw until both arms sit level under load.
A monitor tilts forward after a few hours. That’s a loose tilt mechanism. Tighten the tilt pivot screw. If it still drops, the mount’s friction mechanism may be worn.
Replace the mount.
The arm sags under the monitor’s weight. Gas spring arms have a tension adjustment. Turn the hex key clockwise to increase lift. If the arm is fully tightened and still sags, the gas spring is too weak for that monitor’s weight.
You need a stronger arm.
Monitors wobble when you type. Wobble comes from a loose wall plate or a desk clamp that isn’t tight. Check the wall bolts first. If they’re solid, the issue is the arm’s pivot joints.
Tighten all pivot screws.
Portrait mode won’t stay rotated. The rotation stop screw may need tightening. Some mounts use a detent that clicks into place. If yours lacks that, rotation may require a lock ring.
Final Checklist Before You Walk Away
Run through these items in order. Satisfy each one before declaring the job done.
- Wall plate is attached to at least one stud (or two heavy-duty toggle bolts if no stud).
- All lag bolts are snug. No wobble when pushing the mount.
- Each monitor’s VESA screws are tight. No gap between bracket and monitor.
- Safety latch or locking screw is engaged on each arm.
- Cable management is complete. No cables pinched or pulling on ports.
- Monitors are level and aligned at correct height.
- All arm tension adjustments are set. Arms stay in position without drifting.
- No electrical wires or pipes were damaged (visible test after install).
- Tools are put away. No screws or debris left on desk.
If everything passes, your setup is safe. Enjoy the extra desk space.
Frequently Asked Questions
How long does it take to mount dual monitors?
Plan for 45 to 90 minutes for a first-time install. Most of that time goes into measuring, finding studs, and leveling. Once you know the process, it’s closer to 30 minutes.
Can I mount dual monitors without a stud finder?
You can, but it’s risky. Without a stud finder, use a small nail to probe the wall gently. Move horizontally until you hit solid wood.
Then mark the spot. A stud finder is safer.
Are toggle bolts strong enough for dual monitors?
Yes, if you use heavy-duty toggle bolts rated for at least 50 pounds each. Never use plastic expansion anchors. Toggle bolts into 1/2-inch drywall can hold a single monitor, but two monitors require stud mounting for the best safety.
What if my monitors have different VESA patterns?
Use a mount that supports both patterns, or buy VESA adapter plates. Adapter plates add thickness and may push the monitor further from the wall. Check that the total weight stays under the mount’s limit.
Do I need an electrician for in-wall cable routing?
For power cables, yes. In-wall power requires a licensed electrician to meet code. For video and USB cables, use CL2 or CL3 rated cables.
You can run those yourself if you’re comfortable cutting drywall and using a fish tape.
When to Seek Professional Help
Call a handyman or licensed contractor if any of these apply. You’re not failing. Safety matters more than pride.
You can’t find a stud in the desired location. Especially in older homes with plaster or lath walls. A pro can identify safe attachment points without damaging the surface.
The wall is brick, concrete, or stone. Masonry anchors need a hammer drill and specific technique. One wrong hole can crack the block.
You need to run power cables inside the wall. As mentioned, this requires an electrician for code compliance. Don’t take shortcuts.
You’re mounting above a crib, bed, or high-traffic area. If the mount fails, the consequences are severe. A pro will guarantee the installation with liability insurance.
For standard drywall over wood studs, this is a confident DIY job. But knowing your limits is the real sign of expertise.

Similar Posts