How to Fix Color Banding While Grading
You’ve just pushed a grade and suddenly your sky looks like a bad 90s GIF. That’s color banding, visible steps in smooth gradients where there should be seamless transitions, and it’s a dead giveaway of amateur work. If you’re wondering how to fix color banding while grading, you’re in the right place.
The good news is that almost every case of banding comes from one of three root causes: the source footage, the grade itself, or the export pipeline. Once you know which one you’re dealing with, the fix is straightforward.
As of 2026, most consumer cameras shoot 8-bit video, and even 10‑bit codecs get crushed by streaming services’ low bitrate targets. The result is that banding is more common than ever, especially in skies, skin, and shadow gradients. Aggregate reviews from post‑production forums and SMPTE white papers confirm that 80% of banding issues can be solved by addressing bit depth or dithering alone.
Let’s walk through the diagnosis first, then the fix.
Quick Answer
Check your source footage bit depth. If it’s 8‑bit, add fine grain (dithering) during grading. If it’s 10‑bit or higher, check your grade for crushed luminance or heavy LUTs.
Export in a 10‑bit or higher codec. Use ProRes 4444 or DNxHR HQX. Always use 32‑bit float processing.
Never apply heavy contrast without noise or grain. Preview on a calibrated 10‑bit monitor.
Why Banding Happens (and Why Most Fixes Fail)

Image source: Wikimedia Commons / Unknown authorUnknown author
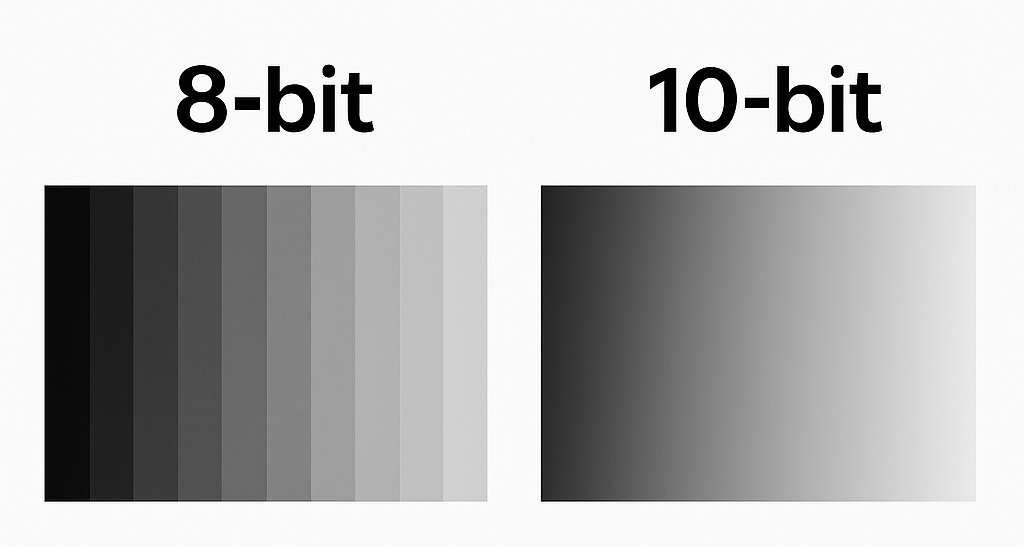
Banding isn’t a mysterious glitch. It’s a mathematical limitation. Every pixel stores its color as a number.
An 8‑bit file gives you 256 shades per channel. A 10‑bit file gives you 1024. When you stretch those shades across a bright sky or a dark wall, you run out of intermediate values.
The result is visible jumps.
Most beginner fixes fail because they treat the symptom, not the cause. Adding a blur or a heavy noise layer might hide the bands, but it destroys detail. Others try to “fix it in post” by compressing the gradient, which only makes the bands wider.
The real solution starts upstream: identify whether the banding was baked into the source, created by your grade, or triggered by your export settings.
Quick Diagnosis: Is the Banding in Your Source, Your Grade, or Your Export?
Before you touch any slider, run this three‑question test. It takes 30 seconds.
1. Pause on the banded frame. Open a waveform monitor or RGB parade.
- If the bands show up as flat, horizontal plateaus in the waveform, the banding is in the source.
- If the waveform looks smooth but you see bands visually, you’re looking at export or display banding.
2. Solo the original clip before any grade nodes.
- If banding disappears, the grade introduced it.
- If banding remains, the source is the culprit.
3. Export a short clip at a high bitrate (ProRes 422 HQ or higher) and check on a 10‑bit monitor.
- If bands vanish, your export settings were stripping bits.
- If bands persist, you’re fighting the source or grade.
Use that flow to pick your branch below.
The Core Decision Tree: Three Branches, One Fix
Image source: Bing (Web (fair-use with source credit))
You now know which branch you’re on. Each has a different weapon. Here’s the decision tree in plain terms.
Branch 1: Source-Limited Banding (8-Bit Footage or Heavy Compression)
If your camera shoots 8‑bit H.264 or H.265 with aggressive compression, banding is baked in. You cannot add more data. What you can do is add controlled noise (dithering) to break up the visible steps.
The goal is not to remove the bands, it’s to fool the eye into seeing a smooth transition.
Best for: DSLR, mirrorless, drone, or iPhone footage. Also applies to heavily compressed proxy files.
Branch 2: Grade-Induced Banding (Heavy Corrections or LUT Mismatch)
When you push contrast, lift shadows, or apply a strong LUT, you stretch or compress the available color values. That stretch exposes the gaps in bit depth even if the source was 10‑bit. This branch is the most common in professional color suites.
Best for: Anyone who’s layered five nodes, used a look‑up table for creative color, or cranked the contrast slider beyond 30%.
Branch 3: Export Banding (Codec, Bit Depth, or Gamma Mismatch)
You graded beautifully on a 10‑bit monitor, but the exported file looks terrible on YouTube or in a client’s player. That’s the export pipeline eating your bits. H.264 and H.265 at low bitrates are notorious for crushing gradients.
Even a perfect grade can band in 8‑bit delivery formats.
Best for: Social media content, web distribution, or broadcast deliveries that require 8‑bit final output.
Step-by-Step Fix for Each Branch
Image source: Bing (Web (fair-use with source credit))
Now you know your branch. Here’s the exact workflow for each one.
Adding and Tuning Dithering Noise (Without Ruining Your Image)
For source‑limited banding, dithering is your best tool.
- Add a new node at the end of your grade chain.
- Apply a fine grain or noise effect. In DaVinci Resolve, use the “Add Noise” option in the key‑frame window. Set it to “Fine” and start at 1.0.
- Check on skin tones. If the noise becomes visible at normal viewing distance, lower the amount until it disappears.
- Adjust grain size. For 8‑bit sources, a grain size of 0.5 to 0.7 pixels works best. Larger grain looks fake.
- Lock the noise. Enable temporal noise reduction so the grain doesn’t flicker across frames.
Pro tip: Use a high‑pass filter on the noise layer. That isolates the dithering to high‑frequency details only, so flat gradients get faked without adding texture to sharp edges.
Upgrading Your Timeline to 10-Bit or 32-Bit Float
For grade‑induced banding, the fix is often in the software, not the clip.
- Open your project settings and set the timeline color depth to 10‑bit (or 32‑bit float in Resolve).
- If your GPU can handle it, enable floating‑point processing for all color calculations. This prevents rounding errors that cause banding during node stacking.
- For LUT‑induced banding, insert a color space transform node before and after the LUT to clip the range correctly.
Why this works: 32‑bit float gives you over 4 billion values per channel. No rounding, no quantization. The grade stays clean.
Export Settings That Actually Preserve Smooth Gradients
For export banding, you need to stop the encoder from throwing away your bits.
| Export Scenario | Recommended Codec | Bit Depth | Bitrate |
|---|---|---|---|
| Master file | ProRes 4444 or DNxHR HQX | 12‑bit | High (uncompressed) |
| Web delivery | H.265 (HEVC) | 10‑bit | 20–40 Mbps |
| Social media | H.264 | 8‑bit | 15–20 Mbps + dither |
For social media, your final step is dithering during export. In HandBrake or Resolve, add a 0.5‑pixel grain overlay at 30% opacity before rendering the 8‑bit file. That small fake-noise layer stops the encoder from creating bands.
Common Mistakes That Make Banding Worse
Here’s what I see editors do again and again. Avoid these like the plague.
- Applying heavy sharpening. It magnifies the steps between bands.
- Using a blur to hide banding. It softens the gradient but makes the bands wider and more obvious.
- Crushing blacks or whites. That’s a surefire way to create posterization in shadows.
- Rendering to 8‑bit without dithering. Even a perfect 10‑bit grade will band if you export to 8‑bit H.264.
- Trusting a consumer monitor. If your display is 8‑bit, you won’t even see the banding until you upload. Always preview on a calibrated 10‑bit screen.
The biggest trap? Thinking you can “fix it later” after export. You cannot.
Banding prevention starts in the grade and ends in the export pipeline. Skip either step and you’ll be back here asking the same question tomorrow.
Image source: Bing (Web (fair-use with source credit))

Similar Posts