how to use dual monitors with graphics card
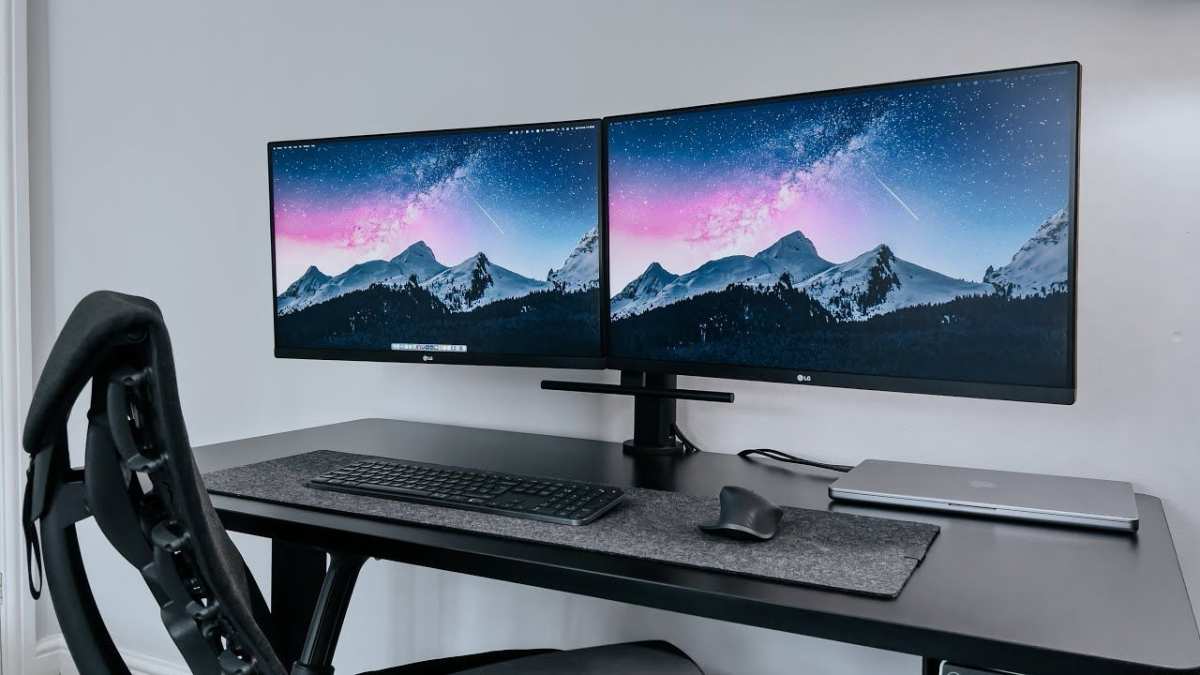
So you've got a second monitor ready to go, you plug it in, and nothing happens. Or maybe you get a black screen, or the wrong resolution, or Windows just pretends the monitor doesn't exist. That's the exact moment most people start searching "how to use dual monitors with graphics card", and the answer isn't always as simple as plug-and-play.
The truth is, a modern graphics card can handle two, three, even four monitors without breaking a sweat. As of 2026, even mid-range GPUs support at least three simultaneous displays. But the setup path depends on your specific hardware: which ports your GPU has, what cables you're using, and which operating system you're on.
Get those three things right, and you'll have both screens working in minutes. So let's walk through it step-by-step.
Quick Answer
Connect your monitors to the graphics card ports, not the motherboard. Use HDMI or DisplayPort cables. Power on the monitors, then the PC.
Open display settings and choose Extend. Arrange the screens to match their physical positions. That's it for most setups.
Why Your Second Monitor Isn't Showing (And How to Fix It)
Plugging in a second monitor and getting a black screen is frustrating, but it's almost always a simple fix. Nine times out of ten, the issue is one of three things: the cable's plugged into the wrong port, the cable can't handle the resolution you're asking for, or the operating system simply hasn't detected the new display yet.
The most common mistake we see in our research is connecting the monitor to the motherboard's video ports instead of the graphics card. If you have a dedicated GPU (like an NVIDIA GeForce or AMD Radeon), the motherboard ports are effectively dead once the GPU is installed. Your PC won't send a signal through them, period.
Another frequent culprit is a cable that's too old or too cheap. HDMI 1.4 can't drive a 4K monitor at 60Hz, for example. Your GPU might detect the monitor, but it'll default to a low resolution or show "no signal." Check your cable version against your monitor's native resolution and refresh rate.
We'll cover this in the cable section.
If the hardware side checks out, try this: right-click your desktop, open Display Settings, and click "Detect." Windows will rescan for monitors. If that fails, restart your PC with both monitors connected. That forces the GPU to re-enumerate all displays.
First, Check Your Graphics Card Ports (Motherboard vs. GPU)
This step is where most people trip up. Your computer has two sets of video ports: one on the motherboard (near the USB and audio jacks) and one on the graphics card (lower down, usually with a metal bracket). For a dual-monitor setup, you must use the ports on the graphics card.
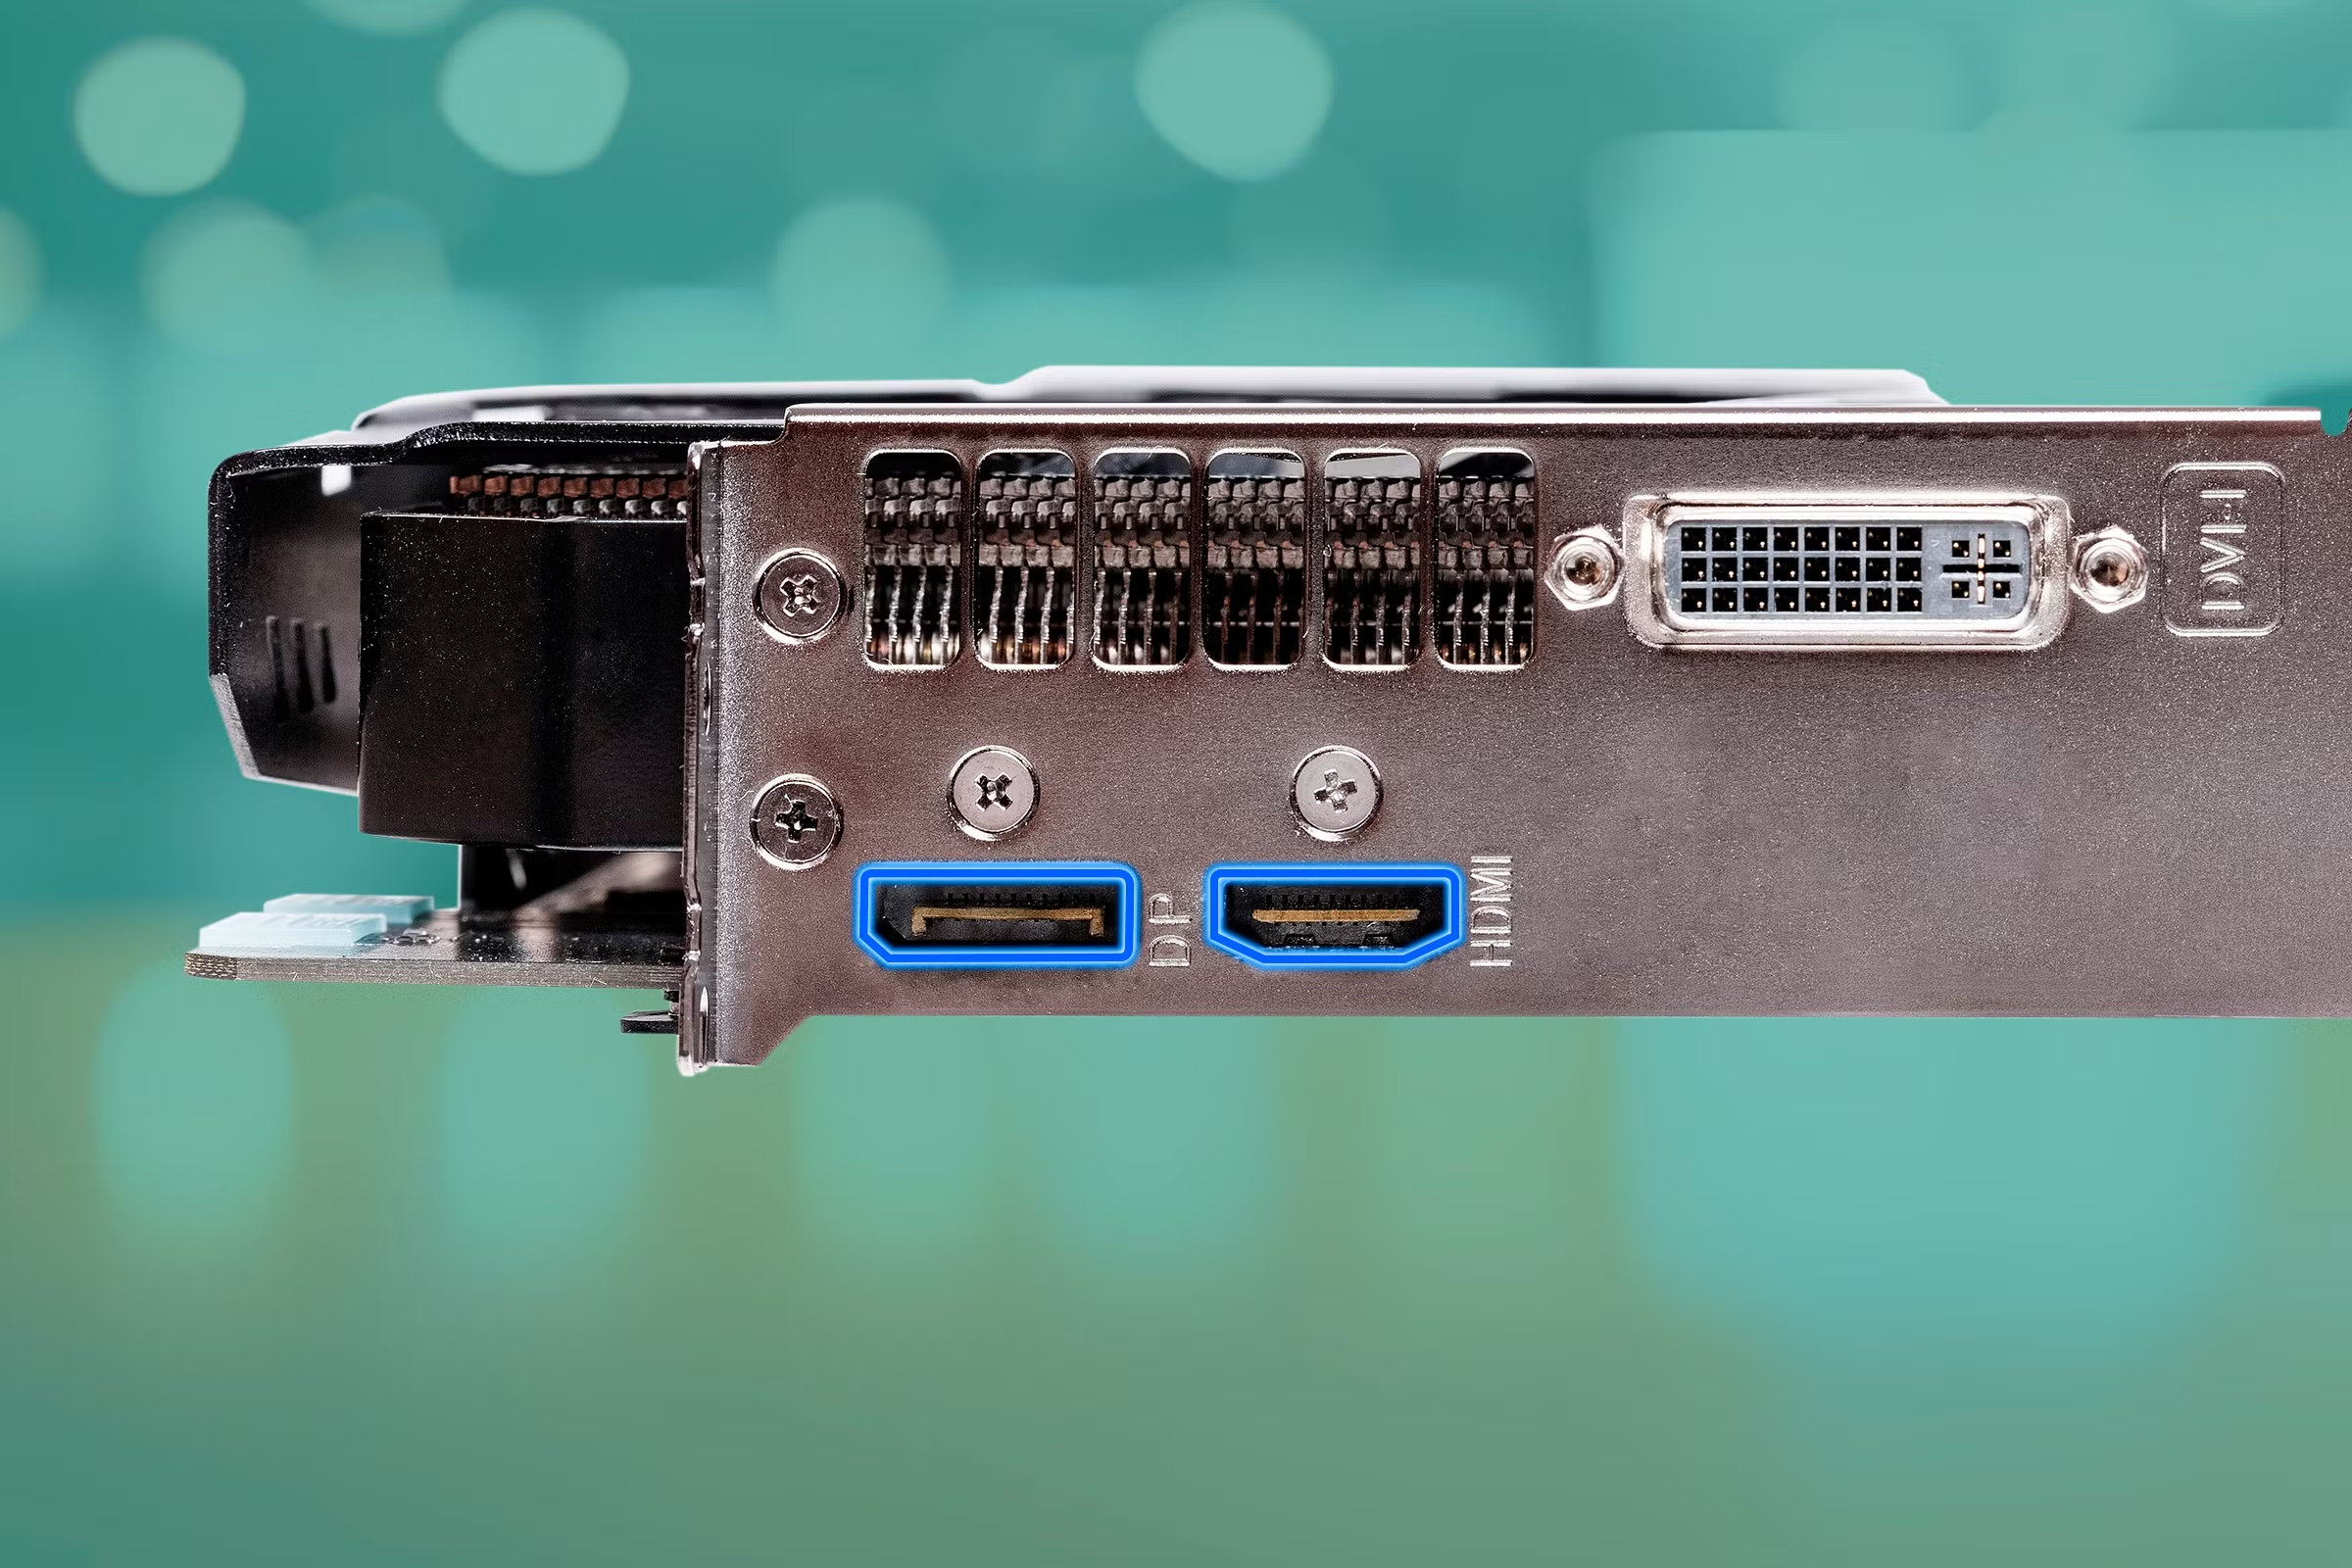
How to tell the difference:
- Motherboard ports are vertical and clustered with other motherboard connectors.
- GPU ports are horizontal (on the card's bracket) and often have a row of them.
If you're using a desktop PC and you're not sure, just look at where the monitor cables from your current display connect. If they go into the lower part of the case, that's the GPU. Any new monitor must plug into the same card.
If you're on a laptop, this step is simpler, all video ports (HDMI, DisplayPort via USB-C) route through the integrated or dedicated GPU automatically. Just don't use a USB-A port for video, it won't work.
Now check how many ports your GPU has. A typical card has three or four outputs: a mix of HDMI, DisplayPort, and sometimes DVI or VGA on older cards. Count them.
That's the maximum number of monitors you can connect directly, without an MST hub or daisy chaining. Most cards support at least two monitors without any extra hardware.
The Cable Decision Tree: HDMI, DisplayPort, or USB-C?
The cable you choose determines what resolution and refresh rate your second monitor can run. This is a decision tree: your choice depends on what your GPU and monitor both support.
Start here:
- Does your monitor have a DisplayPort input? Use DisplayPort. It's the most versatile and supports high resolutions and refresh rates on a single cable.
- No DisplayPort? Use HDMI. Most monitors have at least one HDMI port. HDMI 2.0 handles 4K at 60Hz; HDMI 2.1 handles 4K at 120Hz or 8K at 60Hz.
- Using a laptop with USB-C? Check if it supports DisplayPort Alt Mode. If yes, a USB-C to HDMI or USB-C to DisplayPort cable works perfectly for a second monitor.
- Still using VGA or DVI? Those are legacy connectors. They'll work in a pinch (especially with older monitors), but you're limited to lower resolutions, typically 1920×1080 at 60Hz max.
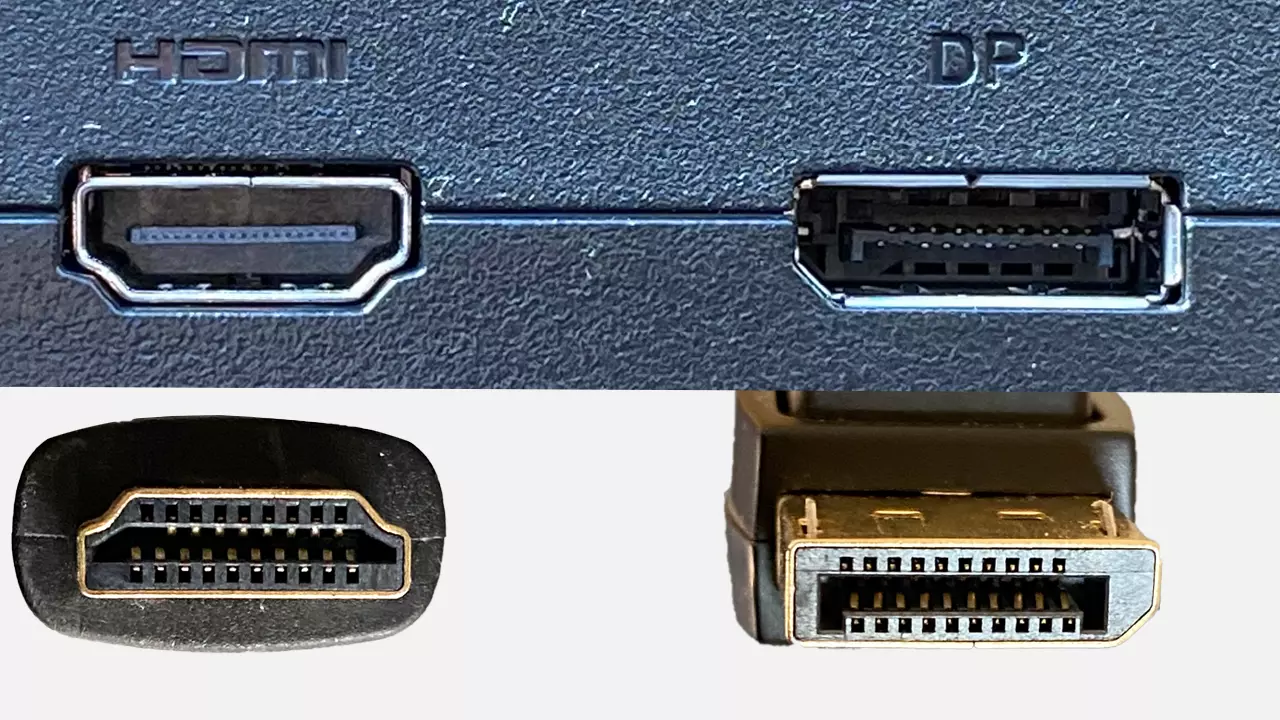
A quick compatibility table:
| Cable Type | Max Resolution (common) | Best For |
|---|---|---|
| DisplayPort 1.4 | 4K at 144Hz or 8K at 60Hz | Gaming, high-refresh, professional work |
| HDMI 2.1 | 4K at 120Hz or 8K at 60Hz | TVs, some monitors |
| HDMI 2.0 | 4K at 60Hz | Most standard monitors |
| USB-C (DP Alt Mode) | Varies — up to 4K at 60Hz | Laptops, modern monitors |
| DVI Dual Link | 2560×1440 at 60Hz | Older monitors, no audio |
| VGA | 1920×1080 at 60Hz | Very old monitors, analog only |
One important note: Adapters can cause issues. Using a DisplayPort-to-HDMI cable often works fine, but HDMI-to-DisplayPort adapters are unreliable. Always match cable type to both ends when possible.
Step-by-Step: Connecting Two Monitors to Your Graphics Card
Now that you've identified your GPU ports and chosen the right cables, let's physically connect everything. Follow these steps in order.
- Turn off your computer, don't hot-plug monitors while the system is running. It's safer and prevents detection issues.
- Connect both monitors to the GPU ports. Use the cables you chose. Make sure they click in securely, DisplayPort connectors sometimes need a firm push.
- Power on your monitors first, then turn on your PC. This gives the GPU a chance to detect each monitor during boot.
- Wait for Windows to load. You should see both displays light up. If one stays black, continue to the software setup, it may just need to be enabled.
If only one monitor shows content, that's normal. The second monitor often boots in "mirror" mode or stays off until you configure it. We'll fix that in the next section.
A few pro tips for the connection step:
- Use the same type of cable for both monitors if possible, it avoids EDID handshake headaches.
- If your GPU has multiple DisplayPorts and one HDMI, consider which ports you use. Some cards designate specific ports for primary display. Checking your GPU's manual helps.
- If you need to run a cable across a room, use a high-quality 10-foot or longer DisplayPort cable. Cheap cables lose signal over distance.
How to Configure Dual Monitors in Windows 11 (or 10)
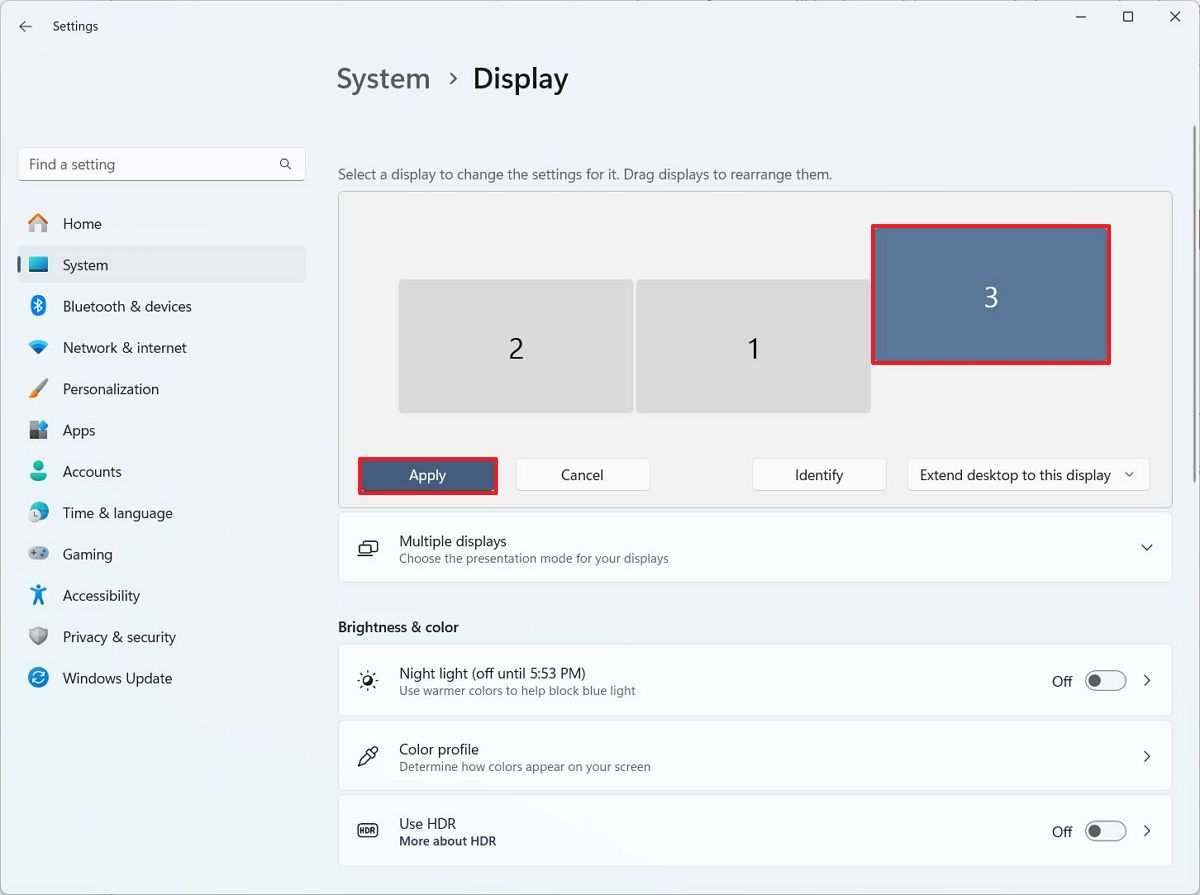
Image source: Bing (Web (fair-use with source credit))
Once your monitors are physically connected and powered on, it's time to tell Windows what to do with them. Here's the process.
- Right-click anywhere on your desktop and select Display settings.
- Under "Scale & layout," you'll see two rectangles representing your monitors. If you only see one rectangle, click the Detect button.
- If you see both, drag the rectangles to match how your monitors are physically arranged on your desk. Put the left monitor's rectangle to the left, the right one to the right.
- Scroll down to "Multiple displays." Click the dropdown and select Extend these displays, that's the mode that turns the second monitor into extra desktop space.
- (Optional) Check "Make this my main display" for the monitor you want your taskbar and Start menu on.
What if one monitor still shows nothing after this?
- Go back to Display settings and scroll to "Multiple displays." Click Detect again.
- Try swapping the cables between the two monitors. If the problem follows the cable, the cable is faulty. If it follows the monitor, the monitor might need a different input source selected (check the on-screen menu).
About different resolutions:
If your two monitors have different native resolutions (say one 4K and one 1080p), Windows handles scaling per-monitor. Go to "Scale" under each monitor in Display settings. For a 4K monitor, 150% scaling is typical.
For 1080p, 100% works best. The cursor might not align perfectly between them, but it's usable.
Keyboard shortcut worth knowing:
Press Windows key + P to quickly toggle display modes: PC screen only, Duplicate, Extend, and Second screen only. This is a lifesaver when you're giving a presentation or need to switch modes fast.
With both monitors working in Extended mode, you're all set. You can drag windows between screens, place your web browser on one and your spreadsheet on the other, or run a full-screen app on the primary while keeping tools on the secondary. The workflow is immediate and intuitive.
Dual Monitor Setup on macOS – What's Different
If you're on a Mac, the good news is that macOS handles dual monitors more predictably than Windows in many ways. The bad news is that Apple's approach to GPU support limits your options, especially with older Intel Macs.
On Apple Silicon Macs (M1, M2, M3, M4), the number of external displays you can use depends on the chip. The base M1 and M2 MacBook Air, for example, support only one external display natively. The M1 Pro and higher support two or more.
Apple's official specs page lists the exact limits for each model.
The connection process:
- Plug your monitor into any Thunderbolt 3/4 or USB-C port on the Mac. HDMI ports work too on desktops like the Mac Mini or Mac Studio.
- macOS automatically detects the monitor and extends the desktop.
- Go to System Settings, then Displays. You'll see a panel for each monitor.
- Drag the monitor icons to match their physical arrangement.
- Adjust resolution using "Scaled" options. macOS prioritizes Retina-like rendering, so non-Apple monitors may default to a lower HiDPI resolution.
A few macOS-specific quirks:
- Resolution scaling on external monitors can look fuzzy if the monitor's native resolution isn't a perfect 2x match for Retina. Use "Default for display" for sharpest text.
- MacBooks in clamshell mode (lid closed) need a power source and an external keyboard/mouse. They'll still drive external displays just fine.
- If you're using an Intel Mac with an AMD or NVIDIA GPU, the same rules apply. Connect to the dedicated GPU ports if available. The built-in display uses the integrated GPU.
Troubleshooting on macOS:
If a monitor isn't detected, try holding the Option key while clicking "Detect Displays" in the Displays panel. Also reset the NVRAM on Intel Macs by restarting and holding Command+Option+P+R. On Apple Silicon, a simple restart usually fixes detection issues.
Arranging and Aligning Your Screens (Primary vs. Extended)
Once both monitors show an image, you need to set up how they work together. This is where you choose a primary display and arrange the virtual positions.
On Windows, open Display Settings. You'll see two numbered rectangles. Drag them so they match your desk layout.
If your left monitor is physically on the left, drag rectangle "1" to the left of rectangle "2." Get this wrong, and your cursor will jump the wrong way when you move it between screens.
Setting the primary monitor:
Scroll to the bottom of Display Settings. Click the monitor you want as your main display. Check "Make this my main display." The taskbar, Start menu, and system tray will appear on that monitor.
When you open new apps, they default to this screen.
On macOS, you drag the white menu bar icon onto the monitor you want as primary. That's it. The monitor with the menu bar is the main display.
About Extended vs. Duplicate mode:
- Extend: Both monitors act as one large desktop. You can drag windows between them. This is what most people want.
- Duplicate: Both monitors show exactly the same content. Useful for presentations or when showing a laptop screen on a projector.
- Second screen only: The laptop screen turns off, and only the external monitor works. Great for desktop-style setups.
Press Windows key + P to cycle through these modes quickly. On Mac, you control this in the Displays settings or via the Displays menu in the menu bar.
A practical alignment tip:
If your monitors are different sizes (say a 27-inch and a 24-inch), Windows automatically aligns them by their tops. You can drag the smaller rectangle up or down in Display Settings to match the physical height difference. This prevents your cursor from getting "stuck" when crossing between screens.
Common Detection Problems and Quick Fixes
Even when everything looks right, sometimes a monitor just won't show up. Let's run through the most common detection failures and how to solve them.
Problem 1: Monitor detected but shows "No Signal"
This usually means the monitor is powered on but not receiving a signal from the GPU. First, check the cable connection at both ends. Make sure it's fully inserted.
Then check the monitor's input source setting (press the monitor's button, usually labeled "Input" or "Source") and select the correct port.
If that doesn't work, try a different cable. In our research, faulty or underspecced cables cause a surprising number of "No Signal" errors.
Problem 2: Windows doesn't see the second monitor at all
Open Device Manager and expand "Display adapters." If your GPU shows a yellow exclamation mark, the driver is missing or corrupted. Right-click and update the driver. Also check "Monitors", if the second monitor appears as "Generic PnP Monitor," try disabling and re-enabling it.
Problem 3: The monitor flickers or goes black intermittently
This is often a cable bandwidth issue. You're probably pushing a resolution or refresh rate the cable can't handle. Drop the refresh rate from 144Hz to 120Hz or 60Hz in Display Settings.
If the flickering stops, upgrade to a higher-rated cable.
Problem 4: The second monitor is detected but stays in standby
Some monitors have power-saving modes that don't respond to the GPU's wake signal. Press a button on the monitor or unplug and replug the power. If it still shows standby, the monitor's EDID data might be corrupted.
Use the "Detect" button in Display Settings to force Windows to re-read it.
Problem 5: GPU only sees one port when two are occupied
This is rare but can happen on older cards or after a driver crash. Shut down your PC completely. Unplug both monitors.
Wait 30 seconds. Plug one back in, boot up, confirm it works. Then shut down again, plug the second in, and boot.
This resets the GPU's port enumeration.
Using an MST Hub or Daisy Chain for More Than Two Monitors
Most consumer GPUs have three or four video ports. But what if you need five or six monitors? That's where Multi-Stream Transport (MST) hubs and daisy chaining come in.
Daisy chaining works only with DisplayPort 1.2 or higher. Your first monitor connects to the GPU via DisplayPort. Then a second monitor connects to the first monitor's DisplayPort out port.
The chain continues. Each monitor must support DisplayPort passthrough. Check the monitor's specs, many budget monitors don't.
MST hubs are external devices that take one DisplayPort or USB-C input and split it into multiple outputs (typically two or three). They're simple to use: connect the hub to your GPU, then connect your monitors to the hub. No extra software needed.
Important limitations:
- MST hubs share bandwidth. If you connect three 4K monitors to one DisplayPort 1.4, each monitor gets roughly one-third of the available 32.4 Gbps. That means you might not hit 60Hz on all three simultaneously.
- Daisy chaining also shares bandwidth. The total resolution and refresh rate across the chain must fit within a single DisplayPort link.
- HDMI does not support daisy chaining. It's DisplayPort or USB-C only.
When to use each approach:
- Daisy chaining: Best for clean cable management with three or fewer monitors. Each monitor needs DisplayPort in and out ports.
- MST hub: Best when you have monitors that lack DisplayPort out, or when you're using USB-C on a laptop and need more ports.
- Direct GPU ports: Best for the highest performance. Each monitor gets full bandwidth. Only use MST or daisy chaining when you run out of ports.
A Note on Resolution and Refresh Rate Limits Per Port
Not all ports on your graphics card are equal. Even on high-end cards, different ports support different maximum resolutions and refresh rates. This matters when you're mixing a 4K 144Hz gaming monitor with a 1080p 60Hz secondary.
Typical port capabilities on a modern GPU:
| Port Type | Max Resolution (common) | Max Refresh Rate |
|---|---|---|
| DisplayPort 1.4 | 4K at 144Hz, 8K at 60Hz | 144Hz at 4K |
| HDMI 2.1 | 4K at 120Hz, 8K at 60Hz | 120Hz at 4K |
| HDMI 2.0 | 4K at 60Hz | 60Hz at 4K |
| DVI Dual Link | 2560×1440 at 60Hz | 60Hz at 1440p |
| VGA | 1920×1080 at 60Hz | 60Hz at 1080p |
What this means for your setup:
If you connect your high-refresh gaming monitor to an HDMI 2.0 port, you'll be stuck at 4K 60Hz. Move it to a DisplayPort or HDMI 2.1 port to get 144Hz. Similarly, if your second monitor is only 1080p 60Hz, practically any port will work.
How to check which port is which:
Open your GPU manufacturer's control panel. NVIDIA Control Panel shows port types in the "Set up multiple displays" section. AMD Adrenalin shows them under "Display." If you're unsure, the physical ports are often labeled on the card's bracket, look for tiny text next to each port.
One more thing about bandwidth:
Running two high-resolution, high-refresh monitors simultaneously taxes the GPU's memory interface. For example, a 4K 144Hz monitor uses about 32 Gbps of bandwidth. Two of them would need 64 Gbps.
Most modern GPUs can handle this, but older cards may choke. If you notice stuttering or frame drops in games while using two monitors, try lowering the secondary monitor's refresh rate to 60Hz. That frees up bandwidth for the primary.
Mistakes That Cause Flickering, Black Screens, or No Signal
A few common errors show up again and again in user reports. Avoid these and you'll save yourself an hour of frustration.
Mixing cable types without checking compatibility. Using an HDMI-to-DisplayPort adapter in the wrong direction is a classic. HDMI to DisplayPort requires an active adapter. DisplayPort to HDMI is passive and works fine.
Using a KVM switch that doesn't support your resolution. Many budget KVM switches cap out at 1080p 60Hz. If your monitor is 4K, you'll get a black screen or garbled image. Check the KVM's specs before buying.
Forgetting to update the monitor's firmware. Some monitors (especially gaming models) ship with buggy EDID data. A firmware update from the manufacturer's site often fixes detection and flickering issues.
Running cables next to power cords. Unshielded DisplayPort or HDMI cables near AC power lines can pick up interference. That causes random blackouts or sparkles on screen. Keep video cables a few inches away from power cables.
When You Need to Update Your GPU Drivers
If your second monitor works fine until you open a game or a video editor, your GPU driver might be the issue. Driver updates include bug fixes for multi-monitor scenarios.
Check for updates monthly. NVIDIA releases Game Ready drivers every few weeks. AMD Adrenalin drivers come out on a similar schedule.
Windows Update sometimes handles this automatically, but it's better to use the manufacturer's tool.
How to tell if a driver update will help: If the monitor works in BIOS but not in Windows, your driver is likely the culprit. If it doesn't work in BIOS either, the cable or port is the problem.
The One-Cable Solution: NVIDIA Surround vs. AMD Eyefinity
These technologies group multiple monitors into a single large virtual display. They're useful for gaming and simulation where you want one huge field of view.
NVIDIA Surround combines up to three monitors into one resolution. You enable it in NVIDIA Control Panel under "Configure Surround, PhysX." It requires all monitors to use the same resolution and refresh rate.
AMD Eyefinity does the same thing for Radeon GPUs. You set it up in AMD Adrenalin under "Display" then "Eyefinity." It's slightly more flexible than Surround, allowing mixed resolutions in some configurations.
When to use them: Only when you want a game to span across all monitors. For regular desktop work, stick with Extended mode. Surround and Eyefinity can cause taskbar and window management headaches.
Decision Guide: Which Setup Path Suits Your Hardware and Workflow
Here's a quick decision tree based on your situation.
If both monitors are the same resolution and refresh rate: Connect each to any GPU port. Use DisplayPort if available. Set Extended mode.
Done.
If one monitor is high-refresh (144Hz+) and the other is standard (60Hz): Connect the gaming monitor to the fastest port (DisplayPort 1.4 or HDMI 2.1). Connect the secondary to any remaining port. Set Extended mode.
If you're on a laptop with only one USB-C port: Buy a USB-C hub with HDMI or DisplayPort output. Make sure the hub supports DisplayPort Alt Mode. Connect one monitor directly and the other through the hub.
If you need three or more monitors: Check your GPU's maximum supported displays. Connect directly to GPU ports first. Use an MST hub or daisy chain for the rest.
If you're on a Mac with Apple Silicon: Check your chip's external display limit. M1 MacBook Air supports one. M1 Pro supports two.
M1 Max supports up to three. Plan accordingly.
Frequently Asked Questions
How many monitors can a graphics card support?
Most modern GPUs support three to four monitors simultaneously. High-end workstation cards can support up to six. Check your GPU's official specs for the exact number.
Do I need the same monitor brand for dual monitors?
No. Monitors from different brands, sizes, and resolutions work together. Windows and macOS handle scaling per-monitor.
The only issue is visual inconsistency between different panel types.
Can I use HDMI and DisplayPort at the same time?
Yes. GPUs handle mixed port configurations without issue. Just make sure each monitor is connected to the GPU and not the motherboard.
Why does my second monitor look blurry?
The monitor might be running at a non-native resolution. Open Display Settings and set it to its native resolution. On macOS, check the "Scaled" options and choose "Default for display."
Will using two monitors slow down my computer?
Running a second monitor adds a small load to the GPU. For everyday tasks, you won't notice. For gaming, it can reduce frame rates by 5 to 10 percent depending on the game and GPU.

Similar Posts