How To Block Website In Ipad Effectively For Better Control

To block a website on your iPad quickly, go to Settings, tap Screen Time, then Content & Privacy Restrictions, and set restrictions for websites. You can add specific sites to limit or block access entirely. It’s a straightforward way to control what can be accessed on your device, ensuring a safer browsing environment.
Blocking websites on an iPad might seem tricky at first, but it’s actually quite simple once you know where to look. Whether you want to restrict access for kids, avoid distractions, or safeguard sensitive content, the process involves using built-in features like Screen Time. In this guide, I’ll walk you through how to effectively block websites on your iPad, helping you customize your browsing experience and maintain control over internet access. No need for third-party apps—your iPad has everything you need to set up restrictions easily and quickly, so you can enjoy a safer, more focused device.

How to Block Website in iPad: A Complete Guide
Understanding Why You Might Want to Block Websites on iPad
Many parents and educators want to control what children can access on their iPads. Some users also prefer to avoid distractions from certain websites during work or study. Blocking websites helps ensure a safer, more focused browsing experience.
Methods to Block Websites on iPad
There are several ways to restrict access to websites on an iPad. Each method suits different needs, whether for parental controls, productivity, or personal privacy. The most common options include using Screen Time settings, third-party apps, or network configurations.
Using Screen Time to Block Websites in iPad
Apple provides a built-in feature called Screen Time that allows users to set restrictions on websites. This method is straightforward and requires no additional downloads. You just need to go into your iPad settings and customize your restrictions.
Setting Up Screen Time
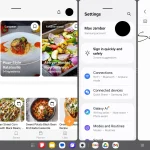
Open the Settings app on your iPad. Tap on “Screen Time” and enable it if it isn’t already active. You can then set a passcode to prevent others from changing these settings.
Accessing Content & Privacy Restrictions
Within the Screen Time menu, tap on “Content & Privacy Restrictions.” Turn on this feature and then navigate to “Content Restrictions” to find website options.
Blocking Specific Websites
Select “Web Content” and choose “Limit Adult Websites” for general restrictions. To block specific sites, tap “Add Website” under the “Never Allow” section and enter the URL of the website you want to prevent access to.
Using Safari Restrictions for Website Blocking
Safari, the default browser on iPads, allows you to control access to certain websites. By configuring Safari settings, you can restrict browsing to only permitted sites or block others completely.
Restricting Access Through Safari Settings
In Settings, scroll down to “Safari.” Tap on “Content Blockers” to enable any third-party content blocker apps you have installed. You can also set “Website Restrictions” under “Content Restrictions” to limit access.
Adding Website Restrictions
Choose “Limit Adult Content” and add specific websites under “Never Allow” to prevent children from visiting inappropriate sites. This option works best when combined with Screen Time.
Using Third-Party Website Blocker Apps
Third-party apps can offer more advanced features like scheduled blocking, detailed reports, or specific category restrictions. These apps often require installation from the App Store.
Popular Website Blocker Apps
Some well-known options include “Qustodio,” “Net Nanny,” and “OurPact.” These apps provide user-friendly interfaces suitable for parents or individuals who want detailed control.
Setting Up a Third-Party App
Download and install your chosen app from the App Store. Follow the setup instructions, which often include creating an account and configuring website restrictions according to your preferences.
Configuring Network-Level Blocking with DNS Services
For comprehensive control, setting up DNS services like OpenDNS can block websites across all devices connected to your Wi-Fi.
Using OpenDNS to Block Websites
Create an OpenDNS account and configure your router’s DNS settings to point to OpenDNS servers. Then, log into your OpenDNS dashboard to specify which websites to block.
Advantages of DNS-Level Blocking
This method covers all devices on your network, including iPads, without needing individual settings. It is ideal for families or organizations managing multiple devices.
Additional Tips for Effective Website Blocking
Blocking websites alone might not always be enough, especially if users know how to bypass restrictions. Combining methods offers better security.
Keep Software Up-to-Date
Ensure your iPad’s iOS is current. Updates often include security enhancements and new features for content restrictions.
Use Multiple Restrictions
Combine Screen Time, Safari restrictions, and third-party apps for layered protection. This makes it harder to bypass restrictions.
Monitor Usage and Adjust Settings
Regularly review the browsing history and adjust restrictions as needed. This helps maintain a safe and productive environment on your iPad.
Extra Measures for Enhanced Website Blocking
In addition to built-in features, consider setting up device-wide network controls or using parental control solutions that monitor activity and enforce restrictions more effectively.
Installing Parental Control Devices
Hardware solutions like internet filtering devices can provide real-time alerts and detailed reports on browsing activity, adding an extra layer of protection.
Educating Users about Safe Browsing
Discuss with children the importance of internet safety. Encourage responsible browsing habits alongside technical restrictions.
Blocking websites on an iPad is a manageable process with various effective methods. Whether you prefer built-in features like Screen Time, Safari restrictions, third-party apps, or network-level solutions, you can tailor your approach to suit your needs. Combining these methods ensures a safer, more controlled browsing experience, whether for children, students, or yourself. By regularly reviewing and updating your restrictions, you can maintain the appropriate level of access and protect against unwanted content.
HOW TO BLOCK CERTAIN WEBSITES ON IPAD 2024
Frequently Asked Questions
How can I restrict access to specific websites on my iPad?
You can restrict access by enabling Screen Time and adding the websites to the Content & Privacy Restrictions. Go to Settings > Screen Time > Content & Privacy Restrictions. Turn on the feature, then tap Content Restrictions > Web Content. Choose “Limit Adult Websites” and add specific sites to the Never Allow list to prevent access.
What steps should I follow to block websites using Safari’s settings?
Open Settings on your iPad and navigate to Screen Time. Tap Content & Privacy Restrictions and enable it. Select Content Restrictions, then tap Web Content. Choose “Limit Adult Websites” to restrict most sites, and use the “Always Allow” or “Never Allow” options to specify individual websites to be accessible or blocked.
Can I block websites without using Screen Time on my iPad?
Yes, you can use third-party parental control apps that allow you to block specific websites. Install a trusted app from the App Store, and follow its instructions to set filters and restrictions. These apps often offer more detailed control over website access compared to native settings.
Is it possible to block websites on the iPad’s Wi-Fi network level?
Blocking websites at the network level involves configuring your router to restrict access to certain sites for all devices connected to it, including your iPad. Access your router settings, find the parental controls or URL filtering options, and add the websites you want to block. Keep in mind, this method affects all devices on the network.
How effective is enabling Content & Privacy Restrictions for blocking websites?
Enabling Content & Privacy Restrictions provides a reliable way to restrict access to unwanted websites on your iPad. While it effectively blocks unauthorized browsing within Safari and other apps, tech-savvy users might find ways to bypass restrictions. Regularly update restrictions and use additional controls for enhanced security.
Final Thoughts
To block website in iPad, you can use built-in features like Screen Time. Adjust the content restrictions and add specific websites to block. Alternatively, install third-party apps for more control.
Remember, applying these settings ensures a safer browsing experience.
In conclusion, learning how to block website in iPad helps manage content effectively. It’s simple to set up and enhances your navigation security.
Similar Posts