How To Replace Screen On Ipad: Step-By-Step Guide
To replace an iPad screen quickly, start by turning off your device, removing the screws, and carefully lifting the broken screen using proper tools. Disconnect the display connectors and then attach the new screen securely before reassembling everything. Always handle components with care to avoid further damage.
If your iPad screen is cracked or unresponsive, replacing it can bring your device back to life. The process involves removing the damaged display, disconnecting delicate cables, and fitting a new screen in place. While it might seem daunting, with patience and the right tools, you can successfully restore your iPad at home. This guide will walk you through each step, helping you save money and avoid a trip to the repair shop. Whether you’re experienced with DIY electronics or a first-timer, you’ll find tips here to make the replacement smooth and safe.

How to Replace Screen on iPad: A Complete Step-by-Step Guide
Understanding Why Your iPad Screen Needs Replacement
Before starting the repair process, it’s important to identify why your iPad screen needs replacing. Common reasons include cracks, dead pixels, unresponsive touch areas, or displays with discoloration.
If your device has a cracked screen, the damage can worsen over time, potentially harming internal components. Recognizing these issues early helps you decide whether to attempt a repair yourself or seek professional help.
Gathering the Necessary Tools and Replacement Parts
Replacing an iPad screen requires specific tools and parts to ensure a safe and successful repair. Having all items ready will save you time and prevent frustration.
- Replacement screen compatible with your iPad model
- Small Phillips screwdriver
- Plastic prying tools or opening picks
- Suction cup
- Tweezers
- Heat gun or hairdryer
- Adhesive strips or glue
- Anti-static wrist strap (optional but recommended)
Always buy quality replacement parts from reputable sellers to avoid issues with fit or display quality.
Preparing Your Workspace for Repair
A clean, well-lit workspace helps you work more efficiently. Place a soft cloth or mat on your table to prevent scratching your iPad or tools.
Ensure the area is free from static electricity, which can damage electronic components. Wearing an anti-static wrist strap can help protect your device during the repair process.
Powering Down the iPad Safely
Before starting, turn off your iPad completely. Press and hold the power button, then slide to power off. This step minimizes the risk of short circuits or electric shocks.
Removing power also protects delicate internal parts from accidental damage while working inside the device.
Removing the Screen: Step-by-Step Process
Heating the Device to Loosen Adhesive
Apply gentle heat around the edges of your iPad using a heat gun or hairdryer. This softens the adhesive holding the screen in place. Keep the heat at a safe distance to avoid overheating.
Heat the device for about two minutes, moving the heat source evenly around the perimeter.
Creating a Gap Using Suction Cup
Once the adhesive softens, attach a suction cup to the corner of the screen. Gently pull on the suction cup to create a small gap between the screen and the body.
Use plastic prying tools to carefully slide into the gap, working around the edges. Be gentle to avoid cracking the glass further or damaging internal components.
Separating the Screen from the Frame
Insert plastic opening tools into the gap, gradually lifting the screen away from the device. Work slowly and methodically, maintaining even pressure to prevent cracks.
If resistance occurs, reheat the area briefly to further soften the adhesive. Turn off your device if you encounter any unusual resistance or noises.
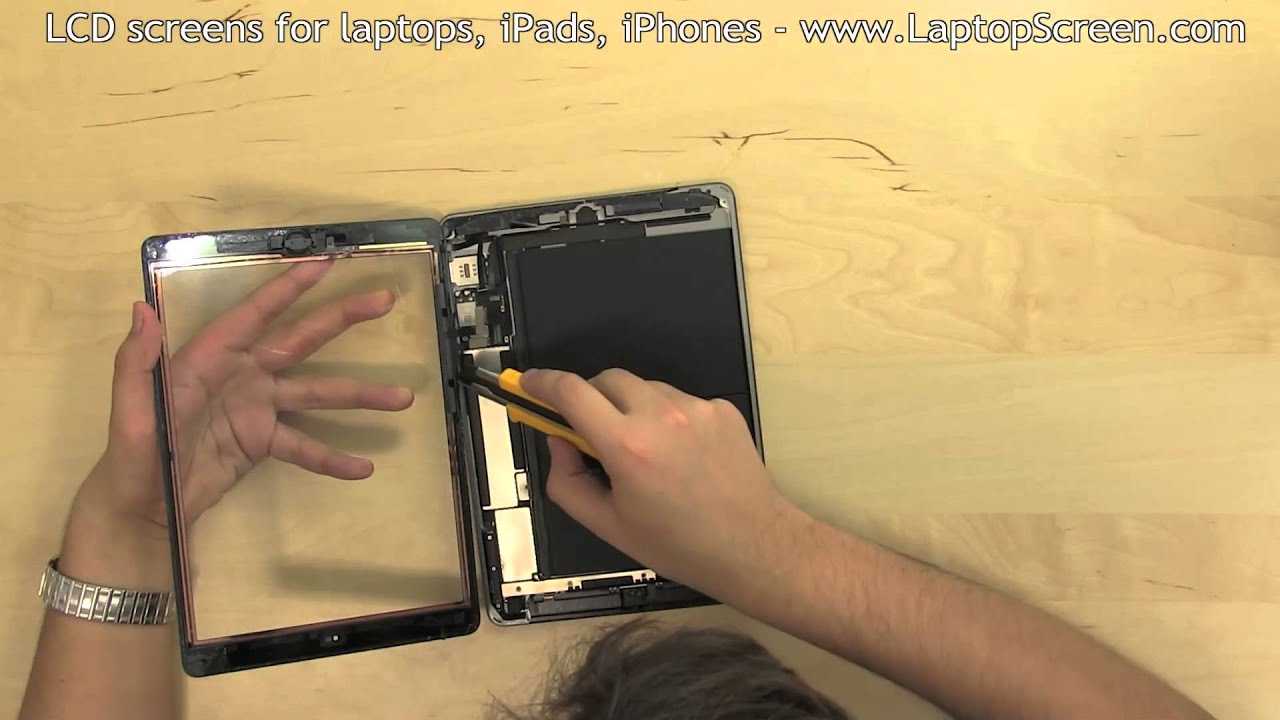
Disconnecting the Screen from Internal Components
After lifting the screen slightly, locate the connector cables attached to the device’s logic board. These are tiny and delicate, so use tweezers or a plastic opening tool.
Carefully disconnect each ribbon cable, noting their positions for reassembly. Remember, forced removal can damage the connectors or the display itself.
Removing the Broken or Damaged Screen
With all connectors detached, gently lift the damaged screen away from the device. Keep track of any adhesive strips or parts that might need replacement during reassembly.
Place the broken screen aside for proper disposal, following local regulations on electronic waste.
Preparing the New Screen for Installation
Inspect your new replacement screen for any defects or damage. Use a soft, lint-free cloth to clean the edges and ensure a perfect fit during installation.
If your replacement comes with protective film, leave it on until final assembly to prevent fingerprints or scratches.
Reconnecting the New Screen to the iPad
Align the new screen carefully over the device’s frame. Reattach the ribbon cables to the logic board, ensuring each connector clicks securely into place.
Double-check all connections before proceeding to avoid issues with touch sensitivity or display quality later on.
Adhesive Application and Final Assembly
Apply new adhesive strips around the frame to secure the screen firmly. Press the screen gently but firmly into the frame, working from the center outward.
Ensure no dust or debris gets trapped between the screen and the device during assembly. This step is crucial for a clean and professional look.
Sealing the Screen and Completing the Repair
Once the screen is in place, press down along the edges to activate the adhesive. Use a soft cloth to wipe away any fingerprints or smudges.
Power on your iPad to test the display and touch functionality. If everything works properly, your repair is complete.
Tips and Precautions for a Successful Screen Replacement
- Work patiently and avoid rushing to prevent accidental damage.
- Keep track of all screws and small parts from your device.
- Use the proper tools to minimize the risk of scratching or breaking components.
- If unsure about any step, consult tutorial videos or professional repair guides.
- Consider professional repair services if your device is under warranty or the repair seems too complex.
Additional Resources and Support
Many online tutorials, videos, and community forums can offer visual guidance and helpful tips for replacing an iPad screen. Always choose reputable sources for instructions and parts.
Some manufacturers provide repair kits that include everything needed for the process, simplifying the task. Always verify compatibility with your specific iPad model before purchasing parts.
Maintaining Your Repaired iPad
After replacing the screen, handle your device with care to prolong the new display’s lifespan. Use a protective case and avoid dropping the device.
Regularly clean the screen with a soft, lint-free cloth to keep it looking clear and responsive.
iPad 9 (2021) Screen Replacement Guide | Same old traps, thanks Apple
Frequently Asked Questions
What tools are necessary to replace an iPad screen safely?
You will need specific tools such as a P2 Pentalobe screwdriver, a plastic opening tool, a suction cup, tweezers, and a screen adhesive. Using the right tools ensures you don’t damage the device during the repair process and helps to perform the replacement cleanly and efficiently. Make sure all tools are of high quality to avoid slipping or causing additional damage.
How can I detach the broken screen from the iPad without causing further harm?
Begin by powering off your iPad completely. Use a heat gun or a hot air rework station to soften the adhesive around the screen. Carefully apply a suction cup near the edge and gently lift the screen while inserting a plastic opening tool to separate the glass from the frame. Take your time, work gradually, and be cautious around delicate components such as cables and connectors to prevent tearing or damaging internal parts.
What are the best steps to attach a new screen securely to an iPad?
First, clean the frame thoroughly to remove any old adhesive and debris. Apply new, high-quality adhesive around the edges of the frame. Carefully align the new screen with the device, ensuring the connectors fit properly. Press down evenly along the edges to secure the screen in place, and then reassemble the device. Let the adhesive set according to the manufacturer’s instructions before turning the iPad back on to ensure a firm bond.
How do I test the new screen before completing the full assembly?
Once you connect the new screen’s display and touch connectors to the motherboard, turn on the device to verify the display functions correctly. Check for responsiveness, color accuracy, and any dead pixels or display irregularities. Confirm that touch responses work across the entire screen. If everything appears normal, proceed with reassembling the iPad; if not, troubleshoot the connections or consider re-seating the connectors.
What precautions should I take to avoid damaging internal components during screen replacement?
Always power down the device before starting repairs, and work in a static-free environment. Handle internal parts with care, avoiding excessive force or bending of cables. Use appropriate tools to prevent scratches or punctures. Keep track of all screws and small components, and follow a step-by-step guide specific to your iPad model. Taking your time and maintaining a clean workspace reduces the risk of accidental damage.
Final Thoughts
To replace the screen on an iPad, gather the necessary tools and carefully follow the steps. Begin by turning off the device and removing the screen screws. Use a prying tool to separate the screen from the frame without damaging any components.
Next, disconnect the digitizer and display cables securely. Swap out the damaged screen with a new one, reconnect all cables, and reassemble the device.
In conclusion, knowing how to replace screen on iPad allows you to fix your device efficiently. Proper handling and patience are key to a successful repair, ensuring your iPad functions perfectly afterward.
Similar Posts