How to Mirror Screen on Dual Monitors
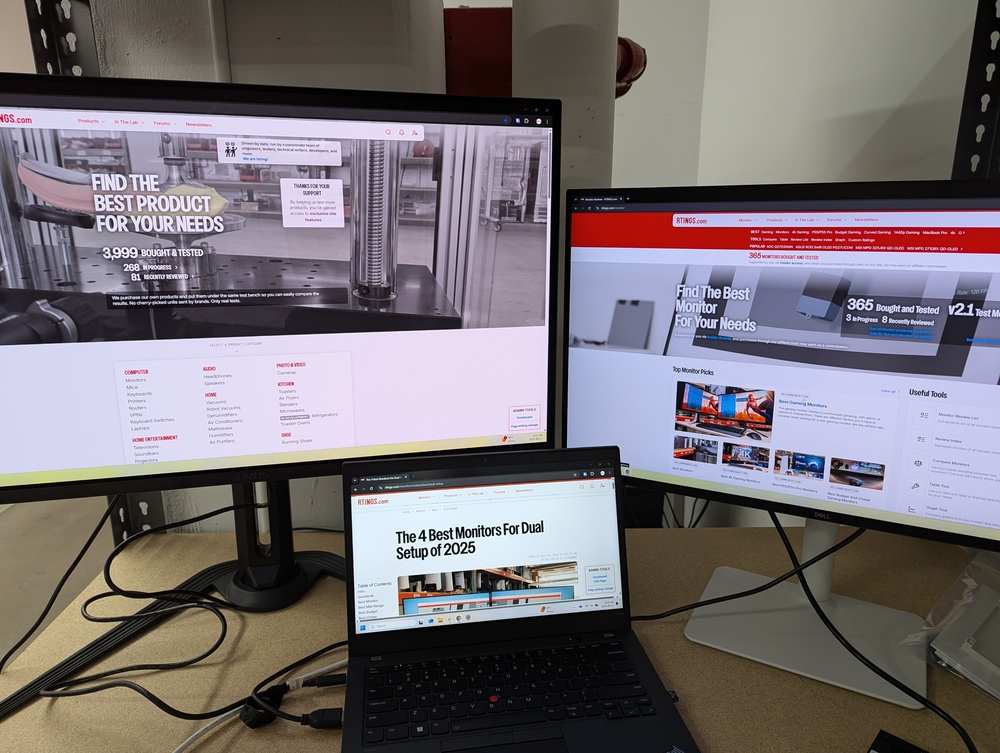
Image source: Bing (Web (fair-use with source credit))
So you've got two screens and you want them showing the same thing. That's what we call mirroring, or duplicating your display, and it's actually pretty straightforward once you know which path to take. Knowing how to mirror screen on dual monitors comes down to your operating system, what ports you have available, and whether you want to go wired or wireless.
The whole process usually takes under five minutes. Windows has a built-in shortcut that cycles through display modes instantly, and Mac users can push their screen to another display with a couple of clicks. Let's walk through every method so you can pick the one that fits your setup.
Quick Answer
Screen mirroring duplicates your display across two monitors. Windows users press Win + P and select "Duplicate." Mac users click the AirPlay icon in the menu bar and choose the target display. Both methods work with a wired connection.
Wireless options include Miracast for Windows and AirPlay for Apple devices.
How Screen Mirroring Actually Works
Mirroring sends the exact same video signal to two displays. Your computer or laptop outputs one image, and that image appears on both screens simultaneously. This is different from extending, which treats both monitors as one big desktop where you drag windows between them.
When you mirror, your GPU renders a single frame and pushes it to two outputs. Both screens show the same resolution and refresh rate. If your monitors have different native resolutions, the system usually defaults to the lower of the two.
That's why matching monitor specs gives you the cleanest result.
There are two main ways to achieve this. Software-based mirroring uses your operating system's display settings to send the same image through multiple output ports. Hardware-based mirroring uses an external device, like an HDMI splitter, to clone the signal before it ever reaches the displays.
What You Need Before You Start
Check Your Ports and Connections
Before you dive into settings, take a look at what you're working with. Your source device, whether that's a laptop or desktop, needs at least one video output port. Common types include:
- HDMI: Found on most laptops and desktops made in the last decade. Carries both video and audio.
- DisplayPort (DP): More common on desktop GPUs. Supports higher refresh rates and daisy-chaining.
- USB-C with DisplayPort Alt Mode: Found on modern laptops and MacBooks. A single cable can carry video, data, and power.
- VGA: Older analog standard. Still hanging around on some projectors and legacy monitors.
Your target display needs a matching input. If your laptop only has HDMI out and your second monitor only has DisplayPort in, you'll need an adapter cable. They're cheap, usually under $15, but make sure you get the direction right.
An HDMI-to-DisplayPort cable isn't always bidirectional.
Wireless vs. Wired: Which Path Makes Sense for You?
Wired connections are more reliable and have zero latency. If you're presenting in a conference room or watching video content, a cable is almost always the better choice. You plug in, select mirror mode, and you're done.
Wireless mirroring is great when cables aren't practical. Maybe you want to cast your laptop screen to a TV across the room. Maybe you're in a space where running a cable would be a tripping hazard.
The tradeoff is latency, typically 30 to 150 milliseconds depending on the protocol, and occasional connection drops.
Here's a quick comparison to help you decide:
| Factor | Wired (HDMI/DP/USB-C) | Wireless (Miracast/AirPlay/Chromecast) |
|---|---|---|
| Latency | Near zero | 30–150ms |
| Reliability | Very high | Good, can drop |
| Max resolution | Up to 8K (HDMI 2.1) | Up to 4K (device-dependent) |
| Audio support | Yes | Yes |
| Setup complexity | Low | Moderate |
| Cost | $5–$20 for cable | $30–$80 for adapter or built-in |
| Best for | Presentations, video, gaming | Casual streaming, flexible setups |
How to Mirror on Windows (Step by Step)
The Fastest Way: Win + P
This is the method most people should start with. It's instant and works on any Windows 10 or Windows 11 machine regardless of GPU brand.
- Press Win + P on your keyboard.
- A projection menu appears on the right side of your screen.
- Select Duplicate.
- Both screens now show the same image.
The menu cycles through four modes. "PC screen only" turns off the external display. "Duplicate" mirrors.
"Extend" treats both screens as one desktop. "Second screen only" turns off your primary display and uses only the external one.
You can also get to this menu by right-clicking on the desktop background and selecting Display settings, then scrolling to Multiple displays.
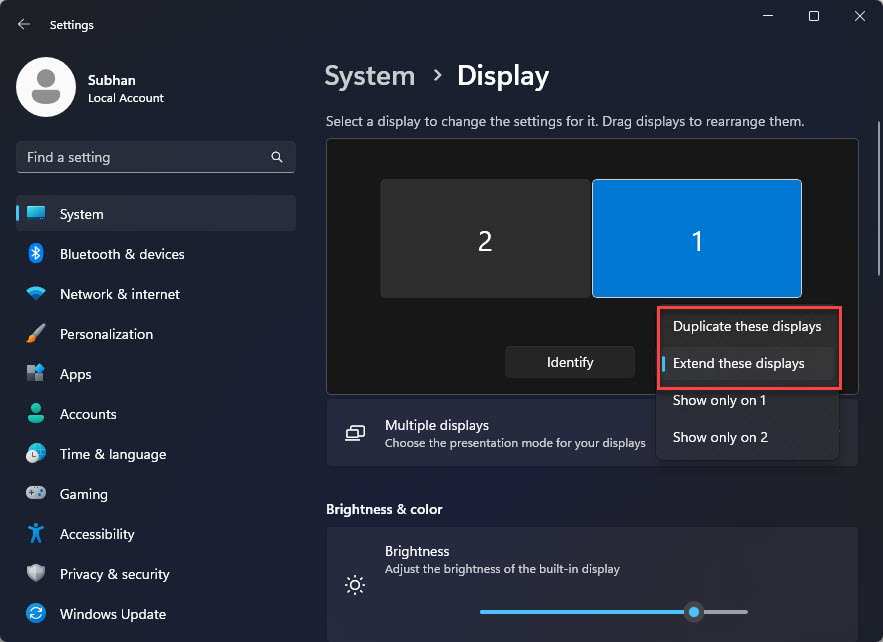
Image source: Bing (Web (fair-use with source credit))
Through Display Settings
If you want more control over resolution and arrangement, use the full settings panel.
- Right-click the desktop and select Display settings.
- You'll see numbered boxes representing your displays. If the second monitor isn't showing, click Detect.
- Scroll down to Multiple displays.
- Select Duplicate these displays from the dropdown.
- Click Keep changes if the setting looks right.
This panel also lets you rearrange displays to match their physical position on your desk. For mirroring this matters less, but it's useful if you switch between mirror and extend modes regularly.
When Windows Won't Detect the Second Screen
This is the most common headache. You plug in the cable, select duplicate mode, and nothing happens. Here's what to check:
- Cable connection: Unplug and reseat both ends. Loose HDMI connections are more common than you'd think.
- Input source: Make sure the second monitor is set to the correct input. Many monitors have multiple HDMI or DP ports and you may need to switch manually.
- Driver update: Open Device Manager, expand Display adapters, right-click your GPU, and select Update driver.
- Win + P again: Sometimes Windows needs a second press to recognize the connection.
- Restart: Old school, but it forces Windows to re-enumerate connected displays.
If none of that works, try the cable with a different device to rule out a hardware issue. A surprisingly large number of "broken" monitors just have a bad cable.
How to Mirror on Mac (Step by Step)
Using AirPlay from the Menu Bar
MacOS makes wireless mirroring dead simple if you have an Apple TV or AirPlay-compatible display on the same Wi-Fi network.
- Click the Control Center icon in the menu bar (the two toggles icon) or the AirPlay icon (a rectangle with a triangle at the bottom).
- Click Screen Mirroring.
- Select your target display from the list.
- Your Mac's screen now appears on the external display.
To stop mirroring, click the AirPlay icon again and select Turn AirPlay Off. You can also open Control Center and toggle it off from there.
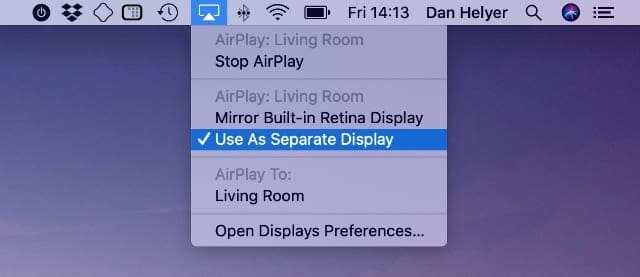
Image source: Bing (Web (fair-use with source credit))
Through System Settings > Displays
For wired connections or more granular control, use the Displays panel.
- Open System Settings (or System Preferences on older macOS versions).
- Click Displays.
- If your external monitor isn't detected, click Detect Displays (hold Option key to make this button appear if it's hidden).
- Click Arrange or look for the Use as dropdown.
- Select Mirror or check the Mirror Displays toggle.
On macOS Ventura and later, the mirror toggle is a simple checkbox in the Displays panel. On older versions, you'll find it under the Arrangement tab where you can also see both displays represented as blue rectangles.
What to Do When AirPlay Isn't Showing Up
AirPlay issues usually come down to network problems. Both devices need to be on the same Wi-Fi network. That sounds obvious, but it's easy to overlook when your Mac is on Ethernet and your Apple TV is on Wi-Fi, or when your router has separate 2.4GHz and 5GHz bands with different names.
Other fixes:
- Restart both devices: Your Mac and the receiving device.
- Check AirPlay restrictions: On macOS, go to System Settings > General > AirDrop & Handoff and make sure AirPlay isn't restricted.
- Firewall settings: Make sure your firewall isn't blocking AirPlay connections.
- Bluetooth: AirPlay uses Bluetooth for discovery, so make sure Bluetooth is enabled on your Mac.
If you're trying to mirror to a non-Apple TV, look for AirPlay 2 support in the TV's settings. Many Samsung, LG, and Sony smart TVs from 2019 onward support it natively.
HDMI Splitters: The Hardware Shortcut
When a Splitter Makes More Sense Than Software Mirroring
An HDMI splitter takes one HDMI input and sends it to two or more outputs. Your computer thinks it's connected to a single display. The splitter handles the duplication at the hardware level.
This is useful in a few specific situations:
- You want zero latency: No software processing, no wireless lag. The signal is cloned electrically.
- You're connecting to displays that don't match: Since your computer sees one display, it outputs a single resolution. Both screens get the same signal regardless of their individual specs.
- You're using a device that doesn't support multiple displays: Some older hardware or locked-down workstations can't run two displays through the OS. A splitter bypasses that limitation.
- You need a reliable presentation setup: Conference rooms and lecture halls often use splitters because they just work. No software to configure, no settings to change.
The downside is that you lose independent control over each display. Both screens show the same resolution and refresh rate. If one monitor is 4K and the other is 1080p, the splitter will typically output at the lower resolution unless it supports downscaling, which costs more.
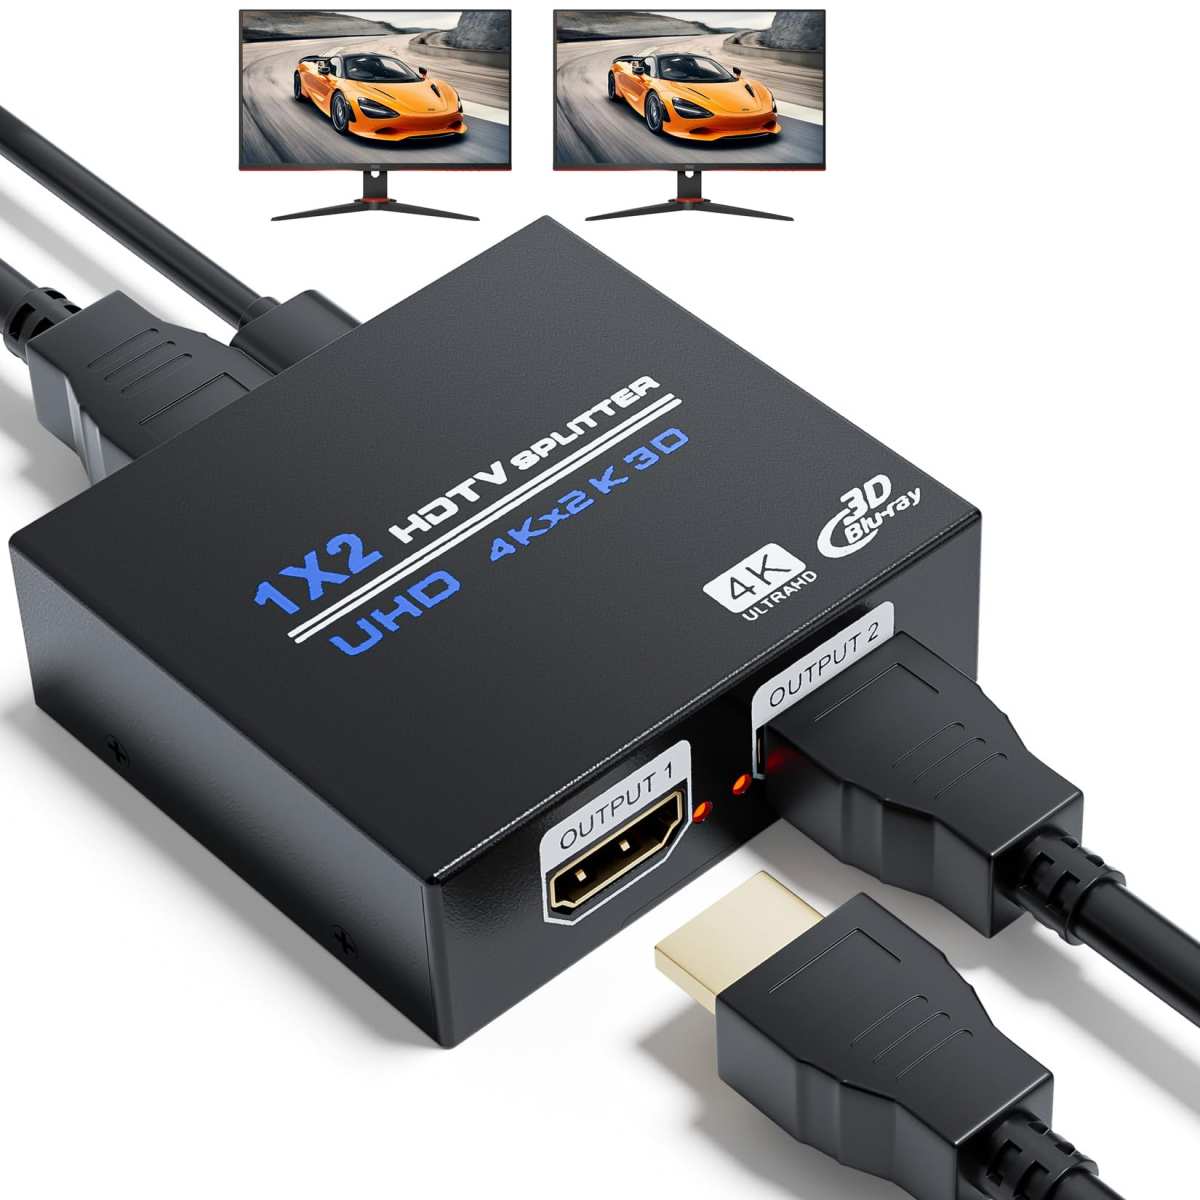
Image source: Bing (Web (fair-use with source credit))
What to Look for in a Splitter
Not all splitters are created equal. Here's what matters:
- 1×2 configuration: One input, two outputs. That's what you need for mirroring to two displays.
- 4K support: If either your source or your displays support 4K, make sure the splitter does too. Look for HDMI 2.0 at minimum. HDMI 2.1 splitters handle 4K at 120Hz and 8K content.
- HDCP compliance: If you're mirroring protected content like Netflix or Blu-ray, the splitter needs to support HDCP 2.2. Non-compliant splitters will give you a black screen on protected material.
- Powered vs. unpowered: Powered splitters have their own AC adapter and maintain signal integrity over longer cable runs. Unpowered splitters work fine for short runs under 15 feet but can cause signal degradation beyond that.
- Audio pass-through: Most splitters carry audio along with video, but it's worth confirming. Some cheaper models drop audio entirely.
A basic 1×2 HDMI splitter runs about $15 to $25. 4K-capable models with HDCP 2.2 support typically cost $25 to $50. If you need downscaling (outputting 4K to one display and 1080p to another), expect to pay $60 or more.
Wireless Mirroring Options Compared
Miracast (Windows)
Miracast is Microsoft's built-in wireless display standard. It creates a direct Wi-Fi connection between your PC and the receiving device. No router needed.
To use it, open Settings > System > Project to this PC on your Windows machine. Set it to "Available everywhere" or "Available on secure networks." On the device you want to project from, press Win + K and select the target display from the list.
The catch is hardware support. Not every Windows PC supports Miracast. Your Wi-Fi adapter needs to support Wi-Fi Direct.
Most laptops made after 2015 do, but many desktop motherboards don't unless they have a built-in Wi-Fi module. You can check by opening Command Prompt and typing netsh wlan show drivers. Look for "Supported wireless display: Yes."
AirPlay (Apple)
Apple's AirPlay protocol is baked into every Mac, iPhone, and iPad. For Mac mirroring, it works through the menu bar or Control Center as we covered earlier. On iPhone or iPad, open Control Center, tap Screen Mirroring, and select your target.
AirPlay 2, the current version, supports 4K streaming at 60 frames per second. It requires both devices to be on the same Wi-Fi network unless you're using peer-to-peer AirPlay, which works without a router but requires Bluetooth proximity.
Many smart TVs from Samsung, LG, Sony, and Vizio now support AirPlay 2 natively. Check your TV's settings under "Apple AirPlay" or "AirPlay and HomeKit" to enable it.
Chromecast
Google's Chromecast works differently. You don't mirror your entire screen by default. Instead, you cast specific apps or browser tabs through the Google Home ecosystem.
Full screen mirroring is possible through the Google Chrome browser. Open Chrome, click the three-dot menu, select Cast, and choose your Chromecast device. Under the "Sources" dropdown, select Cast desktop to mirror your entire screen.
The downside is performance. Chrome's desktop casting is optimized for sharing tabs, not full-screen mirroring. You'll notice higher latency compared to Miracast or AirPlay.
It works fine for slideshows and static content. It's not ideal for video playback or anything motion-heavy.
Mirroring vs. Extending: When to Use Each Mode
This is where most people get tripped up. They want one thing but accidentally enable the other.
Use mirroring when:
- Presenting to an audience that needs to see what you see
- Training someone who needs to watch your exact screen actions
- Displaying the same content on a larger screen for visibility
- Running digital signage where two screens show identical content
Use extending when:
- You need more screen real estate for multitasking
- You want to keep reference material on one screen and your main work on another
- You're coding and want documentation on one display and your IDE on the other
- You're monitoring dashboards on one screen while working on another
Switching between modes is instant on both Windows and Mac. On Windows, just hit Win + P and toggle. On Mac, uncheck the Mirror Displays box in System Settings.
You don't need to restart or reconnect anything.
Common Mistakes and How to Fix Them
Mismatched Resolution Making Everything Look Blurry
This happens when your laptop is 1920×1080 and your external monitor is 2560×1440, or vice versa. The mirrored image gets scaled to fit, and it looks soft on one or both screens.
The fix is to set both displays to the same resolution before mirroring. Go to Display Settings, select each display individually, and set them both to the lower resolution. It's not ideal, but it's the only way to get a clean mirrored image when monitors don't match.
Audio Playing from the Wrong Screen
When you mirror via HDMI, audio often follows the video signal. But sometimes it doesn't. On Windows, right-click the speaker icon in the taskbar, select Sound settings, and choose your output device under the output dropdown.
On Mac, open System Settings > Sound > Output and pick the right device.
"Project to This PC" Not Working
This Miracast feature requires the Wireless Display optional feature to be installed. Go to Settings > System > Optional features > Add a feature and search for Wireless Display. Install it, then restart.
After that, the "Project to this PC" settings should work.
HDCP Errors (Black Screen on Streaming Apps)
Some streaming apps, Netflix, Disney+, and Blu-ray players, check for HDCP compliance before playing content. If your splitter, cable, or adapter doesn't support HDCP 2.2, you'll get a black screen with audio only.
The solution is to use HDCP-compliant hardware end to end. That means your cable, splitter, and both displays all need to support the same HDCP version. Check manufacturer specs before buying.
This is one area where cheap cables and splitters cause real problems.
Real-World Use Cases: Who Mirrors and Why
Presentations and Conference Rooms
This is the most common scenario. You walk into a meeting room, plug in your laptop, hit Win + P > Duplicate, and your slides appear on both your screen and the projector. The audience sees exactly what you see.
No fiddling with extended desktop modes or dragging windows around.
Many conference rooms now use wireless presentation systems like Barco ClickShare or Mersive Solstice. These work on the same principle as Miracast but with dedicated hardware for better reliability in enterprise environments.
Home Theater and Media Streaming
Plugging your laptop into a TV to watch content is essentially screen mirroring. An HDMI cable from your laptop to the TV, set to duplicate mode, and your laptop screen appears on the big screen. Audio travels over HDMI too, so your TV's speakers handle the sound.
Wireless options work here as well. AirPlay to an Apple TV or cast to a Chromecast lets you stream without cables across the room.
Trading and Office Workstations
Financial traders and data analysts often use mirrored displays to show the same dashboard on multiple screens around their desk. It's easier to glance at a screen in your peripheral vision than to turn your head. An HDMI splitter is popular here because it guarantees identical output with zero latency.
Teaching and Training Environments
Teachers mirror their screen to a projector so the class can follow along. IT trainers mirror to a second monitor so trainees can watch the instructor's actions in real time. In both cases, mirroring keeps everyone on the same page, literally.
Quick Troubleshooting Reference
| Problem | Likely Cause | Fix |
|---|---|---|
| Second monitor not detected | Loose cable, wrong input, outdated driver | Reseat cable, check input source, update GPU driver |
| Blurry image on one screen | Mismatched resolutions | Set both displays to the same resolution |
| No audio on external display | Audio routing wrong | Manually select output device in sound settings |
| Wireless mirroring won't connect | Different Wi-Fi networks | Put both devices on the same network |
| Black screen on streaming apps | HDCP handshake failure | Use HDCP 2.2 compliant cables and hardware |
| Screen flickers when mirroring | Bad cable or loose connection | Replace cable, check all connections |
| Can't find AirPlay receiver | Bluetooth off or network issue | Enable Bluetooth, check Wi-Fi, restart both devices |
| Win + P does nothing | Display not detected | Click Detect in Display Settings, try a different port |
Frequently Asked Questions
Can I mirror to two monitors at the same time?
Yes. Use an HDMI splitter with one input and multiple outputs, or use your operating system's display settings to duplicate to two external displays. On Windows, connect both monitors, go to Display Settings, and set each one to duplicate the primary display.
On Mac, this requires a third-party app since macOS only supports mirroring to one external display natively.
Does screen mirroring work with any TV?
Most smart TVs made after 2019 support at least one wireless mirroring protocol. Look for Miracast, AirPlay 2, or Chromecast built-in in the TV's specs or settings menu. If your TV doesn't support any of these, you can buy a streaming device like an Apple TV, Chromecast with Google TV, or Microsoft Wireless Display Adapter to add the capability.
Why is there lag when I mirror wirelessly?
Wireless mirroring encodes your screen, transmits it over Wi-Fi, and decodes it on the receiving device. That process takes time. Miracast typically adds 50 to 150 milliseconds.
AirPlay 2 is faster at around 30 to 100 milliseconds. Chromecast desktop casting can be even higher. For presentations and static content, you won't notice.
For video or gaming, the delay is obvious.
Do I need an internet connection to mirror my screen?
Not necessarily. Miracast creates a direct Wi-Fi connection between devices and works without internet. Peer-to-peer AirPlay also works without a router.
However, both devices need to be on the same local network for standard Wi-Fi mirroring. If you're using an HDMI cable or splitter, no network connection is needed at all.
Can I mirror my screen and still use my laptop normally?
That's exactly what mirroring does. Your laptop stays fully functional. You can browse, type, or work on anything.
Everything you do appears on both screens simultaneously. The only limitation is that both screens show the same thing, so you can't have different content on each display while in mirror mode.
What's the difference between a splitter and a docking station?
An HDMI splitter takes one input and sends the identical signal to multiple outputs. It's for mirroring only. A USB-C docking station can do much more.
It may include multiple video outputs, USB ports, Ethernet, and audio. Some docks support mirroring, while others let you extend your desktop across multiple monitors. A dock is more versatile.
A splitter is simpler and cheaper if all you need is duplication.
Final Recommendation: The Right Setup for Your Situation
If you want the simplest, most reliable mirroring experience, use a wired connection and your operating system's built-in tools. Windows users should memorize Win + P > Duplicate. Mac users should get comfortable with the AirPlay menu in the control center.
These methods cost nothing and take seconds to activate.
For conference rooms and permanent installations, an HDMI splitter is worth the investment. It eliminates software configuration entirely. Your source device sees one display, and the splitter handles the duplication.
Just make sure you buy a powered, HDCP 2.2 compliant model if you're working with 4K content or streaming services.
Wireless mirroring is best when cables aren't practical. AirPlay 2 on Apple devices is the smoothest wireless option available. Miracast works well for Windows users with compatible hardware.
Chromecast desktop casting is a fallback, not a primary solution, due to higher latency.
The key thing to remember is that mirroring and extending are two different tools for two different jobs. Use mirroring when both screens need to show the same thing. Use extending when you need more workspace.
Switching between them is instant, so don't be afraid to toggle back and forth as your needs change throughout the day.

Similar Posts