How to Know If HDR Monitor Is True HDR
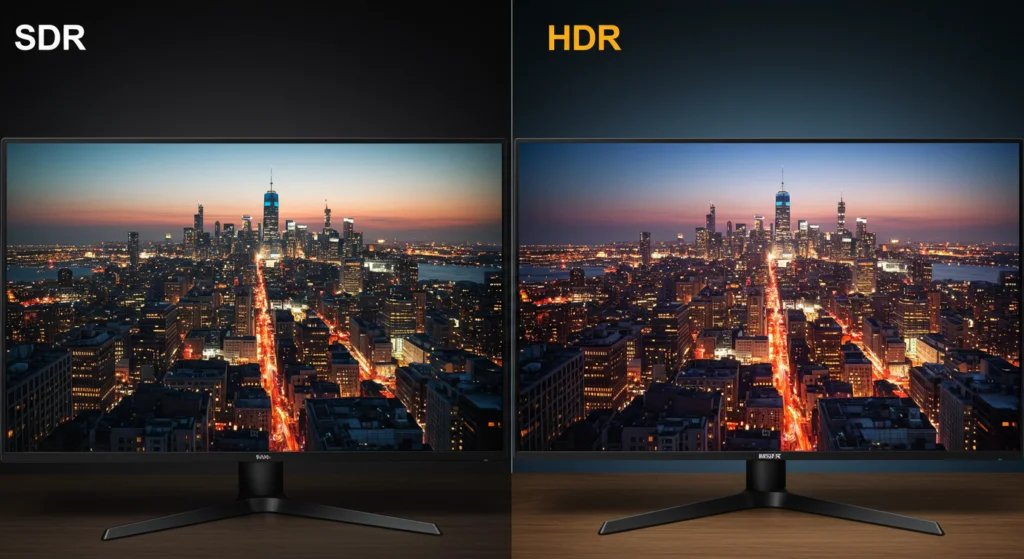
If you've ever turned on HDR in Windows or on your console and thought "this looks worse than before," you're not alone. Figuring out how to know if hdr monitor is true hdr is one of the most confusing parts of buying a display right now, because almost every monitor box says "HDR" on it. The problem is that the word "HDR" on a spec sheet can mean anything from a genuine reference-grade display to a panel that barely brightens a specular highlight.
The difference comes down to five measurable hardware specs, not a logo. A true HDR monitor needs high peak brightness, real local dimming, wide color gamut coverage, 10-bit color depth, and proper EOTF tracking. VESA's DisplayHDR certification program actually defines these thresholds clearly, but most shoppers never check the certification level.
Let's walk through exactly what separates a real HDR display from a marketing label.
Image source: Bing (Web (fair-use with source credit))
Quick Answer
True HDR requires a peak brightness of at least 600 nits with local dimming. DisplayHDR 400 is not real HDR. Look for DisplayHDR 1000 or True Black certification.
Check the spec sheet for local dimming zones, DCI-P3 coverage, and 10-bit color depth. If a monitor lists "HDR10" but only hits 350 nits with no local dimming, it is not true HDR.
Why Most "HDR" Monitors Aren't Actually HDR
The biggest issue in the monitor market right now is label inflation. Manufacturers know "HDR" sells, so they slap it on everything. A monitor that accepts an HDR10 signal is technically "HDR-compatible," but that tells you almost nothing about what the image actually looks like.
Here's what's happening behind the scenes. Your GPU sends an HDR signal to the monitor. The monitor then has to map that signal to its actual hardware capabilities.
If the panel can only hit 350 nits peak brightness and has no local dimming, it tone-maps the entire HDR signal into a range barely wider than SDR. The result is often a washed-out, grayish image that looks flatter than standard dynamic range.
This is why "HDR Ready" and "HDR Effect" are red flags. Those terms mean the monitor accepts an HDR signal but lacks the hardware to display it properly. Real HDR is a hardware capability, not a software toggle.
The monitors that actually deliver a visible HDR experience share a common set of traits. They hit at least 600 nits of sustained brightness in small window tests. They use some form of local dimming to control black levels in specific zones.
They cover at least 90% of the DCI-P3 color space. And they process 10-bit color, either natively or through well-implemented FRC (frame rate control).
If a monitor is missing even two of those four traits, the HDR experience will be compromised. Missing all four means you're looking at a standard panel with an HDR input flag, nothing more.
The 5 Specs That Actually Determine True HDR
When you're evaluating any monitor for real HDR performance, these are the numbers that matter. Everything else is secondary.
Peak brightness (nits). This is the single most important spec. SDR content targets 100 nits. Real HDR starts at 600 nits for small highlights, and 1000 nits is where specular highlights like sunlight reflections and explosions start looking genuinely bright.
DisplayHDR 400 monitors hit 400 nits peak, but that's sustained brightness, not the small-window peak that matters for HDR impact.
Local dimming. Without local dimming, an LCD panel can't produce deep blacks and bright highlights at the same time. The backlight is either on or off across the whole screen. Full-array local dimming (FALD) divides the backlight into zones that brighten or dim independently.
Edge-lit dimming with a handful of zones is better than nothing, but FALD with 384 or more zones is where HDR really works on LCD panels.
Color gamut coverage. HDR content is mastered in wide color gamut, primarily DCI-P3. A monitor needs at least 90% DCI-P3 coverage to render HDR colors accurately. Some professional targets aim for 98% or higher. sRGB coverage alone is irrelevant for HDR evaluation.
Color depth. True HDR requires 10-bit color processing. This gives you 1.07 billion colors versus 16.7 million in 8-bit. Without 10-bit depth, you'll see visible banding in gradients like skies and shadows.
Native 10-bit panels exist but are expensive. 8-bit + FRC dithering to 10-bit is common and works well when implemented properly.
EOTF tracking accuracy. The Electro-Optical Transfer Function defines how the monitor translates signal values into brightness. HDR10 uses the PQ curve defined in SMPTE ST 2084. A monitor that tracks this curve accurately renders content as the creator intended.
Poor EOTF tracking crushes shadows or blows out highlights, and this is something spec sheets rarely mention directly.
| Spec | Minimum for Real HDR | Ideal for Reference HDR |
|---|---|---|
| Peak brightness | 600 nits (small window) | 1000+ nits |
| Local dimming | FALD, 16+ zones | FALD, 512+ zones |
| DCI-P3 coverage | 90% | 98%+ |
| Color depth | 10-bit (8-bit + FRC acceptable) | Native 10-bit |
| EOTF tracking | Within 10% of PQ curve | Within 5% of PQ curve |
How to Read a Monitor Spec Sheet for Real HDR Clues
Manufacturer spec sheets are designed to make every monitor look good. You need to know which numbers to trust and which to ignore.
Start with brightness. If the spec sheet lists "typical brightness" at 350 nits but doesn't mention a separate peak brightness number, that monitor almost certainly can't do real HDR. True HDR monitors will advertise peak brightness prominently, often with a note about the test window size (like "10% window" or "3% window").
Next, look for local dimming. The spec sheet might say "local dimming: yes" without specifying the zone count. That's a yellow flag.
A monitor with only 8 edge-lit zones is technically "local dimming," but the HDR effect will be minimal with visible blooming around bright objects on dark backgrounds. Look for specific zone counts or the term "full-array local dimming."
Color gamut is usually listed as a percentage of DCI-P3 or Adobe RGB. If you only see sRGB listed at 99% or 100%, that monitor is targeting SDR color work, not HDR. DCI-P3 at 90% or above is the baseline for HDR.
Color depth is often buried in the panel specs. Look for "10-bit," "1.07B colors," or "8-bit + FRC." If it just says "8-bit" or "16.7M colors," that's an 8-bit panel without dithering, and HDR gradients will show banding.
Finally, check for VESA DisplayHDR certification. This is the one spec sheet item that does the work for you, because VESA actually tests and certifies these displays against defined standards.
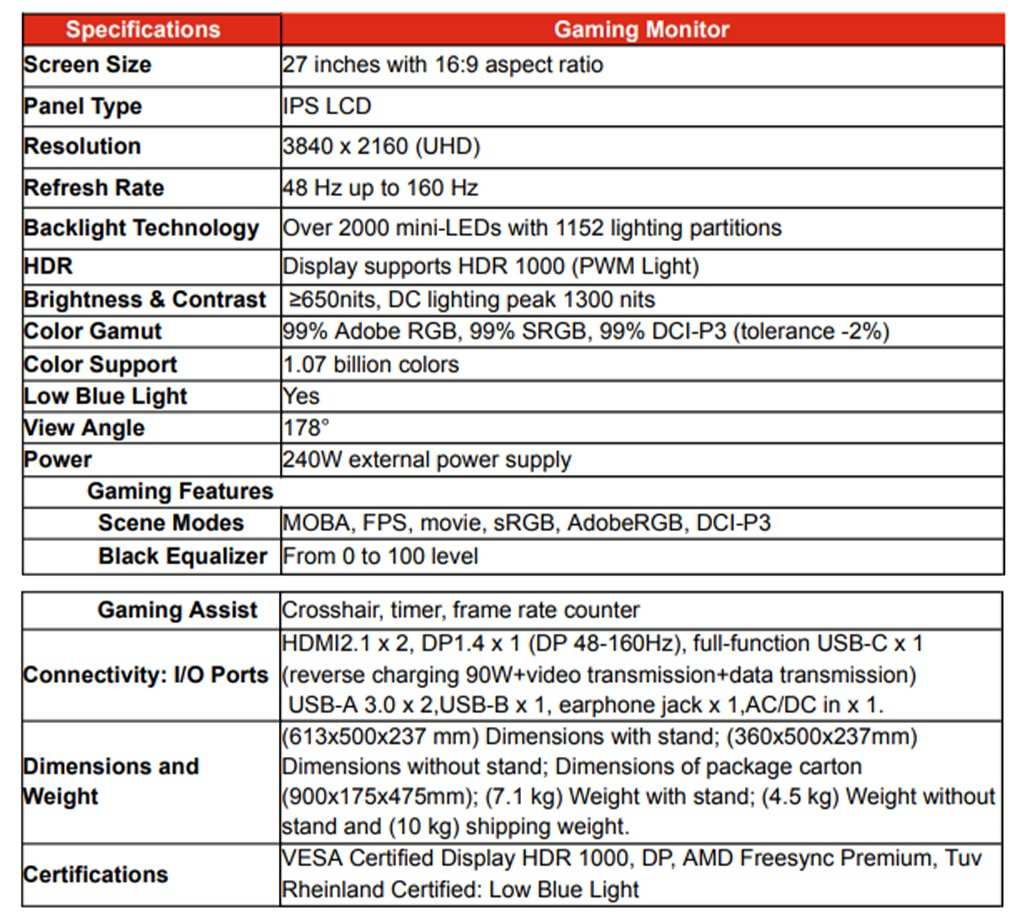
Image source: Bing (Web (fair-use with source credit))
VESA DisplayHDR Certifications Explained (400 vs 600 vs 1000 vs True Black)
VESA created the DisplayHDR certification program specifically to cut through the marketing noise. Each tier has defined requirements for brightness, color gamut, black level, and bit depth. The certification level tells you exactly what the hardware can do.
DisplayHDR 400 is the entry level, and honestly, it's barely HDR. It requires 400 nits peak brightness, 95% sRGB coverage, and 8-bit color. There's no local dimming requirement and no DCI-P3 requirement.
Most HDR400 monitors are standard SDR panels with an HDR input flag. The HDR experience on these is marginal at best.
DisplayHDR 600 is a meaningful step up. It requires 600 nits peak, 99% sRGB, 90% DCI-P3, and 10-bit color processing. It also requires a dimming capability that achieves a black level of 0.12 nits or lower in a specific test pattern.
This is where HDR starts to look noticeably different from SDR, though local dimming quality varies widely between models.
DisplayHDR 1000 is serious HDR territory. It requires 1000 nits peak, 90% DCI-P3, 10-bit color, and a black level of 0.02 nits or lower. Monitors at this level have substantial local dimming systems, often with hundreds of zones.
Specular highlights look genuinely bright, and the overall image has real punch.
DisplayHDR 1400 pushes peak brightness to 1400 nits with tighter black level requirements. These are reference-grade displays, and they're expensive.
DisplayHDR True Black 400/500/600 is a separate track for OLED and emissive display technologies. Since OLED pixels produce their own light and can turn completely off, the certification focuses on black level and response time rather than peak brightness. True Black 600 requires 600 nits peak on a small window with near-infinite contrast.
These are the best HDR displays you can buy for dark-room viewing.

Image source: Bing (Web (fair-use with source credit))
The key takeaway is simple. If a monitor only says "HDR10" or "HDR Ready" without a VESA DisplayHDR certification level, treat it with skepticism. If it's DisplayHDR 400, know that you're getting a minimal HDR experience.
DisplayHDR 600 and above is where things get real, and DisplayHDR 1000 or True Black is where HDR genuinely transforms what you see on screen.
How to Test Your Monitor's HDR at Home
You don't need a $3,000 colorimeter to get a sense of whether your monitor is delivering real HDR. A few free tools and some careful observation will tell you most of what you need to know.
Step 1: Check Windows HDR status. Go to Settings > System > Display > HDR. Toggle HDR on and look at the "Display capabilities" section. It will tell you whether your monitor reports HDR support, what color spaces are available, and whether 10-bit output is active.
If it says "Not supported" for any HDR-related item, your monitor or cable is the bottleneck.
Step 2: Run the Windows HDR Calibration app. Microsoft released a free calibration tool in the Microsoft Store. It walks you through setting peak brightness, black saturation, and color balance for your specific panel. This app also generates an ICC profile that improves HDR accuracy in supported apps.
It's the single most impactful free tool for HDR on Windows.
Step 3: Test with known HDR reference content. Pull up the "HDR Video" section on YouTube or play a known HDR game like Forza Horizon 5 or Cyberpunk 2077. Look for scenes with bright sunlight, neon signs against dark backgrounds, or explosions. On a true HDR display, specular highlights will look noticeably brighter than the rest of the image, and dark areas will retain detail without looking gray.
Step 4: Observe black level behavior. Display a full black screen in a dark room. On an OLED or good FALD monitor, the screen should look genuinely black, not gray. On an edge-lit or direct-lit panel without local dimming, you'll see a uniform gray glow.
This is the fastest way to confirm whether local dimming is actually working.
Step 5: Check for banding. Display a smooth gradient test pattern, like a dark blue-to-black sky. On an 8-bit panel without good FRC, you'll see visible steps or bands in the gradient. On a proper 10-bit or well-dithered panel, the transition should be smooth.
If you want to go deeper, the free tool HCFR Colorimeter (used with an affordable colorimeter like the SpyderX) can measure actual peak brightness, EOTF tracking, and color gamut coverage. But for most people, the five steps above will reveal whether your monitor is doing real HDR or just pretending.
True HDR vs. Fake HDR: Side-by-Side Comparison
The difference between a real HDR display and a fake one is immediately visible once you know what to look for. Here's how they compare across the key visual characteristics.
Highlight brightness. On a true HDR monitor with 1000+ nits, a sun reflection or explosion will look genuinely bright, almost uncomfortable to stare at in a dark room. On a fake HDR monitor capped at 350-400 nits, those same highlights look only slightly brighter than the rest of the image. The "pop" is missing.
Black levels. Real HDR with local dimming produces deep, inky blacks right next to bright objects. Fake HDR without local dimming shows gray, washed-out blacks, especially in dark scenes. This is the most common complaint when people say "HDR looks worse than SDR."
Color saturation. True HDR with wide color gamut coverage renders saturated colors that look vivid without clipping. Fake HDR on a narrow-gamut panel either desaturates colors to fit the smaller space or clips them, losing detail in bright reds and greens.
Shadow detail. Good HDR preserves detail in dark areas while keeping blacks deep. Fake HDR either crushes shadows into black blobs or lifts them into gray, depending on how the tone mapping is handled.
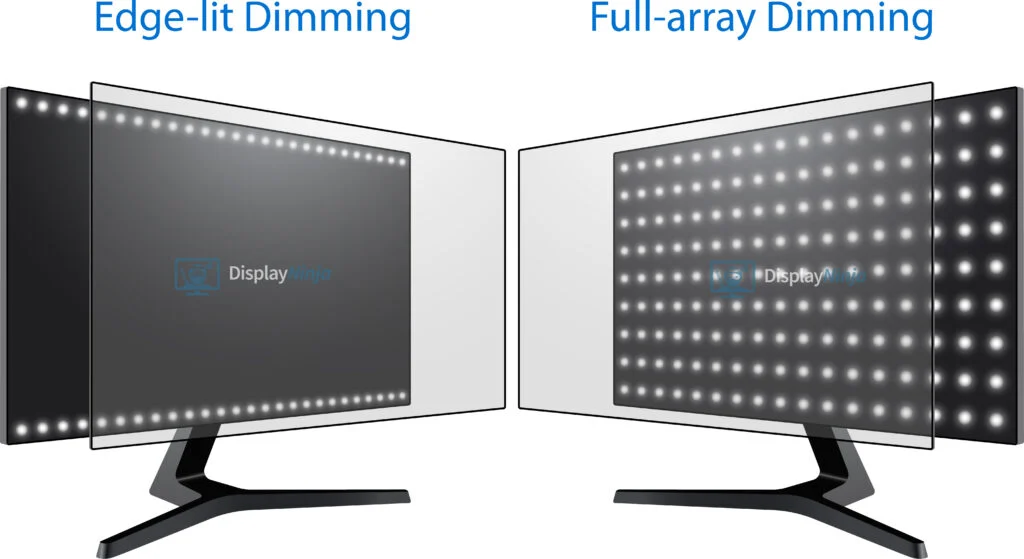
Image source: Bing (Web (fair-use with source credit))
The image above illustrates the blooming problem. On the left, an edge-lit panel with minimal dimming zones shows halos of light around bright objects on dark backgrounds. On the right, a full-array local dimming panel keeps the bright object crisp while maintaining deep blacks around it.
This is the practical difference between DisplayHDR 600 and DisplayHDR 1000 in most cases.
What Your GPU and Cable Need to Deliver Real HDR
Even a perfect HDR monitor will fail if your source device or cable can't deliver the full signal. Here's what needs to line up.
GPU requirements. Any NVIDIA GTX 10-series or newer, AMD RX 400-series or newer, or Intel Arc GPU supports HDR10 output. For 10-bit color at 4K 60Hz, you need either DisplayPort 1.4 or HDMI 2.0. For 4K 120Hz with HDR, you need HDMI 2.1 or DisplayPort 1.4 with DSC (Display Stream Compression).
Cable requirements. Not all HDMI cables are equal. For 4K 60Hz HDR, a "High Speed HDMI" cable (HDMI 2.0) works. For 4K 120Hz HDR, you need an "Ultra High Speed HDMI" cable (HDMI 2.1) rated for 48 Gbps.
Using the wrong cable forces chroma subsampling (4:2:2 or 4:2:0), which reduces color resolution and can introduce visible artifacts in HDR content.
Output settings. In your GPU control panel, verify that color depth is set to 10-bit (or "Maximum" in NVIDIA Control Panel), color format is RGB or YCbCr 4:4:4, and dynamic range is set to "Full." Many GPUs default to 8-bit output, which defeats the purpose of an HDR monitor.
Console considerations. PS5 and Xbox Series X both support HDR10 output. On Xbox, the system-level HDR calibration app is excellent and should be run after enabling HDR. On PS5, the HDR adjustment screen in system settings lets you set peak brightness and black level to match your display.
Both consoles require HDMI 2.1 for 4K 120Hz HDR.
How to Enable and Calibrate HDR on Windows and Console
Getting HDR working properly requires more than just flipping a switch. Here's the correct setup sequence for each platform.
Windows HDR setup:
- Update your GPU driver to the latest version.
- Connect your monitor using DisplayPort 1.4 or HDMI 2.0/2.1.
- In GPU control panel, set output color depth to 10-bit and dynamic range to Full.
- Go to Settings > System > Display > HDR and toggle "Use HDR" on.
- Adjust the "SDR content brightness" slider so desktop apps don't look washed out.
- Download and run the Windows HDR Calibration app from the Microsoft Store.
- Launch HDR content and verify it triggers the HDR indicator in the display's OSD.
Xbox Series X|S HDR setup:
- Go to Settings > General > TV & display options > Video modes and check "Allow HDR10."
- Run the "Calibrate HDR for games" tool in the same menu.
- Follow the on-screen prompts to set peak brightness, minimum luminance, and maximum luminance to match your monitor's actual capabilities.
- Enable "Auto HDR" if you want SDR games to receive an HDR treatment (results vary by game).
PS5 HDR setup:
- Go to Settings > Screen and Video > Video Output > HDR and set it to "On When Supported."
- Adjust the HDR brightness settings using the sliders provided.
- The PS5 will test your display's capabilities automatically during initial setup.
The most common mistake on Windows is leaving HDR on all the time. HDR desktop usage washes out SDR content like web browsers and office apps. Toggle HDR on only when you're about to consume HDR content or play an HDR game.
Common Mistakes That Ruin HDR (Even on Good Monitors)
Even a DisplayHDR 1000 monitor can look terrible if something in the chain is misconfigured. Here are the most frequent problems.
Leaving HDR on for desktop use. Windows desktop is SDR content. When HDR is enabled globally, SDR content gets tone-mapped into the HDR container, which often results in washed-out colors and elevated blacks. Only enable HDR when you're launching HDR content.
Using the wrong cable. A cheap HDMI 1.4 cable will force 4K HDR down to 30Hz or drop to 4:2:0 chroma subsampling. Both ruin the experience. Use certified Ultra High Speed HDMI 2.1 cables for 4K 120Hz HDR.
Ignoring the monitor's HDR mode. Many monitors have multiple HDR modes in their OSD, like "HDR Cinema," "HDR Game," and "HDR Vivid." Some of these are just picture presets that oversaturate colors. Check your monitor's manual to see which mode is closest to accurate HDR tracking.
Not running calibration. Out of the box, most monitors ship with HDR settings that are too bright, too dim, or poorly tone-mapped. The Windows HDR Calibration app or console calibration tools take two minutes and make a visible difference.
Expecting OLED-level blacks from an LCD. Even the best FALD LCD monitor will show some blooming around bright objects on dark backgrounds. This is a fundamental limitation of backlit LCD technology. If you want perfect per-pixel black, you need OLED or a true emissive display.
Overlooking the "peak brightness" vs "sustained brightness" distinction. A monitor might hit 1000 nits for a 2% window for a fraction of a second, but only sustain 600 nits across a 10% window. Sustained brightness matters more for real-world HDR content, which rarely has tiny specular highlights as the only bright element.
Who Actually Needs True HDR vs. Who's Fine Without It
Not everyone needs to spend extra for a DisplayHDR 1000 or OLED panel. Your use case determines whether true HDR is worth the investment.
Worth it for: Console gamers playing HDR-optimized titles, PC gamers with modern GPUs who play cinematic single-player games, video editors working in HDR color spaces, photographers editing HDR photos, and anyone who watches a lot of HDR streaming content from Netflix, Disney+, or Apple TV+.
Skip it for: Competitive esports players who prioritize 240Hz+ refresh rates over image quality, office workers who only browse the web and use spreadsheets, and budget-conscious buyers who would rather put the money toward a higher resolution or faster refresh rate.
If you primarily play competitive shooters like Valorant or CS2, you're likely turning HDR off anyway for the clearest possible image. In that case, a fast 1440p 240Hz SDR panel will serve you better than a slower HDR display.
Real-World Examples: Monitors That Deliver vs. Monitors That Don't
Looking at specific models makes the gap between real and fake HDR concrete.
Delivers true HDR: The LG C3/C4 OLED (42-inch as a monitor) hits DisplayHDR True Black 600 with perfect blacks and 800+ nits peak. The Samsung Odyssey Neo G8 uses Mini-LED with 1,196 zones and hits DisplayHDR 2000. The ASUS ROG Swift PG32UQX is a 4K 144Hz IPS with 1,152 FALD zones and DisplayHDR 1400 certification.
Fake or minimal HDR: Many budget 4K monitors advertise "HDR10 support" with 300-350 nits peak brightness and no local dimming. These accept an HDR signal but can't display it meaningfully. The HDR experience is indistinguishable from SDR, and sometimes worse due to poor tone mapping.
The price gap is significant. A true HDR monitor starts around $800-1,000 for a good Mini-LED model and goes up to $1,500+ for high-end options. OLED panels used as monitors start around $1,000 for 42-inch models as of 2026.
Final Checklist: Is Your HDR Monitor the Real Deal?
Run through this checklist to confirm your monitor is delivering true HDR.
- VESA DisplayHDR 600 certification or higher (or True Black for OLED)
- Peak brightness of 600+ nits in small-window tests
- Full-array local dimming with 16+ zones
- 90%+ DCI-P3 color gamut coverage
- 10-bit color processing (native or 8-bit + FRC)
- HDMI 2.1 or DisplayPort 1.4 connection
- 10-bit output enabled in GPU control panel
- HDR calibration completed via Windows or console tool
- HDR content showing visible highlight brightness and deep blacks
If you can check at least seven of those nine items, you're getting a genuine HDR experience. If you're below five, your monitor is likely an SDR panel with an HDR input flag.
Frequently Asked Questions
Is DisplayHDR 400 real HDR?
No. DisplayHDR 400 requires only 400 nits peak brightness, 8-bit color, and no local dimming. It accepts an HDR signal but can't display meaningful HDR contrast or brightness.
The visual difference from SDR is minimal.
Can I make a non-HDR monitor display HDR?
You can enable HDR output from your GPU to any monitor, but without the hardware to back it up, the result is poor tone mapping and washed-out colors. A monitor needs local dimming and high peak brightness to display HDR properly.
Does HDR work at 1440p or only 4K?
HDR works at any resolution. The HDR metadata and color space are independent of pixel count. Many excellent HDR monitors are 1440p, and some of the best HDR experiences come from 1440p OLED panels.
Is OLED always better than LCD for HDR?
OLED produces perfect blacks and per-pixel dimming, which is ideal for dark-room HDR viewing. However, high-end Mini-LED LCD panels can hit much higher peak brightness, making them better for bright rooms and specular highlight impact. Each technology has strengths.
Why does HDR look washed out on my monitor?
This usually means HDR is enabled in Windows but you're viewing SDR desktop content. Toggle HDR on only when consuming HDR content. Also check that your GPU is outputting 10-bit color and that the correct HDR mode is selected in your monitor's OSD.

Similar Posts