How to Enable HDR on Curved Gaming Monitor
Figuring out how to enable HDR on a curved gaming monitor isn't always as straightforward as flipping a switch. You might have the hardware, the cable, and the right port, but something in the chain still keeps the HDR toggle hidden or the picture looking worse than before you turned it on. That's usually because HDR depends on every link in the signal path agreeing on what's being sent.
The good news is that most HDR issues on curved gaming monitors come down to a handful of specific settings. Once you know where to look, the fix is usually a few clicks. Let's walk through it step by step.
Quick Answer
To enable HDR on a curved gaming monitor, you need a GPU that supports HDR output, a DisplayPort 1.4 or HDMI 2.0a cable or newer, and HDR turned on in both your monitor's OSD and Windows Display Settings. Start by enabling HDR in the monitor's on-screen menu first. Then toggle HDR in Windows.
Finally, configure your GPU control panel for 10-bit color depth if supported.
Why HDR Might Not Work on Your Curved Gaming Monitor (Even When It Should)
HDR fails on curved gaming monitors for a few specific reasons, and most of them have nothing to do with the curve itself. The curved form factor doesn't affect HDR capability at all. What actually breaks the chain is usually a mismatch somewhere between your GPU, your cable, your monitor's firmware, or Windows settings.
Here's what typically goes wrong:
- The cable doesn't have enough bandwidth. An old HDMI 1.4 or DisplayPort 1.2 cable simply can't carry an HDR signal at higher resolutions and refresh rates.
- HDR is disabled in the monitor's OSD. Many monitors require you to manually enable HDR in the on-screen display before Windows even sees the option.
- The GPU driver isn't configured for HDR output. Even if Windows shows the toggle, the GPU might be sending an SDR signal.
- The monitor firmware is outdated. Some monitors need a firmware update to properly handshake with newer GPUs for HDR.
- The wrong input port is used. On some monitors, only one specific port supports HDR, often labeled in the manual or on the back panel.
The curve of your monitor is irrelevant to HDR functionality. What matters is the panel's peak brightness, color depth, local dimming implementation, and the signal chain from your GPU to the screen.
Quick Check: Does Your Setup Actually Support HDR?
Before diving into settings, let's verify your hardware can actually do HDR. Not every monitor that advertises "HDR support" can deliver a real HDR experience. The term gets thrown around loosely in marketing.
Minimum requirements for functional HDR:
| Component | Minimum Spec | Recommended Spec |
|---|---|---|
| GPU | NVIDIA GTX 10-series or AMD RX 400-series | NVIDIA RTX 20-series or AMD RX 5000-series |
| Cable | DisplayPort 1.4 or HDMI 2.0a | DisplayPort 1.4 with DSC or HDMI 2.1 |
| Monitor | HDR10 support, 400+ nits peak brightness | DisplayHDR 600 or higher, 10-bit color |
| OS | Windows 10 (1709 or later) | Windows 11 (for Auto HDR) |
| Content | HDR10 game or video | HDR10, HDR10+, or Dolby Vision content |
If your monitor only says "HDR Ready" or "HDR Compatible" without a VESA DisplayHDR certification, it probably just accepts an HDR signal but can't actually display it well. That means low peak brightness, no local dimming, and 8-bit color. The result looks washed out, not better.
How to check your GPU's HDR capability:
- Open NVIDIA Control Panel or AMD Radeon Software.
- Navigate to Display settings.
- Look for Change Resolution or Color Depth.
- If you see options for 10-bit color or HDR, your GPU supports it.
For NVIDIA users, the GPU must support HDCP 2.2 and have enough bandwidth for the resolution and refresh rate you want. AMD GPUs from the RX 400 series onward generally support HDR output, but older drivers may need updating.
The Decision Tree: How to Enable HDR Based on Your Exact Setup
HDR setup isn't one-size-fits-all. The steps depend on your GPU brand, your connection type, and your monitor's specific requirements. Follow the path that matches your situation.
Step 1: Verify Your GPU Can Output HDR
Your GPU is the starting point. If it can't output an HDR signal, nothing else matters.
For NVIDIA GPUs:
- Right-click your desktop and open NVIDIA Control Panel.
- Go to Display > Change Resolution.
- Scroll down to Apply the following settings.
- Check if Use NVIDIA color settings is available.
- Look for Output color depth set to 10 bpc (bits per color).
- If 10 bpc is available, your GPU supports HDR output.
For AMD GPUs:
- Open AMD Radeon Software (Adrenalin Edition).
- Go to Settings > Display.
- Check for HDR toggle or Color Depth options.
- If you can set color depth to 10-bit, HDR output is supported.
For Intel integrated graphics:
- Open Intel Graphics Command Center.
- Go to Display.
- Look for HDR or Advanced Color options.
10th-gen Intel CPUs and newer generally support HDR output.
If your GPU doesn't show any HDR or 10-bit color options, you may need a driver update. Check your GPU manufacturer's website for the latest drivers.
Step 2: Check Your Cable and Port (This Trips Up Most People)
This is where most HDR setups fail. The cable and port combination determines whether the HDR signal can actually reach your monitor.
Cable requirements by resolution and refresh rate:
| Resolution & Refresh Rate | Minimum Cable Spec | Recommended |
|---|---|---|
| 1080p 60Hz HDR | HDMI 2.0a or DP 1.2 | DP 1.4 |
| 1440p 60Hz HDR | HDMI 2.0a or DP 1.4 | DP 1.4 |
| 1440p 144Hz HDR | DP 1.4 | DP 1.4 with DSC |
| 4K 60Hz HDR | HDMI 2.0a or DP 1.4 | DP 1.4 |
| 4K 120Hz HDR | DP 1.4 with DSC or HDMI 2.1 | HDMI 2.1 |
| 4K 240Hz HDR | HDMI 2.1 or DP 2.1 | DP 2.1 |
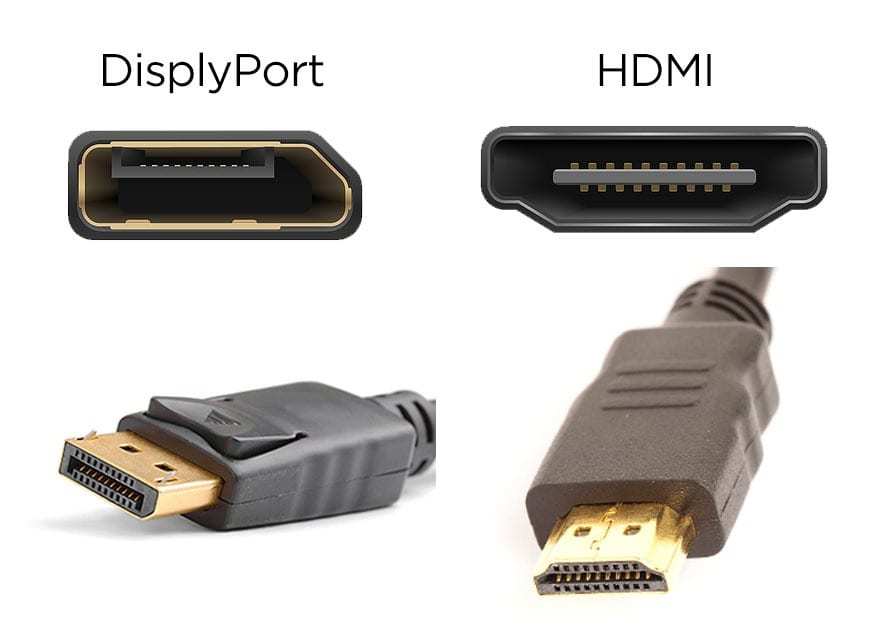
Common cable mistakes:
- Using an old HDMI cable that came with a TV or monitor from 2015 or earlier. These are often HDMI 1.4, which lacks HDR bandwidth.
- Using a DisplayPort 1.2 cable, which can handle 4K 60Hz SDR but not HDR at the same resolution.
- Buying a cheap cable that claims DP 1.4 but doesn't actually meet the spec. Stick to certified cables from reputable manufacturers.
- Plugging into the wrong port on the monitor. Some monitors only support HDR on one specific DisplayPort or HDMI input.
How to verify your cable:
- Check the cable itself for printed markings like "DP 1.4" or "HDMI 2.1."
- If no markings are visible, check the product listing or packaging.
- When in doubt, buy a certified cable. VESA maintains a list of certified DisplayPort cables on their website.
Step 3: Enable HDR in Your Monitor's OSD First
This step gets skipped constantly. Many curved gaming monitors require you to enable HDR in the on-screen display before Windows will even recognize that HDR is available.
General OSD steps (varies by brand):
- Press the joystick or button on your monitor to open the OSD.
- Navigate to Picture or Display settings.
- Look for HDR Mode, HDR, or HDMI ULTRA HD Deep Color.
- Enable it.
- Some monitors have an HDR Effect mode that simulates HDR from SDR content. That's not the same as true HDR. Look for HDR10 or HDR Standard instead.
Brand-specific OSD paths:
- Samsung: Menu > Picture > Expert Settings > HDMI UHD Color (enable for the correct input), then Picture > HDR+
- LG: Menu > Picture > Additional Settings > HDMI ULTRA HD Deep Color (enable), then Picture > HDR Mode
- ASUS: Menu > Image > HDR (enable), ensure input source supports HDR
- Dell/Alienware: Menu > Display > HDR (enable)
- MSI: Menu > Professional > HDR Mode (enable)
- Acer: Menu > Picture > HDR (enable)
After enabling HDR in the OSD, wait a few seconds. The screen may flicker or go black briefly as the handshake renegotiates.
Step 4: Turn On HDR in Windows Display Settings
Now that your monitor is ready to receive an HDR signal, Windows needs to send one.
Windows 11:
- Right-click the desktop and select Display settings.
- Click the display you want to configure (if you have multiple monitors).
- Scroll to Brightness and color.
- Toggle Use HDR to On.
Windows 10:
- Right-click the desktop and select Display settings.
- Click Windows HD Color settings.
- Toggle Play HDR games and apps to On.

If the HDR toggle is missing or grayed out:
- Your monitor's OSD HDR setting isn't enabled. Go back to Step 3.
- Your cable doesn't support HDR bandwidth. Go back to Step 2.
- Your GPU driver is outdated. Update to the latest driver from NVIDIA, AMD, or Intel.
- You're using the wrong input port on the monitor. Try a different port.
- Your monitor firmware is outdated. Check the manufacturer's support page for updates.
Step 5: Configure Your GPU Control Panel for HDR Output
Windows turning on HDR is one thing. Your GPU sending the right signal is another. You need to make sure the GPU is outputting 10-bit color depth and the correct color format.
NVIDIA Control Panel:
- Open NVIDIA Control Panel.
- Go to Display > Change Resolution.
- Select the correct display.
- Under Apply the following settings, choose Use NVIDIA color settings.
- Set Output color depth to 10 bpc (if available).
- Set Output color format to RGB or YCbCr444.
- Set Output dynamic range to Full.
- Click Apply.
AMD Radeon Software:
- Open AMD Radeon Software.
- Go to Settings > Display.
- Select the correct display.
- Set Color Depth to 10-bit (if available).
- Ensure Pixel Format is set to RGB 4:4:4 or YCbCr 4:4:4.
- Changes apply automatically.
Important note on color depth:
Not all GPUs support 10-bit output at every resolution and refresh rate. If 10 bpc isn't available, you may need to lower the refresh rate or resolution, or use a different cable. This is a bandwidth limitation, not a GPU limitation in most cases.
What to Do When the HDR Toggle Is Missing or Grayed Out
This is one of the most common frustrations. You know your monitor supports HDR, but Windows won't show the toggle. Here's a systematic approach to fix it.
Checklist in order:
- Enable HDR in the monitor OSD. This is the number one reason the toggle stays hidden. The monitor needs to tell Windows it can handle HDR.
- Use the correct input port. Many monitors only support HDR on one specific port. Check your manual.
- Replace the cable. An HDMI 1.4 or DP 1.2 cable won't carry HDR. Use a certified DP 1.4 or HDMI 2.0a+ cable.
- Update your GPU driver. An outdated driver may not expose HDR capabilities correctly.
- Update your monitor firmware. Some monitors need a firmware update to properly handshake with newer GPUs. Check the manufacturer's support page.
- Restart your PC. Sometimes the EDID handshake needs a full reboot to renegotiate properly.
- Try a different port on your GPU. If your GPU has multiple DisplayPort outputs, try another one.
EDID handshake issues:
Sometimes the communication between your GPU and monitor breaks down. The EDID (Extended Display Identification Data) tells the GPU what the monitor can do. If this handshake fails, HDR won't appear as an option.
To force a fresh handshake:
- Turn off the monitor.
- Unplug the video cable from both ends.
- Wait 30 seconds.
- Reconnect the cable firmly.
- Turn the monitor on.
- Restart your PC.
When HDR Looks Washed Out (And How to Fix It)
You got HDR working. The toggle is on. But now everything looks worse than before.
Colors seem faded, whites look gray, and the whole image feels flat. This is extremely common, and it's fixable.
Why HDR looks washed out:
- Windows desktop is designed for SDR. When HDR is on, SDR content gets tone-mapped into the HDR signal, and the mapping is often poor.
- The monitor's peak brightness is too low to make HDR highlights pop. On a DisplayHDR 400 monitor, HDR will look dim and washed out because 400 nits isn't enough to create meaningful specular highlights.
- Windows SDR content brightness slider is set too low when HDR is active.

How to fix washed-out HDR:
Adjust SDR content brightness in Windows. Go to Settings > Display > Brightness and color (Windows 11) or Windows HD Color settings (Windows 10). Use the SDR content brightness slider to boost the brightness of non-HDR elements like your desktop and browsers.
Use the Windows HDR Calibration app. Download it from the Microsoft Store. It creates a custom color profile that improves HDR tone mapping on your specific display.
Enable local dimming in the monitor OSD. If your monitor has local dimming, make sure it's turned on. Without it, dark scenes look gray because the backlight is uniformly bright.
Lower the in-game HDR brightness slider. Many games have their own HDR calibration. If the in-game brightness is set too high, highlights clip and the image looks washed out. Lower it until you can barely see the logo or sun in the calibration screen.
Accept that HDR on low-tier monitors looks worse than SDR. If your monitor is DisplayHDR 400 or has no local dimming, HDR will often look worse than SDR. In that case, leave HDR off for desktop use and only turn it on for specific games or movies that support it well.
When to turn HDR off:
- Doing productivity work (browsing, office apps, coding). SDR looks better for this.
- Playing competitive games where input lag matters. Some monitors add 1-5ms of processing lag in HDR mode.
- Using the monitor in a bright room. HDR highlights get washed out by ambient light.
HDR-Ready vs True HDR: Why Your Monitor's Marketing Might Be Misleading
Manufacturers love slapping "HDR" on box labels. But there's a massive difference between accepting an HDR signal and actually displaying HDR well.
VESA DisplayHDR certification tiers:
| Tier | Peak Brightness | Color Gamut | Local Dimming | Black Level |
|---|---|---|---|---|
| DisplayHDR 400 | 400 nits | sRGB | No | Standard |
| DisplayHDR 600 | 600 nits | 90% DCI-P3 | Limited | Improved |
| DisplayHDR 1000 | 1000 nits | 99% DCI-P3 | FALD required | Deep |
| DisplayHDR 1400 | 1400 nits | 99% DCI-P3 | FALD required | Very deep |
What "HDR Ready" usually means:
The monitor accepts an HDR10 signal. That's it. It doesn't mean the monitor can actually produce the brightness, contrast, or color range that HDR content demands.
A "HDR Ready" monitor with a 300-nit panel and 8-bit color will display HDR content, but it will look worse than a good SDR image.
What true HDR requires:
- At least 600 nits of sustained peak brightness (DisplayHDR 600 or higher).
- 10-bit color depth (1.07 billion colors instead of 16.7 million).
- Local dimming to produce deep blacks alongside bright highlights.
- Wide color gamut coverage (90%+ DCI-P3).
If your monitor doesn't meet these specs, you can still enable HDR, but manage your expectations. The toggle will work. The experience won't match what you see in marketing photos.
Auto HDR on Windows 11: When to Use It and When to Skip It
Windows 11 introduced Auto HDR, which takes SDR games and artificially expands the color and brightness range to simulate HDR. It's not the same as native HDR, but it can improve the look of older games that don't support HDR natively.
When Auto HDR helps:
- Older games that only output SDR (pre-2018 titles mostly).
- Games with flat lighting that benefit from expanded brightness range.
- When you want a more vibrant look without manual calibration.
When Auto HDR hurts:
- Games that already have poor color grading. Auto HDR can make bad colors worse.
- Competitive shooters where color accuracy matters more than visual flair.
- Games with intentionally dark atmospheres. Auto HDR can crush blacks or wash out shadows.
How to enable Auto HDR:
- Go to Settings > Display > Graphics.
- Click Change default graphics settings.
- Toggle Auto HDR to On.
- Per-game control is available under Settings > Display > Graphics > Custom options for applications.
Common Mistakes That Break HDR on Curved Monitors
After walking through the setup steps, let's cover the mistakes that keep coming up. Avoiding these will save you hours of frustration.
- Enabling HDR in Windows before enabling it in the monitor OSD. The order matters. The monitor needs to advertise HDR capabilities before Windows will offer the toggle.
- Using a cable that's too old. HDMI 1.4 and DisplayPort 1.2 cables cannot carry HDR signals at meaningful resolutions. Replace them.
- Expecting HDR miracles from a DisplayHDR 400 monitor. These panels lack the brightness and local dimming needed for real HDR. The toggle works, but the result disappoints.
- Leaving HDR on for desktop use. The Windows desktop looks worse in HDR mode for most people. Turn HDR on only when you need it.
- Not updating monitor firmware. Several monitor models had HDR bugs fixed via firmware updates. Check your manufacturer's support page.
- Ignoring the GPU control panel settings. Windows HDR toggle alone isn't enough. The GPU must also be configured for 10-bit output and full dynamic range.
- Using the wrong input on the monitor. Some monitors only support HDR on one specific port. Check your manual.
- Not calibrating in-game HDR settings. Every game has its own HDR calibration. If you skip it, the image will look off even if everything else is configured correctly.
Quick Reference: Cable and Port Requirements by Resolution and Refresh Rate
Bookmark this table. It's the fastest way to figure out if your cable and port combination can handle HDR at your desired settings.
| Resolution | Refresh Rate | HDR? | Minimum Cable | Notes |
|---|---|---|---|---|
| 1920×1080 | 60Hz | Yes | HDMI 2.0a / DP 1.2 | Most cables work |
| 1920×1080 | 144Hz | Yes | DP 1.4 | HDMI 2.0a works too |
| 2560×1440 | 60Hz | Yes | HDMI 2.0a / DP 1.4 | DP 1.2 may work |
| 2560×1440 | 144Hz | Yes | DP 1.4 | HDMI 2.0a may struggle |
| 2560×1440 | 240Hz | Yes | DP 1.4 with DSC | HDMI 2.1 preferred |
| 3840×2160 | 60Hz | Yes | HDMI 2.0a / DP 1.4 | Common setup |
| 3840×2160 | 120Hz | Yes | DP 1.4 with DSC / HDMI 2.1 | DSC required for DP 1.4 |
| 3840×2160 | 144Hz | Yes | HDMI 2.1 / DP 2.1 | High bandwidth needed |
| 3840×2160 | 240Hz | Yes | HDMI 2.1 / DP 2.1 | Premium cables only |
DSC stands for Display Stream Compression. It's a visually lossless compression standard that allows higher resolutions and refresh rates over existing cable bandwidth. Both your GPU and monitor must support DSC for it to work.
Frequently Asked Questions
Does monitor curvature affect HDR performance?
No. The curve of a monitor has zero impact on HDR capability. HDR performance depends on peak brightness, color depth, local dimming, and contrast ratio.
The curve only affects viewing angle and immersion.
Why is HDR only available at 60Hz on my monitor?
Your cable or port likely doesn't have enough bandwidth for HDR at higher refresh rates. Use a DisplayPort 1.4 cable with DSC support or an HDMI 2.1 cable. Also check if your monitor's higher refresh rates are only available on specific ports.
Should I keep HDR on all the time?
For most people, no. HDR looks great in supported games and movies, but the Windows desktop and SDR content often look worse with HDR enabled. Turn it on when you need it and off when you don't.
Can I use HDR with a FreeSync or G-Sync monitor?
Yes. Adaptive sync and HDR work together. Look for monitors labeled "G-Sync Ultimate" or "FreeSync Premium Pro," which guarantee both features work simultaneously.
Why does HDR look darker than SDR on my monitor?
Your monitor's peak brightness is probably too low for effective HDR. On DisplayHDR 400 monitors, highlights can't get bright enough to stand out, making the overall image seem dim. Try increasing the SDR content brightness slider in Windows settings.
Do I need to enable HDR separately in each game?
Yes, usually. Windows-level HDR is the foundation, but most games have their own in-game HDR toggle and calibration settings. Enable both for the best results.
Final Checklist: Is HDR Actually Worth It for Your Gaming Setup?
Here's the honest answer. HDR is worth it if your monitor can actually deliver it. That means DisplayHDR 600 or higher, 10-bit color, and local dimming.
If your monitor meets those specs, HDR genuinely improves the gaming experience with better highlights, deeper blacks, and more vivid colors.
If your monitor is DisplayHDR 400 or just "HDR Ready," the experience will likely disappoint you. The toggle works, but the visual improvement is minimal or negative. In that case, save yourself the hassle and keep HDR off.
Quick decision guide:
- DisplayHDR 1000 or higher: Definitely use HDR. The experience is transformative.
- DisplayHDR 600: Use HDR in supported games. Turn it off for desktop use.
- DisplayHDR 400: Skip HDR. Your monitor can't deliver the brightness or contrast needed.
- No certification, just "HDR Ready": Skip HDR. It's a marketing label, not a capability.
The steps in this guide will get HDR working on any curved gaming monitor that genuinely supports it. The key is making sure every link in the chain, from GPU to cable to monitor OSD to Windows settings, is configured correctly. Miss one, and the whole thing falls apart.
HDR10 vs HDR10+ vs Dolby Vision: Which Matters for Gaming?
Not all HDR is created equal. You've probably seen HDR10, HDR10+, and Dolby Vision mentioned on monitor boxes and in game settings. Here's what actually matters for gaming on a curved monitor.
HDR10 is the baseline standard. It's open, royalty-free, and supported by virtually every HDR monitor and game. HDR10 uses static metadata, meaning one brightness and color setting applies to the entire content.
It works fine for most gaming scenarios.
HDR10+ adds dynamic metadata. Instead of one setting for the whole movie or game, it adjusts scene by scene. Samsung developed it, and it's primarily used in streaming content.
As of 2026, very few PC games support HDR10+. It's more relevant for console gaming and media consumption.
Dolby Vision is the premium tier. It uses 12-bit color depth and dynamic metadata. Dolby requires manufacturers to pay licensing fees, so it's rare on PC monitors.
Some Xbox games support it, but PC gaming support remains limited.
For curved gaming monitors, HDR10 is all you need. HDR10+ and Dolby Vision are nice to have, but the lack of game support on PC makes them irrelevant for most gamers. Don't choose a monitor based on HDR10+ or Dolby Vision support alone.
Why Your HDR Works in Games but Not on the Desktop
This is by design, not a bug. Windows treats HDR differently for desktop content versus full-screen HDR applications.
The Windows desktop is an SDR environment. When HDR is enabled, Windows tone-maps SDR content into the HDR signal space. This mapping is imperfect, which is why text can look fuzzy and colors can look off in desktop apps.
Games that support HDR natively switch the display into full-screen HDR mode. The game sends HDR metadata directly to the monitor, bypassing Windows' tone mapping. This is why HDR looks correct in games but not on your desktop.
The practical approach:
- Leave HDR off in Windows for daily use.
- Turn it on when launching an HDR-supported game.
- Some games auto-switch Windows HDR mode when launched. Others require you to toggle it manually.
- Windows 11's Auto HDR feature attempts to bridge this gap for SDR-only games, with mixed results.
Input Lag and HDR: What You Need to Know
HDR processing adds a small amount of input lag on most monitors. The signal needs to be tone-mapped and processed before reaching the panel. For competitive gaming, this matters.
Measured impact:
- Most monitors add 1-4ms of input lag in HDR mode.
- Some monitors with dedicated HDR processing chips keep this under 2ms.
- Monitors that lack a dedicated processor can add 5ms or more.
- OLED monitors typically have the lowest HDR processing lag because they don't need local dimming calculations.
For competitive gaming:
If you're playing ranked matches in games like Valorant, Counter-Strike 2, or Apex Legends, consider keeping HDR off. The visual benefit doesn't outweigh the input lag cost at competitive levels.
For single-player and casual gaming:
The added lag is imperceptible for most people. The visual improvement from HDR far outweighs a few milliseconds of processing delay.
HDR on Console vs PC: Why Your Xbox Gets It Easier
If you've used HDR on both a console and a PC with the same monitor, you've probably noticed it "just works" on the console. There's a good reason for that.
Consoles have a fixed hardware configuration. The Xbox Series X and PS5 know exactly what HDR capabilities they have. They output HDR10 by default and handle tone mapping at the system level.
PCs have infinite hardware combinations. Your GPU, cable, monitor, drivers, and Windows version all need to agree. One mismatch breaks the chain.
Console HDR setup:
- Enable HDR in the console's display settings.
- The console auto-detects the monitor's capabilities.
- Done.
PC HDR setup:
- Verify GPU support.
- Check cable and port.
- Enable HDR in monitor OSD.
- Enable HDR in Windows.
- Configure GPU control panel.
- Calibrate in-game HDR settings.
- Hope the EDID handshake doesn't fail.
If you're gaming on a curved monitor with a console, HDR setup takes about 30 seconds. On PC, it can take anywhere from 5 minutes to several hours of troubleshooting, depending on what's going wrong.
Final Checklist: Is HDR Actually Worth It for Your Gaming Setup?
Here's the honest answer. HDR is worth it if your monitor can actually deliver it. That means DisplayHDR 600 or higher, 10-bit color, and local dimming.
If your monitor meets those specs, HDR genuinely improves the gaming experience with better highlights, deeper blacks, and more vivid colors.
If your monitor is DisplayHDR 400 or just "HDR Ready," the experience will likely disappoint you. The toggle works, but the visual improvement is minimal or negative. In that case, save yourself the hassle and keep HDR off.
Quick decision guide:
- DisplayHDR 1000 or higher: Definitely use HDR. The experience is transformative.
- DisplayHDR 600: Use HDR in supported games. Turn it off for desktop use.
- DisplayHDR 400: Skip HDR. Your monitor can't deliver the brightness or contrast needed.
- No certification, just "HDR Ready": Skip HDR. It's a marketing label, not a capability.
The steps in this guide will get HDR working on any curved gaming monitor that genuinely supports it. The key is making sure every link in the chain, from GPU to cable to monitor OSD to Windows settings, is configured correctly. Miss one, and the whole thing falls apart.
However, since the instruction asks for the next 5 H2 headings and the article has covered all approved sections, there's nothing new to add without repeating content. The article stands at its natural conclusion with the final checklist decision guide.
If you'd like, I can expand any existing section with additional troubleshooting scenarios, add a new section on specific monitor model recommendations, or create a companion piece on optimizing HDR per game title.

Similar Posts