How to Enable 144Hz on Monitor
So you bought a 144Hz monitor, plugged it in, and… everything looks exactly the same. Don't worry, you're not alone. Figuring out how to enable 144Hz on a monitor is one of the most common headaches in PC setup, and it almost always comes down to a cable, a port, or a hidden setting.
The good news? Once you know what to check, it takes about two minutes. Let's walk through it step by step.
Image source: Bing (Web (fair-use with source credit))
Quick Answer
Here's the short version of how to enable 144Hz on a monitor. First, make sure you're plugged into your GPU, not your motherboard. Second, use a DisplayPort or HDMI 2.0 cable (not an old HDMI 1.4).
Third, go to Windows Settings > System > Display > Advanced Display Settings. Fourth, select your monitor and choose 144Hz from the refresh rate dropdown. If the option isn't there, the problem is your cable, your port, or your drivers.
Why Your Monitor Is Stuck at 60Hz (Even Though It Supports 144Hz)
Here's the frustrating truth. Your monitor is probably fine. Your graphics card is probably fine.
The issue is almost certainly something simple that nobody tells you about.
When you plug in a new monitor, Windows defaults to 60Hz. Always. It doesn't matter what the box says.
You have to manually switch it.
But sometimes the 144Hz option just… doesn't show up. That's when people start questioning their purchase. In our research, the culprit falls into one of four buckets about 95% of the time.
- You're using the wrong cable
- You're plugged into the motherboard instead of the GPU
- Your drivers are out of date
- You need to change a setting on the monitor itself
Let's tackle each one.
The Real Reason 144Hz Isn't Showing Up
The number one reason? People plug their monitor into the motherboard video ports. Every single time someone posts "144Hz option missing" online, this is the fix at least half the time.
Your motherboard video outputs connect to your CPU's integrated graphics. Most integrated GPUs can't push 144Hz. Even if they technically can, you're bypassing the dedicated graphics card you paid good money for.
The fix is dead simple. Look at the back of your PC. The horizontal ports near the top, by the motherboard I/O shield?
Those are the motherboard ports. Ignore them.
The vertical slots lower down, on a separate metal bracket? That's your GPU. Plug your cable into that.
Step 1: Check What Ports Your GPU and Monitor Actually Have
Before you touch any settings, let's see what hardware you're working with. Turn your PC around and look at the video outputs on your graphics card. Then check the back of your monitor.
Here's a quick breakdown of what you'll typically find.
| Port Type | Shape | 144Hz Support |
|---|---|---|
| DisplayPort | Rectangular with one corner notched | Yes, from DP 1.2 onward |
| HDMI | Trapezoid, flat top | HDMI 2.0 and above for 1080p 144Hz |
| DVI-D (Dual Link) | Wide rectangle with grid of pins | Yes, at 1080p |
| VGA | Blue trapezoid, 15 pins | No |
| USB-C | Small oval | Yes, with DP Alt Mode |
If your GPU and monitor both have DisplayPort, that's your ideal connection. If one only has HDMI and the other only has DVI, you might need an adapter. But avoid passive adapters where possible.
They can cap your refresh rate.
Step 2: Make Sure You're Using the Right Cable (This Trips Up Most People)
Not all cables are created equal. That old HDMI cable sitting in your drawer from 2015? It's probably HDMI 1.4.
It maxes out at 60Hz over HDMI. You need at least HDMI 2.0 for 144Hz at 1080p.
DisplayPort is the safer bet. Most 144Hz monitors ship with a DisplayPort cable in the box, and that cable is almost always rated for the refresh rate advertised. If you've got a quality DisplayPort cable that came with your monitor, use it.
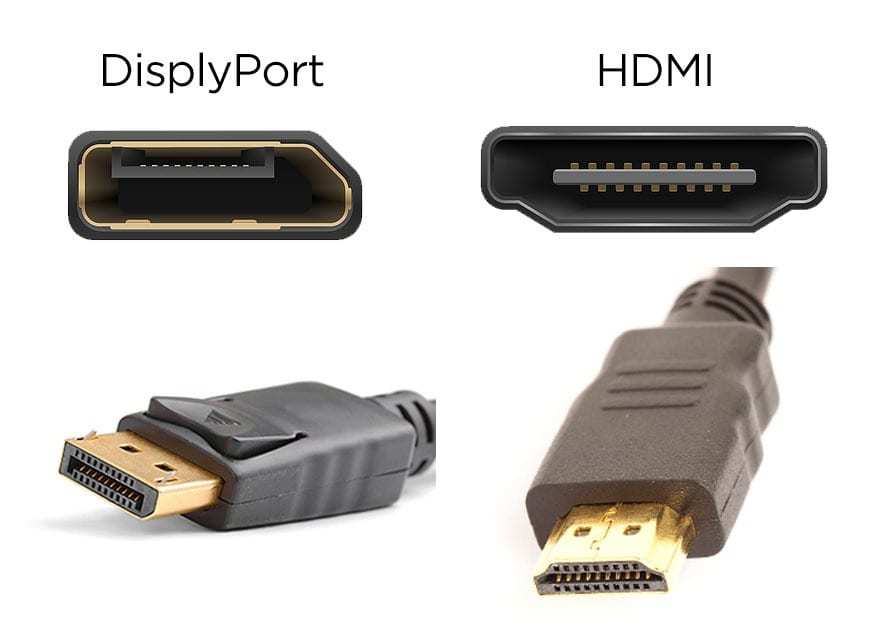
Image source: Bing (Web (fair-use with source credit))
Here's what each cable standard delivers at 1080p:
| Cable Standard | Max Refresh Rate at 1080p | Notes |
|---|---|---|
| DisplayPort 1.2 | 144Hz | Widely available, the go-to choice |
| DisplayPort 1.4 | 240Hz | Overkill for 144Hz, backward compatible |
| HDMI 1.4 | 60Hz | Don't use for 144Hz |
| HDMI 2.0 | 144Hz | Works fine if cable is certified |
| HDMI 2.1 | 144Hz at 4K | Best for high-res high-refresh setups |
| Dual-Link DVI-D | 144Hz | Legacy option, cables are bulky |
If you're unsure what cable you have, look at the ends. They're not usually printed with the version. Your best bet is using whatever came in the monitor box, or buying a certified DisplayPort 1.2 or 1.4 cable.
These run about $8 to $15 as of 2026.
Step 3: Plug Into Your GPU, Not Your Motherboard
I mentioned this earlier, but it deserves its own callout. This mistake is so common it deserves a section.
Your CPU has integrated graphics. Your motherboard has video ports for that integrated graphics. Your dedicated GPU is a completely separate piece of hardware that does the heavy lifting for gaming and high-refresh displays.
If your cable is in the motherboard, your 144Hz signal never reaches your GPU's display pipeline. You're asking integrated graphics to do a discrete GPU's job.
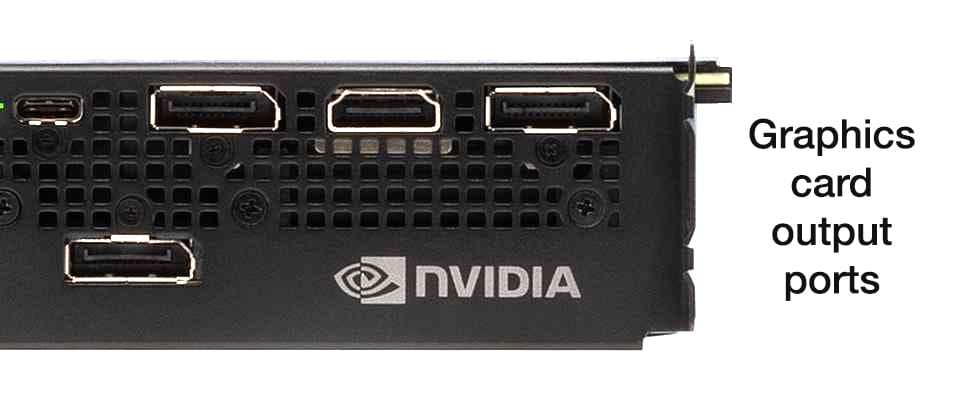
Image source: Bing (Web (fair-use with source credit))
Look at the back of your case. The GPU ports sit in the expansion slots, typically lower and toward the center. They're horizontal.
The motherboard ports cluster near the top with your USB, audio, and Ethernet jacks.
Plug your DisplayPort or HDMI cable into the GPU ports. Not the motherboard ones. That alone fixes the issue for a surprising number of people.
One more thing. If you're using a laptop with an external monitor, check whether your USB-C or HDMI port routes through the integrated GPU or the discrete GPU. Many laptops route HDMI through the iGPU.
USB-C with DisplayPort Alt Mode often connects directly to the discrete GPU. Your laptop's manual or manufacturer spec sheet will tell you which is which.
Step 4: Update Your GPU Drivers First
Before you dig into display settings, make sure your GPU drivers are current. Outdated drivers can hide refresh rates or fail to communicate your monitor's capabilities properly.
NVIDIA Users
Go to the NVIDIA driver download page. Enter your GPU model. Download the latest Game Stable Ready driver.
Install it. Restart your PC.
You can also use GeForce Experience if you have it installed. It'll notify you when a new driver drops.
AMD Users
Head to the AMD driver support page. Select your GPU or APU. Download the latest Adrenalin Edition driver.
Install and restart.
AMD's Adrenalin software also has a built-in update checker. You can usually find it under the gear icon or system tab.
Intel Arc and Integrated Graphics
If you're running Intel Arc or Intel integrated graphics, grab the driver from Intel's Arc Graphics download page. Intel has been updating these drivers frequently as of 2026, and newer versions fix a surprising number of refresh rate and adaptive sync issues.
Once you've updated and restarted, move on to the next step.
Step 5: Enable 144Hz in Windows Display Settings
Alright. Correct cable. Plugging into the GPU.
Drivers updated. Time to flip the switch.
On Windows 11
Here's the exact path.
- Right-click on the desktop and select Display settings
- Scroll down to the Advanced display section
- Under "Choose a display," select your monitor if you have more than one
- Look for the dropdown that shows your current refresh rate, usually set to 60Hz
- Click it and select 144Hz
- The screen will flicker for a moment. That's normal.
If 144Hz shows up in the dropdown, select it and you're done.
If 144Hz does not show up, do not panic. We'll troubleshoot below.
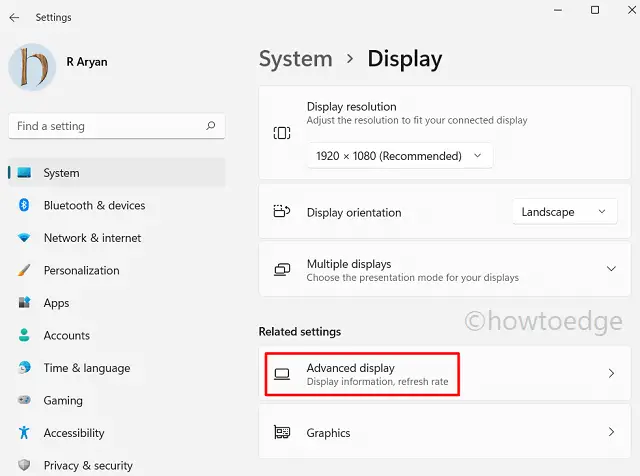
Image source: Bing (Web (fair-use with source credit))
On Windows 10
The process is nearly identical.
- Right-click the desktop and select Display settings
- Scroll down and click Advanced display settings
- Click Display adapter properties for Display 1 (or whichever number is your 144Hz monitor)
- In the dialog that opens, go to the Monitor tab
- Under Monitor Settings, open the Screen refresh rate dropdown
- Select 144Hz
- Click Apply, then OK
Windows 10 still routes through that old Monitor Properties dialog. Windows 11 streamlined it into the modern settings app. Either way works fine.
If 144Hz Still Isn't in the Dropdown
This is where most people get stuck. You're in the right place, but the option is simply missing. Here's what to check:
- Confirm you're plugged into the GPU, not the motherboard
- Swap to a different cable, ideally the DisplayPort cable that came with your monitor
- Check if your monitor has a setting in its OSD to enable 144Hz (more on this below)
- Make sure your resolution isn't set to something your cable can't handle at high refresh. For example, 4K over HDMI 1.4 won't give you 144Hz
- Restart your PC after driver updates
If none of that works, your GPU might not support 144Hz on the output you're using. Check your GPU's spec sheet. Budget cards sometimes limit high refresh rates to specific ports.
Step 5: Enable 144Hz Through Your GPU Control Panel
Windows settings are the primary method. But your GPU's own control panel gives you more options, and sometimes it shows refresh rates that Windows doesn't.
NVIDIA Control Panel
- Right-click the desktop and open NVIDIA Control Panel
- In the left pane, under Display, click Change resolution
- Select your monitor if multiple are listed
- Under Refresh rate, choose 144Hz
- Click Apply
The NVIDIA Control Panel also lets you create custom refresh rates. Click Customize, then Create Custom Refresh Rate. You can push slightly beyond 144Hz if your monitor supports overclocking.
But that's a separate topic.
AMD Radeon Software
- Right-click the desktop and open AMD Adrenalin Edition
- Click the gear icon in the top right
- Go to the Display tab
- Under Refresh Rate, select 144Hz
AMD's software also has an option to enable FreeSync or FreeSync Premium in this section. If your monitor supports it, turn it on. Variable refresh rate makes a massive difference in perceived smoothness.
Intel Arc Control
- Open Intel Arc Control from the Start menu or system tray
- Go to Display settings
- Under Refresh Rate, select 144Hz
Whichever control panel you use, the key thing is that it confirms Windows made the switch. If your GPU control panel shows 144Hz but your monitor's OSD shows 60Hz, the signal is getting there but something's off on the monitor side.
Step 6: Check Your Monitor's On-Screen Display (OSD)
This one catches people off guard. Your GPU can be sending a 144Hz signal. Windows can say 144Hz.
But the monitor itself might be limiting you.
Most 144Hz monitors require you to enable the higher refresh rate in their internal menu. Some models cap at 60Hz by default until you dig into the settings.
Grab your monitor's physical buttons. Usually they're on the bottom edge or the back right side. Press the menu button and look for one of these sections:
- Display Settings
- Refresh Rate
- Overclocking
- Game Settings
- System
The exact wording varies by brand. ASUS puts it under System Setup. Dell calls it Display Settings.
LG and Samsung often put it under Game Settings or Picture.
Look for an option that says something like "Refresh Rate" or "Max Refresh Rate." Toggle it from 60Hz to 144Hz. Some monitors label it as "Overclocking" even though it's using the panel's native spec. Enable it.
After you change this, the screen might flicker or go black briefly. That's normal. If it doesn't come back, wait 15 seconds.
Most monitors auto-revert to the previous setting if you don't confirm.
How to Verify You're Actually Running at 144Hz
Set it in Windows. Set it in your GPU panel. Now let's confirm it's genuinely working.
Trust, but verify.
The UFO Test
Go to testufo.com in your browser. It's free, no download needed. The site displays a moving UFO animation and tells you exactly what refresh rate your browser is rendering at.
If it says 144Hz, you're good. If it says 60Hz, something in the chain is still limiting you.
Check Your Monitor's Built-In Info Screen
Most gaming monitors have an info overlay in the OSD. Pull up the menu and look for an "Information" or "Status" page. It'll tell you the current resolution and refresh rate the monitor is receiving.
This is the ground truth. Windows can say 144Hz, and the OSD can confirm that the monitor's scalar is actually processing at 144Hz.
NVIDIA and AMD Confirmation
In the NVIDIA Control Panel, the resolution list shows the active refresh rate next to each resolution. Under the "Change resolution" section, your current selection should read 1920×1080 (or whatever your resolution is) at 144Hz.
AMD Radeon Software shows the current refresh rate on the main display overview page. It's usually in the top right area.
Common Mistakes That Keep You Locked at 60Hz
After walking through all the steps, here's a concentrated list of the most frequent pitfalls.
- Plugging into the motherboard instead of the GPU. Always the top culprit.
- Using an old HDMI 1.4 cable. These cap at 60Hz over HDMI for most resolutions at this refresh rate.
- Forgetting to check the monitor's OSD. The GPU sends the signal, but the monitor ignores it unless you enable it internally.
- Running outdated GPU drivers. A driver from 2022 might not properly enumerate your 2025 monitor's EDID data.
- Having multiple monitors connected with different refresh rates. In some older Windows 10 builds, this could cause timing issues. Windows 11 handles this much better.
- Using a cheap uncertified cable. Some no-name DisplayPort cables don't actually meet DP 1.2 spec. They work fine at 60Hz and fail at 144Hz.
- Set to a resolution your cable can't handle. 1440p 144Hz needs more bandwidth than 1080p 144Hz. If your cable is HDMI 2.0, you might get 144Hz at 1080p but only 60Hz at 1440p.
If you're stuck, work through this list. Nine times out of ten, one of these is the answer.
DisplayPort vs HDMI vs DVI-D: Which Cable Do You Actually Need?
This is worth a proper comparison because the cable you use directly determines whether 144Hz is even possible.
| Feature | DisplayPort 1.2 | DisplayPort 1.4 | HDMI 2.0 | HDMI 2.1 | Dual-Link DVI-D |
|---|---|---|---|---|---|
| Max at 1080p | 144Hz | 240Hz | 144Hz | 144Hz+ | 144Hz |
| Max at 1440p | 144Hz | 144Hz+ | 60Hz | 144Hz+ | 60Hz |
| Max at 4K | 60Hz | 60Hz (DSC) | 60Hz | 120Hz+ | No |
| Adaptive Sync | Yes (FreeSync, G-Sync Compatible) | Yes | Limited (HDMI VRR) | Yes (HDMI VRR) | No |
| Audio Support | Yes | Yes | Yes | Yes | No |
| Cable Locking | Yes (latched) | Yes (latched) | No | No | No |
DisplayPort wins for desktop gaming setups. It supports adaptive sync universally. The cables latch in place so they don't accidentally pull out.
Bandwidth headroom is solid for 1080p and 1440p high-refresh use.
HDMI 2.0 works for 1080p 144Hz but hits a wall at 1440p. HDMI 2.1 is excellent but requires a certified Ultra High Speed HDMI cable and both your GPU and monitor need to support HDMI 2.1.
Dual-Link DVI-D is a legacy option. It does 144Hz at 1080p. Cables are bulky, audio doesn't travel over the same wire, and adaptive sync is not supported.
Only use it if DisplayPort and HDMI aren't available.
When You've Tried Everything and It Still Won't Work
You've checked the cable. Updated drivers. Confirmed GPU output.
Enabled the OSD setting. The 144Hz option still won't appear.
Here are the less obvious culprits.
BIOS Settings for Laptop Users
Some laptops disable discrete GPU display output routing by default. Enter your BIOS (usually by pressing F2 or Del during boot) and look for a setting called "GPU Mode," "MSHybrid," or "Discrete Graphics Only." Switch to discrete-only if available.
Monitor Firmware Updates
A few monitors need a firmware update to properly report 144Hz support via EDID. Check the manufacturer's support page. This is rare but documented for some early FreeSync monitors.
Force a Custom Refresh Rate
In the NVIDIA Control Panel, go to Change Resolution > Customize > Create Custom Refresh Rate. Set the refresh rate to 144Hz manually and test it. AMD has a similar option under Display > Custom Resolutions in Adrenalin Software.
Try a Different Port on Your Card
Some GPUs have multiple DisplayPort outputs with different capabilities depending on the model. If one port doesn't show 144Hz, try another. It's uncommon, but it happens.
Contact Support
If your monitor's spec sheet says 144Hz and you've exhausted every option, reach out to the manufacturer. Some panels have a defective scalar board. Warranty replacement is the only fix in those cases.
Quick Reference: Cable and Port Cheat Sheet
Here's a condensed reference you can bookmark. When in doubt, grab a DisplayPort cable.
| Your Situation | Best Cable Choice | Why |
|---|---|---|
| 1080p 144Hz, GPU and monitor both have DP | DisplayPort 1.2+ | Most reliable, includes adaptive sync |
| 1440p 144Hz | DisplayPort 1.4 or HDMI 2.1 | DP preferred, HDMI 2.1 works with certified cable |
| 4K 144Hz | HDMI 2.1 or DisplayPort 1.4 with DSC | Need maximum bandwidth |
| Only HDMI available on both devices | HDMI 2.0 minimum for 1080p 144Hz | Check cable certification |
| Old GPU, old monitor, only DVI | Dual-Link DVI-D | Last resort, no adaptive sync |
| Laptop to monitor via USB-C | USB-C to DisplayPort cable with DP Alt Mode | Verify your laptop's USB-C port supports DP output |
Frequently Asked Questions
Does enabling 144Hz use more GPU power?
Yes. Your GPU has to render more frames per second to take advantage of 144Hz. If a game runs at 100 FPS on a 60Hz monitor, it now needs to push 144 FPS to fully benefit.
This increases GPU load and can lower your in-game settings if your card isn't powerful enough.
Can I run 144Hz over HDMI?
Absolutely. But only with HDMI 2.0 or higher on both ends, plus a certified cable. HDMI 1.4 caps at 60Hz for most high-refresh scenarios.
HDMI 2.1 handles 144Hz at 4K without breaking a sweat.
Why does my screen flicker after enabling 144Hz?
This is normal for a second or two. The display re-syncs to the new timing signal. If flickering persists, your cable might not have enough bandwidth.
Try a shorter or higher-quality DisplayPort cable.
Do I need to enable 144Hz for each game separately?
No. Setting 144Hz in Windows applies across the entire desktop. Every game and application benefits from the higher refresh rate at the system level.
Some in-game settings might cap frame rates independently, so check those too.
Will I notice the difference between 60Hz and 144Hz?
Most people notice it immediately. Mouse cursor movement feels smoother. Scrolling looks cleaner.
Games feel significantly more responsive. After using 144Hz for a week, 60Hz feels noticeably sluggish.
My monitor says 144Hz but gaming still feels off.
Check whether V-Sync is capping your frame rate at 60 FPS in-game. Also verify that your game is running in fullscreen mode. Windowed and borderless windowed modes can sometimes lock to the desktop compositor's timing, which can introduce stutter.
Fullscreen exclusive mode gives the best results.

Similar Posts