How to Check Resolution of Office Monitor
Figuring out how to monitor is one of those tasks that sounds dead simple until you're clicking through menus and the number displayed doesn't match what you expected. Your monitor's resolution affects text sharpness, how much fits on screen, and whether everything looks crisp or slightly soft. The good news is every operating system gives you a way to check, and most of them take under ten seconds once you know where to look.
The most common resolutions on office monitors as of 2026 are 1920×1080 (Full HD), 2560×1440 (QHD), and 3840×2160 (4K UHD). Your operating system displays the active resolution, and if you see anything below your panel's native number, there's usually a fix. Let's walk through it for every major platform, plus what to do when the software reading doesn't tell the full story.
The One-Second Check Every Operating System Has Built In
Every modern operating system ships with a built-in display settings panel that shows the current resolution. You don't need third-party tools, command lines, or any technical background. The path varies by OS, but the principle is the same: open display settings, find the resolution field, and confirm the number matches your monitor's native spec.
Here's where to find it at a glance:
| Operating System | Menu Path | What You See |
|---|---|---|
| Windows 11 | Right-click desktop → Display settings → Display resolution | Dropdown with resolution options, "Recommended" flagged |
| Windows 10 | Right-click desktop → Display settings → Resolution | Dropdown with resolution options, "Recommended" flagged |
| macOS | Apple menu → System Settings → Displays | Resolution list with "Default" and scaled options |
| ChromeOS | Settings → Device → Displays | Resolution dropdown with display name shown |
| Linux (GNOME) | Settings → System → Display | Resolution dropdown with "Recommended" option |
The "Recommended" or "Default" option in each menu typically equals your monitor's native resolution. Manufacturer specifications confirm that running at native resolution delivers the sharpest image since each pixel maps one-to-one with the panel's physical grid. If you see a lower number selected, that's likely why things look softer than expected.
Windows 10 & 11: Step-by-Step Through Display Settings
Windows is the most common office environment, so let's get this one nailed down first.
For Windows 11:
- Right-click any empty area on your desktop.
- Click "Display settings" in the context menu.
- Scroll to the "Display resolution" dropdown under the Scale & layout section.
- The current resolution shows as a number like 1920×1080. The one marked "Recommended" is your panel's native maximum.

For Windows 10:
- Right-click the desktop background.
- Select "Display settings."
- Under "Scale and layout," find the "Resolution" dropdown.
- Again, "Recommended" marks the native spec.
If you're running multiple monitors, click the display number at the top of the settings window first. Each screen gets its own resolution setting. Microsoft's documentation states that incorrect GPU drivers are the leading cause of missing resolution options on Windows systems.
When the dropdown shows only lower resolutions than your panel supports, updating your graphics driver usually unlocks the full range.
Quick tip: You can also open the NVIDIA Control Panel, AMD Software, or Intel Graphics Command Center for more detailed readout including refresh rate and color depth. We'll cover those later in this article.
macOS: Where Apple Actually Hides the Resolution Info
Apple moved things around starting with macOS Ventura, so if you're used to older versions, the location changed.
On macOS Ventura, Sonoma, and Sequoia:
- Click the Apple menu in the top-left corner.
- Open "System Settings."
- Click "Displays" in the left sidebar.
- Your connected monitor appears. The current resolution shows as part of the resolution options.

By default, macOS uses a scaled resolution on many displays, especially 4K and 5K panels. The interface shows options labeled "Larger Text" through "More Space" rather than raw pixel numbers. To see the actual numerical resolution, hold Option while clicking the resolution option, and macOS reveals the native pixel values for each scaled point.
To see full technical details:
- Click the Apple menu.
- Hold Option and click "System Information" (replaces "About This Mac" with Option held).
- Under Graphics/Displays in the left panel, select your display.
- The exact resolution, pixel density, and refresh rate all appear in one detailed block.
This method gives you the ground truth the simplified settings menu hides. Useful when confirming whether your monitor truly runs at native resolution or sits at a scaled intermediate step.
For older macOS versions (Monterey and earlier): Go to System Preferences → Displays, and click "Scaled" to view all native and scaled options directly.
ChromeOS: The Simplest Method You'll Find
ChromeOS keeps display management lightweight, which works in your favor here.
- Click the clock area in the bottom-right system tray.
- Click the gear icon to open Settings.
- On the left sidebar, click "Device," then select "Displays".
- The "Display resolution" dropdown shows your current setting.
ChromeOS also detects your monitor's name and native spec automatically. When connected to an external display via USB-C or HDMI, ChromeOS lists both the internal laptop screen and the external monitor separately. Each gets its own resolution dropdown.
The catch? ChromeOS resolution options depend heavily on what the cable and port support. Aggregate user reports indicate that some USB-C hubs and older HDMI connections limit ChromeOS to 1920×1080 even when the panel supports higher.
Confirming your cable version and port capability matters here.
If the resolution looks capped, try connecting directly with a certified HDMI 2.0 or DisplayPort cable rather than through a hub. That simple swap often unlocks the full native spec instantly.
When the OS Lies: Using Your GPU Control Panel Instead
Operating systems don't always tell the whole story. Sometimes Windows reports 1920×1080 when the monitor supports 2560×1440, or macOS hides the actual pixel value behind scaled labels. That's when you bypass the operating system's display layer and read data directly from the graphics driver.
The OS may oversimplify things, or a generic driver might not parse the monitor's Extended Display Identification Data (EDID) correctly. The GPU control panel reads that same EDID data straight from the display hardware, bypassing any OS-level shortcuts.
If you have an NVIDIA GPU:
- Right-click the desktop and select "NVIDIA Control Panel."
- Expand "Display" in the left panel, then click "Change resolution."
- The right panel shows your current resolution, refresh rate, color depth, and the full list of supported modes. Your monitor's native option sits at the top of the "PC" section.
If you have an AMD GPU:
- Right-click the desktop and open "AMD Software" (Adrenalin Edition).
- Click the gear icon, then select "Display" from the top menu.
- Current resolution, refresh rate, and the display's supported resolutions appear together.
If you have integrated Intel Graphics:
- Right-click the desktop and select "Intel Graphics Command Center" (or search for it in Start).
- Click "Display" in the left sidebar.
- Resolution, refresh rate, and scaling all show under the General Settings tab.
Each of these tools also reports the cable type the driver detects (HDMI, DisplayPort, USB-C) and the link bandwidth in use. That insight matters when troubleshooting lower-than-expected resolution, which we'll get to shortly.
The Monitor's Own OSD Menu: The Ground Truth Nobody Checks
Your monitor has a tiny built-in diagnostic screen, accessible through physical buttons on the panel itself. People walk past this for years without opening it, but it shows exactly what signal the monitor currently receives, not what the computer thinks it's sending. Your monitor's on-screen display pulls the information directly from the incoming video signal.
It reports the exact horizontal and vertical pixel count the graphics card is output, the refresh rate, and sometimes the input source and firmware version.
How to access it:
- Locate the physical buttons on your monitor (usually on the bottom bezel, right edge, or back panel). Most modern office monitors from Dell, HP, LG, Samsung, and BenQ use either a joystick-style button or a row of tactile press buttons.
- Press the labeled Menu button (or the button that opens the OSD) while the monitor is on and connected.
- Navigate to an "Information," "Support," or "System" section within the menu tree.
- You'll see the current input resolution listed along with the vertical frequency (refresh rate).
On many Dell UltraSharp panels, the information lives under Menu → Display Settings → Factory Reset area or in a top-level Information tab. On the LG 27UN850 and similar UltraFine displays, pressing the joystick once shows input info overlaid on screen. Some monitors allow you to pin an input info overlay to the display corners, persistent on screen, which is helpful for confirming the exact mode while you adjust settings on your PC.
Why trust the OSD over the OS? Because the monitor never lies about the signal it receives. If Windows says 2560×1440 but the OSD reports 1920×1080, the OS might be sending a scaled image or the cable might be limiting bandwidth.
The OSD gives you the hard reality to work backward from.
Native vs. Scaled: Why the Number You See Might Not Be the Real Number
Operating systems love to make your 4K monitor behave like a lower-resolution display by rendering everything at a lower pixel count and then upscaling it. This scaling function keeps text and UI elements readable on high-density panels. On Windows, scaling shows as a percentage like 125% or 150%.
On macOS, the default mode is a scaled mode that chooses a virtual resolution and then maps it to the physical panel.
When scaling is active, the number you see in Display Settings might not match the panel's native spec. A 3840×2160 (4K) display with 150% scaling "feels" and reports at roughly 2560×1440 equivalent for layout purposes, even though 3840×2160 pixels are still lighting up on the panel.
How to check whether you're running scaled:
- Windows: Go to Settings → Display → Scale & layout. The "Scale" field shows 100%, 125%, 150%, or something similar. 100% means no scaling (native pixel-to-pixel). Anything higher means the OS renders virtually and upscales.
- macOS: Hold Option while clicking the resolution options in Displays settings. The detailed readout reveals the true rendered pixel dimensions, separate from what the panel natively displays.
Running scaled at a different ratio than intended causes slightly softer text, especially in older apps that don't handle scaling well. If you get a new monitor and text looks fuzzy at what you believe is native resolution, check the scaling slider first. Adjusting it to the right percentage clears up most blurriness issues instantly.
Your panel's native resolution is still there; the OS is just choosing how big the interface elements appear on top of it.
Bandwidth Bottlenecks: Cables, Ports, and Docks That Cap Your Resolution
Your cable and connector type determine the ceiling for resolution and refresh rate. Even a capable 4K panel gets stuck at 1920×1080 when the connection hardware caps the throughput.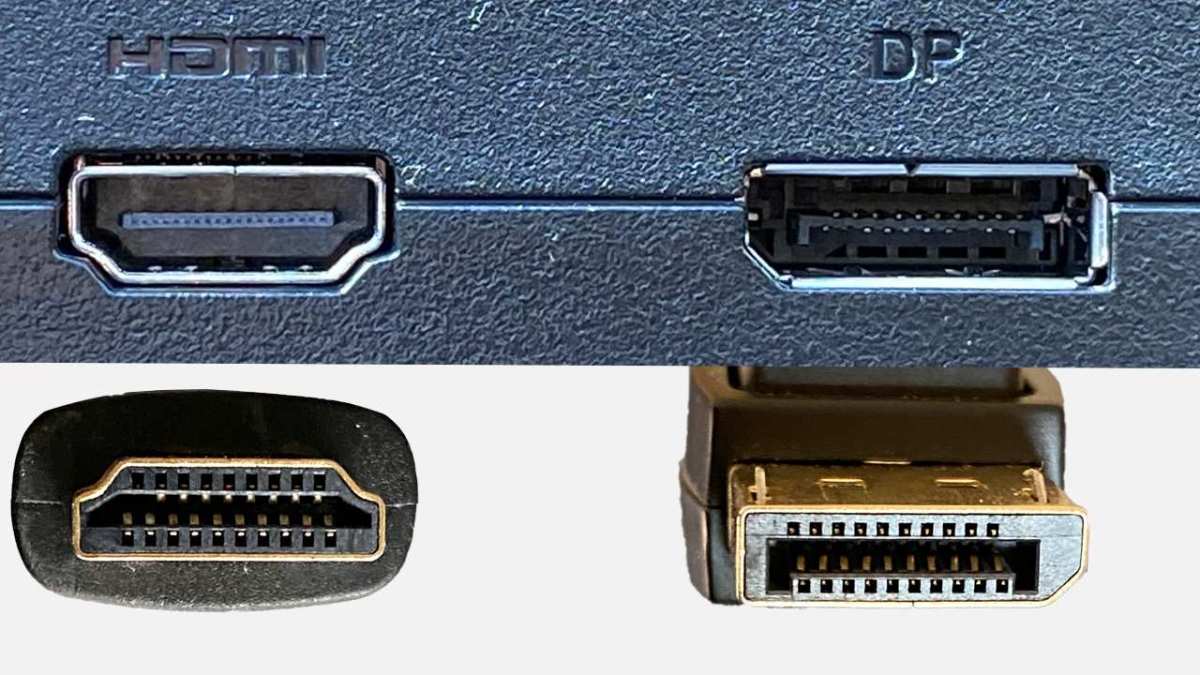
Maximum resolution by cable and version:
| Cable / Port Version | Max 4K (3840×2160) Support | Max Refresh at 4K |
|---|---|---|
| HDMI 1.4 | Yes, limited to 30Hz | 30Hz |
| HDMI 2.0 | Yes at 60Hz | 60Hz |
| HDMI 2.1 | Yes at 120Hz, DSC enables higher | 120Hz |
| DisplayPort 1.2 | Yes at 60Hz | 60Hz |
| DisplayPort 1.4 | Yes at 120Hz with DSC | 120Hz |
| DisplayPort 2.1 | Yes, up to 8K at 60Hz | 120Hz+ with DSC |
| USB-C (DP Alt Mode) | Depends on underlying DP spec | Varies |
| Thunderbolt 3 | 4K at 60Hz per display | 60Hz |
| Thunderbolt 4 / USB4 | Up to 8K with DSC | 60Hz+ |
The key spec to check is the version printed on your cable or in your laptop's port documentation. A cable labeled only "HDMI" without a version number might be HDMI 1.4, which supports 4K only at 30Hz. For office use where you want crisp text and a comfortable 60Hz refresh, HDMI 2.0 or DisplayPort 1.2 minimum is the baseline.
Docking stations add another layer of complexity. Many popular USB-C docks share a single DisplayPort lane between multiple video outputs. Running one 4K display at 60Hz uses nearly all available bandwidth.
Adding a second 4K display to the same dock often forces the first down to 30Hz. When you see a dock that promises dual 4K, check whether both run at 60Hz simultaneously or fall back to 30Hz. The product specification sheet usually clarifies this under "max simultaneous displays" or "max resolution per port." Budget docks without DisplayPort 1.4 or Thunderbolt controller chips tend to cap at single 4K 60Hz, with secondary outputs limited to 1920×1080 or 30Hz 4K.
Multi-Monitor Setups: Checking Each Display Independently
Running two or more monitors means each one maintains its own resolution setting. The OS doesn't apply one resolution to all screens simultaneously unless you mirror displays (duplicating the same image). Check each panel individually in Display Settings or System Settings by selecting the corresponding numbered display tile.
In Windows, click "Identify" to flash large numbers on each physical screen, then match the on-screen digit to the numbered tile in settings. That tells you exactly which display you're configuring before you change anything.
For macOS, open Displays settings and click "Gather Windows" if your GPU control panel (NVIDIA or AMD) pops up separately. Each display gets its own resolution dropdown. When you hold Option and click Scaled before selecting a resolution, macOS lists all supported modes for that exact panel.
Linux users on GNOME see a similar layout under Settings → Display. KDE Plasma users find equivalent controls in System Settings → Display and Monitor. Select the display from the diagram at the top, and the resolution dropdown updates to reflect that panel's supported modes.
A common mistake after connecting a second display is assuming both run at highest spec independently. In extended desktop mode, each monitor can run at its own native resolution regardless of what the other uses. A 4K primary next to a 1080p secondary is completely normal.
Text and windows scale per display in modern operating systems, though older Linux desktop environments sometimes treat scaling globally, leading to oddities when mixing pixel densities.
Refresh Rate vs. Resolution: Two Different Things People Confuse
People mix these up constantly, so let's clear it once. Resolution is the number of pixels on the screen (1920×1080, 3840×2160). Refresh rate is how many times per second the screen redraws the image (60Hz, 144Hz).
Both show up in the same settings menus, which causes the confusion. Your resolution determines real estate. Refresh rate determines motion smoothness, which matters for scrolling and video but little for static office work.
Most office monitors run at 60Hz. Pushing to 75Hz or 120Hz makes cursor movement feel smoother and reduces eye fatigue during long work sessions. You can check your refresh rate in the GPU control panels we covered earlier, or on Windows: advanced display settings list both the current resolution and the current refresh rate.
Common Problems and How to Fix Them
Resolution stuck at 1920×1080 on a 4K monitor:
- Check your cable version first. HDMI 1.4 caps 4K at 30Hz and many OSes hide the 60Hz option when bandwidth isn't there.
- Try a certified HDMI 2.0 or DisplayPort 1.2 cable, or better.
- Update your GPU driver from the manufacturer's site, not Windows Update. Generic plug-and-play drivers often don't expose the full resolution range.
Text looks blurry after setting native resolution:
This usually means scaling is above 100%. On Windows, go to Scale & layout and try 100%, though on high-PPI panels that can make things uncomfortably small. On macOS, hold Option while clicking resolution options and confirm the actual rendered pixel count.
Resolution resets after sleep or reboot:
Update your monitor driver. Windows often uses a generic "Generic PnP Monitor" driver. Downloading the specific driver or INF file from Dell, HP, or your manufacturer's support site helps the OS remember the correct resolution profile across reboots.
Multiple monitors show the wrong panel on the wrong number:
Click "Identify" in Windows Display settings or "Gather Windows" in macOS Displays. Then drag the numbered tiles to match the physical arrangement on your desk. This prevents you from configuring the wrong panel.
When to Worry (and When You Don't Need To)
A mismatched resolution causesable eye strain, wasted screen space, and frustration for detail-oriented work. But it won't damage your hardware. Your panel simply scales whatever signal it receives to fill the screen.
Going a month at 1080p on a 4K panel won't degrade the display or void your warranty.
The time to dig deeper is when resolution options after driver updates still seem capped. That can indicate a failing cable, a dock reaching end of life, or a port running in a lower-bandwidth mode due to firmware. Factory reset the monitor via its OSD, check for firmware updates, and swap cables before suspecting hardware failure.
Permanent resolution issues after exhausting these steps may point to a failing panel controller, which typically means replacement rather than repair is the practical answer.
Frequently Asked Questions
Can I run a monitor at a resolution higher than its native spec?
No. Your panel has a fixed physical pixel grid. Anything above native gets downscaled by the monitor's internal processor, which actually makes image quality worse.
Stick with the native resolution for the sharpest result. Custom resolutions above native spec are not recommended for daily use.
DoesHDMI always support 4K?
Not always. HDMI 1.4 supports 4K only at 30Hz, which feels sluggish for productivity. For 4K at 60Hz, you need HDMI 2.0 or DisplayPort 1.2 minimum.
Many budget cables don't have version markings, so if you're unsure, swap in a certified cable rated for your target spec.
Do monitors lose resolution over time?
No. The panel's physical pixel count never changes. If resolution suddenly drops, the cause is always software: driver regression, cable degradation, OS glitch, or dock firmware issue.
Rolling back the driver or swapping the cable typically resolves it.
What resolution is best for office work?
For 24-inch monitors, 1920×1080 (1080p) remains the practical standard with sharp text at 100% scaling. For 27-inch panels, 2560×1440 (QHD) offers noticeably more workspace without requiring scaling that can introduce blur in legacy apps. At 32 inches and above, 3840×2160 (4K) gives excellent density and detail at 150% scaling on modern operating systems.
Match resolution to panel size and viewing distance for the best experience without unnecessary scaling workarounds.

Similar Posts