What Is Overdrive on Gaming Monitors

If you've ever poked around in your monitor's settings menu and seen an option labeled "Overdrive" with choices like Off, Normal, and Extreme, you're not alone. Understanding what is overdrive on gaming monitors comes down to one thing: it's a feature that speeds up how fast your pixels change color, which directly affects how clear and sharp moving objects look on screen. It's one of the most impactful settings you can adjust, and the best part is it costs you absolutely nothing to toggle.
The catch? Crank it too high and you'll introduce bright halos behind moving objects that look worse than the original problem. Per Blur Busters' testing standards and ISO 9241-302 display ergonomics measurements, the optimal overdrive setting is almost never the highest one.
Let's break down exactly what's happening, how to find the right level, and when you should leave it alone entirely.
The Quick Answer You Need
Overdrive is a monitor setting that applies extra voltage to liquid crystal pixels, forcing them to change color faster. This reduces ghosting and motion blur during fast movement in games. The trade-off is that too much overdrive causes overshoot, which creates bright halos behind moving objects.
The best setting is almost always the middle option, not the highest one.
Why Overdrive Actually Matters for Gaming
Here's the core problem. Even if your monitor says "1ms response time" on the box, that's a best-case measurement under ideal lab conditions. In real-world use, average gray-to-gray transitions are slower.
For competitive FPS gamers playing titles like CS2, Valorant, or Apex Legends, those extra milliseconds of smearing make it harder to track moving targets and spot enemies during flick shots.
For single-player and cinematic gamers, the difference is less critical but still noticeable. Panning the camera across a landscape in Cyberpunk 2077 or Elden Ring looks noticeably cleaner with proper overdrive enabled versus off. It's one of those settings where once you see the difference, you can't unsee it.
The beauty of overdrive is that it's processed entirely on the monitor's scalar board. There's zero performance hit on your GPU or CPU. It's a free upgrade to your visual clarity.
How Overdrive Works (Without the Engineering Textbook)
The pixel transition problem
Every pixel on your LCD monitor works by twisting liquid crystal molecules to control how much light passes through. When your display needs to change a pixel from one shade of gray to another, those physical molecules have to rotate. That rotation takes time, and that time is what creates ghosting, the faint trail you see behind fast-moving objects.
The speed of this rotation depends on the voltage applied. Higher voltage means faster rotation. But normal voltage is already calibrated for the panel's intended refresh cycle.
Voltage as the solution
Overdrive works by temporarily applying a higher voltage spike to each pixel during a transition. Think of it like giving the liquid crystal molecules a stronger push so they reach their target position faster. This is technically called Response Time Compensation, or RTC.
The monitor's scalar chip calculates how much extra voltage to apply based on the starting and ending color values of each pixel transition.
Why one setting doesn't fit all
Not all pixel transitions are equally slow. On most panels, dark-to-dark transitions (like dark gray to slightly lighter dark gray) are the slowest and benefit the most from aggressive overdrive. Meanwhile, light-to-light transitions are already fast and need very little help.
This is why overdrive is a balancing act. A setting that fixes one type of transition might overcorrect another.
This is the fundamental reason why overdrive isn't just "on or off." It requires levels, and finding the right level depends on your specific panel, your refresh rate, and even what you're playing.
The Three Things Overdrive Can Do to Your Image
Overdrive isn't purely good or bad. It has three distinct effects on your image, and understanding all of them is the key to dialing it in correctly.
Reduce ghosting (the good)
At its best, overdrive noticeably sharpens moving objects. Text scrolls more cleanly. Camera pans look crisper.
Player models in competitive shooters have less smearing around their edges. This is the entire reason the feature exists, and when it's set correctly, the improvement is immediately visible.
Cause overshoot / inverse ghosting (the bad)
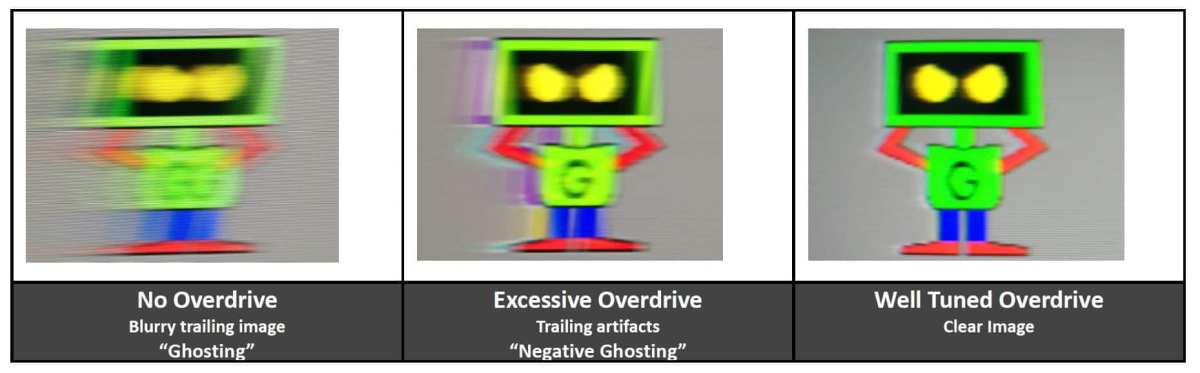
Here's where most people go wrong. When you push too much voltage to a pixel, it overshoots its target color and has to swing back. You see this as a bright corona or halo trailing behind dark objects on light backgrounds.
It's called inverse ghosting because it's essentially the opposite of traditional ghosting, a bright trail instead of a dark one. Ironically, it can be more distracting than the original smearing you were trying to fix.
Introduce black smear on VA panels (the ugly)
VA panel owners, this one's for you. VA pixels have notoriously slow transitions from full black to dark gray. Manufacturers often apply aggressive overdrive to compensate, but this causes pixels to overshoot past the target and then fall back, creating a dark smearing effect called "black smear." It looks like dark, inky trails behind moving objects.
In some cases, VA monitors actually look worse with overdrive enabled than they do with it off. If you're on a VA panel and seeing weird dark trails, try dropping the overdrive setting immediately.
Understanding Overdrive Settings in Your OSD
Why "Extreme" is almost always wrong
This is the single biggest mistake people make. You see "Extreme" in the menu and think "more is better." It's not. The Extreme setting applies maximum voltage to every pixel transition regardless of what that transition actually needs.
On the vast majority of monitors, Extreme produces obvious overshoot artifacts that are worse than having no overdrive at all.
The sweet spot is usually medium
Across dozens of monitors tested by reviewers using pursuit camera photography and tools like the UFO Test at TestUFO, the pattern is remarkably consistent.
| Overdrive Level | What Typically Happens | Who It's For |
|---|---|---|
| Off | Visible ghosting, smeared motion | Professional color work where motion doesn't matter |
| Low / Normal | Minor ghosting reduction, no artifacts | Conservative users, VA panel owners |
| Medium / Normal (higher tier) | Best balance of speed and accuracy | Most gamers, most panels |
| High / Fast | Noticeable overshoot starting to appear | Competitive users on well-tuned IPS panels |
| Extreme / Maximum | Heavy inverse ghosting, bright halos | Almost no one, almost no monitor |
The naming isn't standardized. ASUS might call it "Normal" while BenQ calls the equivalent "Fast" and another brand labels it "Middle." What matters is the position in the hierarchy, not the label. Start at the middle setting.
Move up one level. Check for overshoot. If you see bright halos, go back down.
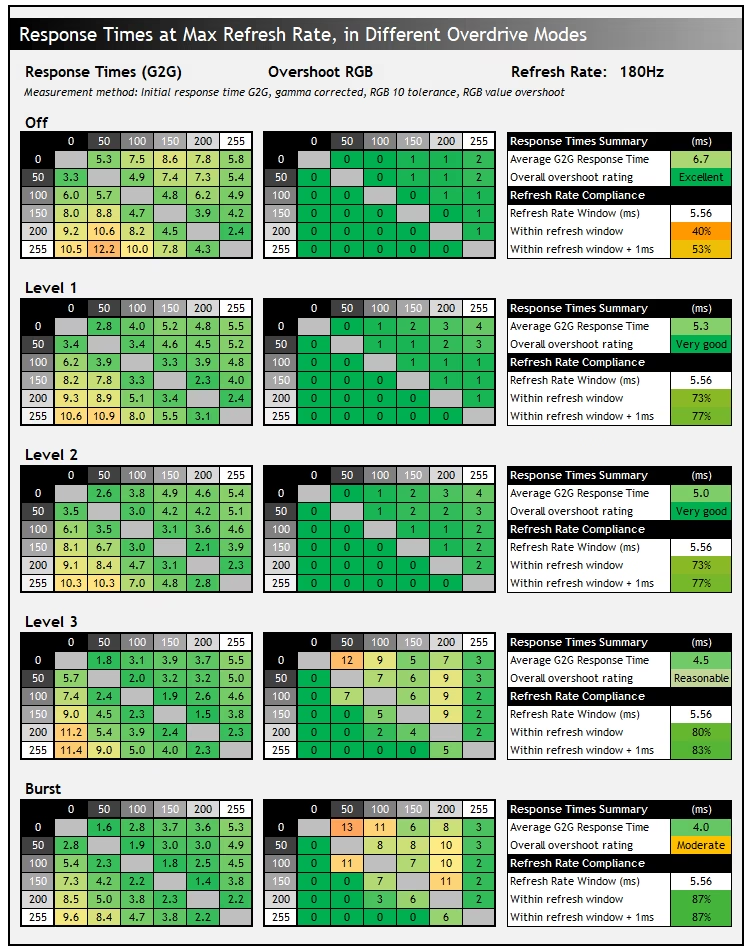
The exact optimal setting also varies unit to unit, even within the same monitor model. This is due to panel binning. Two identical monitors from the same production line can behave slightly differently.
This is why it's worth taking five minutes to test yours personally rather than copying someone else's setting blindly.
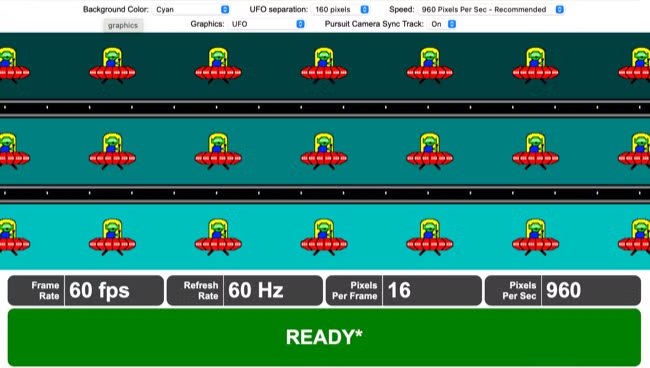
Image source: Bing (Web (fair-use with source credit))

Similar Posts