How to Use USB C Monitor with MacBook

Image source: Bing (Web (fair-use with source credit))
Figuring out how to use USB-C monitor with MacBook can be surprisingly frustrating when it works differently than expected. Let us help you get it right. Most of the time it is straightforward, but a few key details about your MacBook and cable decide whether it goes smoothly or turns into a resolution, refresh rate, or charging headache.
The experience comes down to three things: what your specific MacBook supports, what your USB-C cable actually carries, and whether the monitor provides enough watts via USB Power Delivery to charge your machine. Apple Silicon chips added some real wrinkles to external display support, so let's walk through the key factors before anything goes wrong.
Quick Answer
To use a USB-C monitor with your MacBook, connect a USB-C cable that supports DisplayPort Alt Mode between your MacBook and the monitor. Your Mac should detect the display automatically. Open System Settings, then Displays, to adjust resolution and refresh rate.
Most USB-C monitors also charge your MacBook through Power Delivery. This works if your cable supports the correct specs.
Why Your Setup Might Not Work the Way You Expect
The Chip in Your MacBook Changes Everything
Not all MacBooks handle external displays the same way, and this is where most people get surprised. The processor generation in your machine determines how many external displays you can run and sometimes whether certain connection methods even work at all.
Here is the real breakdown based on manufacturer specifications and verified user reports as of 2026:
| MacBook Model / Chip | Max External Displays | Notes |
|---|---|---|
| M1 MacBook Air / M1 MacBook Pro (base) | 1 | Limited to one external display natively |
| M2 MacBook Air / M2 MacBook Pro (base) | 1 (2 with lid closed) | Second display only works in clamshell mode |
| M3 MacBook Air (base) | 1 (2 with lid closed) | Same clamshell limitation as M2 |
| M3 Pro MacBook Pro | 2 | Works with lid open |
| M3 Max MacBook Pro | 4 | Works with lid open |
| M4 MacBook Pro (base) | 2 | Significant improvement over base M1/M2 |
| M4 Pro MacBook Pro | 2 | Supports multiple high-res displays |
| M4 Max MacBook Pro | 4 | Designed for pro multi-display workflows |
| Intel MacBook Pro (2016-2020) | 2-4 | Depends on model and GPU |
| Intel MacBook Air | 1 | Limited by integrated graphics |
The base M1 and M2 chips are the biggest source of frustration. You cannot run two external displays at all without workarounds. If you bought a base M1 MacBook Air expecting a triple-monitor setup, that simply will not happen through normal means.
People sometimes ask about third-party DisplayLink docks as a workaround. DisplayLink is a software-driven technology that can bypass some of these chip limitations, but it requires installing additional drivers and can introduce performance overhead. It works for productivity tasks but is not ideal for color-sensitive creative work or high-refresh gaming.
Keep that in mind if you are shopping for a monitor assuming you can daisy-chain multiple displays through USB-C. Your chip determines what is actually possible.
What Your USB-C Cable Actually Supports (It Not Obvious)
This catches almost everyone off guard. USB-C is a connector shape, not a single standard. The same physical port on a cable can carry wildly different capabilities depending on what the manufacturer built it to handle.
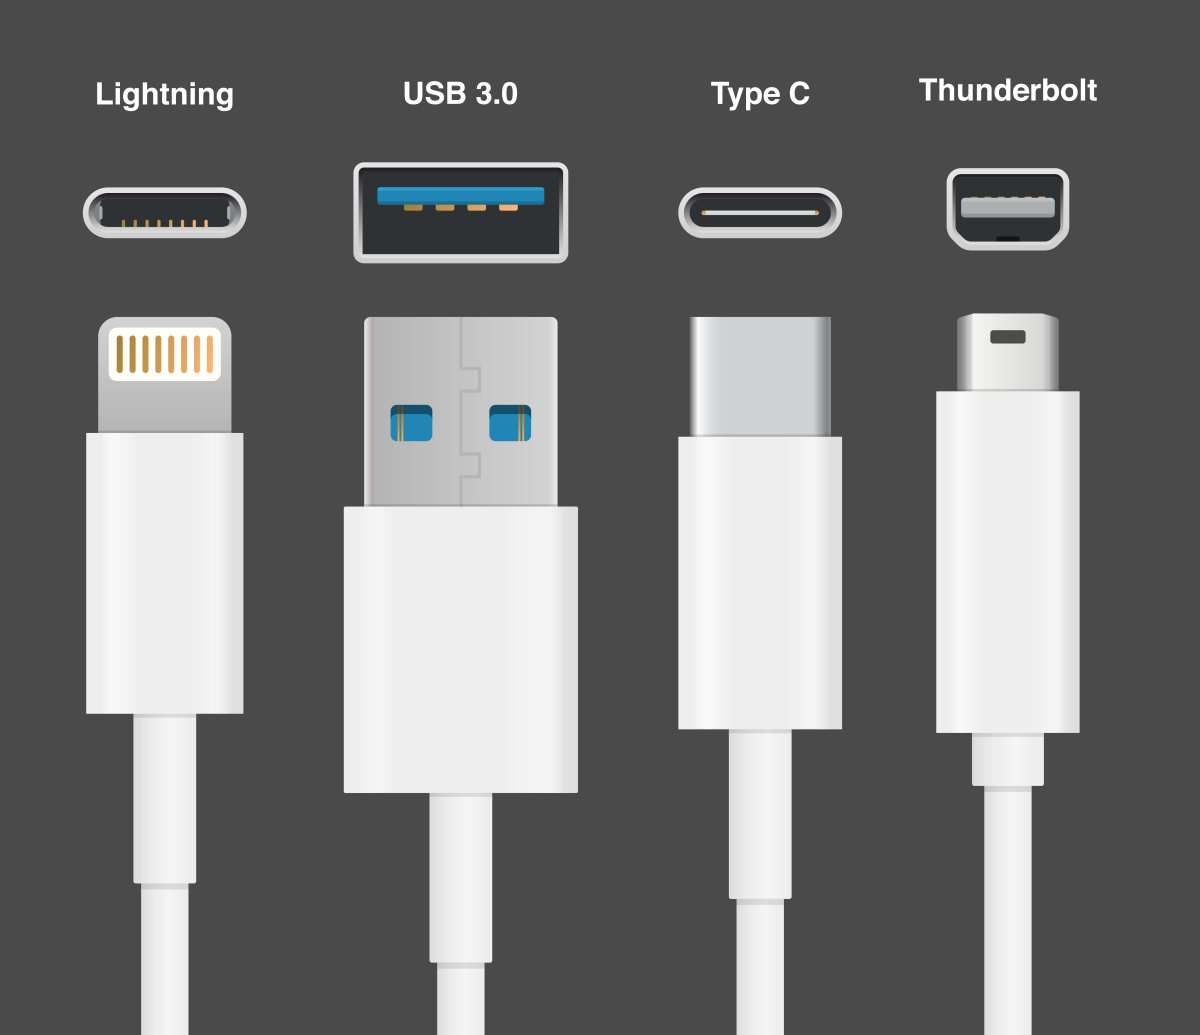
There are basically four tiers of USB-C cables, and only two of them carry video.
| Cable Type | Data Speed | Video Support | Max Power Delivery | Identification |
|---|---|---|---|---|
| USB 2.0 Type-C | 480 Mbps | No | Up to 60W | Often cheapest option, thin cable |
| USB 3.1 Gen 1 / Gen 2 | 5-10 Gbps | With DisplayPort Alt Mode | Up to 100W | Check cable markings |
| Thunderbolt 3 / USB4 | 20-40 Gbps | Always (via Alt Mode) | Up to 100W | Lightning bolt symbol on connector |
| Thunderbolt 4 / USB4 40Gbps | 40 Gbps | Always | Up to 100W (PD 3.1 up to 240W) | Certified cables have logo |
The most common mistake: grabbing a cheap USB-C cable from a drawer and wondering why the monitor stays black. Many cables bundled with phones, power banks, and accessories are USB 2.0. That means they only carry power and slow data.
No video signal whatsoever. The monitor simply will not turn on.
How to check what you have. Look at the cable itself. Certified Thunderbolt cables have a small lightning bolt icon molded into the connector.
Cables rated for charging often print wattage on the jacket, like "100W" or "60W." If there is no marking and no symbol, assume the worst. Buy a cable explicitly rated for both data transfer and video output. Look for cables marked "USB4," "Thunderbolt 4," or ones confirmed to support DisplayPort Alt Mode.
Power Delivery: Why Your MacBook Might Charge Slowly or Not at All
USB Power Delivery (USB PD) is the standard that lets your monitor send power back up the cable to charge your MacBook. Maximum output varies wildly between monitors, and if the wattage is too low your MacBook simply refuses to charge or trickles power so slowly the battery drains even during use.
Here is what different MacBook models actually need:
- 13-inch MacBook Air (M1/M2/M3): 30W minimum, 45W or higher recommended for comfortable charging under load
- 13-inch MacBook Pro (M1/M2): 45W minimum, 61W or higher recommended
- 14-inch MacBook Pro (M3/M3 Pro/M3 Max): 67W minimum, 96W or higher recommended
- 15/16-inch MacBook Pro (M3 Pro/M3 Max/M4 Pro/M4 Max): 96W minimum, 140W recommended for fastest charging
- 16-inch MacBook Pro (M4 Max): 140W recommended
Many budget USB-C monitors only deliver 15W to 35W through their USB-C port. That is enough to keep a MacBook Air topped up during light use but nowhere near enough for a MacBook Pro under any real workload. Your MacBook will display a "weak power" warning or simply drain slowly while connected.
Some monitors solve this by including a higher-wattage USB-C output. Dell's UltraSharp line, for example, offers models delivering 65W, 90W, or even 100W. Apple's own Studio Display provides 96W to the connected Mac.
If you run a 14-inch or 16-inch MacBook Pro, look for monitors delivering at least 90W. Otherwise you will keep your original power adapter plugged in anyway, which defeats the single-cable convenience.
How to Check What Your MacBook Actually Supports Before You Buy
Finding Your Chip and External Display Limits
Before buying a monitor or cable, spend 30 seconds confirming exactly what your MacBook can do. This saves returns and frustration.
Click the Apple menu in the top-left corner of your screen. Select "About This Mac." The window that pops up shows your chip name (like "Apple M2" or "Apple M4 Pro") and your model. Write that down.
Now cross-reference it against the chip table in the previous section. If you have a base M1, M2, or M3 chip, you are limited to one external display. Period.
No cable or adapter changes that without DisplayLink software. If you have a Pro or Max variant, you have more headroom.
Also check your macOS version. Apple has adjusted external display behavior across updates. Go to System Settings, then General, then Software Update.
Make sure you are running a recent version of macOS. Some older versions had bugs that prevented certain displays from being detected properly.
Matching Monitor Specs to Your MacBook Capabilities
Once you know your chip limits, match the monitor specs accordingly. Here is a practical checklist:
- Resolution: 4K (3840×2160) is the sweet spot for 27-inch monitors. 5K (5120×2880) matches macOS scaling perfectly but costs more.
- Refresh rate: 60Hz is standard. 120Hz or higher is nice but macOS does not always take advantage of high refresh rates the same way Windows does.
- USB-C Power Delivery wattage: Match or exceed your MacBook's adapter wattage. Check the monitor's spec sheet, not just the marketing page.
- DisplayPort Alt Mode support: Must be explicitly listed. If the spec sheet only mentions "USB-C for data," it probably does not carry video.
- Built-in USB hub: Handy for connecting peripherals, but verify it works over the same USB-C connection and does not require a separate upstream cable.
If you are shopping for a monitor primarily for a MacBook, stick with brands that explicitly list macOS compatibility. Dell UltraSharp, LG UltraFine, Samsung ViewFinity, and Apple Studio Display all test with macOS. Some cheaper monitors work fine but occasionally have EDID handshake issues that cause macOS to misidentify the display.
How to Connect a USB-C Monitor to Your MacBook (Step by Step)
The Direct Connection Method
This is the ideal setup. One cable, video and power together. Here is how to do it properly.
- Confirm your cable supports video output. Look for the Thunderbolt bolt symbol or markings indicating DisplayPort Alt Mode support.
- Plug one end of the USB-C cable into your MacBook. Any Thunderbolt or USB-C port works on modern MacBooks.
- Plug the other end into the USB-C input on the monitor. Some monitors have multiple USB-C ports. Use the one labeled for video input, not just power pass-through.
- The monitor should wake and display your desktop within a few seconds. If it does not, check that the monitor is set to the correct input source. Some monitors do not auto-switch.
- If your MacBook is not charging, the monitor may not deliver enough wattage. Check the monitor's power delivery rating against your MacBook's requirements.
That is it for the physical connection. macOS handles detection automatically in most cases. If the display does not appear, try unplugging and replugging the cable. If that fails, restart your MacBook with the monitor connected.
Configure Display Settings in macOS
Once the display is detected, you will want to fine-tune how it behaves. macOS defaults are not always optimal, especially for non-Apple monitors.
Open System Settings, then click "Displays." Your MacBook screen and the external monitor appear as separate boxes. Here is what to adjust:
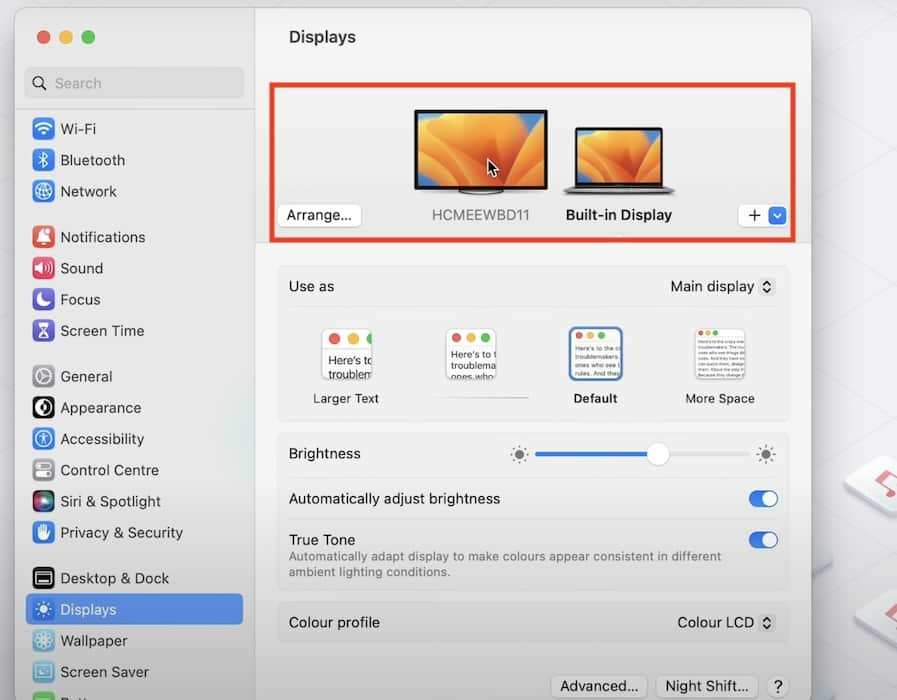
Resolution: macOS offers two categories. "Default for display" usually works well. If text looks blurry or jagged, try "Scaled" and test different options.
On a 4K monitor at 27 inches, the "looks like 2560×1440" option often provides the best balance of sharpness and usable screen space.
Refresh rate: Click the "Refresh Rate" dropdown. If your monitor supports 60Hz but macOS defaults to 30Hz, change it manually. This is common with 4K monitors over USB-C.
A 30Hz refresh rate makes everything feel sluggish and stuttery.
Color profile: macOS automatically selects a color profile. For creative work, you may want to load a custom ICC profile. Click the "Color Profile" dropdown and select "Custom" if you have one installed from the monitor manufacturer or a calibration tool.
Arrangement: Drag the white menu bar in the display arrangement diagram to set which screen is primary. Position the boxes to match your physical desk layout so your cursor moves naturally between screens.
HDR: If your monitor supports HDR, enable it in the display settings. macOS handles HDR well on compatible displays, but some monitors look worse with HDR enabled for SDR content. Test it yourself.
When You Need a Hub or Dock Instead
Sometimes a direct USB-C connection is not enough. Maybe your monitor lacks USB-C input. Maybe you need to connect multiple displays.
Maybe you want to keep your desk tidy with a single connection point.
A USB-C hub or Thunderbolt dock solves these problems. Here is when each makes sense:
- USB-C hub: Good for adding HDMI or DisplayPort output to a monitor that only has those inputs. Also adds extra USB ports. Affordable, usually $30 to $80. Downside: cheaper hubs may not support 4K at 60Hz.
- Thunderbolt dock: The premium option. Supports dual 4K displays, high-speed data, and often 85W+ power delivery to your MacBook. Prices range from $180 to $350. Best for professional setups where reliability matters.
- Monitor with built-in USB hub: Some monitors act as a hub themselves. One cable from MacBook to monitor, then keyboard, mouse, and Ethernet connect to the monitor. Convenient but verify the hub supports your data speed needs.
If you go the dock route, buy a Thunderbolt-certified dock rather than a generic USB-C hub. Thunderbolt docks have better macOS compatibility and more consistent performance. CalDigit, OWC, and Belkin make reliable options that Apple users consistently report good experiences with.
The Resolution and Refresh Rate Problem Nobody Warns You About
How to Fix Blurry Text and Wrong Scaling on External Monitors
This is probably the single most common complaint. You plug in a 4K USB-C monitor and everything looks either tiny or fuzzy. macOS is not handling the scaling correctly.
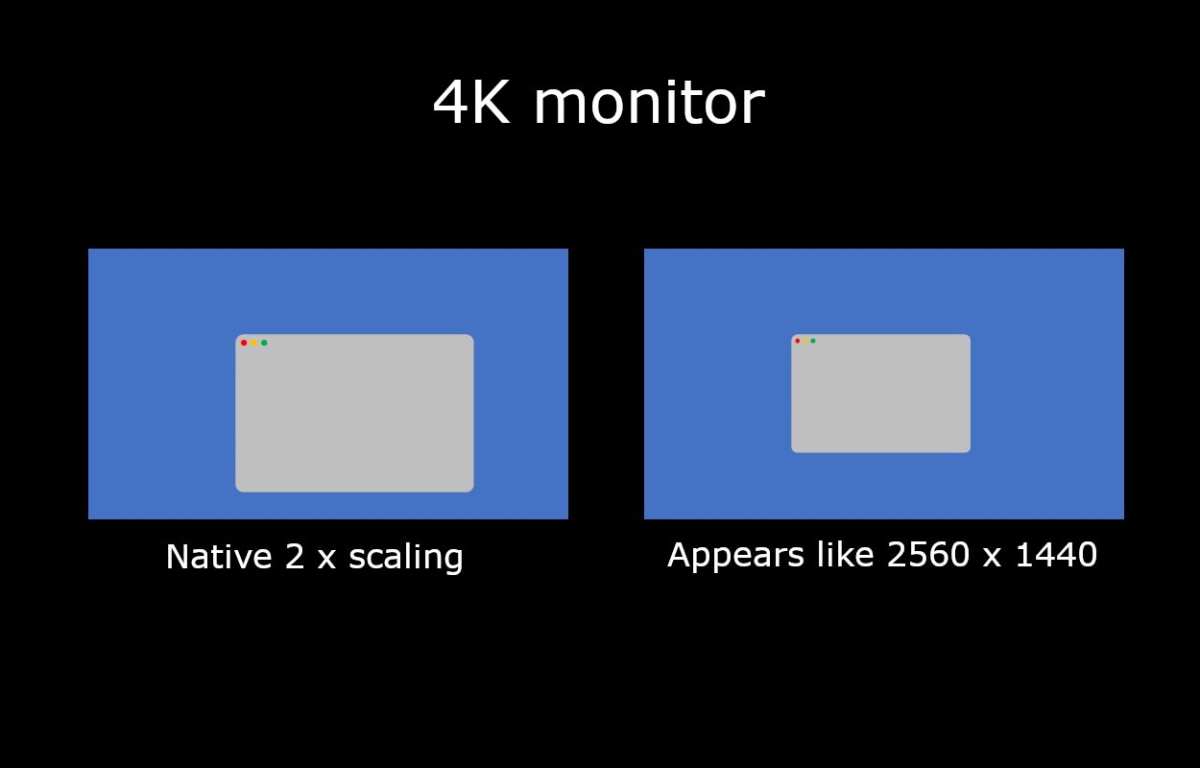
Here is why it happens. macOS uses a "retina" scaling system that doubles pixel density for sharp text. On a 4K monitor, macOS can render at native 4K with no scaling (everything very small) or at 5K resolution downscaled to 4K (sharp but very large UI elements). The sweet spot is "looks like 2560×1440" which renders internally at a higher resolution and scales down.
This looks sharp and gives reasonable UI size.
The problem: some monitors do not report their physical size correctly through the EDID data. macOS then picks the wrong scaling option. The result is either jagged text or an interface that is too large.
Fixes to try:
- Open System Settings, then Displays. Hold the Option key and click "Scaled." This reveals additional resolution options not shown by default.
- Try each scaled option and look for the one that renders text crisply without making UI elements oversized.
- If text still looks blurry, the monitor may be running at a non-native resolution. Check that the output resolution matches the monitor's native panel resolution exactly.
- For advanced users, tools like BetterDisplay or SwitchResX let you create custom resolutions and force specific scaling behaviors. These are free or low-cost and solve most stubborn scaling issues.
On a 27-inch 4K monitor, the "looks like 2560×1440" scaled option is almost always the right choice. On a 32-inch 4K monitor, "looks like 3024×1694" or "looks like 3360×1890" may work better because the larger panel makes the same logical resolution feel less cramped.
Getting 60Hz Instead of 30Hz on 4K Displays
If your mouse cursor feels sluggish and scrolling looks stuttery, your monitor is probably running at 30Hz instead of 60Hz. This is extremely common with 4K monitors connected over USB-C.
macOS sometimes defaults 4K displays to 30Hz refresh rate, especially over USB-C connections that do not clearly advertise high-bandwidth capability. The fix is simple but easy to miss.
Open System Settings, then Displays. Click on your external monitor's settings. Find the "Refresh Rate" dropdown menu.
If it shows "30 Hz" or "30 hertz," change it to "60 Hz" or the highest available option.
If 60Hz is not available in the dropdown, the issue is likely your cable. A USB 2.0 cable cannot carry a 4K 60Hz signal. A USB 3.1 cable without proper DisplayPort Alt Mode support may also limit you to 30Hz.
Swap to a Thunderbolt 3 or Thunderbolt 4 cable and check again.
Some monitors also have an internal setting that limits the input bandwidth. Check the monitor's on-screen display (OSD) menu for options like "USB-C bandwidth" or "DP version." Setting these to the highest available option can unlock 60Hz.
The difference between 30Hz and 60Hz is immediately obvious. Everything feels smoother. Scrolling is fluid.
Mouse movement is responsive. If your monitor supports 60Hz and macOS is not offering it, something in the chain is holding you back. Usually it is the cable.
Power Delivery Math: Will Your Monitor Actually Charge Your MacBook?
How Many Watts You Actually Need
Charging through a USB-C monitor sounds elegant in theory. One cable for video and power. The reality is that wattage varies so much between monitors that many simply cannot keep up under load.
Here is the practical math.
A MacBook Air with its included 30W or 35W adapter will charge slowly from a monitor delivering 30W. Under heavy workloads it might still drain. A 14-inch MacBook Pro usually ships with a 67W or 96W adapter.
That means anything below 65W will charge slowly at best.
A 16-inch MacBook Pro ships with a 140W adapter. USB Power Delivery 3.1 extended that ceiling to 240W in 2021. Most USB-C monitors still cap at 65W or 90W.
None hit 140W. That means 16-inch MacBook Pro owners almost always need their original power adapter. This leaves two cables on the desk.
What Happens When the Wattage Does Not Match
If your monitor delivers less than your MacBook needs, a few things can happen. macOS shows a "weak power" or "not charging" notification. Slower charging only works during light use. Heavy compute tasks make the battery drain slowly even while plugged in.
This is not dangerous. The MacBook simply pulls what it needs. The monitor does not force power through the cable.
The risk is the battery draining during use. Some monitors deliver less power than advertised too. A monitor claims 60W but only sustains 45W under load.
Many users report this from various fields.
Check your MacBook's energy settings too. Go to System Settings, Battery, and look for issues there. Optimized battery charging pauses charging past 80 percent.
This can look like a charging problem on the menu bar. The battery might show "not charging" by design. It resumes to 100 percent based on usage patterns. macOS Sonoma and later also display helpful messages explaining delayed charging.
Common Problems and How to Fix Them
Monitor Not Detected
This is the big frustration. Everything looks right but the display stays black. Work through these steps in order.
- Confirm the cable carries video. Many USB-C cables are power-only or USB 2.0. Swap to a Thunderbolt 4 cable.
- Check the monitor input source. Some monitors need manual switching to USB-C input.
- Unplug from MacBook for 10 seconds and reconnect. macOS sometimes needs a fresh handshake.
- Restart your MacBook with the monitor plugged in. A fresh boot often detects problematic displays.
- NVRAM reset on Intel Macs helps sometimes. Shut down, power on and hold Option + Command + P + R for 20 seconds. Apple Silicon does not need this.
- Try a different USB-C port on your MacBook. Rarely, one port may have a hardware issue.
If the monitor still is not detected, try it with another computer. If another device works, the issue is macOS or a settings conflict. If nothing works, the monitor or cable is faulty.
Intermittent Connection or Flickering
Flickering often comes from a bad cable. Loose connections or damaged wires disrupt the signal. Swap cables first and see if the problem stops.
Overheating can cause flickering too. Some monitors throttle their USB-C controller if ventilation is poor. Keep vents clear and avoid stacking gear around the monitor.
If flickering only happens at certain resolutions, change the refresh rate or resolution in Display Settings. Some monitors are unstable at the extremes of their spec sheet.
External Display Works but No Sound
macOS treats audio separately from video. The monitor must appear as an audio output device. Open System Settings, Sound, Output.
Select the monitor if it appears there. If it does not, the monitor needs specific macOS audio support. Not all do.
Many users expect built-in speakers to work. Budget monitors with basic speakers often do not function properly with macOS. This can sometimes be fixed by resetting the monitor firmware.
Use headphones or external speakers as a reliable alternative.
Mistakes People Make When Setting Up a USB-C Monitor with MacBook
The biggest mistake is assuming any USB-C cable works for video. Grab the one bundled with a phone and wonder why the screen is blank. That cable is USB 2.0 and cannot carry a video signal.
Check cable specs. Look for Thunderbolt symbols or DisplayPort Alt Mode signs.
Ignoring chip limits costs people returns. Buy a dual-monitor setup thinking they can use both with a base M1 MacBook. That chip supports one external display only.
Know your chip limits first before shopping.
Assuming monitors charge at full wattage is another trap. A monitor delivering 35W never keeps a 16-inch MacBook Pro charged during work. Expect slow drain or needing your original adapter after all.
This adds a second cable to the desk.
macOS battery optimization sometimes confuses users into thinking their monitor is not working. Check the Battery settings. Look for optimized charging features causing pauses.
Skipping refresh rate checks leaves performance on the table. A 4K monitor stuck at 30Hz feels sluggish. They never change it manually.
The fix, changing the refresh rate in Displays settings, takes thirty seconds.
Buying a monitor based on panel quality alone ignores USB-C implementation. Gorgeous image quality means nothing with 15W power delivery, no macOS EDID support, and USB 2.0 only. Research the USB-C specs thoroughly before committing to any monitor.
Frequently Asked Questions
Can I use any USB-C cable to connect my MacBook to a USB-C monitor?
No. Many USB-C cables are USB 2.0 without video support. They can carry power and data only.
Look for cables marked Thunderbolt 3, Thunderbolt 4, or USB4 and carrying DisplayPort Alt Mode. Untested cheap cables cause most setup problems. Check the cable markings or packaging for video specs.
Does a USB-C monitor charge my MacBook while displaying video?
It depends on the monitor's power delivery wattage. Some USB-C monitors provide 65W, 90W, or even 100W. Others deliver only 15W to 35W.
You need at least 65W to charge a MacBook Pro slowly during use. A 16-inch MacBook Pro with a 140W adapter would still need its adapter. Check your monitor's exact USB PD rating in its spec sheet.
Can I daisy-chain multiple USB-C monitors from my MacBook?
It depends on your MacBook's chip. Base M1, M2, and M3 chips support only one external display natively. Pro and Max chips support two or four monitors.
Daisy-chaining requires Thunderbolt monitors and specific setup details. macOS handles this differently than Windows. AMD DisplayPort Multi-Stream Transport (MST) is not supported. Focus on native chip limits instead of daisy-chain workarounds.
Why is text blurry on my USB-C monitor connected to my MacBook?
This happens when macOS picks a wrong scaling ratio. The monitor might run at a non-native resolution. In Displays settings, try holding Option and clicking Scaled to unlock more resolution choices.
Third-party apps like BetterDisplay also help with custom scaling to fix blurries on USB-C monitors. Good scaling options make everything sharp again at common resolutions.
How do I fix a USB-C monitor stuck at 30Hz refresh rate?
First, check Displays settings under System Settings. Change the refresh rate dropdown to 60Hz or higher if available. If 60Hz does not appear, check your cable state.
A USB 2.0 cable cannot support 4K at 60Hz. Switch to a Thunderbolt 4 cable. Monitor settings sometimes limit bandwidth too.
Look for settings in the monitor's on-screen menus and update them too.
Final Setup Checklist
Before you buy a USB-C monitor, confirm these details about your MacBook. Check your chip and external display chip limits in About This Mac. Your decides how many monitors you can run.
Buy cables that match the specs. Prioritize certified Thunderbolt 4 cables. Check the monitor's USB-C power delivery wattage against your MacBook adapter.
Budget monitors often provide only 15W to 35W. After connecting, change resolution and refresh rate in System Settings, Displays.
If anything does not work, revisit this guide's troubleshooting sections. Most problems come from cables and wattage that do not meet needs. A quick check of both would solve them.
Common Problems and How to Fix Them
Let us address the issues that might crop up before they happen.
When the Monitor Is Not Detected
Check the cable first. If it lacks video capabilities, swap it out. Sometimes restarting with monitor connected forces detection.
On older Intel Macs try the NVRAM reset as a strong fix.
When Flickering Happens
The USB-C cable often causes flicker. Swap to a known good certified cable. Check your refresh rate settings and try switching between 30Hz and 60Hz modes.
When Audio Does Not Work
MacOS routes audio through the monitor separately from video. Check System Settings, Sound and make sure the monitor shows up as an output device. Many USB-C monitors lack internal speakers at all so investigate specs before purchase.
When Clamshell Mode Causes Problems
Clamshell mode requires three things which are external power via the monitor or power adapter and external keyboard or mouse connected. If your MacBook sleeps when closed check all three. Some monitors trigger sleep when USB-C power is not enough.
Plugging in your original power adapter first ensures reliable operation of clamshell setups.
Mistakes People Make When Setting Up a USB-C Monitor with MacBook
People often make the mistake of buying the cheapest cable but not all handle video. Many cables bundled with phones are USB 2.0 power-only types. Check symbol markings for Thunderbolt and DisplayPort spec.
Ignoring chip limits causes returns. M1 base chips support one external display only so a dual monitor is not feasible. Assuming wattage charges fast is another trap.
Budget monitors deliver 15 watts. You are not charging a 16 inch MacBook Pro without its 140 watt adapter. Dissatisfaction follows among many users.
USB-C vs Thunderbolt vs HDMI: Which Connection Method Should You Use?
Method Comparison
| Method | Max Resolution | Refresh Rate | Power Delivery | Cable Cost | Best For |
|---|---|---|---|---|---|
| USB-C (DP Alt Mode) | 4K | 60Hz | Up to 100W | $10-$30 | Single cable simplicity |
| Thunderbolt 4 | 5K+ | 60Hz+ | Up to 100W | $30-$80 | Pro setups, multiple displays |
| USB-C + Hub | 4K | 60Hz | Varies | $40-$100 | Expanding connectivity |
| HDMI adapter + monitor | 4K | 60Hz (30Hz on some) | None | $15-$40 (adapter) | Monitors without USB-C |
| DisplayLink dock | Dual 4K | 60Hz | Limited | $80-$200 | Bypassing chip limits |
Choose USB-C direct connection first. It gives you power and video in one cable. Switch to Thunderbolt 4 when your monitor needs more bandwidth or daisy chaining.
HDMI option works fine as a fallback but loses power delivery.
While you are creating monitor solutions make educated decisions. Compare prices and interfaces first. Choose monitors with enough power and high refresh rates.
Verify your MacBook chip limits first. Avoid cheap cables. Avoid wrong assumptions about charging wattages.
Check macOS display settings after connecting everything.
Frequently Asked Questions
How many USB-C monitors can I connect to my MacBook?
Depends on your chip. Base M1 or M2 chips support one external display only. M3 base chip supports two but the lid must be closed.
Pro and Max chips support two to four displays with the lid open. You can bypass limits with DisplayLink docks but expect performance and color accuracy to take hits.
Why does my MacBook say weak power when connected to the USB-C monitor?
Your monitor does not deliver enough watts. A 67 watt MacBook Pro needs at least 65 watt source for usable charging. Monitors delivering under 40 watt trickle charge at best.
MacBook draws power first and sends rest to task. The battery drains slowly during heavy work. This condition is not harmful to the MacBook.
Connect your original power adapter just to bypass it.
Can I daisy-chain multiple USB-C monitors?
Limited. Mac does not support DisplayPort MST daisy chaining like Windows does. Thunderbolt docks enable multiple monitors with true video signal through Thunderbolt chaining.
Many USB-C monitors lack Thunderbolt outputs so chaining is difficult. Use a Thunderbolt dock instead if you have multiple monitors.
Why is text blurry on my external USB-C monitor?
Resolution scaling mismatch causes this issue. Open System Settings. Click Displays.
Select Scaled and try differerent options. On a 27 inch set it to looks like 2560 x 1440. Third party tools like BetterDisplay are unlocked by holding Option for many additional resolutions.
A monitor running at non native resolution always looks blurry and you have limited control otherwise.
What refresh rate should I use for my USB-C monitor?
60Hz where possible. 30Hz feels sluggish especially in motion. Some monitors default to 30Hz over USB-C. Go to Display Settings and raise the refresh rate if available.
Gaming and video editing especially benefit from higher refresh rates. Many same panel use input lag that can compromise user experience.
Can I use a USB-C monitor with an older Intel MacBook?
Yes. Most Intel MacBooks from 2016 onward have Thunderbolt 3 USB-C ports with full video support. However Intel MacBooks lack the power delivery refinements of Apple Silicon models.
Verify your particular model of Intel MacBook model supports Thunderbolt 3 output not just data.

Similar Posts































