How to Run Dual Monitors with Docking Station
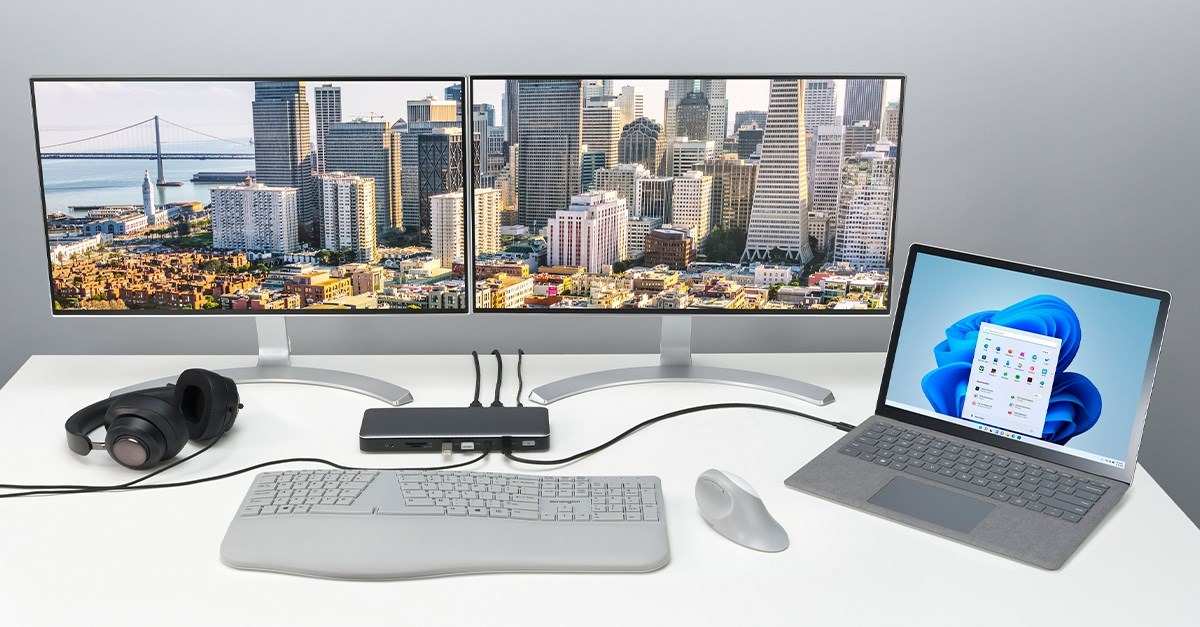
Figuring out how to run dual monitors with docking station gear sounds like it should be simple. You plug in a cable, and both screens light up, right? Not always.
The reality is that your laptop's ports, your dock's technology, and your operating system all have to agree with each other, and when one piece doesn't match, you're staring at a blank screen wondering what went wrong.
The good news is that once you understand the three or four variables at play, the whole thing clicks into place. Thunderbolt docks handle this differently than USB-C Alt Mode docks, which handle it differently again from DisplayLink docks. And macOS plays by different rules than Windows.
Let's walk through it step by step so you can get your dual-monitor setup working without the guesswork.
Quick Answer
To run dual monitors with a docking station, connect the dock to your laptop via USB-C or Thunderbolt, then plug each monitor into the dock's video outputs (HDMI or DisplayPort). Your laptop must support video output through its USB-C or Thunderbolt port. If it does, Windows or macOS should detect both monitors automatically.
Open your display settings to arrange and configure them. If only one monitor shows up, you may need a DisplayLink dock or updated drivers.
Why Most Guides Get This Wrong
Here's the thing most articles skip: not every USB-C port can output video. Laptop manufacturers don't always make this obvious. You'll see a USB-C port on your laptop and assume it handles displays, but some USB-C ports are data-only or charge-only.
That single oversight is probably the number one reason people think their dock is broken when it's actually fine.
The second big issue is that guides treat all docks the same. A USB-C dock that uses native DisplayPort Alt Mode works completely differently from a DisplayLink dock, which renders video through software and your CPU. One is hardware-driven and clean.
The other requires drivers and can introduce lag. If you buy the wrong type for your situation, you'll either overpay for capability you don't need or end up with a sluggish mess.
Third, macOS users get burned constantly. Apple's operating system does not support MST (Multi-Stream Transport), which is the DisplayPort daisy-chaining trick that Windows handles just fine. So a setup that works perfectly on a Windows laptop might only drive one external monitor on a Mac, even with the same dock.
We'll flag these gotchas as we go.
First, Check What Your Laptop Can Actually Do
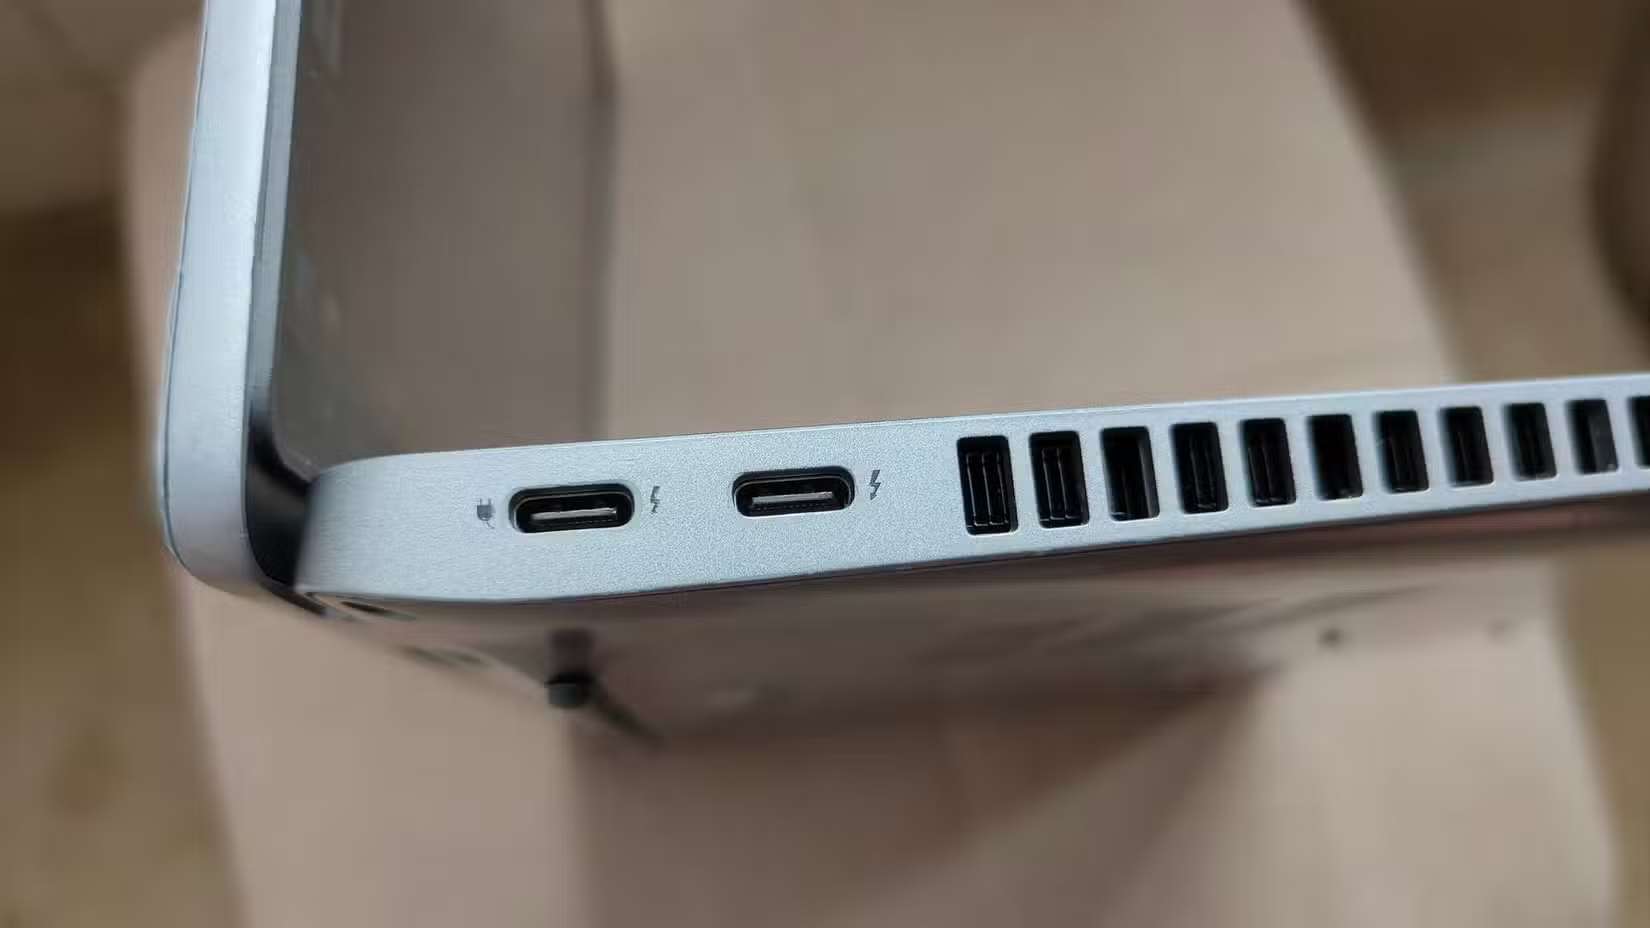
Before you spend a dollar on a dock, you need to know what your laptop can actually deliver through its ports. This is where most people trip up, because the port on the outside doesn't always match the capability on the inside.
USB-C Port Types
Not all USB-C ports are created equal. Here's the breakdown:
- USB-C with DisplayPort Alt Mode: This is native video output over USB-C. The laptop's GPU sends a direct video signal through the port. Most modern laptops with this feature will have a small DP or lightning bolt icon near the port.
- Thunderbolt 3 or 4: These ports always support video output. They use the same USB-C connector but deliver up to 40 Gbps of bandwidth. Look for the lightning bolt icon.
- USB-C (data only): Some laptops have USB-C ports that handle data and charging but do not carry a video signal. These will not work for monitor output, period.
- USB4: Similar to Thunderbolt 4 in capability. Supports video output and high bandwidth.
How to Check Your Specs
The fastest way to know what you're working with is to look up your exact laptop model on the manufacturer's website. Check the port specifications. If you see "DisplayPort over USB-C" or "Thunderbolt 4," you're good for native video output.
If the spec sheet only mentions "USB-C 3.2 Gen 2" with no mention of video or Thunderbolt, that port likely cannot drive a display.
For Windows laptops, you can also open Device Manager and check what's listed under "Display adapters." If you see both an integrated GPU (like Intel Iris Xe) and a discrete GPU (like NVIDIA), your system can typically drive multiple displays, but the port routing varies by manufacturer.
For Mac users, go to Apple menu > About This Mac > System Report > Graphics. This tells you exactly what your Mac supports. As of 2026, Apple Silicon Macs (M1, M2, M3, M4 series) support at least one external display natively through Thunderbolt, with M1 supporting one external display, M2 supporting two (with one up to 6K), and M3/M4 models supporting multiple external displays depending on the specific chip configuration.
The base M1 chip notably only supports one external display, which catches a lot of people off guard.
Choosing the Right Docking Station Type for Your Setup
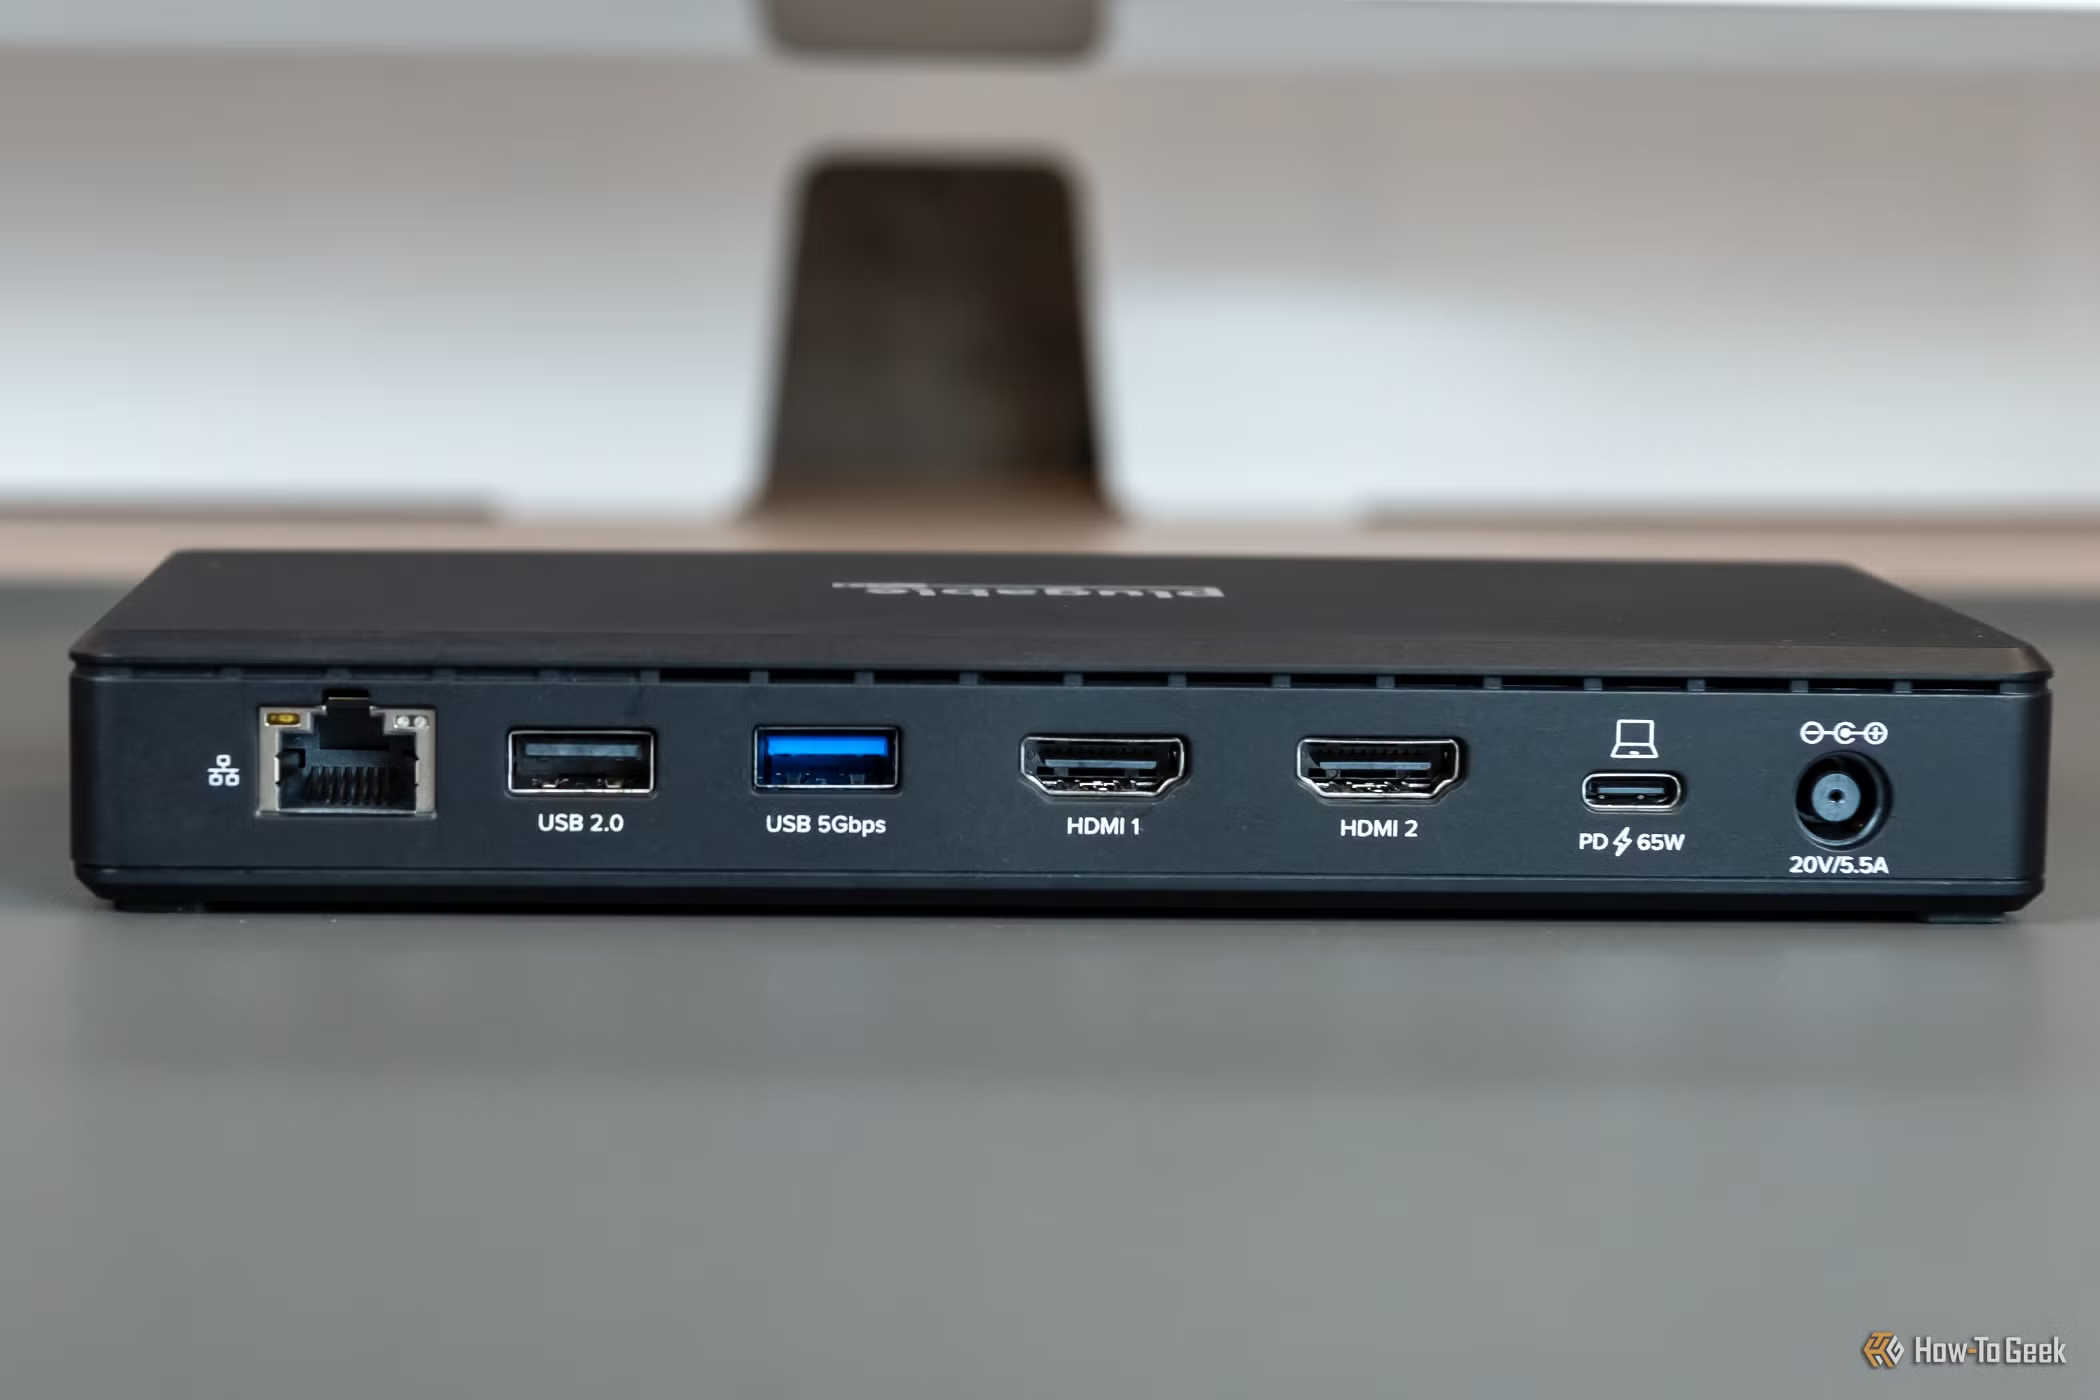
Once you know what your laptop can output, you need to match it with the right kind of dock. There are three main categories, and picking the wrong one is the second most common reason dual-monitor setups fail.
Type 1: Native USB-C Alt Mode Dock
This is the cleanest option when your laptop supports it. The dock passes through the native DisplayPort signal from your laptop's USB-C port. No special drivers needed.
The GPU in your laptop does all the work.
Best for: Laptops with USB-C DisplayPort Alt Mode or Thunderbolt ports. Windows users who want a plug-and-play experience.
Limitations: Bandwidth is shared between video output and data. A single USB-C 10 Gbps connection can typically handle dual 1080p 60Hz displays or a single 4K 60Hz display, but dual 4K 60Hz may require Thunderbolt bandwidth (40 Gbps) or Display Stream Compression (DSC).
Type 2: Thunderbolt Dock
Thunderbolt docks use the full 40 Gbps bandwidth of a Thunderbolt 3 or 4 connection. They can drive dual 4K 60Hz monitors with room to spare for data, charging, and peripherals. These are the premium option.
Best for: Users with Thunderbolt-equipped laptops who want maximum performance and a single-cable setup.
Limitations: More expensive (typically $200 to $350+). Only works if your laptop actually has a Thunderbolt port. Plugging a Thunderbolt dock into a regular USB-C port will limit it to USB-C speeds, which may not support dual high-resolution displays.
Type 3: DisplayLink Dock
DisplayLink is a technology that compresses video data and sends it over USB, where a chip in the dock decompresses it and outputs it to your monitors. This means the dock does the video processing work, not your laptop's GPU.
Best for: Mac users (especially base M1/M2 models with limited native display support), older laptops without video-capable USB-C ports, or anyone who needs to drive more displays than their laptop natively supports.
Limitations: Requires DisplayLink drivers installed on your computer. There can be slight latency, which matters for video playback or fast-moving content. Not ideal for gaming.
DisplayLink Manager must be running for the displays to work.
Quick Comparison Table
| Feature | USB-C Alt Mode Dock | Thunderbolt Dock | DisplayLink Dock |
|---|---|---|---|
| Max typical output | Dual 1080p or single 4K | Dual 4K 60Hz | Dual 4K 60Hz (varies by chipset) |
| Bandwidth | 10-20 Gbps | 40 Gbps | 5-10 Gbps (USB 3.0) |
| Drivers required | No | No | Yes (DisplayLink Manager) |
| Latency | None | None | Slight (noticeable in video/gaming) |
| Price range | $50-$150 | $200-$350+ | $80-$250 |
| Mac compatible | Yes (limited by macOS) | Yes | Yes (often best option for Mac) |
| GPU load | Uses laptop GPU | Uses laptop GPU | Uses CPU for compression |
Step-by-Step: Connecting and Configuring Your Dual Monitors
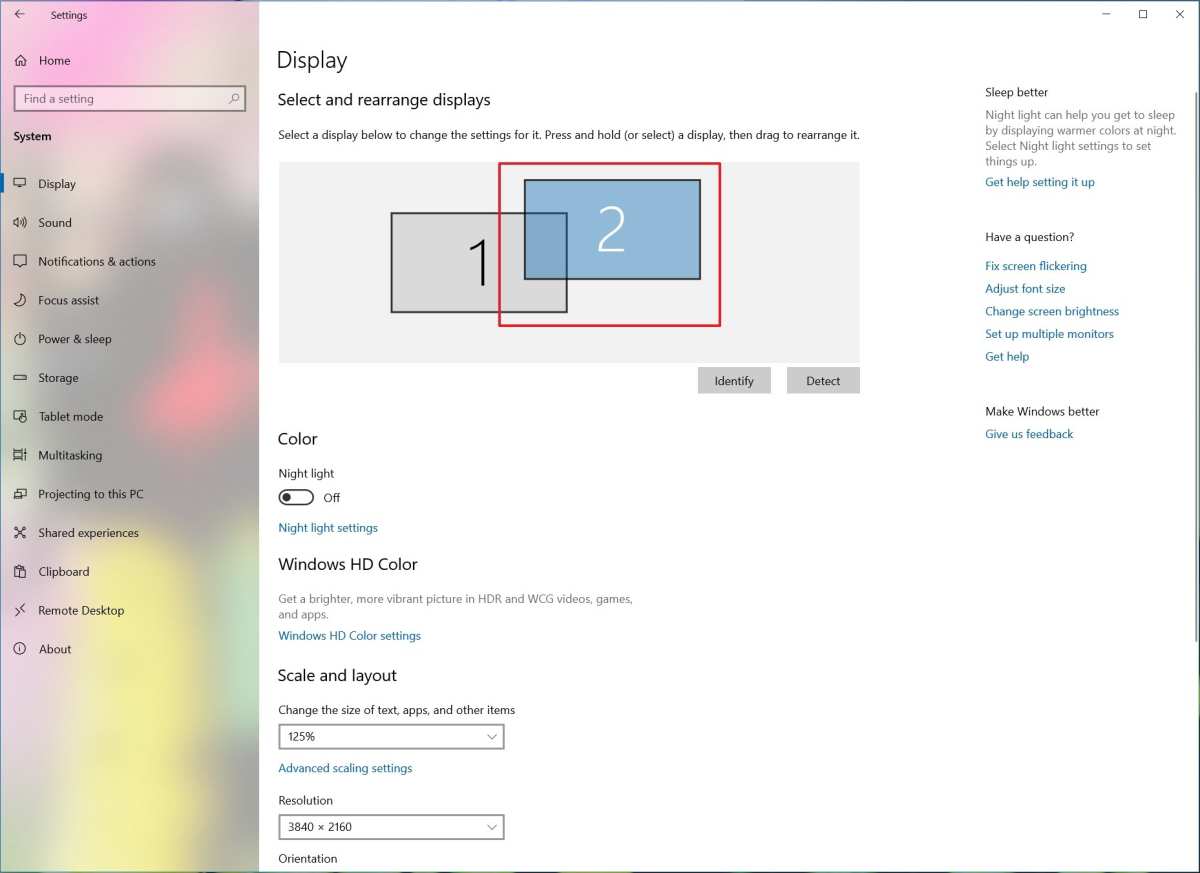
Alright, you've got the right dock for your laptop. Let's get everything connected and configured.
What You'll Need
- Your laptop with a compatible USB-C or Thunderbolt port
- A docking station that matches your needs (see previous section)
- Two external monitors
- Video cables (HDMI or DisplayPort, depending on your dock and monitors)
- The dock's power adapter (most docks need external power to charge your laptop and run peripherals)
- DisplayLink drivers installed (only if using a DisplayLink dock)
Step 1: Connect the Dock to Your Laptop
Plug the dock's upstream cable into your laptop's USB-C or Thunderbolt port. Most docks use a built-in cable or a detachable USB-C cable. Make sure it's seated firmly.
If your dock has a power adapter, plug that in and make sure the dock powers on (most have an LED indicator).
Step 2: Connect Your Monitors to the Dock
Connect each monitor to one of the dock's video output ports. Use the cables that came with your monitors, or use known-good HDMI or DisplayPort cables. If your dock has both HDMI and DisplayPort outputs, either works fine.
DisplayPort is slightly preferable if your monitors support it, since it handles higher resolutions and refresh rates more reliably.
Step 3: Power On and Detect
Turn on your monitors if they don't auto-power. Your laptop should detect both displays within a few seconds. On Windows, you might see the screens flash as they initialize.
On macOS, the displays should appear automatically.
Step 4: Configure Display Settings
On Windows (Windows 10 and 11):
- Right-click on the desktop and select "Display settings."
- You should see three display boxes labeled 1, 2, and 3. If one monitor isn't showing, click "Detect."
- Drag the display boxes to match the physical arrangement of your monitors on your desk.
- Click on each display to set its resolution, refresh rate, and scaling.
- Under "Multiple displays," choose "Extend these displays" to use both monitors as one continuous workspace.
On macOS (Ventura and later):
- Open System Settings > Displays.
- You should see all connected displays listed. If not, click "Detect Displays."
- Arrange the displays by dragging them into the correct physical layout.
- Set resolution and refresh rate for each display using the dropdown menus.
- To use the external monitors as an extended desktop (rather than mirroring), make sure "Mirror displays" is turned off.
Step 5: Set Your Primary Display
On both Windows and macOS, you can designate which screen is your "main" display (where the dock/menu bar appears and where new windows open by default). In Windows, check "Make this my main display" under the display settings. In macOS, drag the white menu bar in the display arrangement view to your preferred screen.
Step 6: Test and Verify
Open a window and drag it between all three screens (laptop plus two externals). Make sure the resolution looks correct on each monitor. Play a video to check for stuttering or lag (especially important with DisplayLink docks).
If everything looks smooth, you're set.
Troubleshooting: When One Monitor Won't Display or Settings Look Wrong
Even with the right setup, things sometimes don't cooperate. Here are the most common issues and how to fix them.
Only One External Monitor Detected
This is the most common problem, and it usually comes down to one of three things:
- Bandwidth limitation: Your USB-C connection doesn't have enough bandwidth for two high-resolution displays. Try lowering the resolution or refresh rate on one or both monitors. If that fixes it, you need a higher-bandwidth dock (Thunderbolt) or a DisplayLink dock.
- macOS MST issue: If you're daisy-chaining monitors via DisplayPort MST, macOS won't do it. Connect each monitor directly to the dock instead.
- Driver issue: If using a DisplayLink dock, make sure DisplayLink Manager is installed and running. Download the latest version from the DisplayLink website.
Monitor Detected but Showing Wrong Resolution
- Update your GPU drivers. Outdated Intel, AMD, or NVIDIA drivers are a frequent cause of resolution caps.
- Check your cable. A cheap or damaged HDMI cable might not have the bandwidth for 4K 60Hz. Use a certified cable that matches your resolution needs.
- In Windows Display Settings, click on the problematic monitor and manually set the resolution. Sometimes Windows defaults to a lower resolution than the monitor supports.
Flickering or Intermittent Display
- Try a different cable. This is the most common fix.
- Make sure your dock's firmware is up to date. Most manufacturers provide firmware update tools on their support pages.
- If using DisplayLink, check that your CPU isn't maxed out. DisplayLink uses CPU resources for video compression, and a busy system can cause flickering.
Dock Not Charging Your Laptop
- Verify the dock's Power Delivery wattage matches or exceeds your laptop's charging requirements. A 60W dock won't charge a laptop that needs 90W or 100W, at least not while running monitors and peripherals.
- Use the power adapter that came with the dock. Third-party adapters may not deliver the correct wattage.
Sleep and Wake Issues
Some setups have trouble waking monitors from sleep. If your displays stay black after waking your laptop:
- Unplug and replug the USB-C cable to the dock.
- Update your GPU drivers and dock firmware.
- On Windows, try disabling USB selective suspend in Power Options.
- On macOS, check Energy Saver settings and uncheck "Put hard disks to sleep when possible."
Who Should Use Which Setup (and Who Shouldn't Bother)
Not everyone needs a docking station for dual monitors. Here's a quick breakdown of who benefits most and who might be better off with a simpler solution.
Best Candidates for a Docking Station
- Remote and hybrid workers who want a clean desk setup with a single cable to connect and disconnect.
- Software developers and data analysts who need multiple screens for code, documentation, and dashboards simultaneously.
- Creative professionals (designers, video editors, photographers) who need color-accurate external displays and a streamlined workflow.
- Corporate environments where IT departments standardize on specific dock models for consistency and support.
Who Might Not Need One
- If your laptop already has two video outputs (say, an HDMI port and a USB-C with DisplayPort Alt Mode), you can connect monitors directly without a dock. A dock adds convenience, not capability, in that case.
- If you only need one external monitor, a simple USB-C to HDMI adapter is cheaper and simpler than a full dock.
- Gamers who want high refresh rates (144Hz or above) on external monitors should connect those monitors directly to the laptop's GPU output (HDMI or DisplayPort) rather than routing through a dock, which can introduce latency or bandwidth limits.
Setup Recommendations by User Type
| User Type | Recommended Dock Type | Why |
|---|---|---|
| Windows laptop, casual use | USB-C Alt Mode dock | Affordable, plug-and-play, no drivers |
| Windows laptop, power user | Thunderbolt dock | Full bandwidth, dual 4K, charging, data |
| Mac (M1 base model) | DisplayLink dock | Only way to get dual external displays |
| Mac (M2/M3/M4 Pro or Max) | Thunderbolt dock | Native multi-display support, clean setup |
| ChromeOS laptop | USB-C Alt Mode dock | Most Chromebooks support DP Alt Mode |
| Budget-conscious user | USB-C to dual HDMI adapter | Cheapest option, works for basic setups |
Common Mistakes That Waste Hours of Your Time
Let's save you some frustration. These are the mistakes we see over and over again.
- Buying a dock without checking your laptop's port specs first. A $250 Thunderbolt dock plugged into a USB-C data-only port will not drive your monitors. Always verify your port supports video output.
- Assuming all USB-C docks are the same. They're not. Native Alt Mode, Thunderbolt, and DisplayLink are fundamentally different technologies. Read the product description carefully.
- Using cheap or old cables. A damaged HDMI cable or a USB-C cable that only supports USB 2.0 speeds will cause detection issues, flickering, or resolution caps. Use cables that are rated for your resolution and refresh rate.
- Forgetting to install DisplayLink drivers. If your dock uses DisplayLink technology, it will not work without the DisplayLink Manager software. This is not optional.
- Trying to daisy-chain on macOS. macOS does not support DisplayPort MST daisy-chaining. Connect each monitor directly to the dock.
- Ignoring firmware updates. Dock manufacturers regularly release firmware updates that fix compatibility issues, add features, and improve stability. Check the manufacturer's support page every few months.
- Not using the dock's power adapter. Some docks can technically pass through a small amount of power without their own adapter, but they won't charge your laptop reliably or support all peripherals. Always use the included power supply.
- Expecting 4K 120Hz through a basic USB-C dock. Most USB-C Alt Mode docks top out at 4K 60Hz. If you need higher refresh rates, you need a Thunderbolt dock or a direct connection to your GPU.
Docking Station Comparison: What to Look For and What to Skip
The dock market is crowded, and the spec sheets can be confusing. Here's what actually matters when you're shopping for a dual-monitor dock.
What Matters
- Video output type and count: Make sure the dock has at least two video outputs (HDMI, DisplayPort, or USB-C with video) that match your monitors' inputs.
- Maximum resolution and refresh rate: Check that the dock supports the resolution and refresh rate you need. If you're running dual 4K 60Hz monitors, the spec sheet needs to explicitly say it supports that.
- Power Delivery wattage: If you want the dock to charge your laptop, make sure the PD wattage meets or exceeds your laptop's requirement. 85W to 100W covers most laptops.
- Compatibility with your OS: Some docks are Windows-first with limited macOS or ChromeOS support. Check the manufacturer's compatibility list.
- DisplayLink vs. native: Know which technology the dock uses. If it's DisplayLink, you'll need to install and maintain drivers.
What You Can Usually Skip
- Fancy branding and marketing language. "Ultra-fast" and "premium" don't mean anything. Look at the actual specs.
- Extra audio jacks. The 3.5mm jack on a dock is convenient but rarely audiophile quality. If you care about audio, use a dedicated audio interface or your monitor's audio output.
- SD card readers. Nice to have, but not worth paying extra for if you already have a card reader or use cloud storage.
- Gigabit Ethernet. Most docks include it, and it works fine. You don't need 2.5 GbE unless you have a specific use case for it.
Price Expectations
- $30-$70: Basic USB-C to dual HDMI adapters. Works for 1080p or single 4K. Often no Power Delivery.
- $70-$150: Mid-range USB-C Alt Mode docks. Dual 1080p or single 4K 60Hz. Usually includes PD charging and USB ports.
- $150-$250: Higher-end USB-C docks and entry-level DisplayLink docks. Dual 4K 60Hz possible. Better build quality.
- $250-$400: Thunderbolt docks. Full bandwidth, dual 4K 60Hz, 85W+ PD, robust build. The sweet spot for power users.
Real-World Setups That Actually Work
Let's look at a few configurations that work reliably in practice, based on common hardware combinations.
Setup 1: Windows Laptop + USB-C Alt Mode Dock
A Dell XPS 15 with a USB-C port that supports DisplayPort Alt Mode, paired with a mid-range USB-C dock (like those from Anker or Plugable) and two 27-inch 1440p 60Hz monitors. Connect each monitor via HDMI or DisplayPort to the dock. Windows detects both monitors natively.
No drivers needed. The dock charges the laptop at 85W through the same cable. Total cost: around $100 to $150 for the dock.
Setup 2: MacBook Pro M3 Pro + Thunderbolt Dock
A 14-inch MacBook Pro with M3 Pro chip, which supports multiple external displays natively. Paired with a Thunderbolt 4 dock (like the CalDigit TS4) and two 4K 60Hz monitors connected via DisplayPort. macOS detects both monitors automatically. The dock delivers 98W of charging power.
Clean single-cable setup. Total cost: around $300 to $350 for the dock.
Setup 3: MacBook Air M1 + DisplayLink Dock
A MacBook Air with the base M1 chip, which only supports one external display natively. To get dual external monitors, a DisplayLink dock is required (like the Plugable UD-6950PDH). Install DisplayLink Manager, connect both monitors via HDMI.
Works well for productivity tasks. Slight latency noticeable during video playback, but fine for office work. Total cost: around $150 to $200 for the dock.
Setup 4: ChromeOS Laptop + USB-C Dock
A Chromebook with USB-C DisplayPort Alt Mode support, paired with a basic USB-C dock and two 1080p monitors. ChromeOS handles dual external displays well when the hardware supports it. Plug and play.
Total cost: around $50 to $80 for the dock.
Expert Tips Most Guides Leave Out
These are the things that separate a working setup from a great one.
- Update your GPU drivers before troubleshooting. Half the "my monitor won't display" posts online are solved by updating Intel, AMD, or NVIDIA graphics drivers. Do this first.
- Use DisplayPort instead of HDMI when possible. DisplayPort handles higher resolutions and refresh rates more reliably, and it supports features like Adaptive Sync. If your monitors and dock both have DP outputs, use them.
- Check your dock's firmware regularly. Manufacturers like CalDigit, Plugable, and Anker release firmware updates that fix real bugs. A firmware update can turn a glitchy dock into a rock-solid one.
- On Windows, check your projection mode. Press Windows + P and make sure "Extend" is selected, not "Duplicate" or "Second screen only." This is a surprisingly common oversight.
- On macOS, disable "True Tone" and "Night Shift" on external monitors if colors look inconsistent. These features can interfere with color-critical work on non-Apple displays.
- If you're using DisplayLink and experiencing lag, try closing unnecessary applications. DisplayLink uses CPU resources, and a busy system will show it. Also make sure you're using the latest DisplayLink Manager version.
- Label your cables. If you're docking and undoing your laptop frequently, labeled cables save you from accidentally unplugging the wrong thing.
- Consider your monitor's own USB hub. Some monitors have built-in USB hubs that can act as a mini-dock. If your monitor has USB-C with Power Delivery, you might be able to connect one monitor through the dock and the second through the monitor's own USB-C output, reducing dock requirements.
Frequently Asked Questions
Can I use any USB-C dock for dual monitors?
No. Your laptop's USB-C port must support DisplayPort Alt Mode or be a Thunderbolt port to output video natively. If your port doesn't support video, you'll need a DisplayLink dock instead, which uses software-based video compression.
Why won't my Mac detect the second monitor through a dock?
If you're using a base M1 MacBook, it only supports one external display natively. You'll need a DisplayLink dock to add a second. If you're on a newer Mac, check that you're not trying to daisy-chain via DisplayPort MST, which macOS doesn't support.
Do I need to install drivers for my docking station?
Native USB-C Alt Mode and Thunderbolt docks don't require drivers. DisplayLink docks absolutely require DisplayLink Manager software to be installed and running for the monitors to work.
Can I mix HDMI and DisplayPort on the same dock?
Yes. Most docks with multiple video outputs let you use a mix of HDMI and DisplayPort connections. Just make sure the total bandwidth doesn't exceed what the dock and your laptop's port can handle.
Will a docking station slow down my computer?
A native USB-C or Thunderbolt dock won't slow anything down. A DisplayLink dock uses some CPU resources for video compression, which can cause slight performance impact on older or slower systems, but modern CPUs handle it fine for everyday tasks.
How many monitors can I connect through one docking station?
It depends on the dock and your laptop. Most dual-monitor docks support two external displays. Some DisplayLink docks support three or four.
Check the dock's specifications and your laptop's GPU capabilities to confirm.

Similar Posts