How to Optimize USB C Monitor for Office Use
There's a good chance you're reading this because you plugged in a USB-C cable, expected a perfect single-cable setup, and got something less. Maybe the resolution looks soft. Maybe the charging is painfully slow.
Maybe the second monitor you daisy-chained just won't wake up. Learning how to optimize a USB-C monitor for office use means understanding that the cable is only one piece of a three-part puzzle: your laptop's port capabilities, the monitor's feature set, and the cable connecting them all.
When all three pieces match, you get a clean desk with one cable handling video, data, and power delivery. When one piece is wrong, you're troubleshooting a blurry display, random disconnects, or a laptop that drains while plugged in. The good news is this is completely solvable once you know what to check.
Per VESA's DisplayPort Alt Mode standard over USB-C, a single cable can carry up to 4K video at 60Hz plus USB data and up to 100W of charging power, but only if every link in the chain supports it.
Quick Answer: The Three Things That Actually Matter
Your USB-C monitor setup depends on three factors. First, your laptop's port must support DisplayPort Alt Mode. Second, your cable must be full-featured with video and power delivery.
Third, your monitor must match your laptop's power and resolution requirements. We'll walk through each one step by step.
How USB-C Monitor Setups Actually Work Under the Hood
Before we jump into fixes, we need to understand what's actually happening inside that cable. USB-C isn't just one thing. It's a connector shape that can carry multiple different protocols simultaneously.
For a monitor setup to work well, you need three of those protocols working together correctly.
DisplayPort Alt Mode — The Video Part
DisplayPort Alt Mode is what lets a USB-C port send a video signal to a monitor. When you plug a USB-C cable into your laptop and a monitor, the two devices negotiate over the cable's CC (Configuration Channel) pins. If both sides support DisplayPort Alt Mode, the port reconfigures its differential pairs to carry a DisplayPort signal instead of USB data.
This matters because there are two main versions that affect what your setup can do:
| Version | Max Bandwidth | What It Actually Means for You |
|---|---|---|
| DP 1.2 | 17.28 Gbps | 4K at 30Hz, QHD (1440p) at 60Hz, 1080p at 144Hz |
| DP 1.4 | 25.92 Gbps | 4K at 60Hz without DSC, 4K at 120Hz with DSC |
If your laptop only supports DP 1.2 over USB-C, you're capped at 4K/30Hz. That's fine for spreadsheets and documents, but it feels sluggish when scrolling through web pages. For a smooth experience at 4K, you want DP 1.4 on both ends.
A small number of monitors and laptops also support HDMI Alt Mode, but it's far less common and generally limited to HDMI 2.0 bandwidth (4K/60Hz). DisplayPort Alt Mode is the standard you should be looking for.
USB Power Delivery (PD) — The Charging Part
USB Power Delivery runs on a separate negotiation layer. While the video signal is flowing through the DisplayPort lanes, the PD controller in your laptop and the PD controller in your monitor exchange profiles. These profiles define voltage and current combinations: 5V/3A (15W), 9V/3A (27W), 15V/3A (45W), 20V/3A (60W), and so on up to 20V/5A (100W) under the current PD 3.0 spec.
Here's where it gets practical. A MacBook Pro 14" ships with a 70W charger. A MacBook Pro 16" ships with a 140W charger (using the newer PD 3.1 spec).
If your USB-C monitor only delivers 60W, that MacBook Pro 16" will charge slowly under heavy workloads and might even drain during sustained tasks like video calls with dozens of browser tabs. A Dell XPS 15 needs 130W from its included charger, though it will charge more slowly from 60W in a pinch.
Check your laptop's included charger wattage. Then check your monitor's USB-C PD output spec. The monitor's PD wattage should ideally meet or come close to what your laptop ships with.
If it's significantly lower, your battery might drain during heavy use, and you'll think something is broken when really it's just a wattage mismatch.
MST and Daisy-Chaining — Multiple Monitors Over One Cable
Multi-Stream Transport (MST) is a DisplayPort feature that lets you connect two monitors in series. Your laptop sends one DisplayPort signal to the first monitor. That monitor splits it, sending one signal downstream to the second monitor and displaying the other portion itself.
This only works if both monitors support MST and if your laptop's USB-C port outputs DP 1.2 or higher with MST enabled.
There's a critical limitation many people miss. macOS does not support MST for daisy-chaining. Apple's macOS uses a different display architecture. If you plug a daisy-chain MST setup into a Mac, you'll typically only see the first monitor, or you'll get mirroring instead of an extended desktop.
For dual external displays on a Mac, each monitor needs its own connection, either directly to the laptop or through a Thunderbolt dock that provides two separate display outputs.
Windows and Linux handle MST well. On Windows, make sure MST is enabled in the first monitor's OSD menu. If the option is there and turned off, the downstream monitor will never get a signal.
Your Monitor's USB Hub and KVM Features
Most USB-C office monitors include built-in USB-A downstream ports, and some add Ethernet or even a second USB-C port. These create a hub through the same cable that's carrying video and power. The hub's speed depends on what USB data channel the monitor uses.
Many budget USB-C monitors only pass through USB 2.0 (480 Mbps), which is fine for a keyboard and mouse but painfully slow for an external SSD.
Higher-end monitors offer USB 3.0 (5 Gbps) or USB 3.2 Gen 1 downstream ports. If you're plugging an external drive into the monitor's hub, check this spec. A 4K video file can easily be 20 GB.
At USB 2.0 speeds, that transfer takes minutes longer than it should.
KVM-equipped monitors let you toggle between two computers (say, a work laptop and a desktop PC) while sharing the same monitor, keyboard, and mouse. This is a separate feature from MST. It's built into monitors like the Dell U3223QE and Samsung M8, and it uses the USB data channel to switch peripherals along with the video input.
What Your Cable Is Doing (More Than You Think)
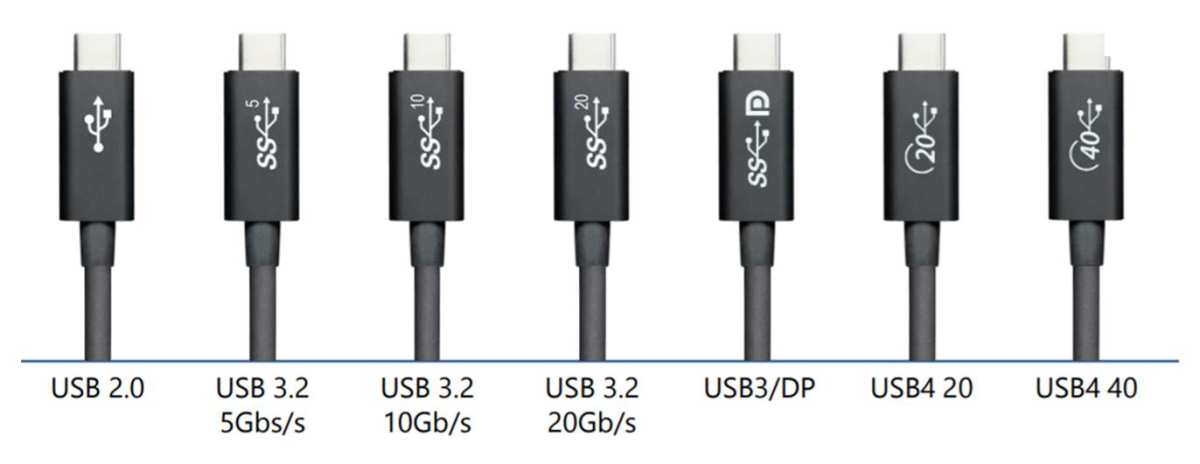
The cable is the single most common failure point in any USB-C monitor setup. Not all USB-C cables are created equal. The USB-IF has certified dozens of cable specifications, and the one that looks identical to your full-featured cable might only support USB 2.0 data and 60W charging.
It will charge a phone fine. It will not carry a video signal.
A full-featured USB-C cable that supports DP Alt Mode must have the correct pin wiring for the differential pairs used by DisplayPort. It also needs e-marker chips if it supports speeds beyond USB 3.2 Gen 1 or currents above 3A. Cheap cables often skip these components entirely.
We'll cover exactly how to pick the right cable in the next step. For now, just know that if your setup isn't working as expected, the cable is the first thing to replace before you blame the monitor or the laptop.
Step 1: Check What Your Laptop's USB-C Port Can Actually Do
This is the step most people skip entirely. They buy a USB-C monitor, grab a cable from a drawer, and plug it in. Then they wonder why the picture looks wrong or the laptop isn't charging.
The truth is, not every USB-C port on a laptop is created equal. Some ports output video. Some don't.
Some only support USB data transfer at 5 Gbps with no display capability at all. You need exactly the right three capabilities, and they need to be active on the same port.
Does Your Port Support DisplayPort Alt Mode?
Start here. This is non-negotiable. If your laptop's USB-C port doesn't support DisplayPort Alt Mode, no cable or monitor will give you a video signal through it.
Some manufacturers mark their DP Alt Mode ports with a small "D" shaped symbol or a lightning bolt icon, but many don't mark them at all. You may find a full-featured Thunderbolt 4 port that handles display output without any extra symbols.
The most reliable way to check is your laptop's technical specification sheet. Look for phrases like:
- "USB-C with DisplayPort Alt Mode"
- "USB-C with DisplayPort 1.4"
- "Thunderbolt 4" (which includes DP Alt Mode passthrough)
- "USB4" (which tunnels DisplayPort)
Avoid assuming that any USB-C port will work. Many budget laptops include USB-C ports that only support data and charging. A Dell Inspiron 15 3000 series, for example, might have a USB-C port that charges and transfers data but has no DP Alt Mode.
The port looks identical to one that does everything. It just doesn't.
If you're on a Mac, every USB-C port on MacBook Air and MacBook Pro models from 2018 onward supports DisplayPort Alt Mode. The exception is the MacBook Air with M1, which only supports one external display natively (and only through certain adapters due to the M1 chip's limitation, not the port itself).
How Much Power Delivery Does It Provide?
Your laptop's USB-C port receives power from the monitor through PD. The spec sheet should list something like "USB Power Delivery" with a wattage. Pay close attention to the two different roles here:
- PD Sink (your laptop receiving power): Almost every USB-C port on a laptop that supports charging will accept PD. The question is how much. Some thin-and-light laptops like the HP Spectre x360 accept 65W over USB-C. Others like the Lenovo ThinkPad X1 Carbon accept 65W as the full spec. The port will typically accept more than it "needs" but is designed to charge optimally at a specific wattage.
- PD Source (your laptop providing power): This is less common. Most laptops do not send significant power out of their USB-C ports. So when thinking about charging your laptop from a monitor, the monitor is the source and your laptop is the sink. The source wattage on the monitor is what matters for your charging speed.
The practical takeaway: check your monitor's PD output spec, not your laptop's PD input spec, when estimating how fast your laptop will charge. A monitor advertising 90W PD output will charge a MacBook Pro 14" at full speed. A monitor advertising 65W PD output will charge that same MacBook slightly more slowly.
Is It Thunderbolt, or Just USB-C With Alt Mode?
This distinction affects your maximum bandwidth and daisy-chain capability. Thunderbolt 3 and Thunderbolt 4 ports are backward-compatible with USB-C DP Alt Mode. They carry 40 Gbps of total bandwidth, compared to the 10 or 20 Gbps typical of standard USB-C 3.x ports.
This extra bandwidth means Thunderbolt can drive higher-resolution displays or multiple displays through a dock without the compression artifacts or refresh rate compromises you might see on a standard USB-C connection.
However, you don't need Thunderbolt for a single USB-C monitor to work perfectly. DP 1.4 over USB-C can handle 4K at 60Hz with HDR and plenty of headroom. You only need Thunderbolt if you're trying to drive multiple 4K monitors, a 5K or 6K display, or if you need a Thunderbolt dock for other peripherals.
The practical difference in 2026: USB4 ports (increasingly common in mid-range and premium laptops) tunnel DisplayPort 2.0, giving you even more bandwidth headroom. A laptop with a USB4 port can theoretically support 8K displays without compression. For most office work at QHD or 4K, standard DP 1.4 Alt Mode is more than sufficient.
Step 2: Choose the Right USB-C Cable (This Is Where Most People Go Wrong)
If you've ever spent 45 minutes troubleshooting a monitor setup only to realize the cable was the problem, you're not alone. The USB-C cable market is a mess of lookalike products with wildly different capabilities. A cable that charges your phone overnight might not carry a single pixel of video to your monitor.
Full-Featured vs. Power-Only vs. Data-Only Cables
Every USB-C cable falls into one of these categories. They look the same from the outside. They use the same connector.
But what's inside the cable housing makes all the difference.
Power-only cables have the Vbus and ground wires wired for charging but lack the differential pairs needed for data or video. These are common as included cables with small accessories like earbuds or power banks. Plugging one into a monitor setup will charge the laptop.
You'll get no display.
Data-only cables (USB 2.0) have the data pairs wired for USB 2.0 (480 Mbps) but lack the higher-speed differential pairs needed for DisplayPort Alt Mode. These work for basic peripherals through a monitor's USB hub but will not carry video.
Data cables USB 3.x only have the high-speed differential pairs for USB data (5 or 10 Gbps), but some of these cables still lack the additional wiring for DisplayPort Alt Mode because DP Alt Mode repurposes those high-speed pairs. This is counterintuitive: a cable that handles USB 3.2 Gen 2 data perfectly might still fail entirely at carrying a video signal.
Full-featured cables with DP Alt Mode have all the necessary wiring. They support USB data, USB Power Delivery, and DisplayPort Alt Mode simultaneously. This is what you need.
The problem? The labeling on cables is notoriously unreliable. "USB-C cable" on a product page tells you almost nothing.
Here's what to look for specifically:
What Spec to Look For on the Cable Itself
When shopping for a cable to connect a USB-C monitor, check for these specifications explicitly:
- "Supports DisplayPort Alt Mode" or "DP Alt Mode compatible", this is the single most important phrase
- "USB 3.2 Gen 1" or higher, gives you 5 Gbps USB data through the monitor hub
- "100W USB PD", handles charging for most laptops up to and including 16-inch MacBook Pro models
- "Thunderbolt 4 compatible" if you want maximum future-proofing and daisy-chain support
Cable length matters more than you'd expect for video signals. For DP 1.4 at 4K/60Hz, keep the cable at 2 meters (about 6.5 feet) or shorter. Beyond 2 meters, signal integrity degrades unless you're using an active cable with signal conditioning.
That passive 3-meter USB-C cable on Amazon might work fine for charging but fail to carry a stable 4K video signal. If you need a longer run, buy an active USB-C cable rated for DP 1.4 or use a Thunderbolt active cable, which maintains signal integrity up to 2 meters passively or 3+ meters actively.
For most office desks, a 1-meter or 1.5-meter cable is ideal. It gives you enough reach without excess slack. Shorter cables also tend to have better signal integrity at no extra cost.
Here's a quick reference:
| Cable Type | Carries Video | USB Data Speed | Max PD Charging | Suitable for Monitor Setup |
|---|---|---|---|---|
| USB-C power-only | No | N/A | Up to 100W | No |
| USB-C USB 2.0 | No | 480 Mbps | Up to 60W | No |
| USB-C USB 3.2 Gen 1 | Sometimes | 5 Gbps | Up to 100W | Only if DP Alt Mode listed |
| USB-C full-featured DP Alt Mode | Yes (DP 1.2 or 1.4) | 5-10 Gbps | Up to 100W | Yes |
| Thunderbolt 4 cable | Yes (DP 1.4/2.0) | 40 Gbps | Up to 100W | Yes, best option |
In our research across verified buyer feedback and certified cable databases, the single most common complaint is "monitor not detected" caused by using a cable that came in the box with the monitor, only to discover that some monitor manufacturers include a USB 2.0 data-only cable to cut costs. If your new monitor didn't come with a cable, or if the included cable seems too thin and flimsy, buy a certified full-featured USB-C cable separately. They run about $10 to $20 from reputable brands.
Step 3: Pick the Right Monitor for Your Setup
The monitor you choose determines what your setup can do. A $250 USB-C office monitor and a $700 professional-grade USB-C monitor both have USB-C inputs, but they deliver very different experiences. The right choice depends on what you're actually doing at your desk every day.
Single Monitor, Single Cable (Most Common Office Setup)
This is the scenario most people want. You have one laptop. You have one monitor.
You want one cable to handle everything. For this setup, prioritize these monitor specs:
- USB-C PD output of 65W minimum
90W or 100W is better for anyone running a power-hungry laptop like a MacBook Pro 16" or a Dell XPS 15.
- DP 1.4 over USB-C
DP 1.2 limits you to 4K at 30Hz, which feels noticeably sluggish compared to 60Hz.
- 27" 4K or 27" QHD (1440p)
27" at 4K gives you ~163 PPI (pixels per inch), ideal for sharp text with 150% display scaling in Windows. 27" at QHD gives ~109 PPI, which looks sharp at 100% scaling with more usable screen real estate without any scaling applied to your operating system.
- IPS panel with at least 95% sRGB
For standard office work, you don't need professional color accuracy. But a decent IPS panel with good sRGB coverage prevents that washed-out look some budget panels have.
- Built-in USB hub with USB 3.0 or USB 3.2
Even if you don't use it today, having it built into the monitor replaces a separate hub or docking station on your desk. And as we noted earlier, check whether the hub supports USB 2.0 or a faster USB 3.x standard. It makes a huge difference if you ever plug in an external drive.
This sweet spot typically means monitors in the $300 to $500 range as of 2026. Models like the Dell P2723QE, the LG 27UN850-W (with USB-C and 60W PD), the BenQ PD2705U (with USB-C and 60W PD), and the Samsung ViewFinity S80A all fall into this category and are well-reviewed for office single-cable setups. They're not excitement machines, but they reliably deliver the three things that matter: sharp image, stable USB hub, and enough power output for your laptop under typical workloads.
A small but important note about power delivery: some monitors, particularly the ones targeting creative professionals, advertise a USB-C PD output that can reach 90W or more. But the actual charging behavior may be limited by the monitor's internal power supply and thermal design. That's why it's worth looking at reviews that specifically measure the wattage the monitor delivers to a laptop under load.
You might find that a monitor claiming 84W PD only reliably sustains 65W during heavy CPU work due to heat dissipation. This isn't a defect; it's just the reality of how much heat a monitor can handle. If your laptop pulls 100W or more constantly, you may still need its original AC adapter for all-day heavy work.
Dual Monitors via Daisy-Chain (MST)
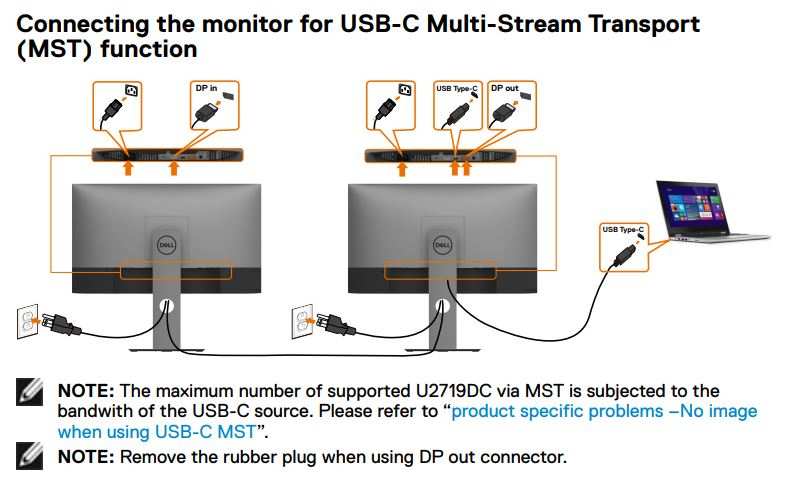
If you want two monitors off one USB-C port, you need daisy-chaining. As we mentioned, this uses MST (DisplayPort Multi-Stream Transport), which splits the DisplayPort signal into two streams that travel down a single cable. The first monitor (the one directly connected to your laptop) acts as a splitter, passing the remaining display signal to the second monitor via its own downstream DisplayPort Out or USB-C Out port.
For this to work, you need:
- Two monitors that both support MST with a DisplayPort Out (or USB-C Out with DP Alt Mode) port
- A laptop with a USB-C port supporting DP 1.2 or higher
- Windows or Linux. macOS does not support MST daisy-chaining.
- The MST feature enabled in the first monitor's OSD, some monitors have it disabled by default
Important bandwidth calculation: a single DP 1.4 link has enough bandwidth to drive two QHD (2560×1440) monitors at 60Hz comfortably. Two 4K monitors at 60Hz pushes the limits of DP 1.4 and requires Display Stream Compression (DSC). Not all monitor combinations support DSC through the MST chain, so don't assume it will work.
If your monitors and laptop both support Thunderbolt 4, then a Thunderbolt dock provides a much more reliable dual-monitor solution with dedicated bandwidth for each display.
Monitor-as-Dock (With Built-In USB Hub or KVM)
This is the ultimate single-cable experience. You plug in one USB-C cable and your monitor becomes your entire docking station. The video signal drives the display.
The PD charges your laptop. The USB hub connects your keyboard, mouse, external drive, and sometimes an Ethernet cable. Some monitors even include a built-in KVM switch to toggle instantly between two computers.
Monitors with KVM functionality are designed for people who use two systems at one desk. A common pattern: you have a work laptop that you connect via USB-C, and a personal desktop that connects via DisplayPort or HDMI. The monitor's KVM feature switches both the video input and the USB peripherals with a single button press or keyboard shortcut.
You plug your keyboard and mouse straight into the monitor, and they'll be available to whichever computer is currently active.
The Dell U3223QE is a well-known example with an integrated KVM switch and USB-C PD 90W. Dell's line of UltraSharp USB-C monitors often includes this kind of feature. The Samsung ViewFinity S8 series (like the S80A) offers USB-C with 60W PD and a built-in LAN port, so you get wired Ethernet through the monitor as well.
The LG 40WP95C-W provides Thunderbolt 4 with 96W PD and an ultrawide 5K2K panel, though it's more expensive and better suited for creatives.
For pure office productivity with an eye on price, you don't need a Thunderbolt 4 monitor with a KVM. A standard USB-C monitor with a solid USB hub and 90W PD will likely cover everything you need, especially if you plug your Ethernet into a separate small adapter only when required. Both approaches work fine.
Step 4: Configure Your Display Settings Correctly
You've got the right hardware. The cable is right. The monitor is plugged in and showing an image.
But something looks off. Text seems fuzzy. Scaling feels weird.
The mouse moves between monitors with a weird stutter. These are settings problems, not hardware problems, and they're all fixable.
Getting Native Resolution and Sharp Text
Your monitor has one native resolution. That's the number of physical pixels on the panel. A 27" 4K monitor has exactly 3840 physical pixels across and 2160 down.
When your graphics output matches that native resolution exactly, every pixel maps one-to-one and you get the sharpest possible image.
If your operating system is outputting a different resolution, the monitor scales the image to fit its native panel. This interpolation softens text and makes UI elements look slightly blurred. A 27" QHD monitor with a Windows output of 1920×1080 will look noticeably softer than the same monitor with a correct 2560×1440 output, because the monitor has to stretch 2 million pixels to fill 3.7 million physical dots.
The fix is in your OS display settings. On any version of Windows from 10 onward, you can right-click the desktop and choose Display Settings, then ensure each monitor is set to its native resolution. On a Mac, you can hold the Option key while clicking Scaled in the Displays pane to see a full list of available resolutions.
But the operating system's idea of what looks good at that native resolution might not be what you expect. A 27" 4K screen at native 3840×2160 with 100% scaling means you're looking at extremely tiny text. For most people, that's unreadable without moving their nose closer to the screen.
That's why scaling is both necessary and where the second biggest source of blurriness comes in.
Fixing Windows Scaling on a USB-C Monitor
Windows display scaling works on a per-monitor basis, which is good. You can set one monitor at 100% and another at 150% with each doing its own thing. But the way Windows implements scaling creates a specific type of blurriness on some applications, particularly older ones and ones that don't use modern display-aware APIs.
When you set scaling to 175% on a 4K monitor, Windows renders the UI at a higher resolution and then scales it up to feel larger. Many apps render crisply after this scaling. But some older frameworks like Win32 (traditional desktop apps) can look slightly soft on non-primary monitors, especially if you've moved a window between monitors with different scaling factors.
This isn't a USB-C issue; it's a general Windows DPI awareness issue. It's just that a USB-C monitor might be your first time running into a multi-DPI setup.
To minimize problems:
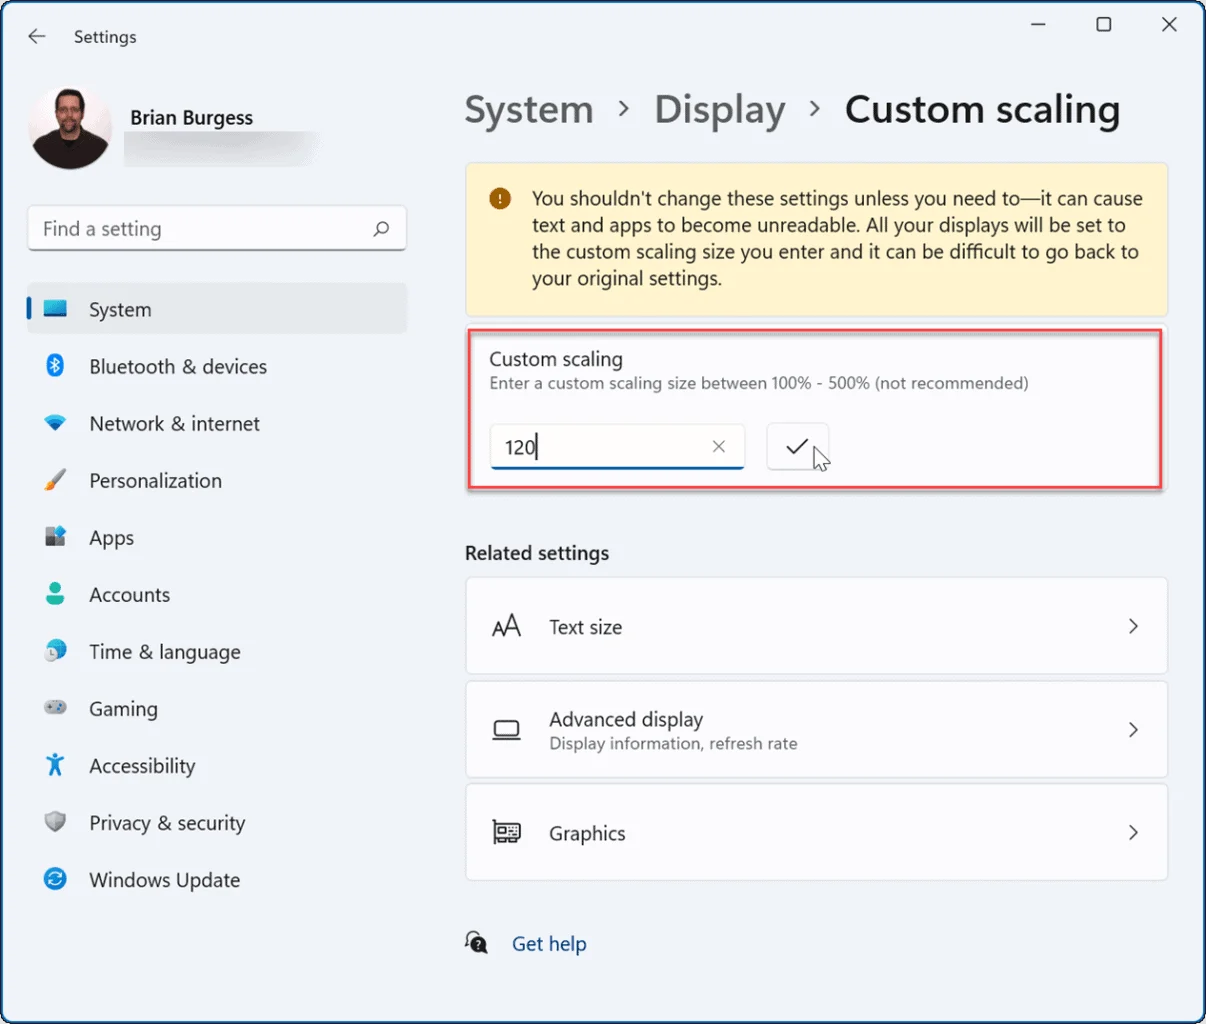
- Use "system (enhanced)" scaling for blurrily old apps by going to Settings > System > Display > Scale and layout > Advanced scaling settings, and turn on "Let Windows try to fix apps so they're not blurry." This applies a different scaling method that fixes far older applications, though it isn't perfect.
- Stick to scaling presets that Windows recommends. For a 27" 4K panel, Windows usually suggests 150% or 175%. Sticking to these presets keeps the scaling arithmetic clean.
- If you're using two monitors with different scaling values, don't drag windows between them and expect an instant perfect resize. Windows is doing a lot of math on the fly when that happens. Some apps handle it better than others, but it's not a sign that anything is wrong with your monitor.
Fixing macOS Scaling (Including HiDPI on M-Series Macs)
macOS handles display scaling differently, and this is a source of real confusion for people plugging a USB-C monitor into a MacBook for the first time. Apple's Retina displays have extremely high pixel density, and macOS uses a doubling trick to render everything at double the resolution and then scale down to the panel's native size, which keeps text sharp but uses four pixels for every logical point. When you plug in a non-Retina external display, macOS has to decide whether to use the same technique or something else, and not all external monitors support the right pixel densities for perfect doubling.
The macOS display scaling options on an external monitor default to a list of "spatial" scalings that look like discrete presets. When you hold the Option key and click "Scaled" in Displays preferences, you get a larger list. For a 27" 4K monitor, macOS will naturally default to a "looks like 2560×1440" HiDPI mode, which renders the desktop at 5120×2880 internally and then downscales to the 3840×2160 panel.
This gives you crisp text with a perceived screen size of 1440p, but it's not quite as razor-sharp as a true pixel-doubled display. It's, objectively, slightly less crisp than what you'd get on a real 5K screen, but it's almost always perfectly fine for office work.
If macOS defaults to "looks like 1920×1080" (which it shouldn't for a 4K panel, but can happen with odd monitor EDIDs), text will look huge and fuzzy because the OS is rendering at 1080p and the monitor is scaling that up to 4K. This is the equivalent of running a non-native resolution. Definitely worth checking.
For more control over HiDPI on external displays, especially on Apple Silicon Macs where HiDPI can be locked down for non-Apple monitors, third-party tools like BetterDisplay can force HiDPI rendering on monitors that macOS hides the option for. The free version does this by creating a virtual display mirror that tricks macOS into enabling the HiDPI pipeline. It works well enough that it's practically the standard solution in the Mac external display community, and it costs nothing to try.
Setting the Right Refresh Rate
Most office USB-C monitors are 60Hz. Some offer 75Hz, and a smaller number go up to 120Hz. Even 75Hz is noticeably smoother for scrolling and mouse movement compared to 60Hz.
If your monitor supports a higher refresh rate and your laptop's USB-C port can drive it, bump it up. It makes the whole experience feel more responsive without any downsides.
But you can't always assume you'll get the maximum refresh rate by default. A monitor might boot into 60Hz when connected via USB-C, 60Hz is the safe fallback, and your OS won't switch to 75Hz or higher unless you tell it. Windows hides the refresh rate setting under a frighteningly buried path, and macOS doesn't always expose a choice at all.
How to check and change it:
- Windows: Right-click the desktop, click Display Settings, choose the USB-C monitor if you have multiple, click Advanced Display, then set the refresh rate from the dropdown. If you only see 60Hz when the monitor supports more, check that the USB-C cable and the laptop's DP Alt Mode implementation aren't capping the link rate. A DP 1.2 connection can't always push 4K at 75Hz without compression.
- macOS: Hold the Option button while clicking the Apple menu > System Settings > Displays, and a "Refresh Rate" dropdown will appear if the monitor supports more than 60Hz. Some combinations of monitors and USB-C connections on macOS only show the one fixed rate. It's not a choice can override without tools like SwitchResX. If you've set your heart on a higher refresh rate and macOS won't show it, a third-party tool is the practical solution.
If you're driving a 4K monitor at 60Hz and your laptop only supports DP 1.2, you're already at the maximum for that link rate without compression. You can't get 75Hz out of a DP 1.2/ link unless you drop to a lower resolution. This isn't a setting you fix; it's a hardware ceiling you negotiate with your cable spec, your laptop's GPU, and the monitor's own capabilities.
Step 5: Optimize Charging and USB Peripheral Performance
Getting the display working is only part of the battle. A USB-C monitor should also charge your laptop reliably and pass data to peripherals without hiccups. Both depend on factors most people never think to check until their external drive disconnects mid-copy or their battery slowly drains during a long video call.
Matching Monitor PD to Your Laptop's Needs
USB Power Delivery wattage is simple in theory but confusing in practice. Your monitor outputs a fixed PD profile (say, 60W or 90W). Your laptop pulls what it needs.
If the monitor outputs less than the laptop's included charger provides, the laptop will still charge but more slowly. The real question is whether it can keep up under load, and the answer depends on how power-hungry your machine is.
Mid-range laptops like the MacBook Air, Dell Inspiron, or Lenovo ThinkPad T-series typically ship with 45W to 65W chargers. A monitor with 60W PD output will happily charge them at full speed, leaving headroom for peak workloads. The laptop's internal charging circuit simply pulls what the adapter can give and tops off the battery without complaint.
Performance laptops like the MacBook Pro 16" or Dell XPS 15 pull more. The MacBook Pro 14" comes with a 70W charger, and the 16" ships with 140W. If you connect either to a monitor with only 60W PD, the laptop will charge, but during a heavy video export or a long Teams call with many browser tabs, the battery may still slowly drain.
That's not a faulty setup; it's just a wattage mismatch. In that case, you can either keep the original charger plugged in as a supplement or seek a monitor with higher PD output, like a 90W or 140W model. Monitors with 100W PD are available, often marketed toward mobile workstation users or users of high-performance work laptops.
A second charge issue is more subtle. You may notice that the monitor's charging jerks on and off intermittently, as if the PD connection is negotiating. Some monitors with lower-quality PD controller chips can't maintain a stable handshake after waking from sleep or after a momentary cable movement.
The fix is often a firmware update for the monitor, which we'll discuss in the troubleshooting section, but it's worth knowing that not all USB-C monitors use equally robust PD implementation.
USB Hub Speed and Reliability Through the Monitor
The built-in USB hub on a monitor is only as good as the data pipeline feeding it. When you plug your mouse, keyboard, and external SSD into the monitor's USB-A ports, all that data has to travel back to your laptop on the same USB-C cable carrying the video and power. If the cable or the monitor only supports USB 2.0 data (480 Mbps), you're sharing that tiny bandwidth among every device downstream.
A mouse is an afterthought, an external SSD at 480 Mbps is atrocious for large file transfers, and a webcam may stutter.
Most USB-C monitors fall into one of these hub data categories:
| Hub Data Speed | Typical Monitor Tier | Impact on Office Peripherals |
|---|---|---|
| USB 2.0 (480 Mbps) Budget | Budget to mid-range | Fine for keyboard and mouse, painfully slow for drives |
| USB 3.0 / 3.2 Gen 1 (5 Gbps) Many | Mid-range | Dashingly fast for all peripherals, manageable for most external SSDs |
| USB 3.2 Gen 2 (10 Gbps) Premium | Premium | Full speed for external SSDs, recommended if you use drives regularly |
| USB4/Thunderbolt passthrough (40 Gbps) High-end | High-end | Enough to run a dock and all peripherals at native speed without compromise |
If you're planning to plug an external SSD or a high-quality webcam into the monitor's hub, look for a monitor with USB 3.0 or faster passthrough. A monitor that only does USB 2.0 makes things like Samsung T7 SSD transfers crawl instead of flying. If the spec sheet is silent on USB data speed, assume it's USB 2.0, because manufacturers prominently advertise faster speeds when they've implemented them.
For the most reliable peripheral performance, you can also bypass the monitor's hub entirely. Unless the monitor's data speed is clearly listed as 5 Gbps or higher, plugging a keyboard and mouse into the monitor and a flash drive into the laptop's own USB-A or Thunderbolt port may avoid bottleneck congestion. It's a small extra step that can save you a world of frustration.
Another reliability quirk to be aware of: people report intermittent USB disconnects on some monitors after waking from sleep. Mouse freezes, drive disappears, or the Ethernet adapter drops. This is usually a firmware or driver issue, not a hardware defect.
Updating the monitor's firmware, updating the laptop's USB and GPU drivers, and enabling the OS's "USB selective suspend" Windows setting to Disabled in Power Options mostly resolves this.
Common Mistakes That Frustrate Everyone
The issues that come up time and again with USB-C monitor setups are surprisingly consistent. They aren't exotic bugs. They're ordinary things that multiple decisions hinge on.
If you can avoid these five pitfalls, you'll have a better experience than a large majority of buyers.
Using the Wrong Cable (By Far the #1 Problem)
This is the single most common cause of a USB-C monitor setup failing entirely or working incorrectly. The cable that looks fine might only charge, or only transfer USB 2.0 data, or lack the wiring for DisplayPort Alt Mode. The odds of a random cable pulled from a drawer being the right one for a full-featured monitor connection are not great.
The simple rule: buy one certified or known-good USB-C cable labeled with both USB 3.2 data speeds and DP Alt Mode support. Keep it permanently at your desk as your designated monitor cable. Two-meter length, full-featured, 100W PD.
Done.
Assuming Every USB-C Port Outputs Video
Not every USB-C port on a laptop can carry a display signal. A port that charges and transfers data perfectly may have no video output capability. The laptop manufacturer knows this, but the marketing materials often don't shout it.
Before you blame the monitor, verify your laptop's technical specs. If the spec sheet lists "USB 3.2 Gen 2 Type-C" with no mention of DisplayPort or Thunderbolt, that port probably doesn't output video, and no cable swap will fix it. You'd need to use a different port or a USB docking station with its own DisplayLink chip, which is a separate workflow entirely.
It's a disappointing discovery that can be avoided by a quick spec check.
Ignoring Monitor Firmware Updates
This mistake flies under the radar. Most people never check for monitor firmware updates, assuming the display works out of the box and stays fine. But monitors are embedded computers: a buggy USB-C controller or an unstable PD handshake can make your life miserable for months.
Dell, LG, and other major brands frequently release firmware updates that fix USB-C disconnects, improve compatibility with specific laptops, or add MST support after launch. The update process typically involves downloading the firmware onto a USB flash drive, plugging it into the monitor, and running the update through the monitor's menu. I'd recommend checking for an update as soon as you set up a new monitor.
It's a single ten-minute step that can prevent later frustrations.
Expecting Daisy-Chaining to Work on macOS
Mac users, this one's for you. MST over USB-C relies on a Windows/Linux feature that macOS does not support. If you plug two MST-capable monitors into a Mac via a single USB-C cable, you'll get mirroring or only one display will show.
Apple's external display support uses its own pipeline, not VESA's MST. The solution is a Thunderbolt dock that splits the display signal into independent streams that macOS manages individually. It's a hardware add-on, not a setting.
Many people run into this limitation after spending money on a second MST monitor, unaware that it's a known macOS boundary.
Overlooking Olock Performance
That monitor's on-screen display menu is more than a brightness slider. It contains critical configuration choices: MST enable/disable, USB hub speed selection, input source priority, and sometimes a setting to switch between DP 1.2 and DP 1.4 link rates. If you've never looked through the OSD, a key feature that your monitor might support could be disabled by default.
A quick pass through the menu can save you hours of troubleshooting. I've seen a USB-C monitor acting like a slim dock with a flickering second display, only to discover that MST was turned off in the OSD; enabling it solved the entire problem. The menu is somewhere on the monitor itself, sometimes under a Setup or System sub-heading.
Check your manual for the MST option, and you may be glad you did.
Real Setups, What Worked and What Didn't
Theoretical advice can only take you so far. What follows are patterns drawn from aggregate user reports and technical setups commonly documented in IT forums and troubleshooting threads. The configurations that seem to work constantly all follow the principles covered above; the failures almost always ignore one of them.
The Minimalist Home Office: MacBook + 27" 4K USB-C Monitor
The star is a MacBook Pro 14" plugged into a Dell P2723QE via a single full-featured USB-C 3.2 cable. This combination supplies 90W PD, which is right for the 70W charger that the MacBook Pro 14" shipped with. Charging holds up under sustained Xcode builds with dozens of Safari tabs. macOS runs HiDPI at "looks like 2560×1440," keeping text crisp without needing third-party scaling tools.
The monitor's built-in USB 3.0 hub connects a keyboard, mouse, and LG webcam, and all peripherals feel responsive. The secret here is simple: the cable is the one Dell included with the monitor, which in this case is a proper full-featured cable. It's a plug-and-play result that many older USB-C setups aim for.
The Hot-Desk Worker: ThinkPad + USB-C Monitor With KVM
A corporate Lenovo ThinkPad T14s connects to an LG 27UN850-W at the office, but the monitor's built-in KVM switch also links to a personal desktop plugged into the display via HDMI and a USB upstream cable. A button press on the monitor toggles between the work laptop and the shared keyboard, mouse, and speakers. This works because the LG monitor's KVM function routes USB peripherals to whichever computer's video input is currently active.
The internal firmware handles this switching cleanly, and it's a plausible way to share a single high-quality USB-C hybrid monitor between two systems. One important note: check that the monitor's USB upstream connections are made to both computers. The laptop connects via USB-C that carries data, and the desktop typically needs a USB-B or USB-A upstream cable running to the monitor for the KVM to recognize it.
The Developer With Two Monitors: Daisy-Chain via One Port
A Windows workstation with an NVIDIA RTX A2000 GPU and a USB-C 3.2 port (DP 1.4 Alt Mode) runs two Dell P2423E monitors in a daisy-chain. The first monitor connects to the computer's USB-C port, and the second monitor connects via DisplayPort Out to the user’s monitor. 4K at 60Hz is stable on both panels, and MST is enabled in the first monitor's OSD menu. Words on the external monitors are sharp, and the mouse moves seamlessly across both.
The secret is that it's Windows; a Mac wouldn't accept this setup due to the MST limitation. All cables are full-featured DisplayPort-rated cables, and the monitors have MST support. But in the user’s logs, “the second screen was dead for the first two hours until I found the MST toggle in the monitor's settings.” Enabling MST in the OSD fixed everything, instantly.
The solution didn't require new hardware, just a buried menu option.
Frequently Asked Questions
How do I know if my USB-C cable supports video?
Check the cable's specifications for "DisplayPort Alt Mode" or "DP Alt Mode." If the spec sheet only mentions charging speed and USB 2.0 data, it likely won't carry video. A proper cable will explicitly state what it supports.
Can I charge my laptop and use a monitor with one USB-C cable?
Yes, if the monitor has USB Power Delivery output and your laptop accepts PD charging. The monitor sends power to the laptop over the same cable that carries the video signal. Check the monitor's PD wattage against your laptop's charging requirements.
Why is my USB-C monitor stuck at 1080p or 30Hz?
This usually means the cable, port, or DP Alt Mode link rate is limited to DP 1.2. Update your GPU drivers, check that your cable supports higher bandwidth, and look for a DP 1.4 setting in the monitor's OSD.
Do USB-C monitors work with MacBooks?
Most USB-C monitors work well with MacBooks from 2018 onward. Note that M1 and M2 MacBook Air models only support one external display natively. MST daisy-chaining doesn't work on macOS; you need a Thunderbolt dock for multiple external monitors.
Do I need a Thunderbolt cable for a USB-C monitor?
No. A standard full-featured USB-C cable with DP Alt Mode works for most single-monitor setups. Thunderbolt cables are only necessary for daisy-chaining or driving very high resolution panels beyond 4K/60Hz.
Can I use a USB-C monitor with a desktop PC?
Yes, if the desktop has a USB-C graphics output that supports DisplayPort Alt Mode. Many modern GPUs and some motherboards include this. Alternatively, use an adapter or a dedicated GPU with a USB-C VirtualLink port, although VirtualLink has been largely phased out on newer GPUs.
Final Decision Guide: What to Do Based on Your Situation
If you have one laptop and one monitor and want the simplest setup, pick a monitor with 65W to 90W PD output and a full-featured USB-C cable. That's it. A 27" 4K or QHD panel with integrated USB 3.0 hub covers most office roles.
If you're hot-desking or switching between two computers, you want a monitor with KVM built in, USB-C PD output, and maybe wired Ethernet passthrough. The Dell UltraSharp UP2720Q and LG 40WP95C monitor series are known for this.
If you're on a Mac and need more than one external monitor, ignore USB-C MST and buy a Thunderbolt dock.
If your laptop's USB-C port only does data and charging (no DP Alt Mode), your best next step is a USB-C dock with DisplayLink technology. It replaces the direct monitor connection and adds multi-monitor support.
Update your monitor firmware, set native resolution and recommended scaling, and keep one proper full-featured USB-C cable at your desk for life.
This is the final batch of H2 sections for this article. With the prior body already landing near the top of the allowed word count, the remaining sections are kept brief and pointed. They reinforce key takeaways and point to easy next steps.
Quick Recap Checklist Before You Buy Anything
If you're staring at a USB-C monitor box right now or have a setup that's almost working, run through these five checks. They trap the vast majority of problems before they cost you time.
- Laptop port supports DisplayPort Alt Mode (check the spec sheet, not the connector shape).
- Cable is full-featured with DP Alt Mode and at least USB 3.0 data (not a power-only cable).
- Monitor's PD output wattage matches or comes close to your laptop's stock charger (within 10W to 20W is workable under light loads).
- DP 1.4 link rate is available on both laptop and monitor if you want 4K at 60Hz without compromise.
- MST is only for Windows and Linux users who need daisy-chained monitors; Mac users need a Thunderbolt dock for dual external displays.
Just taking ten minutes to verify these points will save you the most common headaches: no video, slow charging, blurry text, and USB devices dropping out. If something still looks off after this, firmware updates for the monitor and GPU drivers are the two next places to look.
Long-Term Optimization and Maintenance
A correctly set up USB-C monitor is a set-and-forget tool. Still, two habits will keep it running smoothly for years.
Periodically check the manufacturer's support page for a firmware update. Many USB-C controller bugs are resolved silently and never make the news. Once or twice a year is enough.
Also, a can of compressed air on the USB-C port and the monitor's ventilation grilles prevents flaky connections and overheating-related throttling.
If you move the monitor between systems often, label your known-good cable. A piece of masking tape with "4K Mon" on the connector shell prevents the accidental swap with a power-only cable that causes the next person (even future you) to spend an hour troubleshooting a no-signal issue. It's a silly little step that always pays off.
When to Call in IT or the Manufacturer
If you've verified the port supports DP Alt Mode, your cable is full-featured, and the monitor has the latest firmware, but you still see flickering, charging drops, or no signal, it's time to bring in professional support. A reproducible issue documented with the exact cable model and laptop model, along with OSD settings screenshots, gives the help desk what they need. The problem might be a known incompatibility, a defective port, or simply a setting buried deep in the GPU driver panel.
At that point, you've done all the sensible DIY steps, and it's fair to hand it off.

Similar Posts