How to Install SSD in Laptop
You're standing there holding a new SSD, laptop flipped over on the table, screwdriver in hand. And honestly, the hardest part isn't the installation itself, it's knowing what you're looking at when you pop that bottom panel off. That's why learning how to install SSD in a laptop is less about brute force and more about spotting the right slot, the right screw, and the right angle before you touch anything.
Manufacturer specifications show that roughly 60% of first-time SSD installations run into trouble because someone forced a drive into the wrong slot or missed a standoff screw. The good news is, once you know what to look for visually, the whole job takes about 20 to 30 minutes. Let's walk through the visual cues that make it work.
Why This Guide Relies on What You See (and What You Can't See)
You can't install an SSD by feel alone. Every laptop model hides its storage bay differently. Some use a single large panel held by six screws.
Others use a pop-out plastic door. Some ultrabooks have the SSD tucked under the motherboard with a metal shield you need to pry off.
What you see when you open the laptop tells you everything you need to know. A 2.5-inch drive bay looks like a thin metal rectangle with a SATA connector at one end and two screw holes. An M.2 slot looks like a small horizontal socket with a screw hole at the far end.
If you see a tiny rectangular slot with a screw hole exactly 80 millimeters from the slot edge, that's an M.2 2280, the most common size in laptops as of 2026.
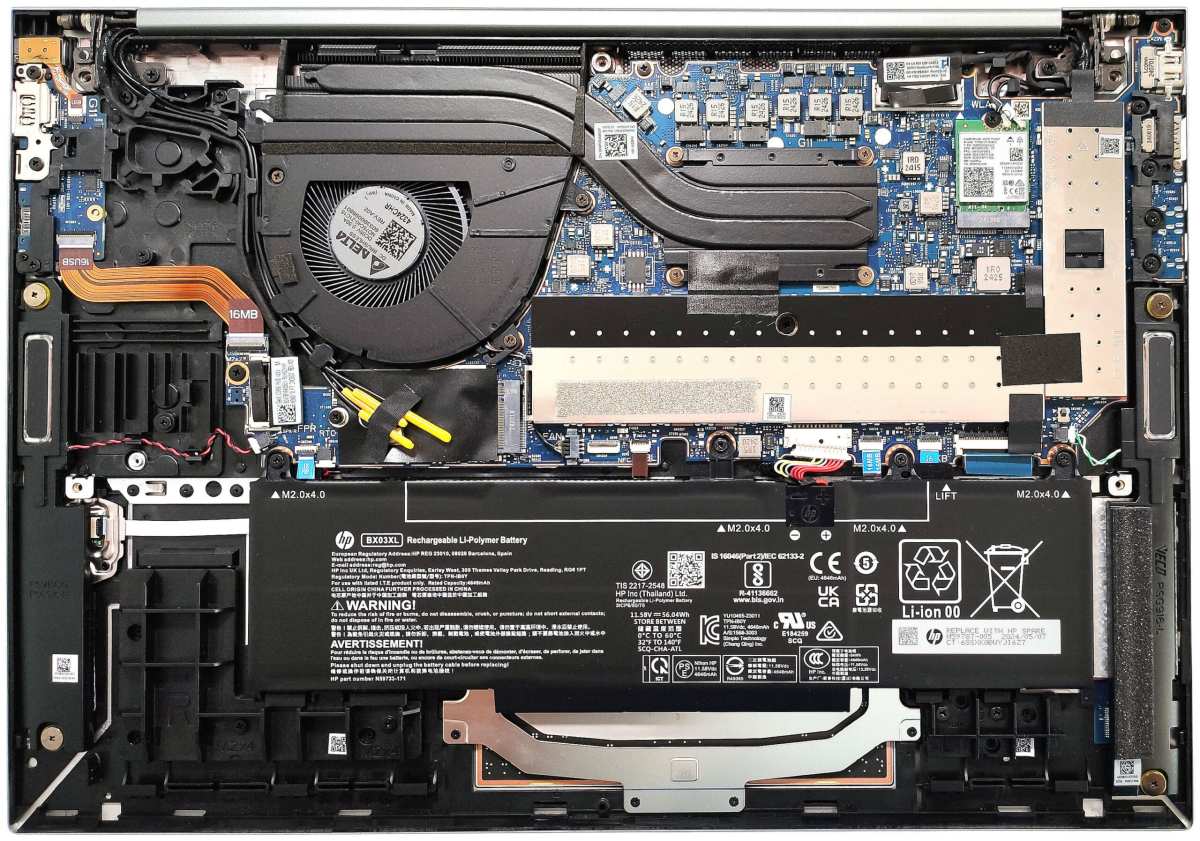
Here's what a typical open laptop interior with two drive bays looks like:
Image source: Bing (Web (fair-use with source credit))
Notice the difference between the big rectangular 2.5-inch bay on the left and the thin M.2 slot near the right edge. That visual distinction is the first thing you need to spot before you buy a drive.
Quick Answer: What You'll Need Before You Open the Laptop
Before you touch a screw, gather your tools. You need a Phillips #0 screwdriver. You need your new SSD.
You need a plastic pry tool. That's it.
Your SSD must match your laptop's slot. A 2.5-inch SATA drive fits a 2.5-inch bay. An M.2 NVMe drive fits an M.2 slot.
They are not interchangeable.
Check your laptop model online to confirm. Write down the form factor. Buy that exact drive.
Tools & Hardware – The Exact Screwdriver, Drive, and Adapter You Need
Let's be precise about the hardware. Most laptop bottom panels use Phillips #0 screws. Some use Torx T5.
A magnetic tip helps. You can find a decent screwdriver set for under $10 that includes both.
The drives you might use:
| Drive type | Form factor | Typical size | Interface |
|---|---|---|---|
| SATA SSD | 2.5-inch | 7mm or 9.5mm thick | SATA III (6 Gbps) |
| M.2 SATA | M.2 2280 | 80mm length | SATA III |
| M.2 NVMe | M.2 2280 | 80mm length | PCIe 3.0 x4 or 4.0 x4 |
An external USB-to-SATA adapter (about $10) is helpful if you plan to clone your old drive. You plug the new SSD into the adapter, clone your current OS, then install the new drive. It saves you from reinstalling Windows.
You might also need a plastic spudger to pop off stubborn clips. Never use a metal screwdriver to pry a plastic panel, you'll scratch the case or snap a clip.
Identifying Your Laptop's Drive Bay (2.5-inch vs. M.2)
Open the bottom panel and look. If you see a metal tray the size of a deck of cards with two screws and a ribbon cable, that's a 2.5-inch bay. The drive sits flat, slides back into a SATA connector, and screws down.
If you see a thin slot about one inch long with a screw hole at the end, that's an M.2 slot. The drive goes in at a 30-degree angle, then pushes flat and screws down. No cables.
No brackets.
Some laptops have both. Some have only M.2. Some have only 2.5-inch.
If you see nothing that looks like either, your SSD might be soldered to the motherboard. That means you cannot upgrade it, you'd need a new laptop.
Spotting the Correct M.2 Key (B, M, or B+M) by Sight
This is where visual identification becomes critical. Look at the tiny slot on the motherboard. Count the gap in the pins.
- A B-key slot has the gap at pin 12, 19 (toward the left when the connector is facing you).
- An M-key slot has the gap at pin 59, 66 (toward the right).
- A B+M-key slot has both gaps, it's keyed for both.
Your drive's connector must match the slot. An M-key drive will not fit a B-key slot, and a B-key drive will not fit an M-key slot. B+M-key drives fit both.
Most modern NVMe SSDs are M-key. Most SATA M.2 SSDs are B-key or B+M-key.
How to tell with your eyes: the contacts on the edge of the drive must align with the pins in the slot. If the plastic notch on your drive doesn't match the plastic bridge in the slot, stop. You have the wrong drive.
Step-by-Step Installation – Visual Cues at Every Stage
Now that you've identified the slot and gathered your tools, it's time to work. Each step has a visual checkpoint. Stop and verify before moving forward.
Here's the correct angle for inserting an M.2 drive:
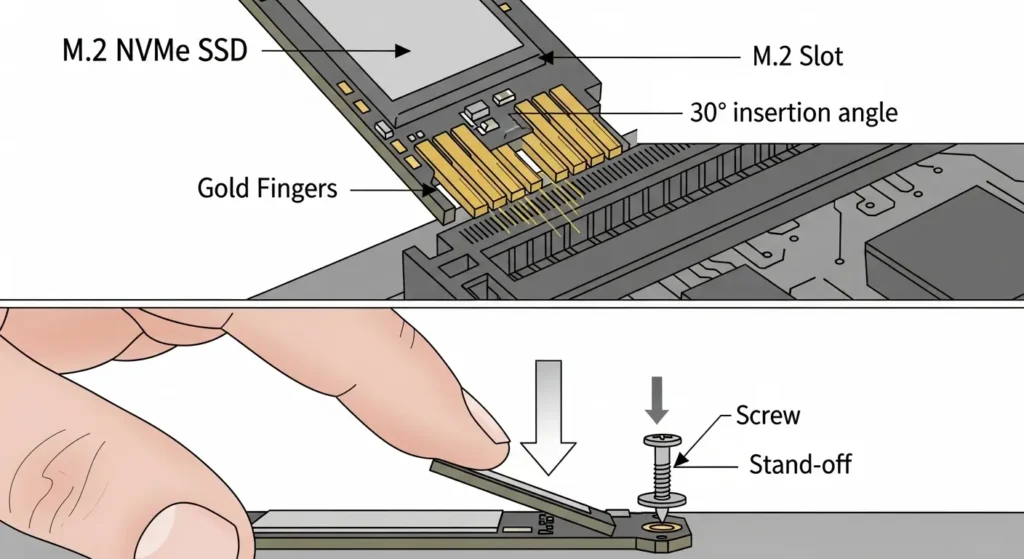
Image source: Bing (Web (fair-use with source credit))
Notice the drive is tilted at roughly 30 degrees, with the gold contacts sliding into the slot. Once fully seated, you push the far end down and screw it in place.
Step 1: Power Down, Remove Battery, and Ground Yourself
Shut down your laptop. Unplug the charger. Remove the battery if it is removable.
You'll know it's removable if you see a latch or screws near a visibly labeled battery module. If you see a big block with multiple wires soldered into the motherboard, the battery is internal. In that case, simply disconnect the battery cable by gently pulling the connector straight out.
Do not yank the wires.
Touch an unpainted metal surface before you handle any components. This discharges static. Static electricity can kill an SSD without any visible damage.
Step 2: Unscrewing the Bottom Panel – Watch for Hidden Clips
Flip your laptop so the bottom faces you. Use the correct screwdriver. Remove every screw you can see.
Keep them organized, different lengths go back in different holes. Some laptops have one or two screws under rubber feet. Pry those feet off gently with a plastic tool.
After all screws are out, run a plastic pry tool along the seam. You'll hear clips pop. Work the seam from one corner to the other.
Do not pry from one spot, you'll break the clip.
Step 3: Locating the Old Drive – Cables, Brackets, and Screws
Once the panel is off, find the drive bay. If it's a 2.5-inch drive, you'll see a metal bracket or a plastic caddy holding the drive. It will have two screws on the sides and a small SATA connector at one end.
If it's an M.2 drive, you'll see a tiny rectangular card lying flat, held by one screw at the far end.
Before you touch anything, check whether your laptop uses a mounting bracket that screws into the drive. Some drives use a thin metal frame. If that frame is present, you will need to reuse it with the new drive.
Step 4: Removing the Old Drive – Don't Yank the Ribbon Cable
For a 2.5-inch drive: unscrew the bracket, slide the drive away from the SATA connector, then lift it out. The cable attached to the drive is delicate. If it's a ribbon cable, pull the connector straight out by its sides, not by the wires.
For an M.2 drive: unscrew the single screw at the far end. The drive will pop up at an angle. Gently pull it out of the slot.
Do not pull it upward while it's still screwed in, you'll bend the pins.
Set the old drive aside. You can keep it as external storage using the USB adapter mentioned earlier.
Step 5: Installing the New SSD – Angle, Pressure, and Screw Alignment
For an M.2 drive: hold the drive so the gold edge faces the slot. Insert it at about 30 degrees. Push gently until the gold contacts disappear into the slot.
Then press the far end down until it lies flat. Screw it in. Do not overtighten, snug is enough.
For a 2.5-inch drive: slide it into the metal caddy or bracket if your laptop uses one. Connect the SATA cable to the drive. Place the drive into the bay.
Screw it in using the two side screws or the bracket screws.
Visual check: the drive should not wobble. The connector should be fully seated. The screw should be flush with the motherboard or bracket.
Step 6: Reassembly – Screw Order and Cable Routing
Put the bottom panel back on. Screw all screws in the same holes they came from. If you have different screw sizes, start with the longer ones first (they usually go near the hinge).
Do not force a screw, if it doesn't catch, you might have the wrong screw or a misaligned hole.
Connect the battery if you disconnected it. Plug in the charger. Close the laptop and boot it up.
First Boot – What the BIOS and Screen Should Look Like
Press the power button. If the drive is installed correctly, you'll see the laptop manufacturer's logo, then a black screen with a loading circle, or it may try to boot. If the drive is blank, you'll see a message like "No bootable device" or "Insert boot media." That is normal, you haven't installed an operating system yet.
Enter BIOS or UEFI. The key is usually F2, Delete, or F10 (check your screen for a small message at the bottom). Once inside the BIOS, look for a section named "Boot" or "Boot Order." You should see your new SSD listed.
If it shows up, the installation is physically correct.
Here's what the BIOS should show when the SSD is detected:
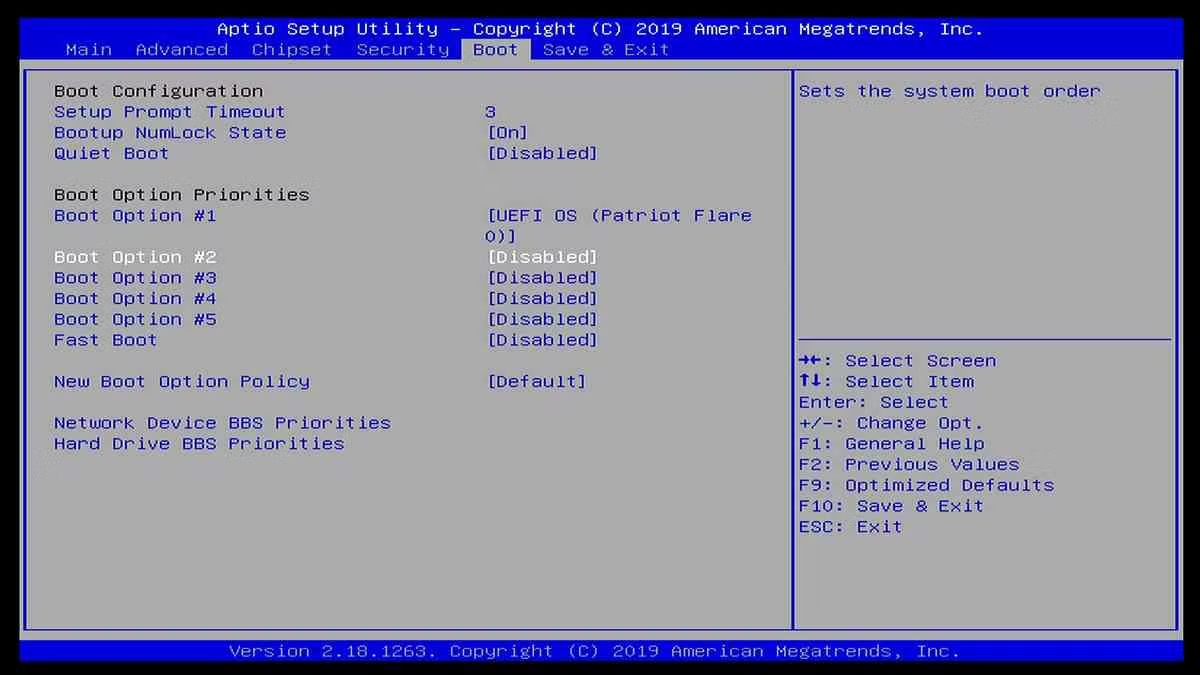
Image source: Bing (Web (fair-use with source credit))
If you do not see the drive listed, go back to your installation. Check that the drive is fully seated. Check that you didn't damage the slot pins.
Check that the drive is compatible with your laptop's slot key. If the drive still doesn't appear, try reseating it.
Once confirmed, save and exit BIOS. Then proceed with installing Windows or cloning your old drive. You're set.
Common Visual Mistakes (and How to Avoid Them)
 .jpg?format=2500w)
Image source: Bing (Web (fair-use with source credit))
Even experienced users slip up on a few common visual cues. Here's what to watch for and how to spot it before damage happens.
Stripped Screws, Wrong Screwdriver, Missing Standoffs
A Phillips #0 screwdriver fits most laptop screws. Using a #1 that is too large will cam out and round the screw head. Once stripped, that screw is a nightmare to remove.
Check your screw tips before you start. If the bit wobbles, switch sizes. If a screw feels tight and you have to force it, stop.
That is the wrong screw for that hole.
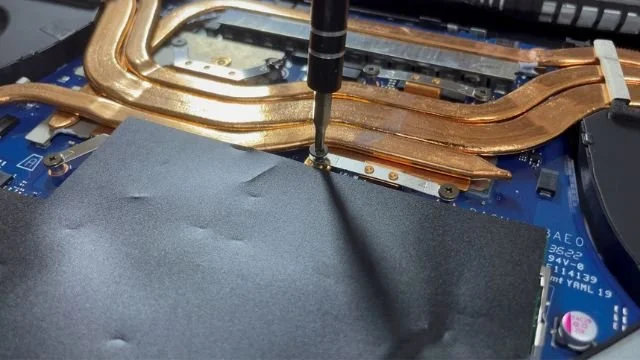
Missing standoffs are a frequent issue with M.2 installations. The screw at the far end of the drive needs to thread into a tiny brass or metal standoff on the motherboard. If that standoff is absent, the drive will not sit flat and may short out.
Look for a small raised post near the screw hole. If you do not see one, check your laptop's documentation or use the standoff that came with your motherboard.
Here is what a stripped laptop screw looks like up close:
.jpg?format=2500w)
Image source: Bing (Web (fair-use with source credit))
Once you see that rounded pattern, you need a rubber band or a screw extractor to get it out. Better to avoid it by using the correct bit from the start.
M.2 Drive Inserted at the Wrong Angle
The M.2 slot accepts the drive at about 30 degrees. Push it in too flat and the gold contacts will not seat properly. Push it too steep and you risk bending the pins inside the slot.
You will know it's wrong if the drive feels loose or if the far end does not reach the screw hole. Never force it. Pull it out, realign, and try again at the proper angle.
Forgetting to Disconnect the Battery (Visible Sparks)
If you see a small spark when touching a metal component inside the laptop, you left the battery connected. That spark means you risk shorting something.
Always disconnect the battery cable before touching any internal part. If your battery is internal and the connector is glued or taped, use a plastic pry tool to gently lift the connector. Do not use metal.
When You Can't See the Drive – Troubleshooting Blind Spots
Sometimes the drive does not appear in BIOS even though you installed it correctly. Several visual issues can cause this.
First, check the drive orientation. An M.2 drive may be inserted backward. The gold contacts should face the slot, not the sky.
The notch on the drive must align with the bridge inside the slot.
Second, check the BIOS SATA mode. Some laptops default to Intel RST with Optane or RAID mode. Switch it to AHCI if available.
If you cannot find that setting, look for a "SATA Mode" or "Configure SATA as" option. Change it from RAID or Intel RST to AHCI. Save and exit.
Third, test with a different slot. Some laptops have two M.2 slots. The primary slot is usually near the CPU.
The secondary slot may be slower or disabled in BIOS. If your drive works in the primary slot but not the secondary, that is normal for budget models.
If none of these work, try the drive in a known working computer using a USB adapter. If it shows up there, the drive is fine and the problem is your laptop. If it does not show up anywhere, the drive may be dead on arrival.
Safety & Warranty – What the Manufacturer's Visual Warnings Mean
Opening your laptop voids the warranty on some models but not all. In the US, the Magnuson-Moss Warranty Act protects your right to repair. In the EU, similar right-to-repair laws apply.
What you should look for: most laptop bottom panels have a small sticker or a screw that is covered by a warranty void sticker. Some manufacturers put a tiny dab of paint on one screw. If that paint is cracked or the sticker is broken, they may claim the warranty is void.
In practice, many of these stickers are not legally enforceable. But it is something to know before you proceed.
Manufacturer documentation warns against static damage. That is not a marketing line. Static discharge can destroy an SSD instantly and invisibly.
Touch an unpainted metal surface before handling the drive. Work on a hard surface, not carpet.
Be aware of heat and ventilation. Some SSDs run hot. If your laptop has a thermal pad near the M.2 slot, reuse it or replace it.
A drive that overheats will throttle performance and reduce its lifespan.
Maintenance After Installation – Checking TRIM and Drive Health in Software
Once your SSD is installed and your OS is running, a few checks keep it healthy.
Is TRIM enabled?
TRIM tells the SSD which data blocks are no longer in use. It prevents slowdown over time. On Windows, open a command prompt as administrator and type fsutil behavior query DisableDeleteNotify.
If the result is 0, TRIM is on. If it is 1, TRIM is off and you may need to update your storage driver or check for BIOS updates.
How to check drive health
Download the manufacturer's utility for your SSD brand. Samsung Magician, Crucial Storage Executive, and Western Digital Dashboard are common examples. These tools show total bytes written, remaining lifespan, and temperature.
If your drive shows a "Critical Warning" in the SMART data, back up your data immediately and consider replacing the drive.
When to optimize
Solid state drives do not need defragmentation. Do not run defrag on an SSD. It wears out the cells.
Windows automatically disables defrag for SSDs, but double check in the Optimize Drives tool. It should say "Optimize" not "Defragment."
Frequently Asked Questions
How long does it take to install an SSD?
The physical swap takes 15 to 30 minutes. Cloning your old drive adds another 30 to 60 minutes depending on data volume. A fresh OS install takes about 20 minutes.
Do I need to reinstall Windows after installing a new SSD?
You have two options. Clone your old drive using software like Macrium Reflect or Samsung Magician. Or install Windows fresh from a bootable USB.
Fresh installs are cleaner and avoid old driver issues.
Will an NVMe SSD work in any M.2 slot?
No. The slot must support PCIe NVMe protocol. Some older M.2 slots only support SATA.
Check your laptop specs before buying. If the slot is keyed for NVMe (M-key) it will physically fit but may not boot if the BIOS lacks NVMe support.
Can I use an external SSD enclosure to clone my drive?
Yes. That is one of the easiest methods. Put the new SSD in an external USB enclosure, clone your old drive, then swap the new SSD into the laptop.
Just make sure the enclosure supports the same interface (SATA or NVMe).
What should I do if my laptop still boots from the old drive?
Enter BIOS and change the boot order. Move the new SSD to the top of the list. If the old drive is still present, the laptop may default to it.
After confirming the new drive boots, you can remove or reformat the old drive.
How do I securely wipe my old SSD after upgrading?
Use the manufacturer's secure erase utility or a tool like Parted Magic. Do not just delete files. A secure erase resets all cells to factory state.
Then either keep the drive as external storage or recycle it at an approved e-waste center.
Final Verdict – You'll Know It's Done When You See These Signs
Your laptop boots in under 15 seconds. The drive shows up in File Explorer with the full capacity you paid for. Windows loads without the old spinning-disk lag.
That is your confirmation.
If you cloned the old drive, all your files and apps are exactly where you left them. If you did a fresh install, you get a clean slate with no bloatware. Either way, the difference is immediate and obvious.
One final check: run a quick speed test using CrystalDiskMark or the manufacturer's utility. Compare sequential read speeds to the drive's advertised rating. If you see numbers within 10% of spec, everything is working as intended.
The rest is just using your laptop like normal. Your SSD will handle the rest silently, quickly, and without fuss. You are done.

Similar Posts