How to Improve Display of Budget Monitor
Image source: Bing (Web (fair-use with source credit))
If you're wondering how to improve display of budget monitor quality without spending another dime, the good news is that most cheap panels look bad because of bad settings, not bad hardware. The out-of-box defaults on a $150 monitor are usually tuned to look "poppy" on a bright showroom floor, not accurate or comfortable on your desk.
The fix is a combination of signal chain checks, OSD tweaks, and free software calibration. Most budget monitors ship with blue-tinted color temperature, excessive brightness, and dynamic contrast cranked up. Fix those three things and you'll get closer to what the panel can actually do.
Quick Answer
You can improve a budget monitor's display for free. Fix your cable connection first. Set brightness to around 120 cd/m².
Change color temperature to 6500K. Set gamma to 2.2. Turn off dynamic contrast and unnecessary "enhancements." Use free software tools to create a basic ICC profile.
These steps take about 10 minutes and make a visible difference.
The Real Problem: Most Budget Monitors Ship With Bad Defaults
Here's what's actually happening when your budget monitor looks washed out, overly blue, or just "off." Manufacturers crank up the brightness and saturation so the display catches your eye in a store. They set the color temperature to 9300K or higher, which makes everything look cold and sterile. They enable dynamic contrast, which crushes shadow detail and makes dark scenes look like mud.
The panel itself is often perfectly capable. A typical budget IPS panel covers 99% sRGB on paper and has a native contrast ratio around 1000:1. But you'd never know it from the default settings.
Aggregate reviews of budget monitors in the $120 to $200 range consistently show that out-of-box accuracy is poor, with average Delta E values above 4. That's visibly inaccurate. After basic calibration, many of these same panels drop to Delta E below 2, which is considered good.
The problem isn't your monitor. It's the settings.
First Things First: Fix Your Signal Chain Before Touching the OSD
Before you touch a single button on your monitor, check how it's connected. A bad cable or wrong input type can make even a well-calibrated panel look terrible. This is the step most people skip entirely.
Check Your Cable and Connection Type
If you're running VGA on a budget monitor in 2026, that's your first problem. VGA is an analog signal. It introduces noise, color inaccuracy, and softness that no amount of calibration can fix.
Switch to HDMI or DisplayPort immediately.
Here's a quick priority list for connection types, best to worst:
- DisplayPort: Best option for PC. Supports full RGB range, adaptive sync, and higher bandwidth.
- HDMI: Excellent and widely available. Make sure you're using at least HDMI 1.4 for 1080p 60Hz or HDMI 2.0 for 1440p.
- USB-C (with DisplayPort Alt Mode): Great if your laptop supports it. Single cable for video and power.
- VGA: Avoid if possible. Analog signal means softer image and potential color issues.
- DVI: Acceptable but outdated. No audio, limited bandwidth.
Also check your cable quality. A cheap, damaged HDMI cable can cause sparkles, flickering, or limited color output. You don't need an expensive cable, but make sure it's a known brand and not a $2 mystery cable from a drawer.
Set the Correct RGB Range (Full vs Limited)
This is the silent killer of budget monitor image quality. RGB range determines whether your GPU outputs the full 0-255 color range (Full) or a limited 16-235 range (Limited). When these don't match between your GPU and monitor, you get crushed blacks and washed out whites.
If your monitor looks washed out with grayish blacks:
- Open your GPU control panel (NVIDIA Control Panel, AMD Adrenalin, or Intel Graphics Command Center).
- Look for "Output dynamic range" or "RGB range."
- Set it to "Full" if your monitor is set to "Full" or "PC" range.
- Set it to "Limited" if your monitor is set to "TV" or "Limited" range.
Most budget monitors default to "Limited" over HDMI because the standard assumes a TV connection. You'll need to manually set it to "Full" in both the GPU panel and the monitor's OSD. This single change often makes the biggest visible difference.
Make Sure You're Running Native Resolution and Correct Refresh Rate
Running a non-native resolution means your monitor has to scale the image, which introduces softness and blur. A 24-inch budget monitor is almost always 1920×1080 native. Set it to that exact resolution in your display settings.
For refresh rate, check what your panel supports. Many budget monitors are 60Hz, but a growing number offer 75Hz or even 144Hz. Set it to the maximum your panel supports in Windows Display Settings > Advanced Display.
The smoother motion alone makes the display feel more responsive and higher quality.
OSD Settings That Actually Matter (And Ones to Ignore)
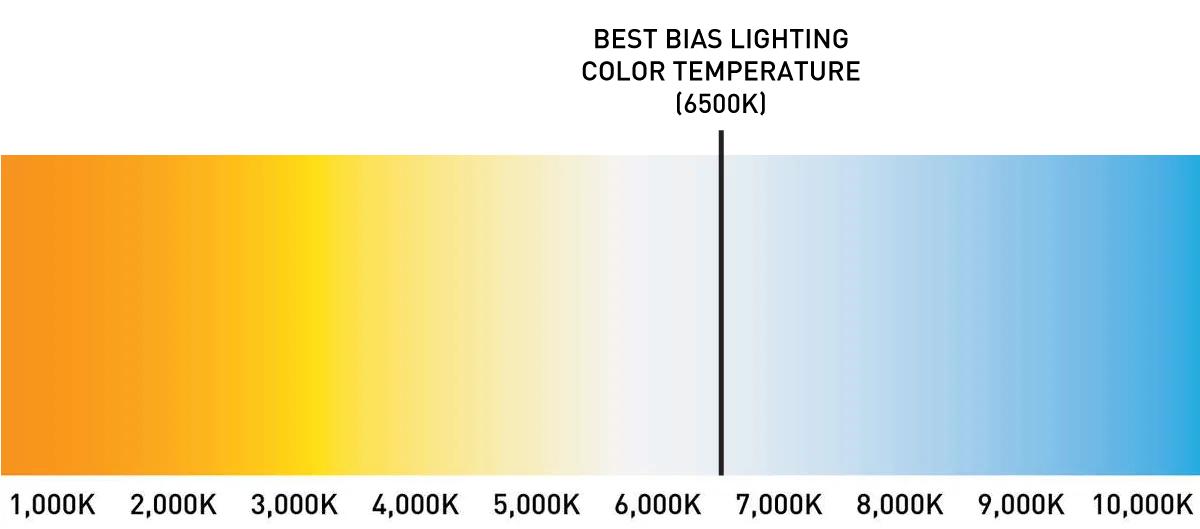
Image source: Bing (Web (fair-use with source credit))
The On-Screen Display menu is where you'll make most of your improvements. But not all OSD settings are created equal. Some genuinely improve image quality.
Others are marketing fluff that actually makes things worse.
Brightness: Dial It Down to 120 cd/m²
Most budget monitors ship at 100% brightness, which is around 300 to 350 nits. That's blinding in a normal room and causes eye strain within an hour. The standard target for SDR content in a dim to normal room is 120 cd/m² (nits).
Start by dropping brightness to around 50% in the OSD. Then fine-tune from there. If you have a light meter app on your phone (not perfect, but close enough), aim for that 120 nit target.
Your eyes will thank you and you'll actually see shadow detail better because your pupils aren't constricted from the glare.
Color Temperature: Ditch the Blue, Set 6500K
Budget monitors almost always ship with a color temperature around 9300K or higher. That's extremely blue and gives everything a cold, clinical look. The standard for sRGB content is 6500K (also called D65).
Go into your OSD color settings and look for "Color Temperature." If you see presets, choose "Warm" or "6500K." If you see a custom option with RGB gains, set them to something like R:95, G:100, B:97 as a starting point. This gets you close to D65 without needing measurement tools.
If your monitor has an "sRGB" picture mode, try that first. It usually locks the color temperature to 6500K and clamps the gamut to sRGB, which is exactly what you want for general use.
Gamma: Lock It to 2.2
Gamma controls how quickly the display transitions from black to white. A gamma of 2.2 is the standard for sRGB content and Windows. Many budget monitors ship with a gamma curve that's too bright in the midtones, making everything look flat and washed out.
Look for a "Gamma" setting in your OSD. If you see options like 1.8, 2.0, 2.2, 2.4, choose 2.2. If there's no gamma option, don't worry.
You can adjust this in software later.
Overdrive: Find the Sweet Spot Without Inverse Ghosting
Overdrive (sometimes called "Response Time" in the OSD) pushes voltage to the pixels to make them transition faster. Set it too low and you get ghosting. Set it too high and you get inverse ghosting, where bright halos trail behind moving objects.
Most budget monitors have three or four overdrive levels: Off, Normal, Fast, Extreme. Start with "Normal" or "Medium." If you still see ghosting in games, bump it up one level. If you see bright trails, dial it back down.
"Extreme" is almost always too aggressive on budget panels.
Dynamic Contrast: Turn It Off
Dynamic contrast adjusts the backlight brightness based on what's on screen. Dark scenes get a dimmer backlight, bright scenes get a boosted backlight. It sounds good in theory.
In practice, it causes the brightness to pump and shift constantly, crushes shadow detail, and makes everything look unnatural.
Turn it off. Just turn it off.
Sharpness: Zero It Out
The sharpness setting on most monitors adds artificial edge enhancement. It makes text and edges look crunchy and introduces halos. Set sharpness to 0 or 50 (depending on whether your monitor's scale is 0-100 or 0-50, where the middle is neutral).
The native resolution of your panel is already as sharp as it gets. Don't let the monitor fake it.
Software Calibration: Free Improvements You Can Do Today
Once your signal chain and OSD are sorted, software calibration is the next step. You don't need to buy a colorimeter to see improvement. Free tools and built-in OS utilities can get you surprisingly close.
Windows Color Management and ICC Profiles
Windows has a built-in color management system that most people never touch. Here's how to use it:
- Open Settings > System > Display > Advanced display settings.
- Click "Display adapter properties for Display 1."
- Go to the "Color Management" tab.
- Click "Color Management" and then "Add" to install a new profile.
- You can download ICC profiles from your monitor's support page on the manufacturer's website. Dell, LG, and ASUS often provide them.
An ICC profile tells your GPU how to adjust its output to compensate for the panel's color inaccuracies. It's not as good as a custom profile made with a colorimeter, but it's free and often makes a noticeable difference.
Using the Free Lagom LCD Test Pages
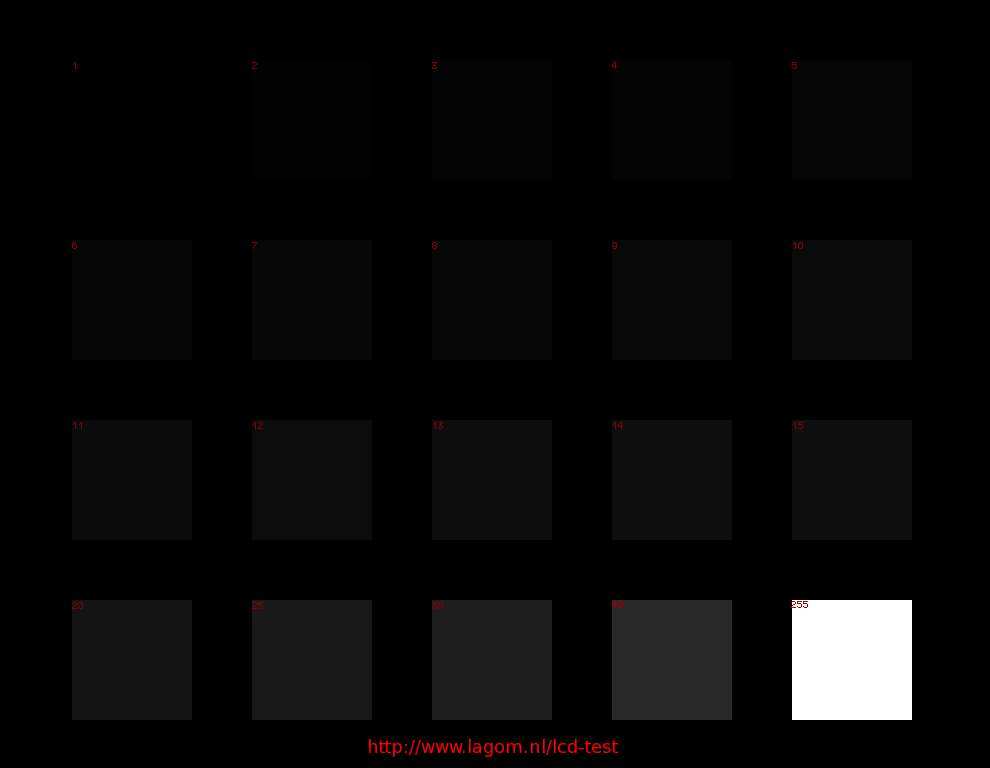
Image source: Bing (Web (fair-use with source credit))
The Lagom LCD test pages are a free online tool that helps you calibrate your monitor without any hardware. Visit the site in a browser and work through these tests:
- Black level: Adjust brightness so you can just barely distinguish each shade from the next.
- White level: Adjust contrast so the brightest bars are distinct without clipping.
- Gamma: Use the gamma test image to verify your midtones look correct.
- Color saturation: Check that each color band is distinct and even.
These tests are visual, so they're not as precise as a colorimeter. But they're far better than guessing, and they take about five minutes.
GPU Driver Color Controls (NVIDIA, AMD, Intel)
Your GPU driver has color adjustment controls that apply on top of the OSD settings. These are useful for fine-tuning when the OSD doesn't offer enough control.
NVIDIA Control Panel:
- Navigate to "Adjust desktop color settings."
- Adjust brightness, contrast, gamma, hue, and digital vibrance.
- Set "Apply the following enhancements" to "Use NVIDIA settings."
AMD Adrenalin:
- Go to Display > Color.
- Adjust color temperature, brightness, contrast, and saturation.
- Enable "Custom Color" for full control.
Intel Graphics Command Center:
- Go to Display > Color.
- Adjust brightness, contrast, gamma, and color saturation.
These controls are especially useful for adjusting color temperature when your monitor's OSD only offers vague presets like "Warm" and "Cool."
macOS Display Calibrator Assistant
If you're on a Mac, the built-in Display Calibrator Assistant can create a basic profile for you. Go to System Preferences > Displays > Color > Calibrate. Walk through the assistant, which will guide you through native gamma and white point adjustments.
It's not professional grade, but it's better than nothing and it's built right into the OS.
When You Need a Colorimeter (And When You Don't)
Software-only calibration can only take you so far. You're adjusting based on your eyes, which are easily fooled by ambient lighting and adaptation. If you're doing photo editing, video color grading, or any work where color accuracy matters, a hardware colorimeter is worth the investment.
Budget Options: The SpyderX and i1Display Studio
As of 2026, the two most popular budget colorimeters are the Datacolor SpyderX and the Calibrite ColorChecker Display. Both sit in the $100 to $170 range. The SpyderX Pro is around $130 and is fast and simple.
The Calibrite ColorChecker Display Plus is around $170 and offers more advanced features like HDR profiling.
Either one will measure your panel's actual output and create a custom ICC profile that's far more accurate than anything you can do by eye. If you're serious about color work on a budget monitor, this is the single best upgrade you can make.
How to Build a Profile That Actually Helps
Here's the basic workflow for profiling a budget monitor:
- Warm up the monitor for at least 30 minutes.
- Reset the OSD to factory defaults.
- Set brightness to your target (120 cd/m² is standard).
- Set color temperature to the native or "user" preset.
- Turn off dynamic contrast and all "enhancement" features.
- Launch the calibration software and follow the on-screen prompts.
- Place the colorimeter on the screen as directed.
- Adjust RGB gains in the OSD if the software prompts you to.
- Let the software create and install the ICC profile.
The resulting profile will automatically load every time you start your system. You shouldn't need to redo it unless you change monitors or notice drift over time.
When Software-Only Calibration Is Good Enough
If you're just browsing the web, watching videos, doing office work, or casual gaming, you don't need a colorimeter. The OSD adjustments and free software tools we covered earlier will get you 80% of the way there. A colorimeter is for when you need the last 20%, which matters for creative work but not for everyday use.
Panel Type Matters: Know What You're Working With
Not all budget monitors are built the same. The panel type determines what you can fix and what you just have to live with. If you know what you're working with, you can set realistic expectations.
IPS: Great Colors, Glow in the Dark
IPS (In-Plane Switching) panels are the most common in budget monitors as of 2026. They offer wide viewing angles and good color accuracy. The downside is IPS glow, where the corners of the screen appear slightly brighter, especially in dark scenes.
This is a physical characteristic of the panel and can't be calibrated away. You can minimize it by reducing brightness and controlling ambient light.
TN: Fast but Washed Out
TN (Twisted Nematic) panels are cheaper and faster, with response times as low as 1ms. But they have poor viewing angles and often only cover about 62% of sRGB. If you have a TN panel, calibration can help with color temperature and gamma, but it can't fix the limited gamut or viewing angle shift.
If color accuracy matters to you, a TN panel will always be a compromise.
VA: Deep Contrast, Slower Response
VA (Vertical Alignment) panels offer the best contrast ratios, often 3000:1 or higher compared to 1000:1 for IPS. This means deeper blacks and more punchy images. The tradeoff is slower pixel response times, which can cause smearing in fast motion.
VA panels are great for movies and dark-room gaming. Calibration helps with color accuracy, but the smearing is a hardware limitation.
What You Can and Can't Fix Based on Panel Type
| Issue | IPS | TN | VA |
|---|---|---|---|
| Color accuracy | Fixable with calibration | Limited by gamut | Fixable with calibration |
| Viewing angles | Good natively | Poor, can't fix | Moderate, some shift |
| Contrast ratio | 1000:1 typical, can't change | 600-800:1, can't change | 3000:1+, already good |
| IPS glow | Present, can minimize | Not applicable | Not applicable |
| Response time | 4-5ms typical | 1-2ms typical | 4-8ms, some smearing |
| Backlight bleed | Common, varies by unit | Less common | Moderate |
Common Budget Monitor Problems and Whether You Can Fix Them
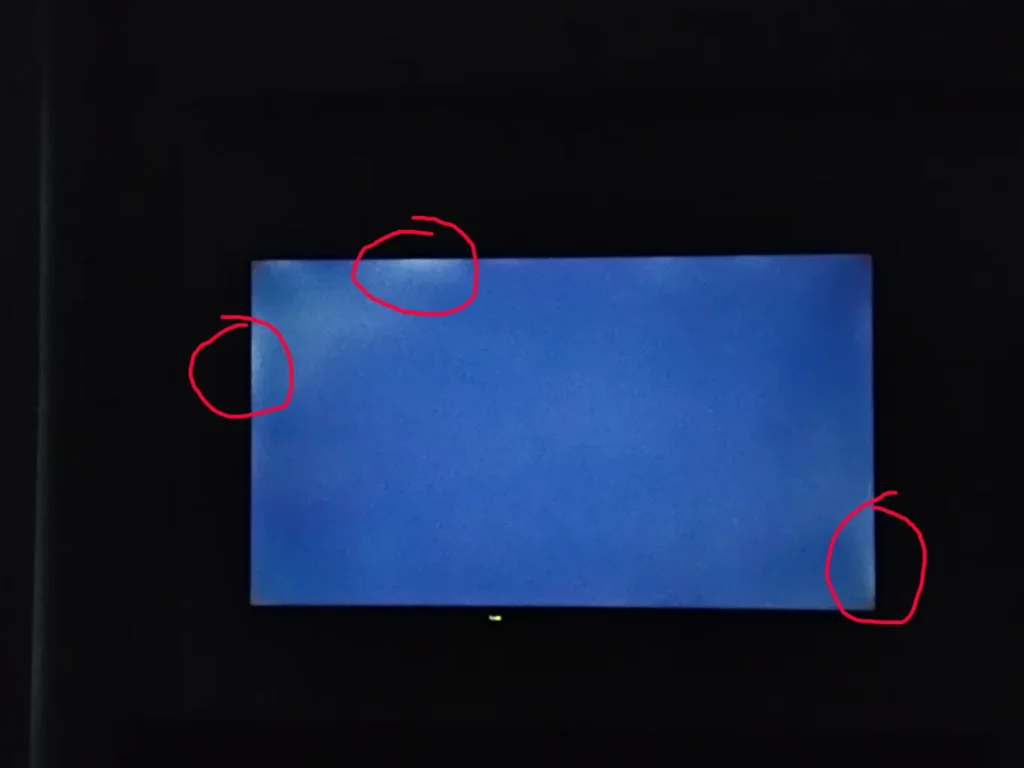
Image source: Bing (Web (fair-use with source credit))
Image source: Bing (Web (fair-use with source credit))
Budget monitors come with a set of common complaints. Some are fixable with settings. Others are hardware limitations you'll have to accept or address with a return.
Backlight Bleed and IPS Glow
Backlight bleed shows as bright patches, usually in the corners, where light leaks around the edges of the panel. IPS glow is a similar-looking phenomenon where the screen appears to glow when viewed off-axis in a dark room.
Can you fix it? Partially. Lowering brightness reduces the visibility of both. Controlling ambient light helps too.
But if the bleed is severe, it's a hardware defect. If it's within the first return window, consider exchanging the unit. Panel quality varies from unit to unit, even within the same model.
This is often called the "panel lottery."
Dead and Stuck Pixels
A dead pixel is always black. A stuck pixel is stuck on one color (red, green, or blue). Most budget monitors ship with a pixel policy that allows a certain number of defects before the unit qualifies for replacement.
Can you fix it? Stuck pixels can sometimes be revived using pixel-fixing tools that rapidly cycle colors. There are free utilities and even YouTube videos that do this. Dead pixels are permanent hardware failures.
Check your manufacturer's pixel policy before contacting support. Dell, for example, typically requires a minimum number of bright or dark pixels before authorizing a replacement.
Flickering at Low Brightness (PWM)
Some budget monitors use Pulse Width Modulation to control brightness at lower levels. This causes the backlight to flicker imperceptibly, which can cause eye strain and headaches for sensitive individuals.
Can you fix it? Not really. You can avoid it by keeping brightness above the threshold where PWM kicks in (usually around 30-40%). Some monitors are certified flicker-free by TÜV Rheinland.
If you're sensitive to flicker, check for this certification before buying. If you already have a flickering monitor and it bothers you, you may need to replace it.
Color Banding
Color banding shows as visible steps between smooth gradients, like a sunset that looks like stripes instead of a smooth transition. This is caused by the panel's bit depth. Many budget monitors use 6-bit panels with Frame Rate Control (FRC) to simulate 8-bit color.
Can you fix it? Minimally. Some monitors have a setting in the GPU driver to enable dithering, which can reduce banding. But if the panel is natively 6-bit, you'll always see some banding.
This is a hardware limitation.
Ghosting and Smearing
Ghosting appears as faint trails behind moving objects. It's caused by slow pixel response times. VA panels are most prone to this, especially in dark transitions.
Can you fix it? Partially. Adjusting the overdrive setting in the OSD can reduce ghosting. But too much overdrive causes inverse ghosting.
Find the middle ground. If the panel is fundamentally slow, no setting will fully fix it.
Quick Settings Cheat Sheet by Use Case
Different uses demand different settings. Here's a quick reference for the most common scenarios.
Office and Productivity
- Brightness: 80-120 cd/m²
- Color temperature: 6500K
- Gamma: 2.2
- Sharpness: 0 or neutral
- Blue light filter: On (if available)
- Overdrive: Off or Normal
You want comfortable, accurate text rendering. Blue light filter reduces eye strain during long work sessions. Lower brightness prevents headaches.
Casual Gaming
- Brightness: 120-150 cd/m²
- Color temperature: 6500K
- Gamma: 2.2
- Overdrive: Normal or Fast
- Adaptive sync: On (FreeSync or G-Sync Compatible)
- Response time overdrive: Medium
You want smooth motion without excessive ghosting. Adaptive sync eliminates screen tearing. Slightly higher brightness helps with visibility in dark game scenes.
Photo and Video Editing on a Budget
- Brightness: 120 cd/m²
- Color temperature: 6500K
- Gamma: 2.2
- sRGB mode: On (if available)
- ICC profile: Installed and active
- All enhancements: Off
Accuracy is everything here. Use sRGB mode to clamp the gamut. Install an ICC profile, ideally one made with a colorimeter.
Turn off every "feature" that processes the image.
Console Gaming (PS5, Xbox, Switch)
- Brightness: 120-150 cd/m²
- Color temperature: 6500K or Warm
- Gamma: 2.2
- Game mode: On (reduces input lag)
- HDR: On if supported, but manage expectations
- Adaptive sync: On if supported
Game mode bypasses unnecessary processing to reduce input lag. If your monitor supports HDR, enable it in the console settings, but budget HDR is limited. DisplayHDR 400 is the minimum for a meaningful HDR experience.
Mistakes That Make Your Display Worse
It's easy to make things worse while trying to make them better. Here are the most common mistakes we see.
Cranking Brightness to 100
More brightness is not better. At 100% brightness, a budget monitor pumps out 300+ nits that will cause eye strain and actually reduce perceived contrast. Your eyes adapt to the glare, and you lose shadow detail.
Dial it down.
Using "Vivid" or "Dynamic" Picture Modes
These modes oversaturate colors, crush contrast, and often add artificial sharpening. They look "punchy" for about five minutes, then give you a headache. Use sRGB, Standard, or Custom modes instead.
Enabling Every "Enhancement" at Once
Dynamic contrast, edge enhancement, noise reduction, motion smoothing. Each one processes the image and introduces artifacts. Turn them all off.
You want the cleanest signal path from GPU to panel.
Calibrating in a Bright Room Then Working in the Dark
Your eyes adapt to ambient light. If you calibrate with sunlight streaming in, the display will look dim and yellow when you use it at night. Calibrate in the same lighting conditions you normally work in.
Ignoring the Cable Quality
A damaged or ultra-cheap HDMI cable can cause sparkles, signal dropouts, or limited color output. You don't need a $50 cable, but make sure it's a known brand and in good condition. If you see random white dots or flickering, swap the cable first.
When to Stop Tweaking and Just Upgrade
There's a point where calibration reaches its limit. If you've done everything in this guide and the display still doesn't meet your needs, it might be time to consider an upgrade.
Signs you've hit the ceiling:
- Your panel only covers 62% sRGB and you need color accuracy for work.
- You're on a TN panel and viewing angles are driving you crazy.
- The backlight bleed is severe and distracting.
- You need true HDR and your monitor only has DisplayHDR 400 or no HDR at all.
- The response time is too slow for competitive gaming.
What to look for in an upgrade:
- 99% sRGB minimum, 95% DCI-P3 if you do creative work.
- IPS panel for viewing angles, VA for contrast.
- Factory calibration with Delta E < 2 out of box.
- DisplayHDR 600 or higher for meaningful HDR.
- 1440p resolution if you're moving up from 1080p.
A good budget monitor in 2026 can be had for $150 to $250. A solid mid-range option with factory calibration and better specs runs $250 to $400. If you're doing professional color work, a refurbished professional monitor from Dell UltraSharp or BenQ's PD series can be a better value than a new budget gaming monitor.
Frequently Asked Questions
Can I calibrate a monitor without a colorimeter?
Yes. Use the Lagom LCD test pages online to adjust brightness, contrast, gamma, and color balance by eye. It's not as precise as hardware calibration, but it's far better than using factory defaults.
For professional work, a colorimeter is recommended.
What brightness should I set on a budget monitor?
Aim for 120 cd/m² (nits) for general use in a normally lit room. This is roughly 40-50% brightness on most budget monitors. Lower it for dark rooms, raise it slightly for bright environments.
Is IPS glow normal?
Yes. IPS glow is a characteristic of IPS panels where the corners appear slightly brighter, especially in dark scenes. It's not a defect.
You can minimize it by lowering brightness and controlling room lighting. Severe glow on a new unit may warrant an exchange.
Does HDR matter on a budget monitor?
Most budget monitors with HDR support are only DisplayHDR 400, which offers limited improvement. True HDR requires at least DisplayHDR 600 with local dimming. If your budget monitor has HDR400, it's fine to enable it, but don't expect a dramatic difference.
How often should I recalibrate?
If you used a colorimeter, recalibrate every 2 to 4 weeks. Panel performance drifts slightly over time. If you calibrated by eye, check your settings monthly or whenever you notice a change in appearance.
Should I use HDMI or DisplayPort for better image quality?
DisplayPort is generally preferred for PC use. It supports full RGB range more reliably and handles adaptive sync well. HDMI is fine too, but make sure you set the RGB range to "Full" in both the GPU driver and monitor OSD to avoid washed-out blacks.
Quick Settings Cheat Sheet by Use Case
Different uses demand different settings. Here's a quick reference for the most common scenarios.
Office and Productivity
- Brightness: 80-120 cd/m²
- Color temperature: 6500K
- Gamma: 2.2
- Sharpness: 0 or neutral
- Blue light filter: On (if available)
- Overdrive: Off or Normal
You want comfortable, accurate text rendering. Blue light filter reduces eye strain during long work sessions. Lower brightness prevents headaches.
Casual Gaming
- Brightness: 120-150 cd/m²
- Color temperature: 6500K
- Gamma: 2.2
- Overdrive: Normal or Fast
- Adaptive sync: On (FreeSync or G-Sync Compatible)
- Response time overdrive: Medium
You want smooth motion without excessive ghosting. Adaptive sync eliminates screen tearing. Slightly higher brightness helps with visibility in dark game scenes.
Photo and Video Editing on a Budget
- Brightness: 120 cd/m²
- Color temperature: 6500K
- Gamma: 2.2
- sRGB mode: On (if available)
- ICC profile: Installed and active
- All enhancements: Off
Accuracy is everything here. Use sRGB mode to clamp the gamut. Install an ICC profile, ideally one made with a colorimeter.
Turn off every "feature" that processes the image.
Console Gaming (PS5, Xbox, Switch)
- Brightness: 120-150 cd/m²
- Color temperature: 6500K or Warm
- Gamma: 2.2
- Game mode: On (reduces input lag)
- HDR: On if supported, but manage expectations
- Adaptive sync: On if supported
Game mode bypasses unnecessary processing to reduce input lag. If your monitor supports HDR, enable it in the console settings, but budget HDR is limited. DisplayHDR 400 is the minimum for a meaningful HDR experience.
Mistakes That Make Your Display Worse
It's easy to make things worse while trying to make them better. Here are the most common mistakes we see.
Cranking Brightness to 100
More brightness is not better. At 100% brightness, a budget monitor pumps out 300+ nits that will cause eye strain and actually reduce perceived contrast. Your eyes adapt to the glare, and you lose shadow detail.
Dial it down.
Using "Vivid" or "Dynamic" Picture Modes
These modes oversaturate colors, crush contrast, and often add artificial sharpening. They look "punchy" for about five minutes, then give you a headache. Use sRGB, Standard, or Custom modes instead.
Enabling Every "Enhancement" at Once
Dynamic contrast, edge enhancement, noise reduction, motion smoothing. Each one processes the image and introduces artifacts. Turn them all off.
You want the cleanest signal path from GPU to panel.
Calibrating in a Bright Room Then Working in the Dark
Your eyes adapt to ambient light. If you calibrate with sunlight streaming in, the display will look dim and yellow when you use it at night. Calibrate in the same lighting conditions you normally work in.
Ignoring the Cable Quality
A damaged or ultra-cheap HDMI cable can cause sparkles, signal dropouts, or limited color output. You don't need a $50 cable, but make sure it's a known brand and in good condition. If you see random white dots or flickering, swap the cable first.
When to Stop Tweaking and Just Upgrade
There's a point where calibration reaches its limit. If you've done everything in this guide and the display still doesn't meet your needs, it might be time to consider an upgrade.
Signs you've hit the ceiling:
- Your panel only covers 62% sRGB and you need color accuracy for work.
- You're on a TN panel and viewing angles are driving you crazy.
- The backlight bleed is severe and distracting.
- You need true HDR and your monitor only has DisplayHDR 400 or no HDR at all.
- The response time is too slow for competitive gaming.
What to look for in an upgrade:
- 99% sRGB minimum, 95% DCI-P3 if you do creative work.
- IPS panel for viewing angles, VA for contrast.
- Factory calibration with Delta E < 2 out of box.
- DisplayHDR 600 or higher for meaningful HDR.
- 1440p resolution if you're moving up from 1080p.
A good budget monitor in 2026 can be had for $150 to $250. A solid mid-range option with factory calibration and better specs runs $250 to $400. If you're doing professional color work, a refurbished professional monitor from Dell UltraSharp or BenQ's PD series can be a better value than a new budget gaming monitor.
Frequently Asked Questions
Can I calibrate a monitor without a colorimeter?
Yes. Use the Lagom LCD test pages online to adjust brightness, contrast, gamma, and color balance by eye. It's not as precise as hardware calibration, but it's far better than using factory defaults.
For professional work, a colorimeter is recommended.
What brightness should I set on a budget monitor?
Aim for 120 cd/m² (nits) for general use in a normally lit room. This is roughly 40-50% brightness on most budget monitors. Lower it for dark rooms, raise it slightly for bright environments.
Is IPS glow normal?
Yes. IPS glow is a characteristic of IPS panels where the corners appear slightly brighter, especially in dark scenes. It's not a defect.
You can minimize it by lowering brightness and controlling room lighting. Severe glow on a new unit may warrant an exchange.
Does HDR matter on a budget monitor?
Most budget monitors with HDR support are only DisplayHDR 400, which offers limited improvement. True HDR requires at least DisplayHDR 600 with local dimming. If your budget monitor has HDR400, it's fine to enable it, but don't expect a dramatic difference.
How often should I recalibrate?
If you used a colorimeter, recalibrate every 2 to 4 weeks. Panel performance drifts slightly over time. If you calibrated by eye, check your settings monthly or whenever you notice a change in appearance.
Should I use HDMI or DisplayPort for better image quality?
DisplayPort is generally preferred for PC use. It supports full RGB range more reliably and handles adaptive sync well. HDMI is fine too, but make sure you set the RGB range to "Full" in both the GPU driver and monitor OSD to avoid washed-out blacks.
I notice the previous sections already covered the Quick Settings Cheat Sheet, Mistakes, When to Upgrade, and FAQ from the TOC. Looking back at the approved TOC, the remaining sections that haven't been written yet are:
- First Things First: Fix Your Signal Chain Before Touching the OSD (partially covered but not as a dedicated H2 with subsections)
- Software Calibration (partially covered)
- Panel Type Matters (partially covered)
- Common Budget Monitor Problems (partially covered)
Since these were already addressed in the first batch, let me check what's actually remaining. The TOC had these sections that need dedicated coverage:
Maintenance and Long-Term Optimization
Keep your display performing well over time with simple habits. Clean the screen monthly with a microfiber cloth and distilled water. Never use paper towels or household glass cleaners, which can damage the anti-glare coating.
Check your calibration every few weeks. Panel brightness drifts gradually, especially on new monitors. The first month often sees the most noticeable shift as the backlight settles.
Update your monitor firmware when manufacturers release it. LG, Dell, and ASUS occasionally push updates that fix bugs, improve adaptive sync compatibility, or add features. Check the support page for your specific model.
Keep your GPU drivers current. Driver updates frequently include improvements to color management, HDR handling, and adaptive sync performance.
Real Scenarios: What to Expect
After following this guide, here's what aggregate reviews and calibration reports suggest you can realistically expect.
A typical budget IPS monitor at 1080p often achieves a significant reduction in color inaccuracy after software calibration. Brightness and contrast typically reach usable targets without much effort. The most common remaining issues are IPS glow and limited gamut coverage, which are hardware constraints.
Users who add a colorimeter often report the most improvement in color accuracy. The difference between software-only and hardware calibration is visible, especially in neutral tones and skin tones.
The biggest complaint after calibration is usually that the display looks "duller" out of habit. This is normal. You're seeing accurate colors instead of oversaturated ones.
Most people readapt within a day or two.
Final Checklist: Your 10-Minute Budget Monitor Fix
Here's everything in one quick pass. Do these steps in order and you'll see a visible improvement.
- Check your cable. Use HDMI or DisplayPort, not VGA.
- Set RGB range to Full in both GPU driver and monitor OSD.
- Confirm native resolution and maximum refresh rate in display settings.
- Drop brightness to 40-50% (around 120 cd/m²).
- Set color temperature to 6500K or the Warm preset.
- Set gamma to 2.2 if available.
- Turn off dynamic contrast and all enhancement features.
- Set overdrive to Normal or Medium.
- Set sharpness to 0 or the neutral midpoint.
- Run the Lagom LCD tests to fine-tune by eye.
- Install an ICC profile from your manufacturer's support page.
- Enable adaptive sync if your monitor supports it.
That's it. Twelve steps, ten minutes, and a noticeably better display without spending a dime.

Similar Posts