How to Fix Dead Pixels on Ips Monitor
So you've spotted a tiny dark speck on your new IPS panel that doesn't change no matter what's on screen. Figuring out how to fix dead pixels on IPS monitor setups starts with a crucial distinction. Whether that pixel is actually dead or just stuck determines whether you can fix it yourself or need a warranty replacement.
Here's the frustrating part. Most manufacturer policies follow ISO 13406-2 guidelines, which actually allow a certain number of pixel defects straight from the factory. But that doesn't mean you're stuck with it.
Let's walk through exactly what's happening with your panel and what you can actually do about it.

Image source: Wikimedia Commons / Selçuk Oral (drumex) (CC BY-SA)
Quick Answer
Stuck pixels can often be fixed. Dead pixels usually cannot. Software tools like JScreenFix work on stuck pixels.
Warranty covers dead pixels if they exceed policy limits. Pressure methods carry real risk of further damage.
Quick Answer: Is Your Pixel Actually Dead?
You need to identify what you're dealing with before trying any fix. A stuck pixel and a dead pixel are fundamentally different problems. Treating one like the other wastes your time at best and damages your panel at worst.
Dead Pixel vs. Stuck Pixel: Why the Difference Changes Everything
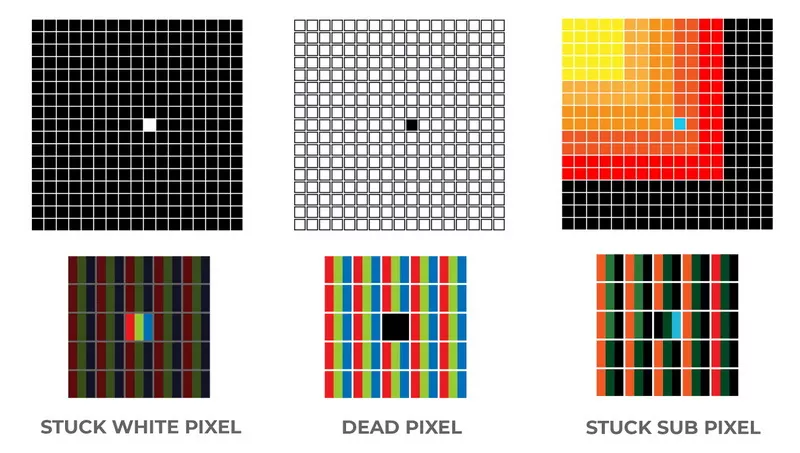
A stuck pixel lights up in one color (red, green, or blue) and stays that way. A dead pixel stays completely black regardless of what's displayed. That single difference determines everything that comes next.
Stuck pixels are caused by a transistor that's locked in position. The liquid crystal material isn't twisting properly to block or pass light. These can often be unlocked with software cycling or gentle physical intervention.
Dead pixels mean the transistor has failed entirely. No voltage reaches that subpixel, so it stays dark. You can't repair a failed transistor.
You'd need a panel replacement to truly fix it.
Let me break down the three types you'll encounter:
- Stuck pixel (bright): Shows one solid color (red, green, or blue) at all times
- Dead pixel (dark): Stays completely black no matter the image
- Partial subpixel failure: One RGB subpixel dead while others work
Image source: Bing (Web (fair-use with source credit))
How to Test Which Type You Have
This takes two minutes and costs nothing. Display solid full-screen colors one at a time and observe the suspect pixel.
Pixel test sequence:
- Display pure black. Note if the pixel is visible (it shouldn't be on black if dead).
- Display pure white. A dead pixel shows as a dark dot. A stuck pixel shows its locked color.
- Cycle through red, green, and blue screens. A stuck pixel will "disappear" on its matching color.
- Take photos at each color. This documentation helps with warranty claims.
You can use free online tools or built-in monitor self-test features. Most manufacturers include a pixel test mode accessible through the OSD menu. Run this test in a dark room for best visibility.
Understanding Dead and Stuck Pixels on IPS Panels
IPS panels dominate the mid-to-good monitor market for good reason. They offer excellent color accuracy, wide viewing angles, and consistent performance. But their pixel structure and driving electronics create specific vulnerability patterns worth understanding.
Why IPS Panels Behave Differently Than VA or TN
IPS stands for In-Plane Switching. The liquid crystal molecules rotate parallel to the panel plane when voltage applies. This rotation controls how much light passes through the polarizing filters.
Each pixel contains three subpixels (red, green, blue) with individual thin-film transistors controlling them.
In IPS design, the transistors sit offset from the pixel aperture. This arrangement allows better viewing angles but creates slightly more complex electrical pathways. A failure in any transistor or its connection kills that subpixel.
VA panels use vertical alignment with different transistor placement. TN panels twist nematic crystals differently still. Both have their own failure modes, but IPS panels tend to show stuck pixels more often than dead ones due to the driving electronics involved.
Key IPS characteristics relevant to pixel defects:
- RGB stripe subpixel layout: Three distinct subpixels arranged horizontally
- Common electrode design: Shared driving circuitry can cause cascading issues
- Backlit technology: Pixel defects visible against bright backlight
- Liquid crystal alignment layers: Physical damage to alignment causes permanent defects
What Causes Pixels to Die or Get Stuck
Understanding the root cause helps you assess your chances of success. Not every defect has the same prognosis.
Manufacturing defects account for most pixel problems appearing in new monitors. Microscopic contamination in the transistor layer, imperfect vacuum sealing, or slight misalignment during assembly can create weak points. These often manifest in the first few weeks of use.
Transistor failure causes true dead pixels. The thin-film transistor that drives a subpixel develops an open circuit. No electrical signal reaches the liquid crystal.
This is permanent physical damage.
Stuck alignment causes stuck pixels. The liquid crystal molecules get locked in one orientation. Voltage should flip them but can't overcome the mechanical resistance.
This is often temporary and fixable.
Electrical stress events include power surges, rapid on/off cycling, or static discharge. These can damage transistors or create temporary charge trapping in the liquid crystal layer.
Physical pressure during shipping, mounting, or even aggressive cleaning can crack transistors or shift internal layers. This is why careful handling matters so much.
The Three Types of Pixel Defects You'll Encounter
Let's get specific about what you're looking at when you examine your screen.
Stuck pixel (bright subpixel): One or more subpixels remain fully lit in a single color. On a black screen, you'll see a red, green, or blue dot. On a white screen, the affected subpixel disappears since it's already maxed out.
Most fixable with software methods.
Dead pixel (dark subpixel): No light passes through the affected pixel or subpixel. On a white screen, you see a black dot. On a black screen, it's invisible.
Represents transistor failure and generally can't be repaired without panel replacement.
Cluster defects: Multiple dead or stuck pixels appearing near each other. Often indicates physical damage to the panel or a manufacturing defect in that region. Higher chance of warranty approval due to visibility.
Should You Try to Fix It or Claim Warranty First?
Before you download any software or try physical methods, check your warranty status. This single step determines your best path forward.
Step 1: Check Your Warranty Status and Coverage
Most IPS monitors carry a 1-year to 3-year manufacturer warranty that explicitly covers pixel defects. Some premium models extend this further. But policies vary significantly between brands.
Gather this information right now:
- Purchase date and proof of purchase
- Monitor model number and serial number
- Current warranty status (check manufacturer website)
- Retailer return policy window (often 14-30 days)
If you're still within the retailer return window, that's your best option. A direct return or exchange at the point of sale avoids warranty claim hassle entirely. Most retailers accept returns for any dead pixel, period.
If you're outside the return window but within warranty, the manufacturer's dead pixel policy determines next steps. This is where things get interesting.
Step 2: Know Your Manufacturer's Dead Pixel Policy
Manufacturers follow ISO 13406-2 standards that classify monitor quality based on allowed pixel defects. The class rating of your monitor determines how many defects are "acceptable."
ISO 13406-2 Pixel Defect Allowances:
| Class | Bright Pixels (per million) | Dark Pixels (per million) | Typical Use |
|---|---|---|---|
| Class 1 | 0 | 0 | Medical, professional |
| Class 2 | 2 | 2 | Consumer monitors |
| Class 3 | 5 | 15 | Budget displays |
| Class 4 | 50 | 150 | Signage, industrial |
Most consumer IPS monitors ship as Class 2. This means a handful of defective pixels counts as "within spec." Frustrating, but that's the industry standard.
Check these common manufacturer thresholds:
- Dell Premium Panel Guarantee: Zero bright pixels, limited dark pixels on UltraSharp models
- LG: Typically allows 3-5 stuck pixels depending on model
- ASUS: 3 bright pixels or 5 dark pixels standard
- BenQ: Varies, often 3-5 total defective pixels
- Samsung: Model-specific, check warranty documentation
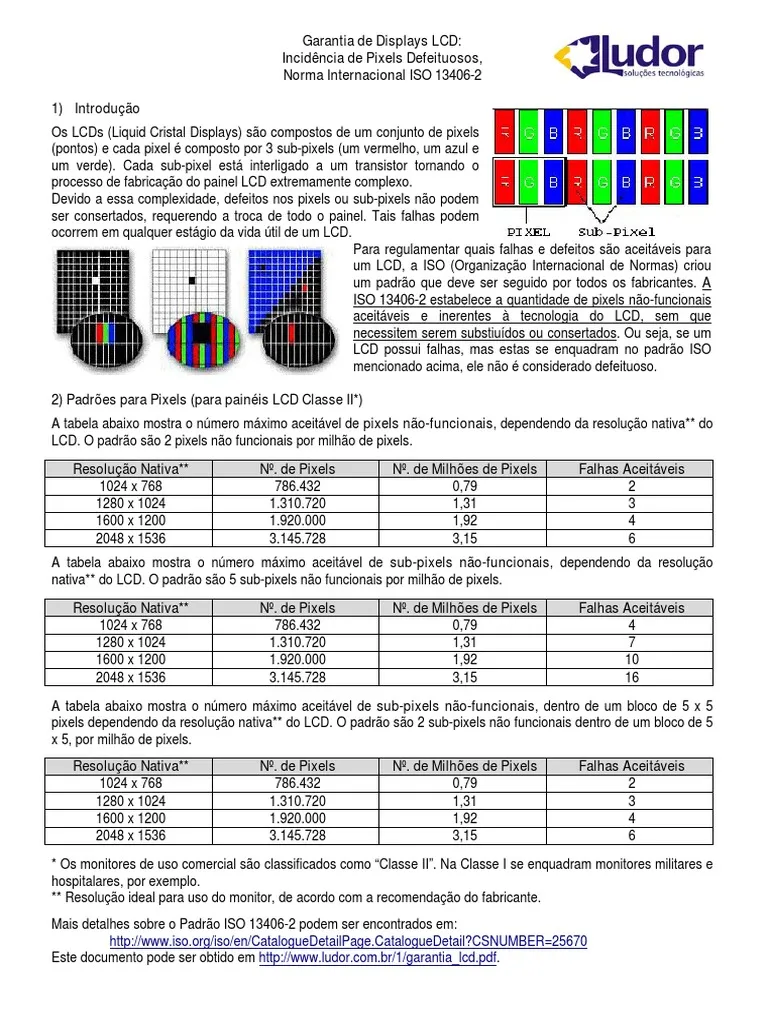
Image source: Bing (Web (fair-use with source credit))
Step 3: Decision Matrix — Fix It or Replace It
Here's your actionable decision tree based on your situation:
If stuck pixel(s) appear:
- Within retailer return window → Return/exchange
- Within warranty but outside return → Try software fix first (1-2 days), then warranty claim
- Out of warranty → Software fix or pressure method
If dead pixel(s) appear:
- Within retailer return window → Return/exchange immediately
- Within warranty with Class 1 panel → Warranty claim immediately
- Within warranty with Class 2+ panel → Check count against policy, then claim if exceeded
- Out of warranty → Live with it or panel replacement
If cluster/multiple pixels fail:
- Any failure pattern within warranty → Strong case for warranty claim
- Expanding failure area → Likely panel degradation, warranty or replacement
The key insight: software fixes only work on stuck pixels. If you've confirmed a dead pixel through testing, skip straight to warranty or replacement options. You won't fix a failed transistor with color cycling.
Software Fixes for Stuck Pixels
Software methods are your safest first attempt. They cost nothing, risk nothing, and genuinely work on stuck pixels. The principle is simple: rapidly cycle colors to "unstick" the locked liquid crystal molecules.
JScreenFix: How It Works and When to Use It
JScreenFix is the most widely recommended stuck pixel tool. It displays a rapidly cycling pattern of random colors in a small window. You position this window over the stuck pixel and let it run.
The rapid color changes create alternating voltage patterns across the pixel. This can free stuck liquid crystal molecules by repeatedly forcing them through their full range of motion. Think of it as physical therapy for a jammed joint.
How to use JScreenFix:
- Go to JScreenFix.com in your browser
- Click "Launch JScreenFix"
- Drag the flickering window over your stuck pixel
- Leave it running for at least 30 minutes
- Check if the pixel returned to normal
Aggregate user reports suggest roughly 60% success rate for stuck pixels. That's not guaranteed, but it's worth the time investment. Some users report success after multiple sessions spanning several hours.
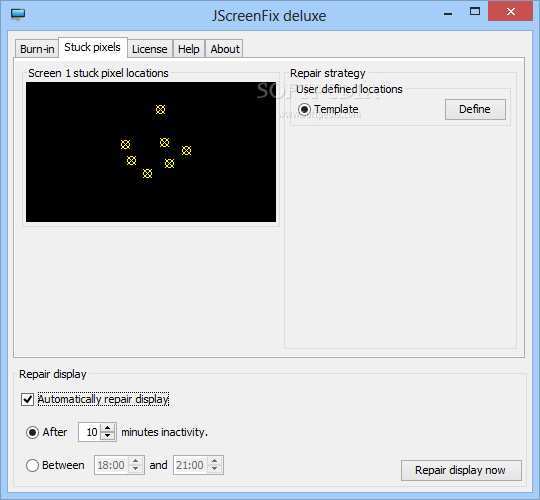
Image source: Bing (Web (fair-use with source credit))
PixelHealer and UDPixel: Lightweight Alternatives
If JScreenFix doesn't work, try these alternatives. They use slightly different color cycling patterns.
PixelHealer is a small Windows application. It flashes rapid color sequences in a small window. No installation required.
Just run the executable and position it over the problem pixel.
UDPixel offers more control. You can choose specific colors to cycle and adjust the refresh rate. It also includes a pixel locator tool to help you identify exact pixel positions.
Both tools operate on the same principle as JScreenFix. The difference is in implementation details. Some pixels respond better to specific color sequences or refresh rates.
Your Monitor's Built-In Pixel Refresh Feature
Many modern IPS monitors include pixel maintenance features in their OSD menus. These are worth checking before trying third-party software.
LG monitors often include "Pixel Refresher" in the settings. This runs a maintenance cycle that can resolve stuck pixels. Some models run this automatically after a set number of hours.
Dell UltraSharp models may feature "Pixel Reset" or similar options. Check under the "Others" or "System" menu sections.
BenQ and ASUS monitors sometimes include pixel maintenance under "Display" or "Image" settings.
These built-in tools are optimized for your specific panel. They're worth trying first since they're designed not to stress the panel unnecessarily.
How Long to Run Each Method Before Moving On
Patience matters here. Running a fix for five minutes won't accomplish anything.
Recommended minimum run times:
- JScreenFix: 30 minutes minimum, several hours for stubborn cases
- PixelHealer: 30 minutes per session
- UDPixel: 30 minutes to 1 hour
- Built-in pixel refresh: Follow manufacturer instructions (often 1-4 hours)
If a stuck pixel hasn't resolved after 4-6 hours of continuous cycling, the chances of software fixing it drop significantly. At that point, you can try the pressure method or move to warranty options.
The Pressure Method: Risky but Sometimes Works
This method involves applying gentle physical pressure to the stuck pixel area. It's controversial because it can cause additional damage. But when done correctly, it has decent success rates for stuck pixels.
When Pressure Might Help (and When It Won't)
Pressure works on stuck pixels by physically manipulating the liquid crystal material. The gentle force can free molecules that are mechanically locked. It does not work on dead pixels where the transistor has failed.
Pressure method is appropriate when:
- Pixel is confirmed stuck (not dead)
- Software methods failed after adequate time
- Pixel appeared after physical stress (pressure, impact)
- You're out of warranty and have nothing to lose
Avoid pressure method when:
- Pixel is confirmed dead (black, no response)
- Monitor is still under warranty (risk of voiding coverage)
- Pixel appeared without physical cause
- You're uncomfortable with the risk
Step-by-Step Gentle Pressure Technique
If you've decided to try this method, follow these steps carefully.
Preparation:
- Turn off the monitor completely
- Wait 10 minutes for the panel to cool
- Dampen a soft microfiber cloth with water (not soaking)
- Find a blunt, smooth tool (pen cap, stylus, or your fingertip through the cloth)
Application:
- Locate the stuck pixel precisely
- Place the cloth over the pixel area
- Apply gentle, steady pressure (about the force of a firm mouse click)
- While maintaining pressure, turn the monitor on
- Keep pressure applied for 5-10 seconds after the image appears
- Release pressure slowly
The theory is that the combination of heat from the backlight and gentle pressure can realign stuck liquid crystal molecules. Some users report success with slightly warmed cloths, but excessive heat risks damaging the panel.
What Can Go Wrong — Real Risks to Know
Let's be honest about the downsides. This method can make things worse.
Potential damage includes:
- Creating additional stuck pixels from pressure on adjacent areas
- Cracking the polarizing filter layer
- Damaging the thin-film transistors
- Causing permanent bright spots from alignment layer damage
- Voiding your warranty if damage is visible
The risk is real but manageable with gentle technique. Aggressive pressure causes most problems. If you're pressing hard enough to see color distortion across a wide area, you're pressing too hard.
What to Do When Nothing Works
Sometimes you've tried everything and the pixel remains. Your options now depend on warranty status and your tolerance for the defect.
Filing a Warranty Claim: What You Need
Warranty claims for dead pixels require documentation and patience. Here's what to prepare before contacting support.
Required documentation:
- Photos of the dead/stuck pixel on solid color backgrounds
- Monitor model number and serial number
- Proof of purchase with date
- Description of when you first noticed the issue
- Record of troubleshooting steps attempted
The process typically goes:
- Contact manufacturer support (phone, chat, or email)
- Describe the issue and provide documentation
- Support may run remote diagnostics
- If approved, you'll receive an RMA number
- Ship the monitor to the service center
- Receive replacement or repaired unit (5-14 business days typical)
Documenting Dead Pixels for RMA Success
Good documentation increases your approval chances significantly.
Photography tips:
- Use a macro lens or phone camera with good close-up capability
- Display solid white, black, red, green, and blue screens
- Take photos in a dark room to maximize contrast
- Include a shot showing the pixel's position relative to screen edges
- Add a ruler or reference object to show scale
Written documentation should include:
- Exact pixel coordinates (count from top-left corner)
- When the defect first appeared
- Whether it's gotten worse over time
- All troubleshooting steps you've already tried
Panel Replacement vs. Buying New: Cost Comparison
For out-of-warranty monitors, you face a repair-or-replace decision.
Cost comparison:
| Option | Typical Cost | Pros | Cons |
|---|---|---|---|
| Panel replacement | $100-$400 | Keeps original monitor | Labor costs, risk of mismatch |
| New budget monitor | $150-$250 | Fresh warranty, new features | Lower quality possible |
| New equivalent monitor | $250-$600 | Matched quality, warranty | Higher cost |
| Professional diagnosis | $50-$100 | Expert assessment | May lead to replacement anyway |
Panel replacement only makes sense for high-end monitors where the panel cost is a small fraction of the original price. For budget and mid-range IPS monitors, replacement is almost always more cost-effective.
When You're Stuck Living With It
Sometimes you can't fix it and can't replace it. Maybe you're out of warranty with a single dead pixel in the corner. Maybe the replacement timeline doesn't work for your situation.
You have options to reduce the annoyance.
Pixels in the Center vs. Edges: Visibility Matters
Pixel position dramatically affects how noticeable it is.
Center screen defects are the worst case. Your eyes naturally focus in the center during most tasks. A dead pixel there draws constant attention.
Edge and corner defects are much less noticeable. Your peripheral vision is less sensitive to detail. A dead pixel in the bottom-right corner might only bother you when you specifically look for it.
Workaround for center pixels:
- Use dark mode in applications (reduces contrast against dead pixel)
- Enable dark theme in your operating system
- Adjust monitor position slightly to shift the pixel relative to your focal point
Workarounds That Reduce the Annoyance
You can't remove the pixel, but you can make it less prominent.
Dark mode everywhere: Most modern applications and operating systems support dark themes. A dead pixel is invisible against a dark background. This single change makes a huge difference for many users.
Custom wallpaper: Choose wallpapers with dark areas where the dead pixel sits. A strategically placed dark element in your wallpaper can hide the defect entirely.
Taskbar relocation: If the dead pixel is near the bottom, move your taskbar to the top or side. This shifts your focal point slightly.
Pixel shifting: Some monitors include a pixel orbiter feature that slightly shifts the entire image periodically. This won't fix the dead pixel but can prevent additional stuck pixels from forming.
IPS Glow, Backlight Bleed, and Other Issues Often Mistaken for Dead Pixels
Not every dark spot on your screen is a dead pixel. Misdiagnosis leads to wasted troubleshooting effort.
IPS glow appears as bright patches in corners, especially visible on dark screens. It's caused by light leakage through the panel edges. This is normal IPS behavior, not a defect.
You can't fix it, but you can reduce it by lowering brightness and adjusting viewing angle.
Backlight bleed shows as uneven bright areas, usually along edges. Again, this is a backlight assembly issue, not a pixel defect. Some units have more bleed than others, but it's within normal manufacturing tolerance.
Dust inside the panel looks like a small dark or bright spot. It's physically between the layers. This requires panel disassembly to clean, which isn't practical for most users.
Pressure marks from cleaning can create temporary discoloration. These usually fade within hours. If they persist, the alignment layer may be damaged permanently.

Similar Posts