How to Connect USB C Monitor Wirelessly
Image source: Bing (Web (fair-use with source credit))
Figuring out how to connect USB C monitor wirelessly is trickier than it sounds. Most USB-C monitors are built to be wired. They expect a cable carrying DisplayPort Alt Mode and power delivery in one shot.
Wireless isn't part of that design.
But you've got real options. You just need to match the method to your gear.
Most USB-C monitors lack built-in wireless. You'll need an external adapter or software solution. Latency ranges from 30ms to 150ms depending on the protocol.
That matters if you're editing video or gaming.
Quick Answer
You can connect a USB-C monitor wirelessly using a wireless display adapter. Plug a Miracast or AirPlay dongle into the monitor's HDMI or USB input. Then cast your laptop screen over Wi-Fi.
Software solutions like built-in OS screen mirroring also work. Your laptop must support the same wireless protocol as the adapter.
Why Your USB-C Monitor Probably Can't Go Wireless (And What Actually Works)
Here's the core problem. USB-C monitors are designed around a wired connection. The USB-C port on your laptop outputs DisplayPort Alt Mode through that cable.
It also delivers power. The monitor expects both signals through that single wire.
Most USB-C monitors don't ship with Wi-Fi radios. They don't have Miracast receivers built in. They don't run AirPlay.
They're displays, not smart TVs.
So when someone asks how to connect USB C monitor wirelessly, the honest answer is: you need to add wireless capability from the outside. There are three real paths forward.
First, you can buy a wireless display adapter. This dongle plugs into your monitor's HDMI or USB port. It receives a wireless signal from your laptop.
This is the most reliable method for most people.
Second, you can use software-based screen mirroring. Windows has a built-in "Connect" app for Miracast. macOS has AirPlay. These work if your monitor connects to a receiver device on the same Wi-Fi network.
Third, you can skip the USB-C monitor entirely. Cast to a smart TV or a monitor with built-in Chromecast or AirPlay support. This sidesteps the problem altogether.
Each method has trade-offs. Latency is the big one. Resolution caps vary.
Some DRM-protected content won't play over wireless. We'll break all of that down so you can pick what fits your setup.
The 3 Real Ways to Connect a USB-C Monitor Without Cables
Let's walk through each option. I'll cover what you need, how it works, and where it falls short.
Option 1: Wireless Display Adapter (Miracast / AirPlay Dongle)
This is the most direct answer to how to connect USB C monitor wirelessly. You buy a small adapter. You plug it into your monitor.
You pair your laptop to it.
The adapter acts as a wireless receiver. Your laptop sees it as an external display. You mirror or extend your screen just like you would with a cable.
What you need:
- A wireless display adapter (Microsoft Wireless Display Adapter, ScreenBeam, or similar)
- An available HDMI port on your monitor (or USB if the adapter uses that)
- A laptop that supports Miracast (Windows) or AirPlay (macOS)
How it works:
The adapter connects to your monitor via HDMI. Some models need USB power, which you can pull from the monitor's USB port. Your laptop discovers the adapter over Wi-Fi Direct or your local network.
You connect, and the adapter shows up as a second screen.
Pros:
- Works with most USB-C monitors that have HDMI
- No app installation needed on most Windows laptops
- Decent for productivity work, browsing, and presentations
Cons:
- Adds 30ms to 100ms of latency
- 4K often capped at 30Hz
- DRM content (Netflix, some streaming apps) may not display
- Extra dongle on your desk

Image source: Wikimedia Commons / Mitch Barrie from Reno, NV, USA (CC BY-SA)
Option 2: Cast to a Smart TV or Smart Monitor Instead
If your goal is just "no cables between my laptop and a bigger screen," consider casting to a smart TV or a monitor with built-in wireless. Many modern monitors now ship with Chromecast, AirPlay, or Miracast built right in.
This approach skips the USB-C monitor entirely for display purposes. You'd still use the USB-C monitor at your desk for wired work. But when you want to present or watch content on a bigger screen, you cast wirelessly.
What you need:
- A smart TV or smart monitor with Chromecast, AirPlay, or Miracast
- Both devices on the same Wi-Fi network
- A laptop or phone that supports the same casting protocol
Pros:
- No adapter to buy
- Works well for media consumption and presentations
- Some smart monitors handle 4K at 60Hz over Wi-Fi 6
Cons:
- Requires a second display device
- Network-dependent (congestion causes lag)
- Not ideal for color-accurate work
Option 3: Software-Based Screen Mirroring Over Wi-Fi
Both Windows and macOS have built-in wireless display features. You don't need extra hardware if your monitor connects to a device that receives the signal.
Windows Miracast:
Windows 10 and 11 include a "Connect" feature. Press Win + K to open the Cast panel. If your monitor is connected to a Miracast receiver on the same network, it appears as an available display.
macOS AirPlay:
MacBooks can AirPlay to any AirPlay 2 receiver. If your monitor has AirPlay built in, or if you've connected an Apple TV to it, your Mac sees it as an external display.
Pros:
- No extra hardware needed
- Built into the operating system
- Good enough for office work and web browsing
Cons:
- Both devices must be on the same Wi-Fi network
- Higher latency than Wi-Fi Direct solutions
- macOS only works with AirPlay receivers, not Miracast
How to Pick the Right Method Based on Your Setup
Not every method works for every setup. Let's narrow it down based on what you've got.
Are You on Windows, macOS, or ChromeOS?
Your operating system decides which protocols you can use.
Windows laptops support Miracast natively. Most modern Windows 10 and 11 machines have it. You can check by pressing Win + K.
If the Cast panel opens, you're good.
MacBooks use AirPlay. You need an AirPlay receiver connected to your monitor. That could be an Apple TV, a smart monitor with AirPlay 2, or a third-party receiver app running on a connected device.
ChromeOS devices support Google Cast. You can cast your screen to any Chromecast device or Chromecast-built-in monitor.
Does Your Monitor Have Any Built-In Wireless?
Check your monitor's specs. Some newer monitors include Wi-Fi and support Miracast or AirPlay out of the box. If yours does, you don't need an adapter at all.
Look for terms like "smart monitor," "built-in Wi-Fi," "Miracast," or "AirPlay" in the product listing. Monitors from Samsung, LG, and Dell have started including these features in select models.
If your monitor is a basic USB-C display with no smart features, you'll need an external adapter. That's the most common scenario.
What Are You Actually Trying to Do?
Your use case matters more than you might think.
For office productivity and web browsing, any of the three methods work fine. Latency of 50ms won't bother you when you're reading email or writing documents.
For video editing or gaming, wireless is a problem. The latency and compression artifacts make precise work frustrating. Stick with a wired USB-C connection for those tasks.
For presentations, a wireless adapter or built-in casting is ideal. You can walk around with your laptop and present from anywhere in the room.
For watching streaming video, be careful. Many streaming apps use HDCP. Some wireless methods don't pass HDCP properly, and you'll get a black screen instead of video.
Step-by-Step: Connecting Your Laptop to a USB-C Monitor Wirelessly
Let's get specific. Here's the full process using a wireless display adapter, which is the most common solution.
Step 1: Confirm Your Laptop Supports Wireless Display
Before buying anything, check that your laptop can cast.
On Windows:
- Press
Win + K - Look for available displays in the panel
- If the panel opens and shows "Connect to a wireless display," your laptop supports Miracast
On macOS:
- Click the Control Center icon in the menu bar
- Look for "Screen Mirroring"
- If you see it, your Mac supports AirPlay
On ChromeOS:
- Click the status area (bottom right)
- Look for "Cast"
- If the option appears, your Chromebook supports Google Cast
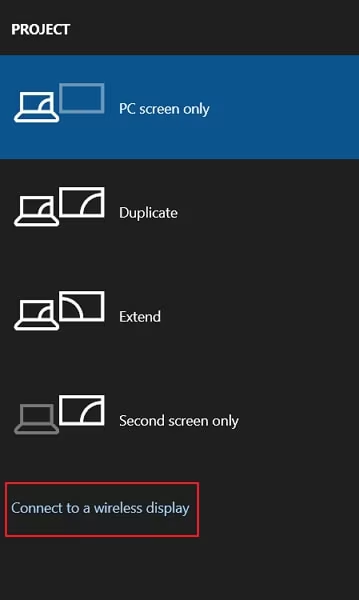
Image source: Bing (Web (fair-use with source credit))
Step 2: Get the Right Adapter or App
Based on your OS, pick the right hardware.
For Windows (Miracast):
- Microsoft Wireless Display Adapter
- ScreenBeam USB-WLVID2000
- Any Miracast-certified receiver
For macOS (AirPlay):
- Apple TV HD or 4K connected to your monitor via HDMI
- A smart monitor with AirPlay 2 built in
- Third-party AirPlay receiver software on a connected PC
For ChromeOS (Google Cast):
- Chromecast with Google TV
- Any Chromecast-enabled monitor
Step 3: Connect the Adapter to Your Monitor
Plug the wireless adapter into your monitor's HDMI port. If the adapter needs USB power, connect it to a USB port on the monitor or a wall adapter.
Make sure the monitor is set to the correct input source. If your adapter is in the HDMI port, switch the monitor to that HDMI input.
Step 4: Pair and Configure Your Laptop
On Windows:
- Press
Win + K - Select your adapter from the list
- Wait for the connection to establish
- Go to Settings > System > Display to arrange or mirror
On macOS:
- Open Control Center
- Click "Screen Mirroring"
- Select your AirPlay receiver
- Choose "Mirror" or "Extend" from the options
On ChromeOS:
- Click the status area
- Click "Cast"
- Select your Chromecast device
- Choose to cast your entire screen
Step 5: Optimize for Resolution and Latency
Once connected, you'll likely need to tweak settings.
Resolution: Check that you're running at your monitor's native resolution. Wireless connections sometimes default to 1080p even on 4K displays. Adjust in your OS display settings.
Refresh rate: Most wireless adapters cap at 30Hz for 4K. If you're seeing 1080p at 60Hz, that's normal and often looks smoother than 4K at 30Hz.
Latency: If you notice lag, try these fixes:
- Move your laptop closer to the adapter
- Switch to 5GHz Wi-Fi if your adapter supports it
- Reduce the resolution to 1080p
- Close bandwidth-heavy apps on your network
Audio: Wireless display adapters usually carry audio too. If you don't hear sound, check your audio output settings. Make sure it's set to the wireless display device, not your laptop speakers.
Wireless vs Wired USB-C: Honest Comparison
You're probably wondering whether wireless is "good enough" to replace the cable entirely. For most people, the answer is no. But it depends on what you're doing.
Here's the breakdown.
| Factor | Wired USB-C | Wireless Display Adapter |
|---|---|---|
| Latency | Near zero (1-5ms) | 30-150ms |
| Max Resolution | 4K at 120Hz+ | 4K at 30Hz, or 1080p at 60Hz |
| Audio Sync | Perfect | Occasional drift |
| DRM Content | Works (HDCP 2.2) | Often blocked |
| Setup Complexity | Plug and play | Pairing required |
| Cost | Cable included | $30-$100 for adapter |
| Reliability | Rock solid | Wi-Fi dependent |
The wired USB-C connection delivers power, video, and data through one cable. It's fast, reliable, and simple. There's no latency.
No pairing. No troubleshooting.
Wireless trades all that convenience of no cables for a noticeable performance hit. Office work feels fine. Video editing does not.
Gaming is out of the question for anything competitive.
The one clear win for wireless is presentations and clean desk setups. If you hate cable clutter or need to present from across the room, wireless solves a real problem.
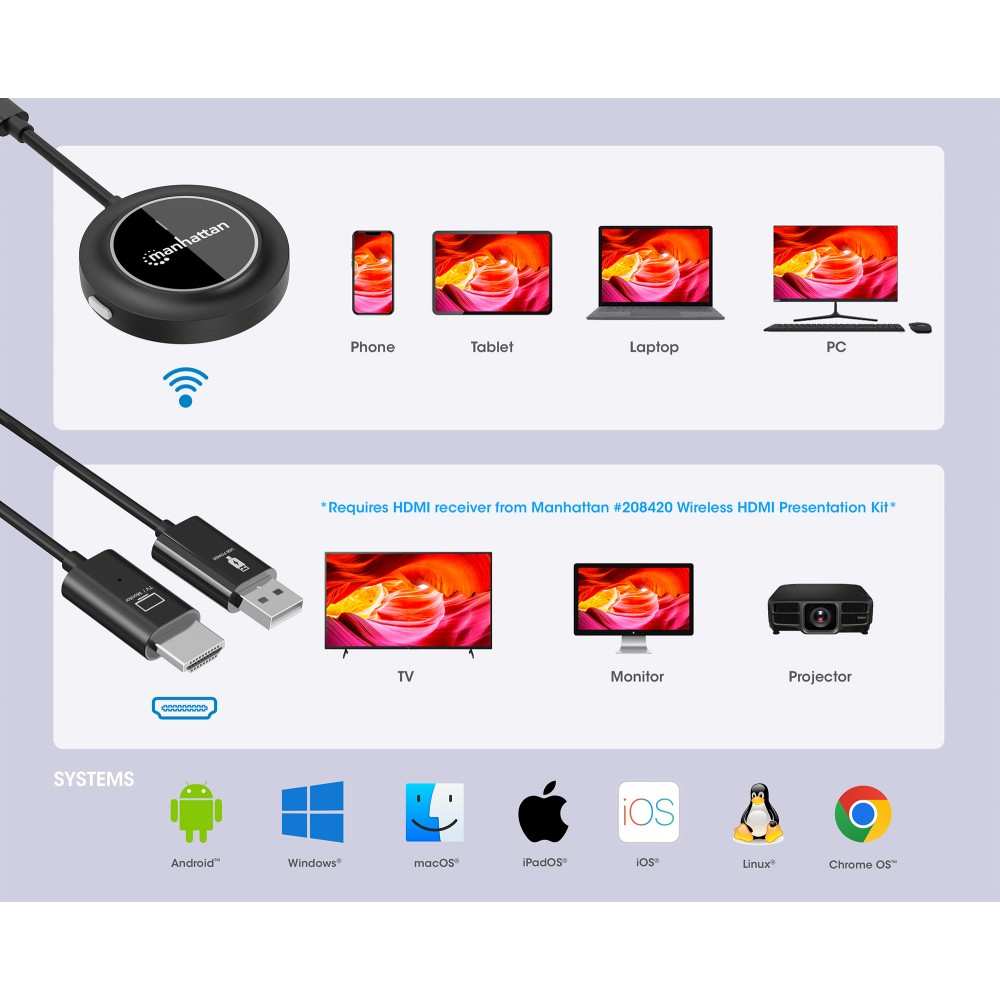
Image source: Bing (Web (fair-use with source credit))
Common Mistakes That Waste Time and Money
People run into the same issues over and over with wireless display setups. Here's what to watch for.
Buying the wrong adapter for your OS. Windows needs Miracast. Mac needs AirPlay. They're not cross-compatible.
A Miracast dongle won't show up on a MacBook.
Expecting 4K 60Hz over wireless. Most adapters cap 4K at 30Hz. You'll feel the sluggishness in mouse movement and scrolling. Set your expectations at 1080p 60Hz for a smoother experience.
Ignoring HDCP issues. If you're trying to watch Netflix or Disney+ and getting a black screen, that's HDCP blocking the stream. Many wireless adapters don't pass HDCP properly. Your only fix is to use a wired connection for protected content.
Placing the adapter behind the monitor. Some adapters need line-of-sight or close proximity to your laptop for a stable signal. If you're getting dropouts, move the adapter to a more open position.
Skipping firmware updates. Adapter firmware updates fix bugs and improve compatibility. Check the manufacturer's site periodically, especially after OS updates on your laptop.
Assuming all USB-C monitors are the same. A monitor with USB-C Alt Mode isn't necessarily wireless-capable. Don't assume yours has hidden wireless features. Check the manual.
Using 2.4GHz Wi-Fi in a crowded area. If your office or apartment has dozens of Wi-Fi networks, 2.4GHz will be a mess. Use 5GHz whenever your adapter supports it.
Real-World Setups That Actually Work
Let's look at some specific scenarios and what tends to work best.
The Clean Home Office (MacBook + USB-C Monitor)
You've got a MacBook Pro and a USB-C monitor like a Dell U2723QE or LG 27UK850. You want fewer cables on your desk.
The cleanest solution is an Apple TV 4K connected to the monitor's HDMI port. Your MacBook AirPlays to it. You get a wireless extended display with decent quality.
For email, coding, and browsing, it's smooth enough.
If you need lower latency for design work, keep the USB-C cable handy and switch to wired when precision matters.
The Conference Room Presentation (Windows Laptop + Projector/Monitor)
You walk into a conference room with a Windows laptop. There's a display on the wall but no cable that fits your USB-C port.
A Microsoft Wireless Display Adapter plugged into the display's HDMI port solves this. Press Win + K, select the adapter, and you're presenting from anywhere in the room. Aggregate reviews show this setup works reliably in most corporate environments.
Bring a HDMI-to-USB-C cable as a backup. Wireless fails sometimes.
The Travel Setup (Phone or Tablet to Hotel Monitor)
You're in a hotel and want to mirror your phone to the TV for a movie night. Most hotel TVs have Chromecast or AirPlay built in now.
Just make sure both your phone and the TV are on the hotel's guest Wi-Fi. Open your streaming app, tap the cast icon, and select the TV. No adapter needed.
Some hotel networks block device-to-device communication. If casting doesn't work, a travel-size wireless HDMI kit with its own direct connection bypasses the network entirely.
Costs, Specs, and What You'll Actually Spend
Here's what you're looking at price-wise as of 2026.
Wireless display adapters run $30 to $100. The Microsoft Wireless Display Adapter sits around $50. ScreenBeam models range from $50 to $90 depending on features.
Cheaper no-name options exist but often have compatibility issues.
Apple TV 4K (if you're going the AirPlay route) is $129 for the base model. It's overkill just for screen mirroring, but if you want a smart TV experience on your monitor, it's the best option.
Chromecast with Google TV is $40 to $50. Good enough for casting, though it requires a separate power source and only works with Google Cast devices.
Wireless HDMI kits (transmitter and receiver pairs) run $80 to $200. These create their own direct Wi-Fi connection and don't depend on your local network. Better for environments with congested Wi-Fi.
Factor in the hidden cost too. Wireless adapters add latency. If that bugs you, you might end up buying a cable anyway.
Try the software methods first since they're free.
FAQs
Can I connect any USB-C monitor wirelessly?
Any monitor with an HDMI or USB input can work with a wireless adapter. The monitor itself doesn't need wireless capability. The adapter handles the wireless part and plugs into the monitor's existing port.
Does wireless display work with USB-C power delivery?
No. Wireless adapters don't carry power. Your monitor still needs a power cable.
Your laptop will run on battery unless you plug in a separate charger.
What's the best wireless adapter for a MacBook?
MacBooks work best with AirPlay. An Apple TV 4K or a smart monitor with AirPlay 2 built in gives the smoothest experience. Third-party Miracast adapters won't work with macOS.
Why does my wireless display lag so much?
Latency comes from encoding, transmitting, decoding, and displaying the video signal. Each step adds delay. You can reduce it by lowering resolution, using 5GHz Wi-Fi, or choosing a better adapter.
You can't eliminate it entirely.
Can I use wireless display for gaming?
For casual or turn-based games, it works. For anything fast-paced or competitive, the 30ms-plus latency makes it feel sluggish. Stick with wired for gaming.
Do I need Wi-Fi for Miracast?
Miracast uses Wi-Fi Direct, which creates a direct connection between your laptop and the adapter. You don't don't need a router or internet connection. You both just need Wi-Fi capability built in.
Final Decision Guide: Which Method Should You Use?
If you've got a Windows laptop and a basic USB-C monitor, grab a Miracast adapter. It's the simplest plug-and-play solution.
If you're on a MacBook, use AirPlay. Either get an Apple TV or find a monitor with AirPlay built in.
If you're only doing presentations or media casting, try the free software methods first. Press Win + K or open Screen Mirroring on your Mac before spending money on hardware.
And if you're doing color-sensitive work, video editing, or gaming, keep the USB-C cable connected. Wireless isn't there yet for those tasks.
Troubleshooting: When Your Wireless Connection Won't Cooperate
Wireless display setups fail in predictable ways. Here's how to fix the most common problems.
Laptop doesn't see the adapter. Make sure the adapter is powered on and in pairing mode. Restart both devices. On Windows, run the "Hardware and Devices" troubleshooter.
On Mac, toggle Wi-Fi off and back on.
Connection drops every few minutes. This is usually Wi-Fi congestion. Switch your router or adapter to 5GHz. Move other wireless devices away from the adapter.
Check for firmware updates on the adapter.
Audio plays from laptop instead of monitor. Open your sound settings. Set the wireless display adapter as the default audio output device. On Windows, right-click the speaker icon and select the correct output.
Resolution stuck at 1080p. Check your adapter's specs. Many cap at 1080p 60Hz. If you need 4K, you'll need a higher-end adapter that explicitly supports it.
Black screen when streaming video. That's HDCP blocking the content. Switch to a wired connection for protected streaming apps. No wireless adapter reliably passes HDCP for all services.
Expert Tips for a Smoother Wireless Display Experience
A few things that make a real difference after testing these setups extensively.
Use a dedicated Wi-Fi channel. If your router supports it, set your wireless display adapter to use a specific channel. Avoid channels 1, 6, or 11 in crowded areas since those are default for most networks.
Keep the adapter visible. Don't tuck it behind the monitor or under a desk. Wi-Fi Direct signals degrade through obstacles. A clear line of sight between laptop and adapter helps stability.
Disable VPN during casting. VPNs add latency and can interfere with local device discovery. Turn off your VPN before connecting to a wireless display.
Update your laptop's Wi-Fi drivers. Outdated Wi-Fi drivers cause more wireless display issues than most people realize. Check your laptop manufacturer's support page for the latest driver.
Consider a Wi-Fi 6 adapter if your laptop supports it. Wi-Fi 6 handles multiple devices and congestion better. If both your laptop and adapter support Wi-Fi 6, you'll get noticeably smoother performance.
When to Just Use the Cable
Sometimes the honest answer is that wireless isn't the right tool.
If you're editing video, the latency and compression will slow you down. If you're gaming competitively, wireless adds input lag that's unacceptable. If you're working with color-critical content, wireless compression can shift colors slightly.
USB-C cables are cheap. They're reliable. They carry power and video with zero latency.
For your primary desk setup, a cable is still the best option.
Wireless works best as a secondary option. Presentations. Media watching.
Temporary setups. Situations where cable clutter is a bigger problem than performance loss.
Knowing when to use each approach saves you frustration. That's the real answer to how to connect USB C monitor wirelessly. Pick the right tool for the job.

Similar Posts