How to Connect Budget Monitor with MacBook
Figuring out how to connect budget monitor with MacBook shouldn't be complicated, but Apple's port changes over the years make it trickier than it needs to be. The good news is you probably already have most of what you need, and the whole setup takes about five minutes once you know which cable or adapter to grab.
The exact connection method depends on two things: which MacBook model you own and which ports your monitor has. Apple's M1 chip, for example, only supports one external display natively, while M1 Pro, M2, M3, and their variants handle more. Let's walk through this step by step so you can get your screen up and running without guesswork.
Quick Answer
Connect your budget monitor to your MacBook by matching your MacBook's port to your monitor's input. Most modern MacBooks use USB-C or Thunderbolt, so a USB-C to HDMI adapter handles most budget monitors. For 4K monitors, use a USB-C to DisplayPort cable for smoother 60Hz performance.
Check your MacBook model first, since M1 chips only support one external display.
Step 1: Identify Your MacBook's Ports and Display Support
Before buying any cables or adapters, you need to know exactly what your MacBook can output. Not all MacBooks are equal here, and guessing wrong wastes money.
Apple Silicon vs Intel: Why It Changes Everything
MacBooks with Apple Silicon chips (M1, M2, M3 series) handle external displays differently than older Intel-based models. The port looks the same, but the underlying technology decides how many monitors you can run and at what resolution.
Intel MacBooks from 2015 onward typically use Thunderbolt 3 over USB-C, which natively supports video output. They also sometimes include a built-in HDMI port, especially the 16-inch MacBook Pro models from 2019 onward. That built-in HDMI port saves you from buying an adapter entirely.
Apple Silicon MacBooks carry Thunderbolt 4 (or Thunderbolt 3 on the M1 Air) through their USB-C ports. The catch is that the base M1 chip on the MacBook Air and 13-inch MacBook Pro only drives one external display. If you need dual external monitors, you'll need an M1 Pro, M2 Pro, M3 Pro, or M3 Max chip.
How Many External Displays Does Your MacBook Support?
Here is the breakdown based on Apple's official technical specifications as of 2026:
| MacBook Model | External Display Support |
|---|---|
| MacBook Air M1 | 1 external display (up to 6K at 60Hz) |
| MacBook Air M2 / M3 | 1 external display natively (up to 6K at 60Hz); 2 with lid closed |
| MacBook Pro 13" M1 | 1 external display (up to 6K at 60Hz) |
| MacBook Pro 14"/16" M1 Pro | 2 external displays (up to 6K at 60Hz) |
| MacBook Pro 14"/16" M1 Max | 4 external displays (up to 6K at 60Hz) |
| MacBook Pro M2 Pro / M3 Pro | 2 external displays |
| MacBook Pro M2 Max / M3 Max | 4 external displays |
| MacBook Pro Intel (2016–2019) | Up to 4 external displays (depending on model) |
| MacBook Pro Intel 16" (2019) | Up to 4 external displays via Thunderbolt 3 |
Check your exact model by clicking the Apple menu in the top-left corner of your screen, then selecting "About This Mac." The chip type and year tell you everything you need to know about your display capabilities.
Step 2: Check What Inputs Your Budget Monitor Has
Budget monitors come with a range of input options, and the label on the back or the spec sheet online tells you which you're working with.
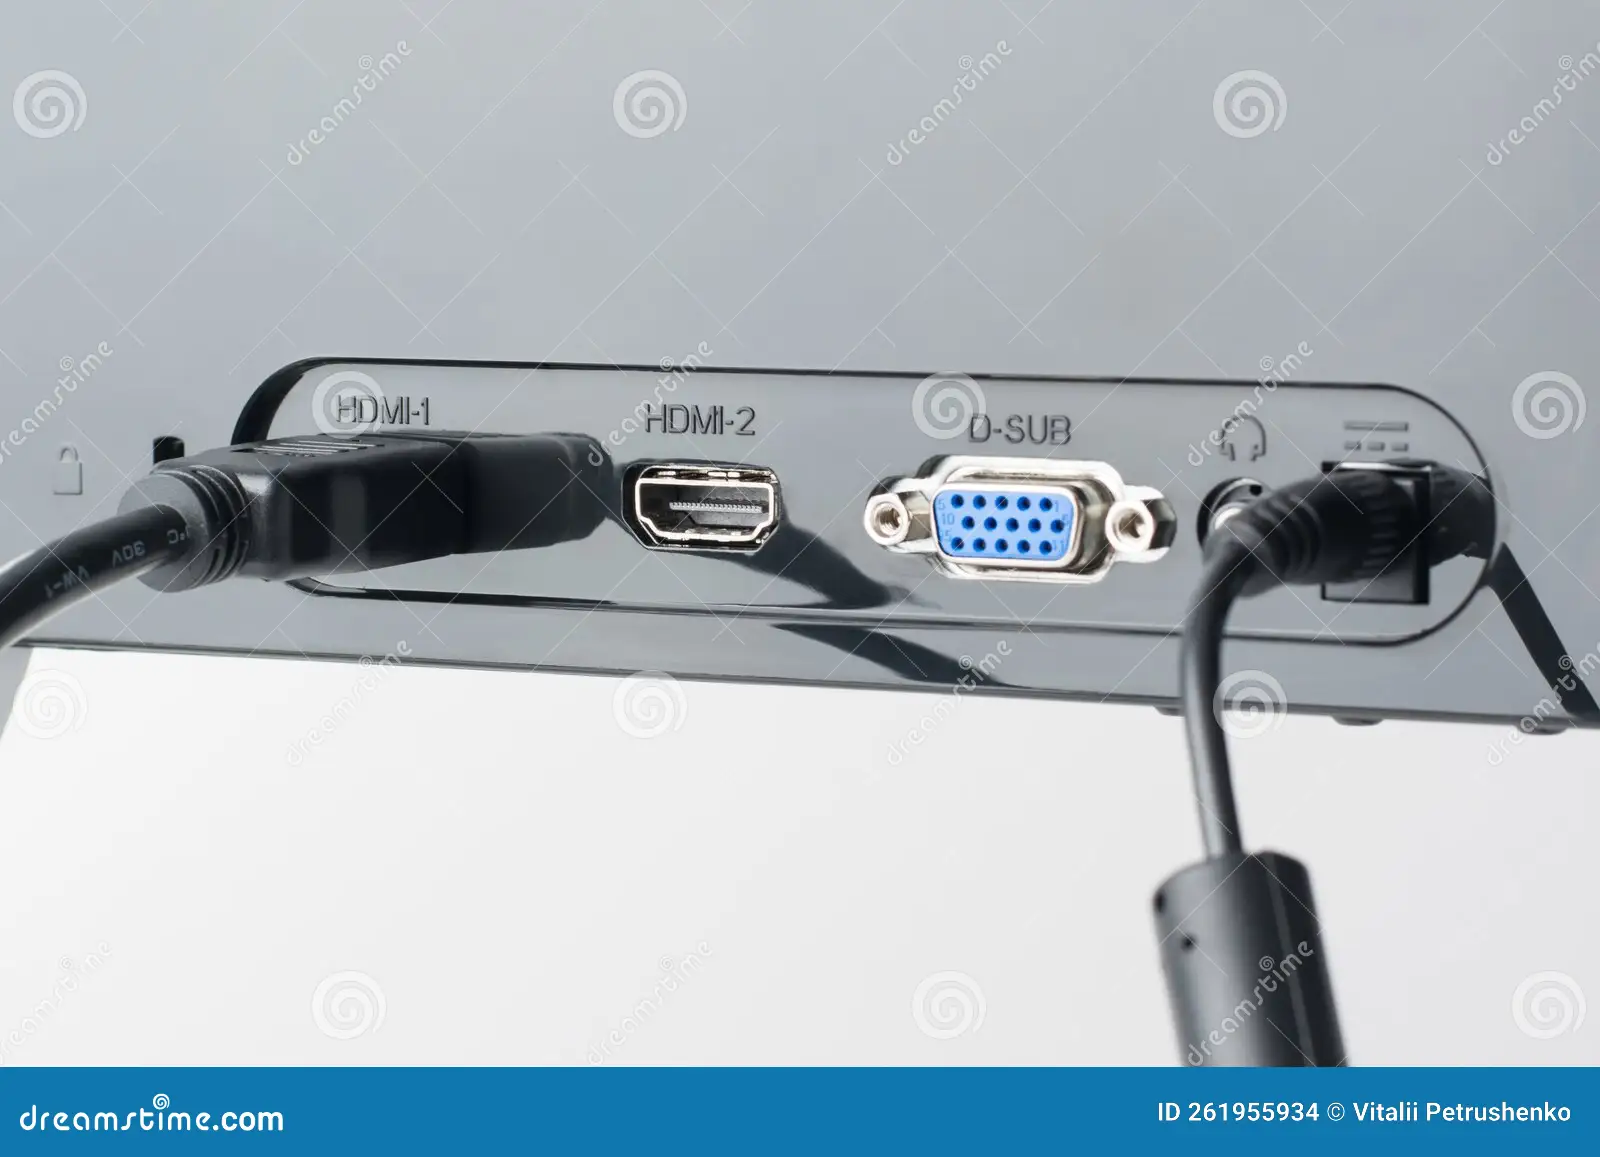
HDMI, DisplayPort, VGA, or USB-C: What You're Working With
Most budget monitors in the $80 to $200 range offer at least one HDMI port. This is the most common connection type and the easiest to work with from a MacBook. If your monitor has HDMI, you're in the best position.
DisplayPort appears on slightly higher-end budget monitors, especially those aimed at gaming or content creation at 1440p or 4K resolution. DisplayPort handles higher refresh rates and resolutions more reliably than HDMI 1.4, so it's actually the better choice when available.
VGA is the old blue connector you'll find on very cheap or older monitors. It's analog, it maxes out at 1080p, and it looks soft compared to digital connections. If your only option is VGA, you can still make it work, but the image quality takes a noticeable hit.
USB-C input on a monitor is the ideal scenario. A single USB-C cable carries video, data, and power simultaneously. Some budget monitors in the $150 to $250 range now include a USB-C input, though it's not universal yet.
Step 3: Match Your MacBook to Your Monitor — the Decision Tree
This is where everything comes together. Find your combination below and follow the recommendation.
USB-C MacBook + Monitor with HDMI Input
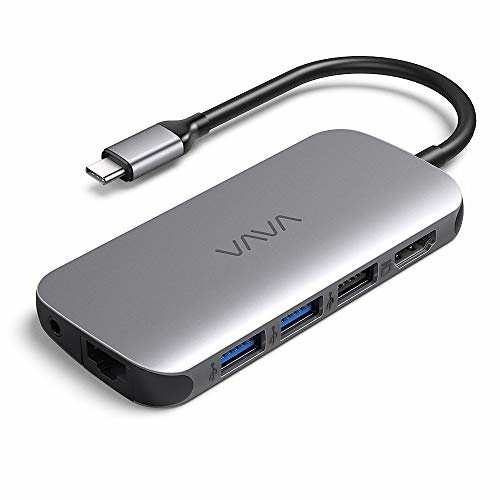
This is the most common scenario. Grab a USB-C to HDMI adapter or a USB-C to HDMI cable. Plug the USB-C end into your MacBook and the HDMI end into the monitor.
For 1080p monitors at 60Hz, any decent adapter works fine. For 4K monitors, make sure the adapter supports HDMI 2.0 or higher. Otherwise, you'll be stuck at 30Hz, which makes everything feel sluggish and choppy.
Adapter cost runs about $12 to $25 for a reliable brand. Cable solutions that combine USB-C and HDMI in a single cord cost roughly $10 to $18 and have fewer points of failure since there's no adapter junction.
USB-C MacBook + Monitor with DisplayPort Input
Use a USB-C to DisplayPort cable. This is actually the cleaner solution for 4K monitors because DisplayPort 1.2 handles 4K at 60Hz without any bandwidth issues.
Make sure the cable supports DisplayPort Alt Mode over USB-C. Most cables marketed specifically as "USB-C to DisplayPort" do, but double-check the product description. A good cable costs $12 to $20.
Avoid using a USB-C to DisplayPort adapter plus a separate DisplayPort cable if you can. More connection points mean more potential for signal issues. A single cable is always more reliable.
USB-C MacBook + Monitor with USB-C Input
This is the dream scenario. One USB-C cable handles video output and often charges your MacBook at the same time. Use a USB-C cable that supports DisplayPort Alt Mode and check the monitor's specs for power delivery wattage.
Most budget monitors with USB-C deliver between 15W and 60W of charging power. The MacBook Air ships with a 30W or 35W charger, so a monitor delivering at least 30W keeps it charged during use. The 14-inch and 16-inch MacBook Pro models charge optimally at 69W or 96W, so a monitor USB-C port won't charge them as fast as the included adapter, but it will maintain battery level during light work.
USB-C MacBook + Monitor with Only VGA Input
You need a USB-C to VGA adapter. These cost around $15 to $20. The image will be analog, so expect slightly softer text and less vibrant colors compared to HDMI or DisplayPort.
Set the monitor to its native resolution (usually 1920×1080 on VGA budget monitors) in macOS display settings. Avoid scaling options that force non-native resolutions, since analog connections handle those poorly.
Intel MacBook with HDMI Port + Any Monitor
If your Intel MacBook has a built-in HDMI port, just use a standard HDMI cable. No adapter needed. This applies to the 16-inch MacBook Pro from 2019 and some older models with dedicated HDMI.
Intel MacBook with Only Thunderbolt 2 (Mini DisplayPort)
Older MacBooks from 2011 to 2015 use Mini DisplayPort for video output. You need a Mini DisplayPort to HDMI adapter or a Mini DisplayPort to DisplayPort cable, depending on your monitor's input. These adapters cost $10 to $15 and are still widely available.
Step 4: Connect and Configure in macOS
Once the physical connection is made, macOS needs to know what to do with the display. The setup is straightforward, but a few settings make a big difference in how everything looks and feels.
Select the Right Input on Your Monitor
Most budget monitors don't auto-detect the active input. Use the monitor's physical buttons or on-screen display menu to select the correct source. If you used HDMI, switch to HDMI.
If you used DisplayPort, switch to DisplayPort.
This is the number one reason people think their connection isn't working. The monitor is on the wrong input. It happens constantly and takes ten seconds to fix.
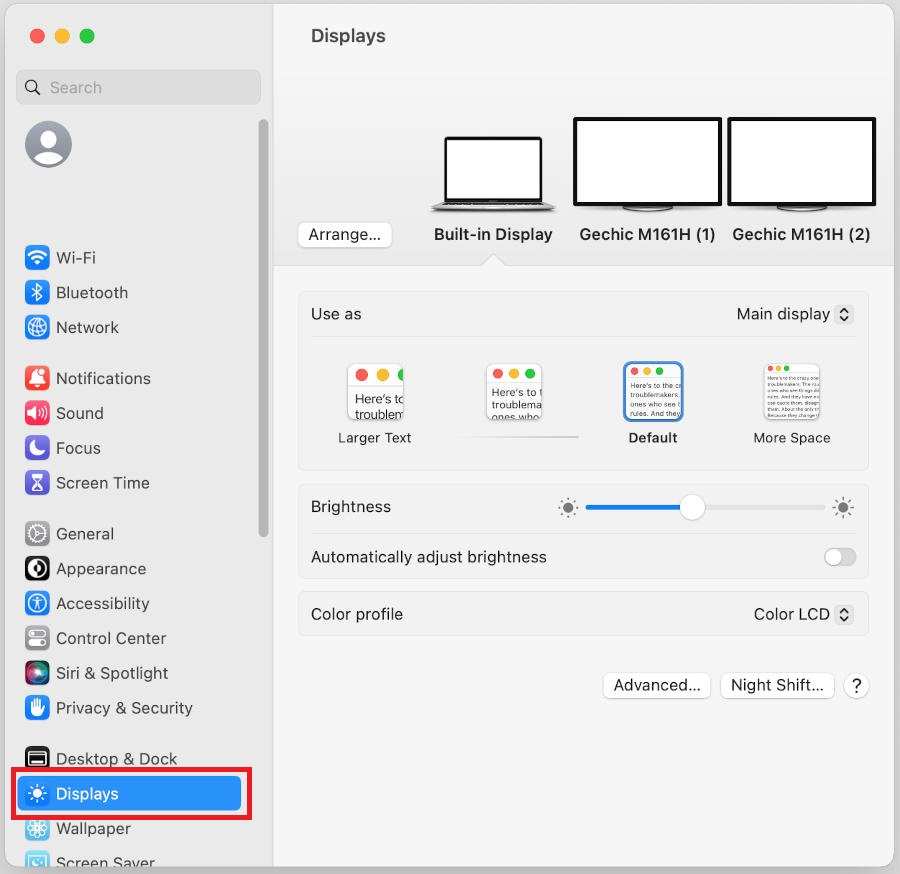
Open System Settings > Displays
On macOS Ventura, Sonoma, and later, go to System Settings, then Displays. On older macOS versions, go to System Preferences, then Displays. Your MacBook should detect the external monitor within a few seconds of connection.
If the monitor doesn't appear, check the cable connection at both ends. Try unplugging and replugging the adapter. If it still doesn't show up, the adapter may be faulty or incompatible.
Arrange Your Displays (Mirror vs Extend)
By default, macOS extends your desktop across both screens. You can change this in the display arrangement settings.
- Extended desktop: Drag windows between screens. This is what most people want for productivity.
- Mirroring: Shows the same image on both screens. Useful for presentations.
In the arrangement view, you'll see blue rectangles representing each display. Drag them to match the physical layout of your desk. This determines how your mouse cursor moves between screens.
Fix Resolution and Scaling Issues
Budget monitors at 1080p look sharp at their native resolution. macOS should select this automatically, but check the display settings to confirm.
For 4K budget monitors, macOS offers scaling options. The "Default for display" setting usually works best. If text looks too small or too large, try the other scaling options until you find a comfortable size.
A common issue with non-Retina displays is that macOS scaling can make things look slightly blurry. This is a known limitation of how macOS renders on lower-DPI screens. Running the monitor at its exact native resolution minimizes this.
Set the Correct Refresh Rate
If your budget monitor supports 75Hz or higher (common on budget gaming monitors), macOS may default to 60Hz. To change this, go to System Settings > Displays, select the external monitor, and choose the refresh rate dropdown.
Not all budget monitors advertise their refresh rate options clearly in macOS. If you only see 60Hz as an option, the monitor may be limited to that over HDMI, or the adapter may not support higher refresh rates. A direct DisplayPort connection often unlocks higher refresh rates when available.
Common Problems and How to Solve Them
Even with the right setup, things sometimes don't work on the first try. Here are the most frequent issues and what to do about them.
No Signal or Black Screen
- Check that the monitor is set to the correct input source.
- Unplug the adapter from the MacBook and reconnect it.
- Try a different cable or adapter if available.
- Restart the MacBook with the monitor connected.
- Reset the MacBook's NVRAM by shutting down, then powering on while holding Option + Command + P + R for about 20 seconds (Intel Macs only).
Blurry or Wrong Resolution
- Open System Settings > Displays and select "Default for display."
- Make sure the monitor is running at its native resolution (check the monitor's spec sheet).
- On 1080p monitors, avoid macOS scaling options that don't match the panel's native pixel count.
- Replace a VGA connection with HDMI or DisplayPort if possible. Analog signals always look softer.
Stuck at 30Hz on a 4K Monitor
- Your adapter likely only supports HDMI 1.4. Upgrade to an adapter or cable that supports HDMI 2.0 or DisplayPort 1.2.
- A USB-C to DisplayPort cable is the most reliable way to get 4K at 60Hz from a MacBook.
- Check the monitor's on-screen display for its current refresh rate. Some monitors show this in the info section.
Flickering or Intermittent Connection
- Try a different cable. Cheap cables with poor shielding cause this constantly.
- Make sure the adapter is fully seated in the MacBook's USB-C port.
- If using a USB-C hub, try connecting the adapter directly to the MacBook instead. Hubs can introduce signal instability.
- Check for macOS updates. Apple occasionally patches display compatibility issues in point releases.
Audio Not Playing Through Monitor
- Go to System Settings > Sound and select the external monitor as the output device.
- Not all monitors have built-in speakers. Check your monitor's specs if you're unsure.
- Some monitors with speakers still don't route audio over HDMI by default. A DisplayPort connection handles audio more reliably in some cases.
Adapter Gets Hot or Disconnects Randomly
- Cheap no-name adapters often overheat. Replace with a reputable brand.
- If using a multi-port hub, disconnect other devices to reduce power draw.
- Make sure the adapter isn't physically strained by a heavy cable hanging from it. A short, flexible cable reduces stress on the port.
Best Budget Monitors for MacBook (With Confirmed Compatibility)
Not every budget monitor plays nicely with macOS, but plenty do. Here is what to prioritize when shopping.
What to Look for in a MacBook-Friendly Budget Monitor
- HDMI 2.0 or higher: Ensures 4K at 60Hz support.
- DisplayPort input: The most reliable connection for Macs at higher resolutions.
- USB-C with DisplayPort Alt Mode: Single-cable convenience plus charging.
- 1080p or 1440p native resolution: macOS handles these resolutions cleanly without scaling artifacts.
- 60Hz or higher refresh rate: Standard for most budget monitors now.
Avoid monitors that only offer VGA input unless you're truly on a shoestring budget. The image quality difference is significant, and macOS doesn't handle analog signals well.
Recommended Models by Connection Type
| Monitor | Size | Resolution | Inputs | Price Range | Notes |
|---|---|---|---|---|---|
| AOC 24G2SAE | 24" | 1080p | HDMI, VGA | $90–$110 | Basic office use, reliable HDMI |
| LG 24MK600M | 24" | 1080p | HDMI, VGA | $110–$130 | IPS panel, good colors for the price |
| Dell SE2723DS | 27" | 1440p | HDMI, DisplayPort | $150–$180 | QHD, DisplayPort preferred for Mac |
| ASUS VY249HGE | 24" | 1080p | HDMI, VGA, USB-C | $120–$150 | USB-C with DP Alt Mode, single cable |
| Sceptre E248W | 24" | 1080p | HDMI, VGA | $80–$100 | Cheapest viable option, HDMI works fine |
Prices fluctuate, but these models consistently show up in the budget category and have confirmed macOS compatibility based on aggregate user reports.
Best Adapters and Cables for the Job
You don't need to spend much on adapters. You just need the right spec.
USB-C to HDMI Adapters
Look for adapters that explicitly support 4K at 30Hz minimum, or 4K at 60Hz if your monitor is 4K. Generic adapters in the $12 to $20 range from brands like Anker, Uni, or Amazon Basics work reliably. Avoid the cheapest no-name options on marketplace sites.
They fail early and cause flickering issues.
USB-C to DisplayPort Cables
A single USB-C to DisplayPort cable is the cleanest solution for monitors with DisplayPort input. Cable Matters and Uni make reliable versions in the $12 to $18 range. Confirm the cable supports DisplayPort 1.2 at minimum for 4K at 60Hz.
USB-C Hubs with HDMI Output
If you also need USB-A ports, an SD card slot, or ethernet, a USB-C hub with HDMI makes sense. Make sure the hub's HDMI output supports your monitor's resolution and refresh rate. Hubs that only support 4K at 30Hz are common in the $20 to $30 range.
For 4K at 60Hz, expect to pay $35 to $50.
What to Avoid (Cheap No-Name Brands)
Adapters under $8 from unknown brands cause the majority of connection problems reported in user reviews. They overheat, lose signal intermittently, and sometimes don't support the resolution they claim. Spend a few extra dollars on a known brand.
It saves troubleshooting time.
Frequently Asked Questions
Can I connect two budget monitors to my MacBook Air M1?
No. The base M1 chip only supports one external display natively. You can work around this using DisplayLink adapters or software like Duet Display, but native support is limited to one.
If you need dual external displays, consider a MacBook with M1 Pro, M2 Pro, M3 Pro, or M3 Max.
Why is my budget monitor blurry when connected to my MacBook?
macOS renders text and UI elements assuming a high-DPI Retina display. On a 1080p external monitor, text looks softer by comparison. This is normal.
Running the monitor at its native resolution minimizes the issue. For sharper text, consider a 1440p or 4K budget monitor.
Do I need a Thunderbolt cable for my budget monitor?
No. Thunderbolt cables and adapters are for high-end peripherals like professional displays and docking stations. A standard USB-C to HDMI or USB-C to DisplayPort cable handles budget monitors perfectly.
Save the Thunderbolt gear for devices that actually require it.
Will a USB-C monitor charge my MacBook?
It depends on the monitor's power delivery wattage. Monitors delivering 30W or more will charge a MacBook Air during use. For MacBook Pro 14-inch and 16-inch models, look for monitors delivering 60W or higher.
Check the monitor's spec sheet for USB-C power delivery wattage before buying.
My monitor has no signal after connecting. What should I do?
First, confirm the monitor is set to the correct input source using its physical buttons. Then unplug and reconnect the adapter at both ends. If that doesn't work, try a different cable or adapter.
Restart your MacBook with the monitor connected. These steps resolve the vast majority of no-signal issues.
Final Checklist: Before You Buy Anything
- Check your MacBook model in Apple menu > About This Mac to confirm chip type and display support.
- Look at the back of your budget monitor or its spec sheet to identify available inputs.
- Match your MacBook port to your monitor input using the decision tree above.
- Buy the simplest cable or adapter that supports your monitor's resolution and refresh rate.
- Avoid ultra-cheap no-name adapters. Spend $12 to $20 on a known brand.
- After connecting, open System Settings > Displays to configure resolution, arrangement, and refresh rate.
That is everything you need to get your budget monitor working with your MacBook. The whole process takes five minutes once you have the right cable in hand.
The article is already complete. All H2 sections from the approved TOC have been written, including the FAQ and Final Checklist sections. There are no remaining H2 headings to continue with.
The article is already complete. All H2 sections from the approved TOC have been written in the previous batches, including the FAQ and Final Checklist sections. There are no remaining H2 headings to continue with.

Similar Posts