How to Connect Budget Monitor to Laptop

So you picked up a budget monitor and you're ready to get it working with your laptop. Good news: figuring out how to connect a budget monitor to laptop setups is usually straightforward. The tricky part is matching the right ports, cables, and settings so everything actually works.
Most connection headaches come down to one thing: port mismatch. Your laptop might only have USB-C, while your monitor only has HDMI or VGA. Once you know what you're working with, the fix is simple.
Let's walk through it step by step.
Quick Answer
Connect your budget monitor to your laptop by matching ports on both devices. Use a direct HDMI or DisplayPort cable if both devices share the same port. If ports differ, grab the right adapter, like USB-C to HDMI.
Then configure your display settings to extend or duplicate the screen.
What Ports Do You Actually Have?
Before you buy any cable or adapter, you need to know what you're working with. This is where most people go wrong. They assume their laptop has an HDMI port or that their monitor supports USB-C.
Sometimes that's true. Often it's not.
Grab your laptop and your monitor, and let's identify the ports on both.
Image source: Openverse / cogdogblog
Checking Your Laptop's Video Outputs
Look at the sides (and possibly the back) of your laptop. Here's what you're likely to find:
- HDMI (full-size): A trapezoid-shaped port, about 14mm wide. Common on larger laptops and gaming laptops.
- USB-C with DisplayPort Alt Mode: A small oval port, about 8mm wide. Found on most modern ultrabooks, MacBooks, and Chromebooks. Look for a lightning bolt or "D" symbol next to it.
- DisplayPort (full-size): A rectangular port with one corner cut at an angle. Rare on laptops but found on some workstation models.
- Mini DisplayPort / Thunderbolt: Smaller version of DisplayPort. Found on older MacBooks and some compact laptops.
- VGA: A blue trapezoid port with 15 pins. Almost never found on laptops made after 2018.
Important: Not all USB-C ports support video output. Some are data-only or charge-only. Check your laptop's manual or look for a DisplayPort symbol (a "D" shape) or lightning bolt icon next to the port.
Checking Your Budget Monitor's Inputs
Budget monitors typically come with one or two of these:
- HDMI: The most common option on monitors under $150. Most budget 1080p panels include at least one HDMI 1.4 port.
- VGA (D-Sub): Still found on many budget and office monitors. It's an older analog standard but works fine for basic use.
- DisplayPort: Less common on the cheapest monitors, but you'll see it on models in the $130 to $180 range.
- USB-C: Rare on budget monitors as of 2026, though a few portable panels include it.
Write down what you have on both devices. That determines everything that comes next.
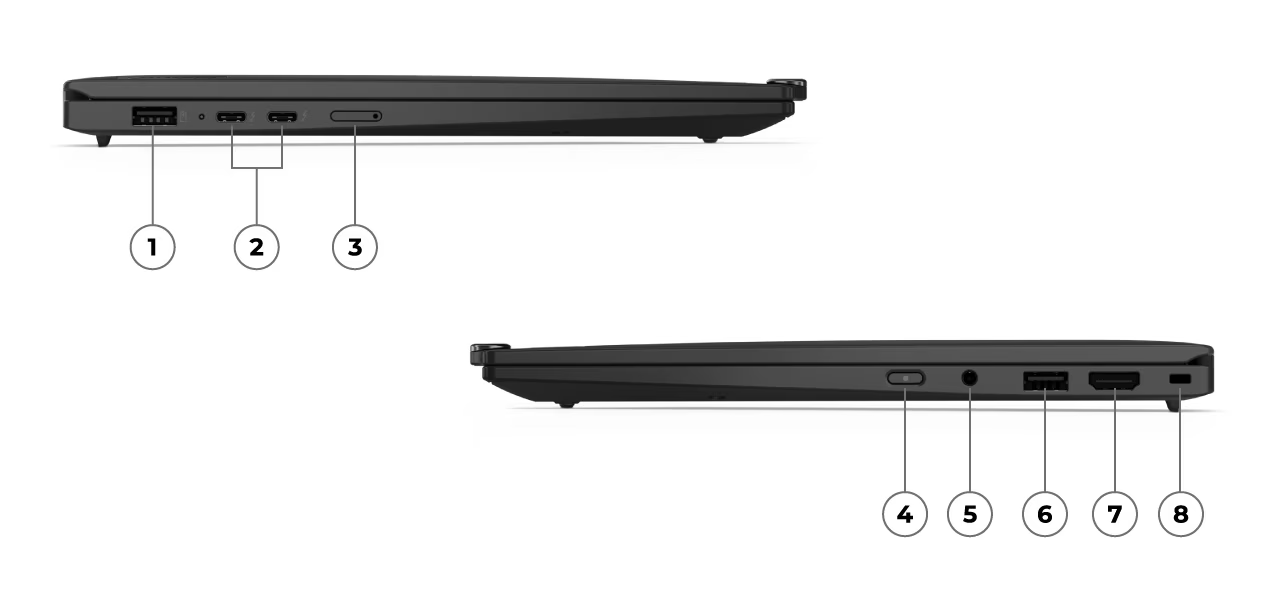
Image source: Bing (Web (fair-use with source credit))
Choosing the Right Cable or Adapter
Now that you know your ports, you can pick the right connection method. The goal is always the simplest, most direct path. Adapters add complexity and potential failure points.
Direct Cable Connection (Best Option)
If your laptop and monitor share the same port type, use a direct cable. This is the most reliable approach.
| Laptop Port | Monitor Port | Cable Needed | Max Resolution (Typical) |
|---|---|---|---|
| HDMI | HDMI | HDMI to HDMI | 4K at 30Hz (HDMI 1.4) or 4K at 60Hz (HDMI 2.0) |
| DisplayPort | DisplayPort | DisplayPort to DisplayPort | 4K at 60Hz (DP 1.2) or 4K at 120Hz (DP 1.4) |
| USB-C | USB-C (with DP Alt Mode) | USB-C to USB-C | Depends on DP version; typically 4K at 60Hz |
A basic HDMI cable costs $5 to $10. You don't need an expensive one. A certified High Speed HDMI cable handles 1080p at 60Hz without any issues.
When You Need an Adapter
If your ports don't match, you need an adapter or a cable with different connectors on each end. Here are the most common scenarios:
- Laptop has USB-C, monitor has HDMI: Get a USB-C to HDMI adapter or cable. This is the most common mismatch in 2026.
- Laptop has USB-C, monitor has VGA: Get a USB-C to VGA adapter. These are less common but still available.
- Laptop has HDMI, monitor has VGA: Get an HDMI to VGA adapter. Note: this requires an active adapter because HDMI is digital and VGA is analog.
- Laptop has Mini DisplayPort, monitor has HDMI: Get a Mini DisplayPort to HDMI cable or adapter.
Pro tip: A single cable with different ends (like a USB-C to HDMI cable) is usually more reliable than a cable plus a separate adapter. Fewer connection points mean fewer things that can wiggle loose.
USB-C: The One-Cable Solution (If Your Laptop Supports It)
If both your laptop and monitor support USB-C with DisplayPort Alt Mode, you can run video, audio, and power through a single cable. This is the cleanest setup possible.
But here's the catch: your laptop's USB-C port must support DisplayPort Alt Mode. Not all do. Check your laptop's specs sheet for "DisplayPort over USB-C" or "DP Alt Mode." If it only says "USB 3.1" or "data transfer," it won't carry a video signal.
Some USB-C monitors also charge your laptop through the same cable. The monitor needs to support USB Power Delivery, and the wattage matters. A 15W PD output won't charge a power-hungry laptop quickly.
Look for 45W or 65W if you want meaningful charging.
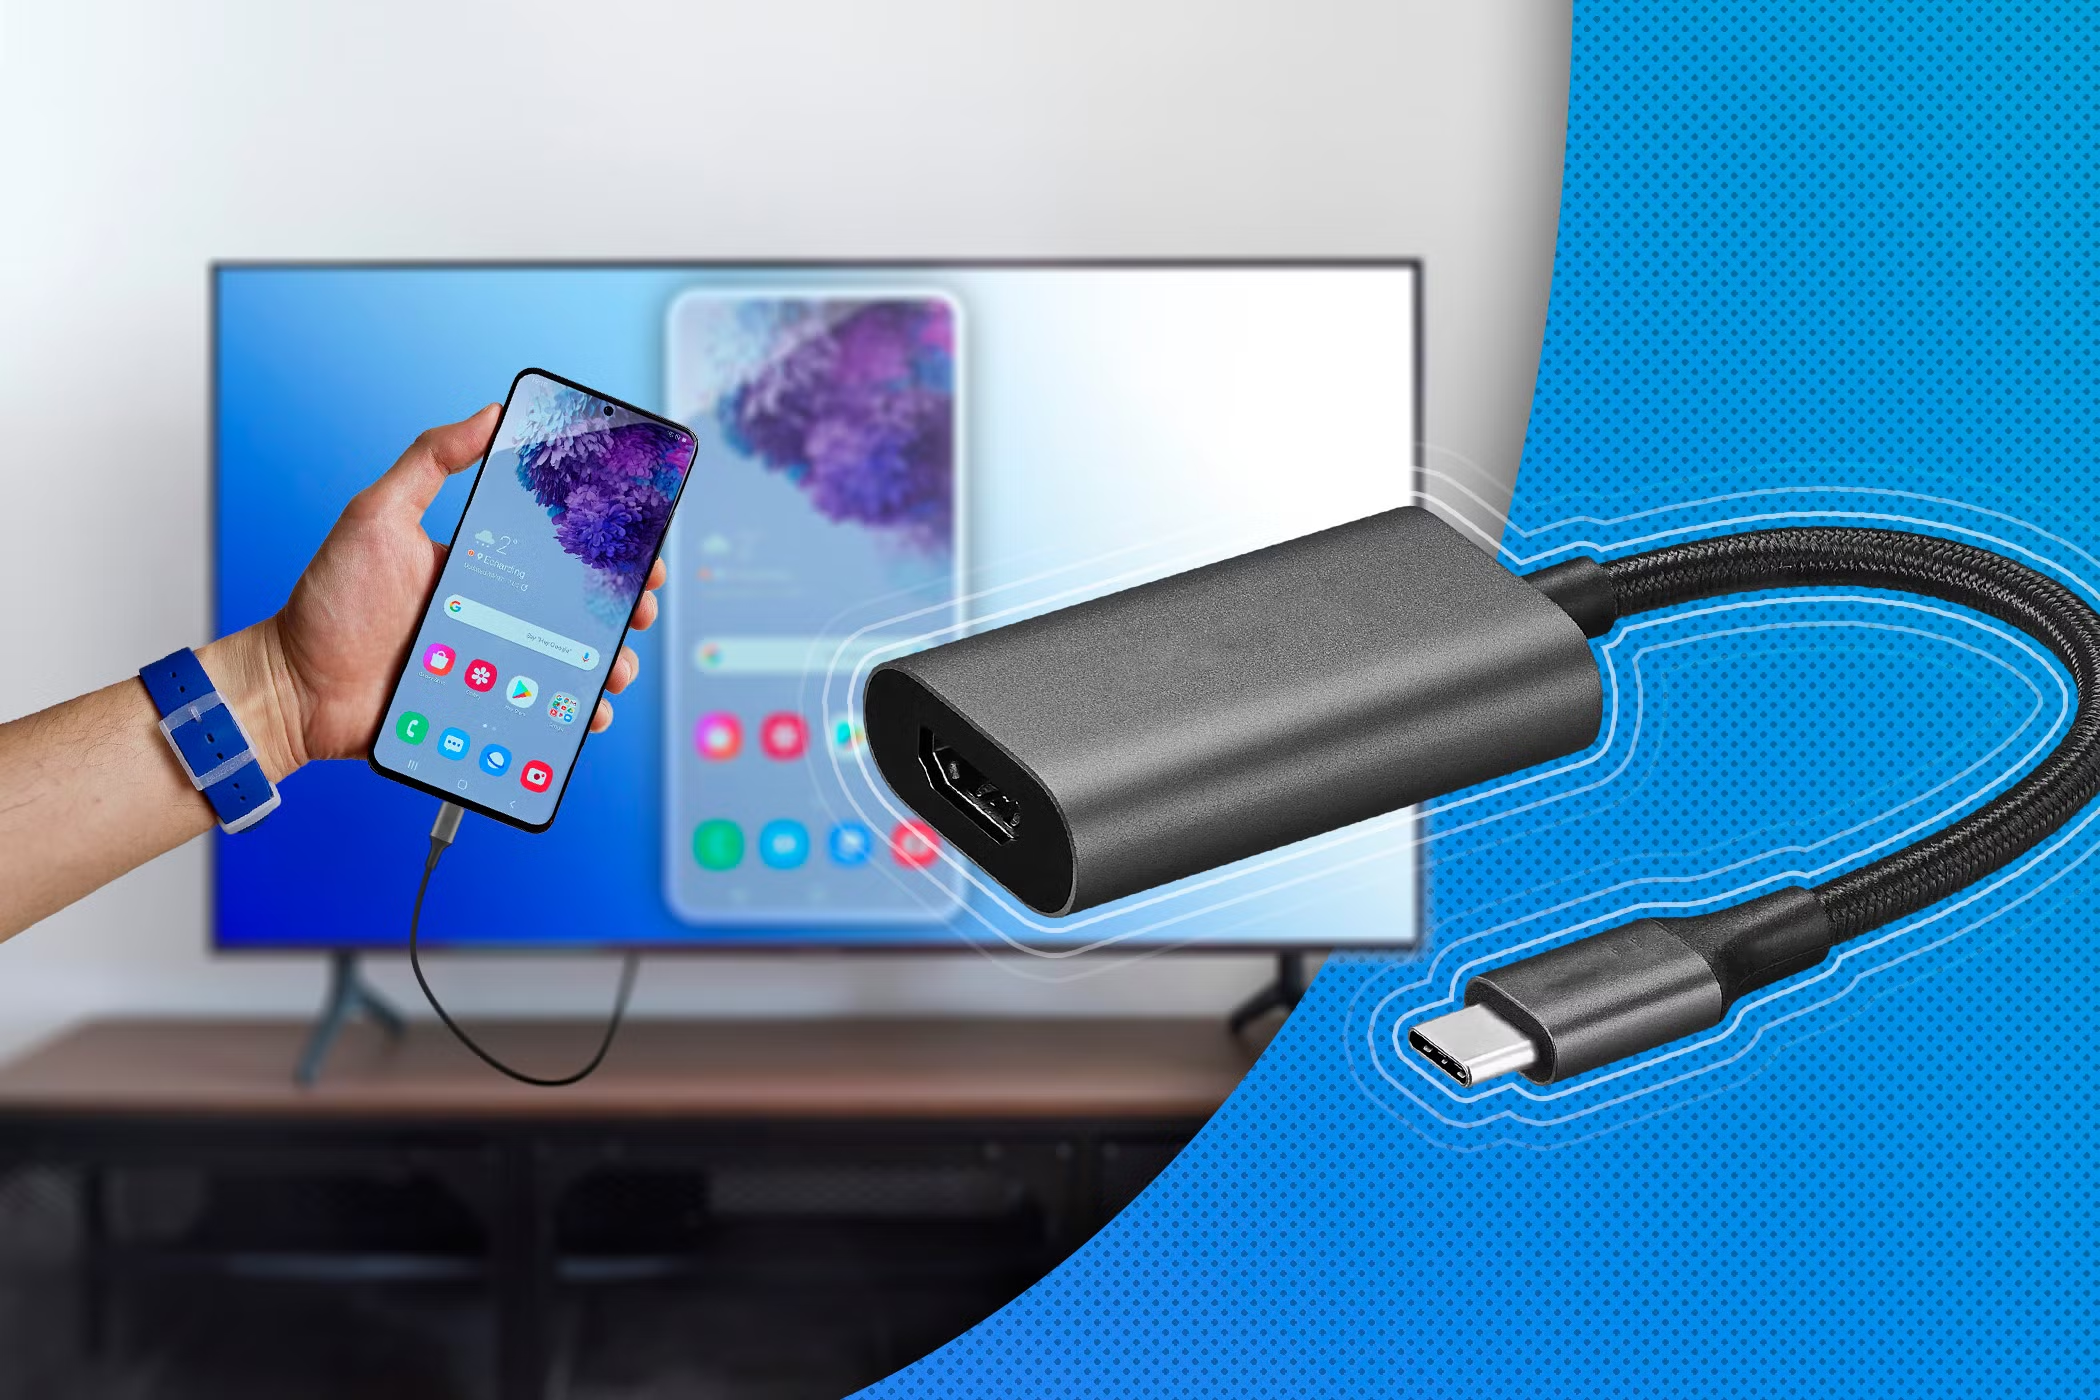
Image source: Bing (Web (fair-use with source credit))
Step-by-Step: Making the Connection
You've got your cable or adapter. Now let's get everything connected and working.
Step 1: Power Everything Off (Yes, Really)
Shut down your laptop and turn off the monitor. This isn't strictly necessary for modern hardware, but it prevents detection issues and protects the ports from any voltage quirks during connection.
Step 2: Connect the Cable
Plug one end into your laptop and the other into your monitor. Make sure both connections are snug. If you're using an adapter, connect the adapter to your laptop first, then run a standard HDMI or DisplayPort cable from the adapter to the monitor.
Step 3: Power On and Select the Right Input
Turn on your laptop first, then the monitor. Most budget monitors auto-detect the active input, but some require you to manually select it. Look for a button on the monitor labeled "Input" or "Source." Press it until you see your laptop's display appear.
If the screen stays black, don't panic. Move on to the troubleshooting section below.
Step 4: Configure Your Display Settings
Once the physical connection is made, your operating system needs to know what to do with the second screen.
On Windows 10 and 11:
- Right-click the desktop and select "Display settings."
- Scroll to the "Multiple displays" section.
- Choose "Extend these displays" for a dual-screen setup or "Duplicate these displays" to mirror your laptop screen.
- Drag the monitor icons to match the physical arrangement of your screens.
On macOS:
- Open System Settings (or System Preferences on older versions).
- Go to "Displays."
- Click "Arrangement" to position the screens relative to each other.
- Uncheck "Mirror Displays" if you want an extended desktop.
On ChromeOS:
- Click the status area (bottom right) and select the gear icon.
- Go to "Device" then "Displays."
- Choose mirror or extend mode and adjust resolution.
Set the resolution to the monitor's native resolution. For most budget 24-inch monitors, that's 1920 x 1080. If the image looks stretched or blurry, the resolution is wrong.
Also check the refresh rate. Right-click the desktop, go to Display Settings, then Advanced Display Settings. Make sure it's set to 60Hz (or higher if your monitor supports 75Hz or 144Hz).
Some setups default to 30Hz, which makes everything feel sluggish.

Image source: Bing (Web (fair-use with source credit))
Troubleshooting the Most Common Problems
Even when you've done everything right, things sometimes don't work. Here are the most common issues and how to fix them.
"My Laptop Isn't Detecting the Monitor"
This is the number one complaint. Try these steps in order:
- Make sure the monitor is powered on and set to the correct input source.
- Reseat the cable at both ends.
- Try a different cable if you have one.
- On Windows, press Win + P and select "Extend" or "Duplicate."
- On Windows, go to Display Settings and click "Detect" under the multiple displays section.
- Restart your laptop with the monitor connected.
- Update your graphics drivers. Go to Intel, AMD, or NVIDIA's website and download the latest driver for your GPU.
"The Screen Looks Blurry or the Resolution Is Wrong"
This usually means your laptop is outputting the wrong resolution. Go to your display settings and set it to the monitor's native resolution. For a budget 1080p monitor, that's 1920 x 1080.
If text still looks fuzzy on a Windows machine, try running the ClearType tuner. Search for "ClearType" in the Start menu and follow the wizard. It makes a noticeable difference on budget IPS and TN panels.
On macOS, check for "Default for display" in the Displays settings. Let macOS pick the right resolution rather than choosing a scaled option.
"It's Stuck at 30Hz and Everything Feels Sluggish"
A 30Hz refresh rate makes mouse movement feel laggy and videos look choppy. Fix this by going to your display adapter properties:
- Right-click the desktop and select "Display settings."
- Scroll down and click "Advanced display settings."
- Click "Display adapter properties for Display 2."
- Go to the "Monitor" tab.
- Set the refresh rate to 60Hz (or higher if supported).
If 60Hz isn't available, your cable or adapter might not support it. HDMI 1.4 cables can do 1080p at 60Hz, but older or low-quality cables might cap at 30Hz. Try a different cable.
"My USB-C Cable Isn't Sending Video"
Not all USB-C cables carry video. A charge-only USB-C cable won't work for display output. You need a cable that supports DisplayPort Alt Mode or Thunderbolt.
Check the cable's packaging or specs. Look for "DisplayPort Alt Mode," "Thunderbolt 3/4," or "USB 3.1 Gen 2 with video." A basic USB-C charging cable from a phone won't cut it.
Also confirm your laptop's USB-C port actually supports video. Some laptops have multiple USB-C ports, and only one of them carries DisplayPort. Check your laptop's manual or spec sheet to identify which port to use.
Budget Monitor + Laptop: Best Setups by Use Case
Not everyone needs the same thing from a second screen. Here's how to get the most out of your setup depending on how you work.
For Remote Workers and Students
You want screen real estate for documents, browsers, and video calls. A 24-inch 1080p IPS panel is the sweet spot. It gives you enough room to have two windows side by side without squinting.
Use "Extend" mode so your laptop screen becomes a secondary display for Slack, email, or reference material. Keep your main work on the bigger external monitor. Your neck will thank you after a full workday.
Look for a monitor with an adjustable stand or VESA mount compatibility. Being able to raise the screen to eye level makes a huge difference in comfort during long sessions.
For Casual Gaming on a Budget
If your budget monitor has a 75Hz or 144Hz refresh rate, you can take advantage of that for smoother gameplay. But you need the right connection. HDMI 1.4 supports 1080p at 144Hz, but only if both the cable and the monitor support it.
DisplayPort 1.2 handles 1080p at 144Hz without issues.
Check your monitor's on-screen display (OSD) settings. Some budget high-refresh monitors require you to manually enable the higher refresh rate in the monitor's own menu, not just in Windows.
Also note that adaptive sync (FreeSync or G-Sync Compatible) typically works over DisplayPort. Some monitors support it over HDMI too, but it varies by model. Check the spec sheet.
For Presentations and Meetings
When you're presenting to a client or team, "Duplicate" mode is your friend. It shows the same thing on both screens. Connect before the meeting starts and test it.
Nothing kills a presentation faster than fumbling with display settings in front of everyone.
Carry your adapter in your laptop bag. Conference room projectors and monitors almost always have HDMI. If your laptop only has USB-C, a small USB-C to HDMI adapter takes up no space and saves you every time.
What to Know Before You Buy a Cable or Adapter
Spending the right amount on cables and adapters matters. Too cheap and you get connection issues. Too expensive and you're wasting money on features you don't need.
For a basic 1080p 60Hz setup: A $5 to $10 HDMI cable or USB-C to HDMI adapter is all you need. Don't overspend.
For 1080p at 144Hz: Make sure the cable supports HDMI 1.4 or DisplayPort 1.2 at minimum. Look for "High Speed HDMI" on the packaging.
For 4K at 60Hz: You need HDMI 2.0 or DisplayPort 1.2. Not all cables advertise this clearly, so check the specs before buying.
For USB-C hubs with video: These range from $20 to $60. Make sure the hub explicitly lists the resolution and refresh rate it supports. A hub that says "4K at 30Hz" will feel sluggish for everyday use.
Look for "4K at 60Hz" if you want smooth performance.
Avoid the cheapest no-name adapters on marketplace sites. Aggregate user reviews consistently report connection drops and compatibility issues with adapters under $8. Stick with reputable brands or certified cables.
Frequently Asked Questions
Can I use any HDMI cable for my budget monitor?
Yes, for 1080p at 60Hz, any standard HDMI cable works. If you need higher refresh rates or 4K, make sure the cable is rated as "High Speed HDMI" or "Premium High Speed HDMI."
Why won't my laptop detect the monitor after connecting?
Start with the basics. Check that the monitor is on and set to the right input. Reseat the cable.
Press Win + P and select Extend. If that fails, update your graphics drivers and try again.
Do I need an expensive adapter for USB-C to HDMI?
No. A basic USB-C to HDMI adapter for 1080p at 60Hz costs $10 to $15. You only need to spend more if you need 4K output or additional ports on a hub.
Can I connect a monitor to a USB-C port that doesn't support video?
No. If the port is data-only or charge-only, it won't output video. You'd need to use a different port on your laptop, if one is available, or use a wireless display option like Miracast.
Will a budget monitor work with a MacBook?
Yes, as long as you have the right adapter. Most modern MacBooks only have USB-C or Thunderbolt ports. A USB-C to HDMI adapter or USB-C to DisplayPort cable handles the connection.
How do I make the external monitor my main display?
On Windows, go to Display Settings, select the external monitor, and check "Make this my main display." On macOS, go to Displays > Arrangement and drag the white menu bar to the external monitor.

Similar Posts































