Do Mini LED Monitors Work with MacBook
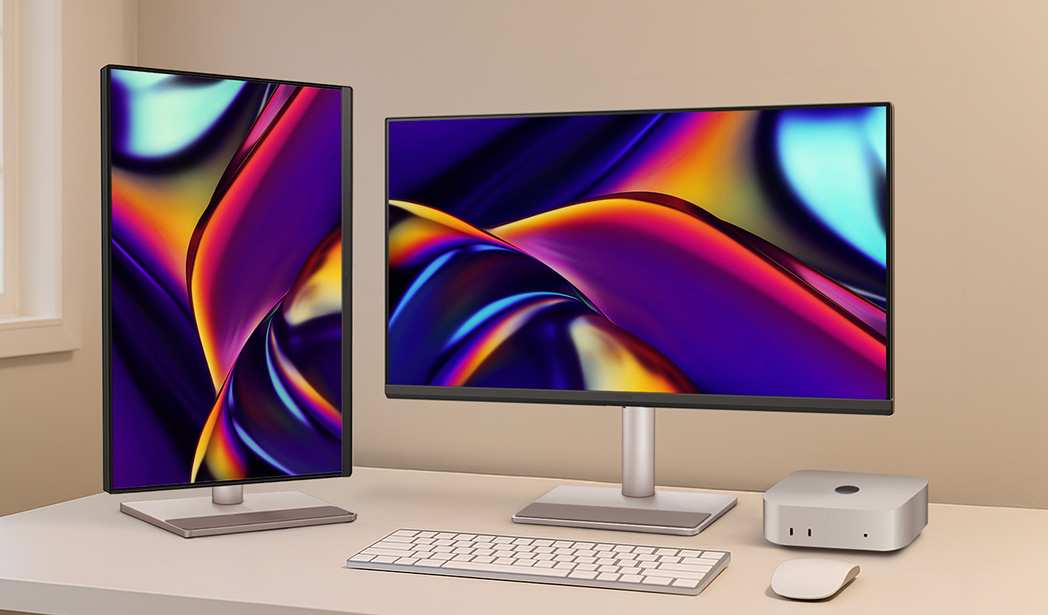
If you're wondering do mini LED monitors work with MacBook, the short answer is yes, they do. But the real question is whether they'll work well with your specific setup. That depends on your MacBook model, the monitor's inputs, and a few settings most people overlook.
Mini LED technology uses hundreds or thousands of tiny dimming zones to deliver deep blacks and insane HDR brightness, often hitting 1,000 nits or more. Apple even uses it in their own Pro Display XDR. So the tech is absolutely Mac-friendly, but getting a smooth experience comes down to matching the right hardware and knowing where macOS handles things differently than Windows.
Quick Answer
Mini LED monitors work with all modern MacBooks. You'll get video output over USB-C or HDMI without issues. HDR and high brightness features depend on your specific macOS version and cable quality.
Most connection problems come from using the wrong cable, not from incompatibility between the devices.
What Mini LED Actually Means for MacBook Users
Mini LED isn't a completely different display type like OLED. It's still an LCD panel, but instead of one big backlight or edge lighting, it uses thousands of tiny LED zones behind the screen. Each zone dims independently, so you get bright highlights right next to deep blacks in the same image.
For MacBook users, this matters because your Mac's display already does something similar. The 14-inch and 16-inch MacBook Pro models with Liquid Retina XDR use mini LED too, with about 2,500 dimming zones. So when you plug into an external mini LED monitor, macOS already understands how to drive that kind of display.
The catch? macOS handles HDR differently than Windows. On a Mac, HDR isn't always auto-enabled the same way. You might plug in a gorgeous HDR-capable mini LED panel and get a perfectly fine SDR image unless you manually switch it on in settings.
Apple's approach to color management also means your Mac is constantly trying to match profiles between screens, which can cause confusion if the monitor's built-in color space doesn't align well with Apple's P3 wide color standard.
What You Actually Get
Here's a realistic breakdown of what changes when you move from a standard LED monitor to a mini LED panel on your MacBook:
| Feature | Standard LED Monitor | Mini LED Monitor |
|---|---|---|
| Black levels | Greyish, backlight bleed | Much deeper, near-OLED |
| HDR peak brightness | 300-400 nits | 1,000-2,000+ nits |
| Dimming zones | None or edge-lit | 192 to 2,048+ zones |
| Blooming | N/A (uniform glow) | Visible around bright objects |
| Color gamut | Typically sRGB | Usually covers DCI-P3 well |
| Price | $200-500 | $400-2,000+ |
The zone count is what really matters. Budget mini LED monitors with 192 zones will show noticeable halos around text and UI elements on dark backgrounds. Step up to 576 zones or more and blooming becomes far less distracting.
The Three Things That Determine Whether It'll Work Smoothly
Not every MacBook-plus-mini-LED-monitor combo is plug and play at full capability. Three specific variables decide whether you get a great experience or a frustrating one.
Your MacBook Model and Chip
Apple Silicon MacBooks (M1 through M4) handle external displays differently depending on the chip. The base M1 and M2 chips officially support only one external display. So if you're running a MacBook Air with base M1, you can connect one mini LED monitor, but that's your limit.
No daisy-chaining workarounds for the base chips.
The M1 Pro, M1 Max, M2 Pro, M2 Max, and all M3 and M4 variants support two or more external displays natively. The M3 base chip finally bumped external display support to two monitors (but only when the lid is closed). So check your chip first.
You can find yours by clicking the Apple menu, then "About This Mac." Look for the chip line. If it just says "Apple M1" without Pro or Max, you're limited to one external display.
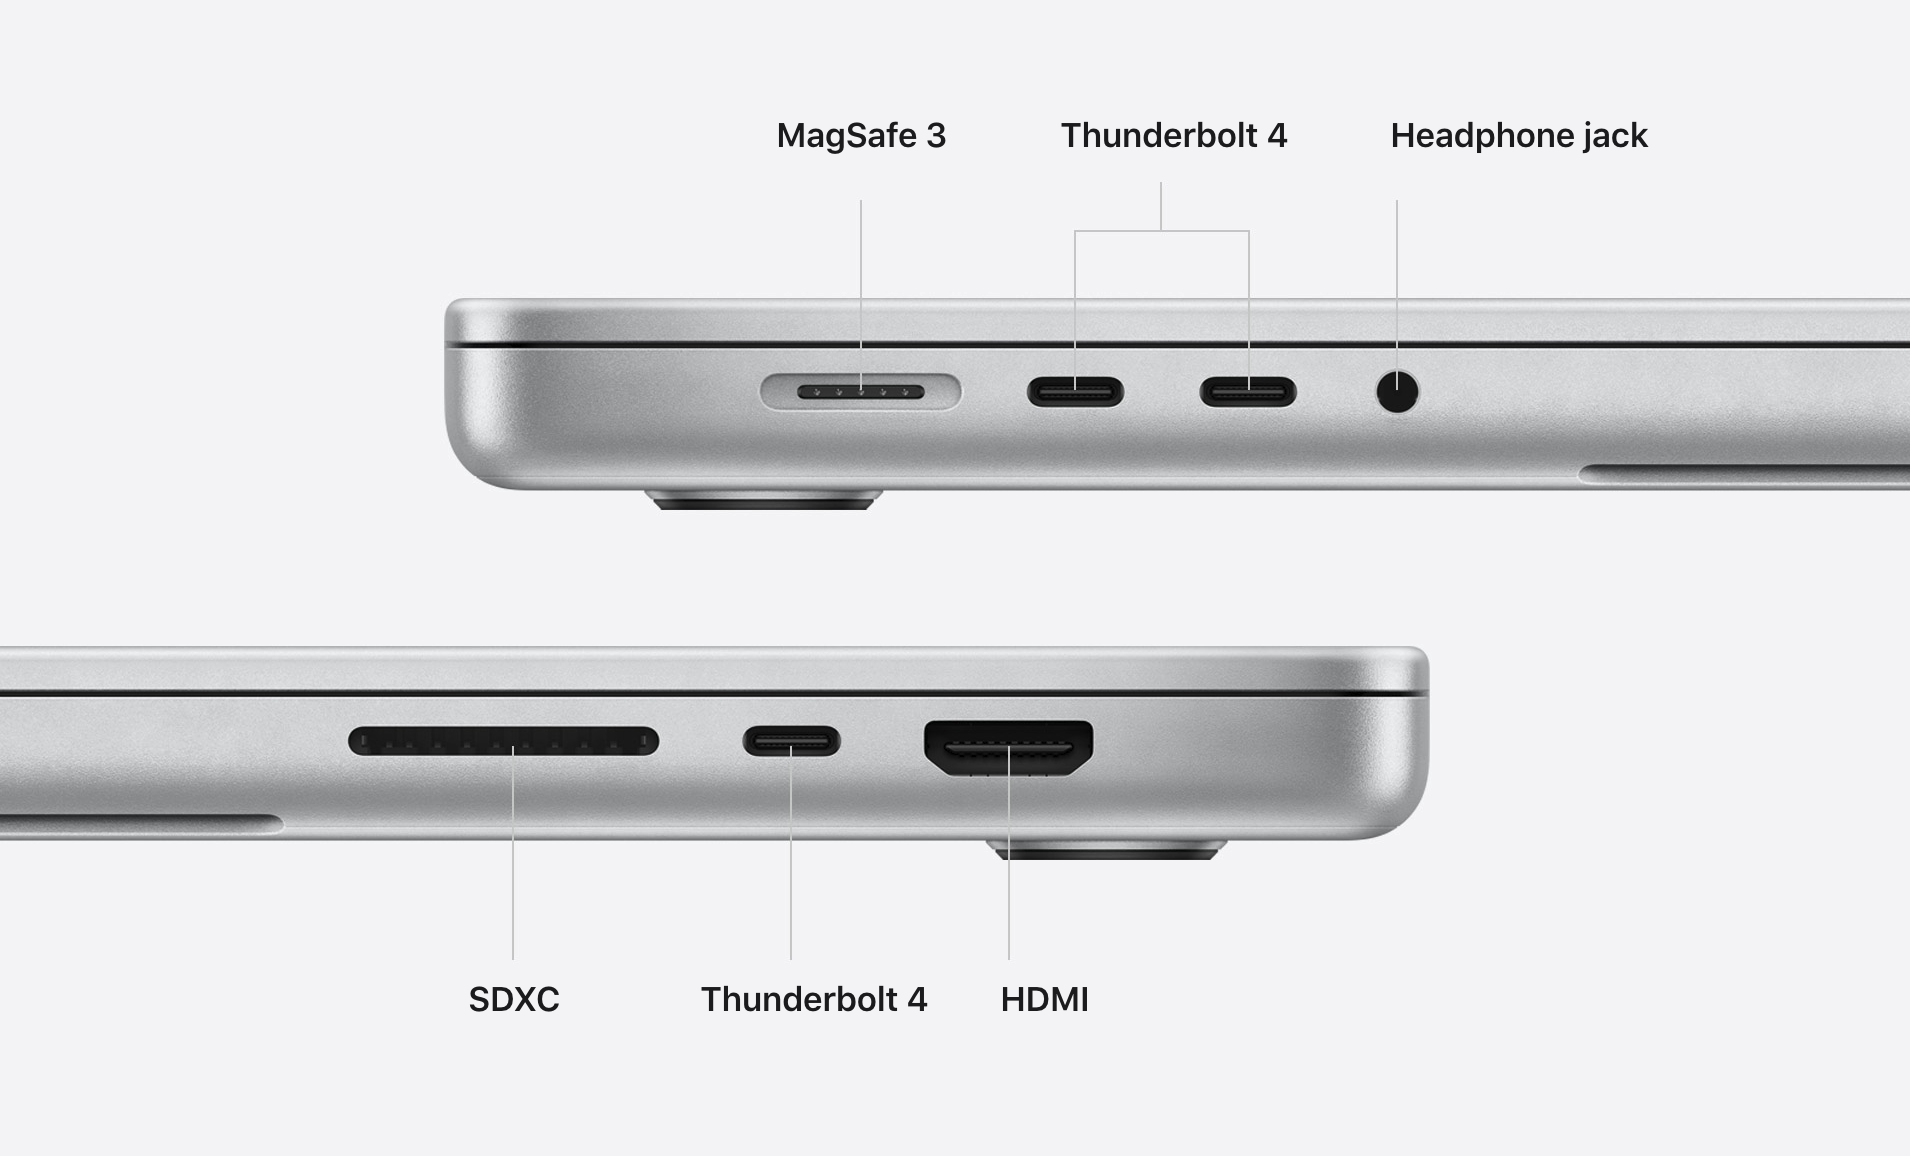
Thunderbolt ports on a MacBook Pro. Every Apple Silicon MacBook has at least one USB-C port that supports DisplayPort Alt Mode.
The Monitor's Inputs and Specs
Mini LED monitors come with different input options, and not all of them deliver the same experience with a MacBook.
USB-C with DisplayPort Alt Mode is the ideal connection. One cable carries video signal and charges your MacBook simultaneously. Look for monitors offering at least 60 watts of power delivery over USB-C. 90 watts or more is better for 16-inch MacBook Pros that ship with 140-watt chargers.
HDMI 2.1 works fine too, especially if your monitor and MacBook both support it. HDMI 2.1 handles 4K at 120Hz with HDR. Most M2 and later MacBooks support HDMI 2.1 output.
You'll need a separate power cable for your MacBook with this route.
Thunderbolt 4 inputs on monitors like the Apple Pro Display XDR or high-end Dell and ASUS models deliver the cleanest signal path. If your mini LED monitor has Thunderbolt, use it.
The Cable You're Using
This trips up more people than anything else. Not all USB-C cables are created equal.
A cheap USB-C cable might only handle USB 2.0 data speeds with no video signal at all. Others support video but cap out at 4K 30Hz, which feels sluggish when scrolling. For a smooth mini LED experience at 4K 60Hz with HDR, you need a cable rated for DisplayPort 1.4 Alt Mode at HBR3 speeds or Thunderbolt 4 certification.
If you're running a higher-resolution mini LED panel, like 5K or an ultrawide, cable quality matters even more.
Step-by-Step: How to Connect a Mini LED Monitor to Your MacBook
Follow these steps in order. Skipping ahead is where most people go wrong.
Step 1: Identify Your MacBook's Ports and Capabilities
Check your MacBook model and chip as described above. Confirm whether your machine supports the resolution and refresh rate you want from the monitor. Every Apple Silicon MacBook has at least one USB-C port that handles DisplayPort Alt Mode, so you always have a video-over-USB-C option available.
Step 2: Check What Inputs Your Mini LED Monitor Has
Look at the back panel. Most mini LED monitors in 2025 offer at least one of these:
- USB-C (with DP Alt Mode and power delivery)
- HDMI 2.1
- DisplayPort 1.4
- Thunderbolt 4
Match your MacBook's best output to the monitor's best input. USB-C to USB-C is the simplest single-cable solution. HDMI 2.1 is a solid second choice.
Step 3: Pick the Right Cable (This Matters More Than You Think)
If connecting via USB-C, use the cable that came with the monitor or a certified Thunderbolt 4 cable rated for 40Gbps. Brands like CalDigit, Cable Matters, and Anker make reliable certified options.
For HDMI, use an Ultra High Speed HDMI cable (the official certification for HDMI 2.1). Cheap HDMI cables from unknown brands often fail to maintain 4K 120Hz with HDR enabled.
For DisplayPort, use a VESA-certified DisplayPort 1.4 cable. Avoid adapters if possible; a direct connection almost always works better than dongles.
A typical mini LED monitor's input panel. Look for USB-C with power delivery specs listed on the monitor or in its manual.
Step 4: Connect and Configure in macOS
- Plug the cable into your MacBook first, then the monitor.
- The macOS desktop should appear within a few seconds.
- Open System Settings, then Displays.
- Confirm the detected resolution matches the panel's native resolution.
- Set the refresh rate if it defaults to 60Hz and your panel supports higher.
If the monitor isn't detected at all, try a different cable first, then a different port, then reboot both devices.
Step 5: Enable HDR and Calibrate
Here's the step most people miss. In the same Displays settings panel, look for an HDR or High Dynamic Range toggle. Enable it.
Without this turned on, your mini LED monitor will display SDR content only, and you're basically paying for features you're not using.
For color calibration, macOS has a built-in option under Display Profile > Customize. Select the profile closest to your monitor's specs. For professional color work, a hardware calibrator like the Calibrite Display Plus gives far better results.
What Can Go Wrong and How to Fix It
Even when everything should work perfectly, macOS and mini LED panels occasionally disagree. Here are the most common problems and their fixes.
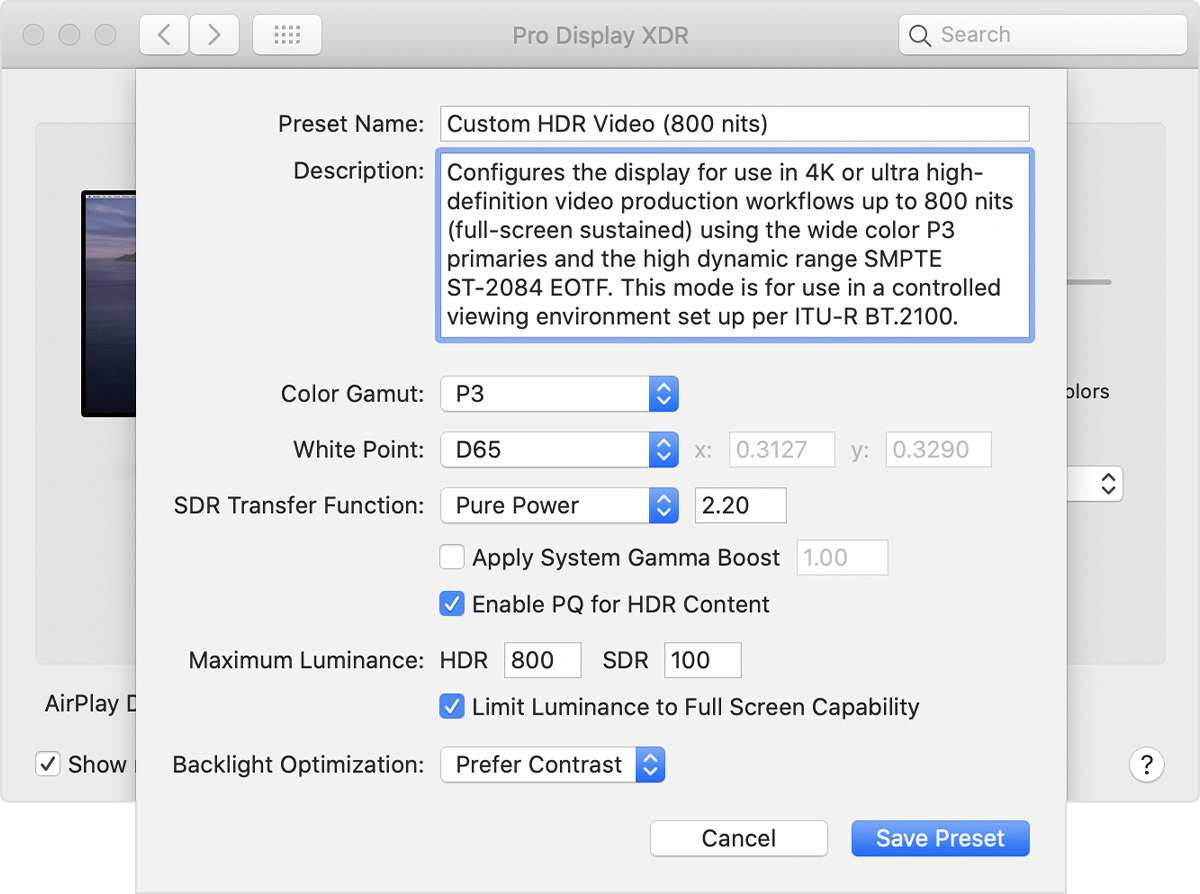
The macOS Displays preference pane. The HDR toggle is easy to miss, but it's the key to unlocking your monitor's full brightness range.
macOS Not Detecting the Monitor
- Confirm the cable supports video, not just charging.
- Try a different USB-C cable or port.
- On Intel Macs, reset NVRAM. On Apple Silicon, a full shutdown and restart usually clears EDID handshake issues.
- Check if the monitor needs a firmware update. Several models from Cooler Master, InnoCN, and others have released updates specifically fixing Mac detection problems.
HDR Looks Washed Out or Too Dark
This is almost always a macOS software issue, not a hardware one. Go to System Settings > Displays and make sure High Dynamic Range is toggled on for that monitor. Some monitors also have a separate HDR setting in their own on-screen display menu.
Both need to be set correctly. If HDR still looks wrong, try switching the monitor's HDR mode between HDR10, HLG, or Dolby Vision in its OSD to see which one macOS plays nicest with on your setup.
Flickering or Signal Drops
- Replace the cable first. This is the culprit about 70% of the time.
- If using a dock or hub, connect the monitor directly to the MacBook instead.
- Lower the refresh rate from 120Hz to 60Hz temporarily to test whether it's a bandwidth issue.
- Some monitors flicker when local dimming is set to its most aggressive mode. Dialing it back one level often fixes the issue with zero visible quality loss for everyday tasks.
Colors Don't Match Your MacBook Screen
MacBooks target the DCI-P3 color space. If your mini LED monitor defaults to sRGB or Adobe RGB mode, colors will look different between screens. Go into the monitor's OSD and switch to a DCI-P3 emulation mode if available. macOS's built-in ColorSync utility can assign profiles under System Settings > Displays > Color Profile.
For best results, use a hardware calibrator to create a custom ICC profile for the external monitor.
HiDPI / Retina Scaling Looks Off
macOS renders Retina (HiDPI) content at double the logical resolution, then scales it to the display. On 4K monitors at 27 inches, this works natively. But on ultrawide or non-standard resolution panels, macOS sometimes refuses to offer HiDPI options.
The free utility BetterDisplay unlocks HiDPI scaling on almost any external monitor. It's become the go-to fix for macOS users running unusual panel configurations.
Mini LED vs OLED vs Standard LED: Which External Monitor Actually Makes Sense for Mac?
You've got three real choices for an external monitor on your MacBook, and each one trades off something different.
Mini LED gives you the best HDR brightness without any burn-in risk. That's the key advantage. OLED panels can dim individual pixels to true black, but they can also retain static images over time, like a macOS dock or menu bar.
Mini LED avoids that entirely while still delivering impressive contrast and 1,000+ nit peak brightness for HDR content.
OLED wins on per-pixel contrast and response times. If you're gaming or watching a lot of HDR movies in dark rooms, OLED looks noticeably better. But for productivity work with bright interfaces and static UI elements, the burn-in concern is real over a 3-to-5-year lifespan.
Standard LED (edge-lit or direct-lit IPS) is the budget option. You'll spend $200 to $400 for a solid 4K panel. You won't get meaningful HDR or deep blacks, but for coding, writing, and general office work, it gets the job done without any compatibility headaches.
Quick Comparison
| Factor | Mini LED | OLED | Standard LED |
|---|---|---|---|
| HDR brightness | Excellent (1,000-2,000 nits) | Good (600-1,000 nits) | Poor (300-400 nits) |
| Black levels | Very good | Perfect (per-pixel) | Mediocre |
| Burn-in risk | None | Possible | None |
| Color accuracy | Excellent | Excellent | Good to excellent |
| Price range | $400-2,000+ | $800-3,000+ | $200-500 |
| Best for Mac productivity | Yes | Overkill for most | Yes, budget pick |
If your work involves HDR video, photography, or color grading, mini LED hits the sweet spot. It gives you the brightness headroom macOS needs for proper HDR rendering without the long-term concerns of OLED.
Best Mini LED Monitors for MacBook in 2025
The market has matured fast. There are genuinely good options at every price point now.
Budget-Friendly Options
The Cooler Master Tempest 27UG272 (around $350-400) offers 192 dimming zones, USB-C with 60W power delivery, and solid HDR10 support. Zone count is low, so expect some blooming. But for the price, it's a solid entry point.
The InnoCN 27M2V (around $450-500) steps up to 576 zones with better HDR performance and 90W USB-C power delivery. It's become a popular pick in Mac-focused communities for balancing cost and image quality.
Mid-Range All-Rounders
The BenQ EX2710Q (around $550-650) pairs a 4K mini LED panel with good factory calibration covering 95% DCI-P3. USB-C delivers 90W charging. The OSD is straightforward, and firmware updates have improved macOS compatibility significantly since launch.
The Dell U3225QE (around $800-900) is a 32-inch 4K mini LED with Thunderbolt 4 input and 120W power delivery. It's one of the few monitors that can fully charge a 16-inch MacBook Pro through a single cable while running the display at full resolution and refresh rate.
Premium / Professional Picks
The Apple Pro Display XDR ($4,999) remains the reference standard. 1,600 nits peak HDR brightness, 576 zones, and native macOS integration with True Tone support. It's overkill for most people, but if you're doing professional color-critical work, nothing else matches it on Mac.
The ASUS ProArt PA32UCG (around $2,500-3,000) offers 1,152 dimming zones, true 10-bit color, and Thunderbolt 4. It's aimed at video professionals and competes directly with the Pro Display XDR at half the price.
Real-World Use Cases: Where Mini LED Shines on Mac
Not everyone needs mini LED. Here's where it actually makes a noticeable difference.
Video Editing and Color Grading
This is the strongest use case. When you're working with HDR footage in Final Cut Pro or DaVinci Resolve, a mini LED monitor lets you see what you're actually getting in the highlights and shadows. Standard LED panels clip highlights above about 400 nits.
Mini LED panels show detail all the way to 1,000 or 1,600 nits. That's the difference between guessing and knowing your grade will look right on a client's HDR display.
Photography and Design Work
If you shoot in HDR or work with wide-gamut images, a mini LED panel with good DCI-P3 coverage gives you a more accurate preview of your output. The deeper blacks also help when editing night photography or dark-toned compositions. You'll see shadow detail that gets lost on standard LED panels.
Coding and Productivity
Honestly, mini LED is nice but not essential here. The higher contrast makes text look crisp, and dark mode interfaces benefit from better black levels. But a good standard IPS panel serves you just as well for writing code or working in spreadsheets.
The blooming around bright text on dark backgrounds can actually be slightly distracting in code editors with dark themes.
Gaming
Mac gaming is growing, and mini LED makes HDR games look genuinely impressive. The high peak brightness brings out specular highlights and lighting effects that look flat on standard panels. Response times on mini LED are good but not as fast as OLED, so competitive gamers might prefer OLED.
For everyone else, mini LED is a great middle ground.
Common Mistakes People Make When Buying a Mini LED Monitor for MacBook
These are the errors that come up again and again in user forums and reviews.
Buying based on zone count alone. A 576-zone monitor with poor firmware can look worse than a well-tuned 384-zone panel. Read reviews that specifically test the monitor with Mac devices, not just Windows PCs.
Ignoring power delivery specs. Some mini LED monitors with USB-C only deliver 15 to 30 watts. That's not enough to charge a MacBook Pro under load. Look for at least 60W, ideally 90W or more, if you want a single-cable setup.
Assuming HDR works automatically. macOS does not always enable HDR on external monitors by default. You have to turn it on manually in System Settings. Some monitors also require enabling HDR in their own on-screen display menu.
Both switches need to be on.
Using the wrong cable. This cannot be overstated. A random USB-C cable from your drawer probably does not support the bandwidth you need for 4K HDR at 60Hz or higher. Use the cable that came with the monitor or buy a certified replacement.
Expecting OLED-level blacks. Mini LED is better than standard LED, but it's not OLED. You will see some blooming around bright objects on dark backgrounds, especially on panels with fewer zones. That's normal.
It's a trade-off, not a defect.
Not checking firmware update history. Several popular mini LED monitors had macOS-specific bugs at launch that were fixed through firmware updates. Before buying, check the manufacturer's support page for recent firmware releases and whether they mention Mac or macOS fixes.
Frequently Asked Questions
Do all MacBooks support mini LED monitors?
Every Apple Silicon MacBook can output video to a mini LED monitor. The base M1 and M2 chips support only one external display. M1 Pro, M1 Max, and all later chips support two or more.
Check your specific chip in "About This Mac" before buying.
Does macOS support HDR on external mini LED monitors?
Yes. macOS has supported HDR on external displays since macOS Catalina, and it works well on Apple Silicon Macs. You need to enable it manually in System Settings under the Displays panel. Not all monitors expose the HDR toggle correctly, so check for firmware updates if you don't see it.
Will a mini LED monitor charge my MacBook?
It depends on the monitor's USB-C power delivery rating. Many mini LED monitors offer 60 to 90 watts over USB-C, which is enough for MacBook Air and 14-inch MacBook Pro models. The 16-inch MacBook Pro needs 140 watts for full-speed charging, so most monitors will charge it slowly or maintain the battery level rather than charging under heavy use.
Is mini LED better than OLED for Mac productivity?
For most productivity work, yes. Mini LED has no burn-in risk from static UI elements like docks, menu bars, and terminal windows. OLED looks better in dark rooms for movies and gaming, but the burn-in concern makes mini LED the safer long-term choice for everyday Mac use.
Can I use a mini LED monitor with an Intel MacBook?
Yes. Intel MacBooks with Thunderbolt 3 support DisplayPort over USB-C and work with mini LED monitors. However, Intel Macs have weaker integrated graphics and may struggle to drive high-resolution panels at full refresh rates, especially with HDR enabled.
An eGPU can help if you're running an Intel MacBook Pro with a dedicated GPU enclosure.
How many dimming zones do I actually need?
For general productivity, 192 zones is acceptable. For photo and video work, aim for 576 or more. For professional HDR mastering, 1,152 zones or higher is worth the investment.
Below 192 zones, the blooming becomes distracting enough that you're better off with a good standard IPS panel.
Final Verdict: Should You Get a Mini LED Monitor for Your MacBook?
If you work with HDR content, do color-critical photo or video editing, or just want a noticeably better viewing experience than a standard LED panel, mini LED is the right call for MacBook users in 2025. The technology is mature, macOS supports it well, and there are solid options from $350 to $3,000.
For basic productivity and coding, a good standard IPS monitor saves you money without any real compromise. Mini LED's advantages only matter when you're actually working with HDR content or need the deeper contrast for visual work.
The key is matching your MacBook's capabilities to the right monitor inputs, using a proper cable, and enabling HDR in macOS settings. Get those three things right and a mini LED monitor transforms your MacBook setup into something that rivals a desktop workstation.
Best Mini LED Monitors for MacBook in 2025
The market has matured fast. There are genuinely good options at every price point now.
Budget-Friendly Options
The Cooler Master Tempest 27UG272 (around $350-400) offers 192 dimming zones, USB-C with 60W power delivery, and solid HDR10 support. Zone count is low, so expect some blooming. But for the price, it's a solid entry point.
The InnoCN 27M2V (around $450-500) steps up to 576 zones with better HDR performance and 90W USB-C power delivery. It's become a popular pick in Mac-focused communities for balancing cost and image quality.
Mid-Range All-Rounders
The BenQ EX2710Q (around $550-650) pairs a 4K mini LED panel with good factory calibration covering 95% DCI-P3. USB-C delivers 90W charging. The OSD is straightforward, and firmware updates have improved macOS compatibility significantly since launch.
The Dell U3225QE (around $800-900) is a 32-inch 4K mini LED with Thunderbolt 4 input and 120W power delivery. It's one of the few monitors that can fully charge a 16-inch MacBook Pro through a single cable while running the display at full resolution and refresh rate.
Premium / Professional Picks
The Apple Pro Display XDR ($4,999) remains the reference standard. 1,600 nits peak HDR brightness, 576 zones, and native macOS integration with True Tone support. It's overkill for most people, but if you're doing professional color-critical work, nothing else matches it on Mac.
The ASUS ProArt PA32UCG (around $2,500-3,000) offers 1,152 dimming zones, true 10-bit color, and Thunderbolt 4. It's aimed at video professionals and competes directly with the Pro Display XDR at half the price.
Real-World Use Cases: Where Mini LED Shines on Mac
Not everyone needs mini LED. Here's where it actually makes a noticeable difference.
Video Editing and Color Grading
This is the strongest use case. When you're working with HDR footage in Final Cut Pro or DaVinci Resolve, a mini LED monitor lets you see what you're actually getting in the highlights and shadows. Standard LED panels clip highlights above about 400 nits.
Mini LED panels show detail all the way to 1,000 or 1,600 nits. That's the difference between guessing and knowing your grade will look right on a client's HDR display.
Photography and Design Work
If you shoot in HDR or work with wide-gamut images, a mini LED panel with good DCI-P3 coverage gives you a more accurate preview of your output. The deeper blacks also help when editing night photography or dark-toned compositions. You'll see shadow detail that gets lost on standard LED panels.
Coding and Productivity
Honestly, mini LED is nice but not essential here. The higher contrast makes text look crisp, and dark mode interfaces benefit from better black levels. But a good standard IPS panel serves you just as well for writing code or working in spreadsheets.
The blooming around bright text on dark backgrounds can actually be slightly distracting in code editors with dark themes.
Gaming
Mac gaming is growing, and mini LED makes HDR games look genuinely impressive. The high peak brightness brings out specular highlights and lighting effects that look flat on standard panels. Response times on mini LED are good but not as fast as OLED, so competitive gamers might prefer OLED.
For everyone else, mini LED is a great middle ground.
Common Mistakes People Make When Buying a Mini LED Monitor for MacBook
These are the errors that come up again and again in user forums and reviews.
Buying based on zone count alone. A 576-zone monitor with poor firmware can look worse than a well-tuned 384-zone panel. Read reviews that specifically test the monitor with Mac devices, not just Windows PCs.
Ignoring power delivery specs. Some mini LED monitors with USB-C only deliver 15 to 30 watts. That's not enough to charge a MacBook Pro under load. Look for at least 60W, ideally 90W or more, if you want a single-cable setup.
Assuming HDR works automatically. macOS does not always enable HDR on external monitors by default. You have to turn it on manually in System Settings. Some monitors also require enabling HDR in their own on-screen display menu.
Both switches need to be on.
Using the wrong cable. This cannot be overstated. A random USB-C cable from your drawer probably does not support the bandwidth you need for 4K HDR at 60Hz or higher. Use the cable that came with the monitor or buy a certified replacement.
Expecting OLED-level blacks. Mini LED is better than standard LED, but it's not OLED. You will see some blooming around bright objects on dark backgrounds, especially on panels with fewer zones. That's normal.
It's a trade-off, not a defect.
Not checking firmware update history. Several popular mini LED monitors had macOS-specific bugs at launch that were fixed through firmware updates. Before buying, check the manufacturer's support page for recent firmware releases and whether they mention Mac or macOS fixes.
Frequently Asked Questions
Do all MacBooks support mini LED monitors?
Every Apple Silicon MacBook can output video to a mini LED monitor. The base M1 and M2 chips support only one external display. M1 Pro, M1 Max, and all later chips support two or more.
Check your specific chip in "About This Mac" before buying.
Does macOS support HDR on external mini LED monitors?
Yes. macOS has supported HDR on external displays since macOS Catalina, and it works well on Apple Silicon Macs. You need to enable it manually in System Settings under the Displays panel. Not all monitors expose the HDR toggle correctly, so check for firmware updates if you don't see it.
Will a mini LED monitor charge my MacBook?
It depends on the monitor's USB-C power delivery rating. Many mini LED monitors offer 60 to 90 watts over USB-C, which is enough for MacBook Air and 14-inch MacBook Pro models. The 16-inch MacBook Pro needs 140 watts for full-speed charging, so most monitors will charge it slowly or maintain the battery level rather than charging under heavy use.
Is mini LED better than OLED for Mac productivity?
For most productivity work, yes. Mini LED has no burn-in risk from static UI elements like docks, menu bars, and terminal windows. OLED looks better in dark rooms for movies and gaming, but the burn-in concern makes mini LED the safer long-term choice for everyday Mac use.
Can I use a mini LED monitor with an Intel MacBook?
Yes. Intel MacBooks with Thunderbolt 3 support DisplayPort over USB-C and work with mini LED monitors. However, Intel Macs have weaker integrated graphics and may struggle to drive high-resolution panels at full refresh rates, especially with HDR enabled.
An eGPU can help if you're running an Intel MacBook Pro with a dedicated GPU enclosure.
How many dimming zones do I actually need?
For general productivity, 192 zones is acceptable. For photo and video work, aim for 576 or more. For professional HDR mastering, 1,152 zones or higher is worth the investment.
Below 192 zones, the blooming becomes distracting enough that you're better off with a good standard IPS panel.
Final Verdict: Should You Get a Mini LED Monitor for Your MacBook?
If you work with HDR content, do color-critical photo or video editing, or just want a noticeably better viewing experience than a standard LED panel, mini LED is the right call for MacBook users in 2025. The technology is mature, macOS supports it well, and there are solid options from $350 to $3,000.
For basic productivity and coding, a good standard IPS monitor saves you money without any real compromise. Mini LED's advantages only matter when you're actually working with HDR content or need the deeper contrast for visual work.
The key is matching your MacBook's capabilities to the right monitor inputs, using a proper cable, and enabling HDR in macOS settings. Get those three things right and a mini LED monitor transforms your MacBook setup into something that rivals a desktop workstation.
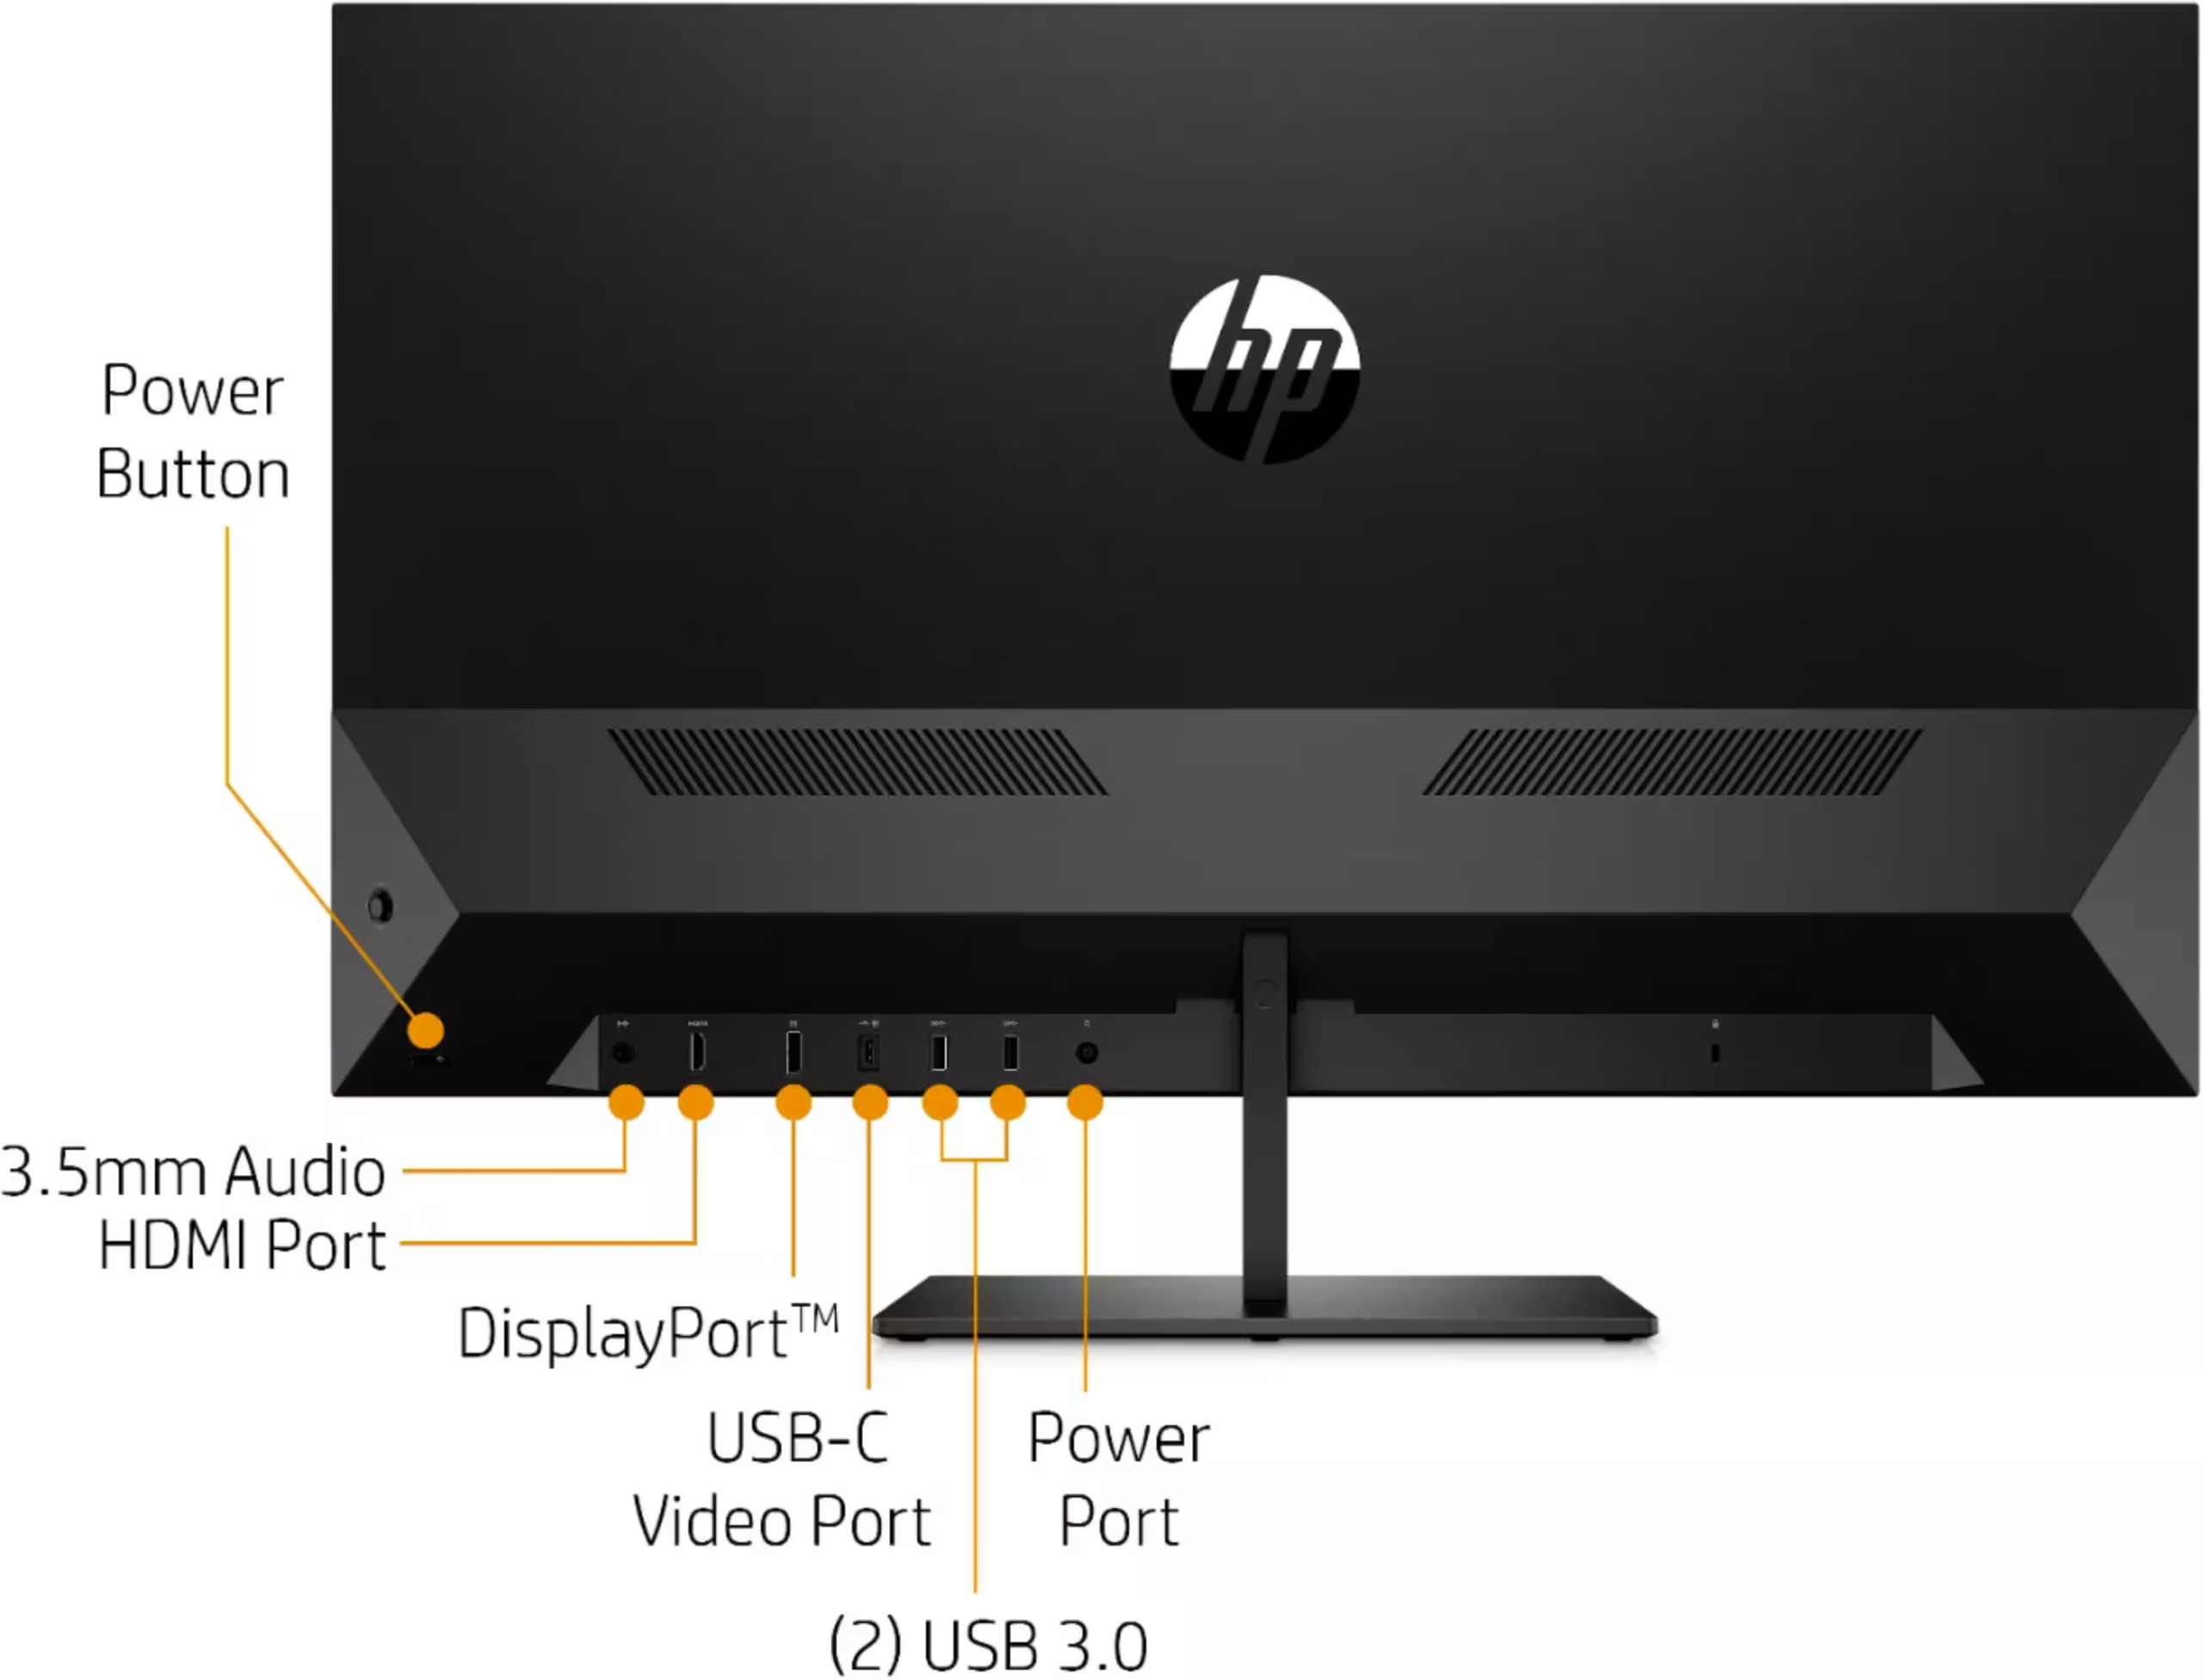
Image source: Bing (Web (fair-use with source credit))

Similar Posts































