How to Connect 4K Monitor Wirelessly
Figuring out how to connect 4K monitor wirelessly isn't as straightforward as plugging in a cable. The right method depends entirely on what device you're using, what you need the monitor for, and how much quality you're willing to trade for convenience. Let's break down your options so you can pick the one that actually works for your setup.
Wireless display tech has come a long way, but it's not one-size-fits-all. Miracast, AirPlay, Google Cast, and dedicated wireless HDMI kits each handle 4K differently, and the wrong choice can leave you with lag, compression artifacts, or a connection that drops every few minutes. Here's what you need to know before you buy anything.
Quick Answer
You can connect a 4K monitor wirelessly using Miracast, AirPlay, Google Cast, or a wireless display adapter. Your device's operating system determines which method works. Most Windows PCs use Miracast.
Macs and iPhones use AirPlay. Expect 4K at 30Hz on most wireless methods. Dedicated wireless HDMI kits can achieve 4K at 60Hz.
Why Most People Get This Wrong Before They Start
The biggest mistake is assuming wireless display is just like wired. It's not. When you plug in an HDMI or DisplayPort cable, you get a clean, uncompressed signal with zero latency.
Wireless connections compress the video, transmit it over Wi-Fi, and decompress it on the other end. That process introduces trade-offs.
Here's what catches people off guard:
- 4K at 30Hz feels sluggish. Moving windows around, scrolling, even the mouse cursor can feel slightly delayed. For office work it's fine. For gaming or video editing, it's frustrating.
- Text can look soft. Compression algorithms prioritize video and motion. Small text, especially at 4K resolution, can appear slightly fuzzy or have color fringing around edges.
- Not every device supports every protocol. If you're on a Mac, Miracast is off the table. If you're on Windows, AirPlay isn't native. You need to match the method to your hardware.
- Wi-Fi congestion matters. If your router is on the same 5GHz band your wireless display adapter uses, you'll get stuttering and dropouts.
The good news? Once you understand these limitations, picking the right method is straightforward. You just need to match your use case to the right technology.
The Three Questions That Determine Your Best Method
Before you spend a dime on hardware, answer these three questions. They'll narrow your options down to one or two viable methods.
What device are you connecting from?
This is the biggest factor. Your source device dictates which wireless display protocols are available to you.
- Windows laptop/desktop: Miracast is built in. Most modern Windows 10 and 11 devices support it natively.
- Mac / iPhone / iPad: AirPlay is your native option. Apple devices don't support Miracast.
- Android phone/tablet: Google Cast or Miracast, depending on the manufacturer. Samsung devices often support both.
- Chromebook: Google Cast is built in.
What are you using the monitor for?
Your use case determines how much latency and compression you can tolerate.
- Office productivity, web browsing, email: Any wireless method works fine. 4K at 30Hz is perfectly usable.
- Photo editing or design work: You'll want the least compression possible. A dedicated wireless HDMI kit is better than Miracast here.
- Gaming: Wireless is generally not recommended. Even the best kits add 5 to 10 milliseconds of latency. Competitive gaming demands wired.
- Video playback: Miracast and AirPlay handle this well. Just expect some compression in dark scenes.
What's your budget?
Wireless display adapters range from $30 to over $150. The price directly correlates with performance.
- Under $50: Basic Miracast adapters. 4K at 30Hz, noticeable compression, fine for productivity.
- $50 to $100: Better Miracast or Google Cast devices. Improved compression, slightly lower latency.
- $100 to $200: Dedicated wireless HDMI kits. 4K at 60Hz possible, much lower latency, better for media.
Option 1: Built-In Wireless Display (Miracast, AirPlay, Google Cast)
This is the simplest path if your devices support it. No extra hardware needed beyond your monitor and source device on the same Wi-Fi network.
Miracast (Windows)
Miracast is Microsoft's wireless display standard. It's been built into Windows since Windows 8.1, and it works over Wi-Fi Direct, meaning it doesn't even need a router. The adapter and your PC create their own direct connection.
How to check if your PC supports it:
- Open the Start menu and search for "Connect."
- If the Connect app appears, your device supports Miracast.
- Alternatively, open the Action Center (bottom-right of the taskbar) and look for the Connect tile.
To connect:
- On your 4K monitor, plug in a Miracast-enabled adapter or use a TV/monitor with Miracast built in.
- On your PC, open Connect and select the display.
- Choose "Duplicate" or "Extend" your screen.
Pros:
- No extra software to install
- Works without a Wi-Fi router
- Built into most Windows devices
Cons:
- 4K limited to 30Hz
- Noticeable latency for gaming
- Not supported on Mac or iOS
AirPlay (Apple)
AirPlay is Apple's proprietary wireless display protocol. If you're on a Mac, iPhone, or iPad, this is your native option.
Requirements:
- Mac running macOS Mountain Lion (2012) or later
- Apple TV or AirPlay 2-compatible smart TV connected to your 4K monitor
- Both devices on the same Wi-Fi network
To connect:
- On your Mac, click the Control Center icon in the menu bar.
- Click Screen Mirroring.
- Select your AirPlay receiver.
Pros:
- Excellent video quality
- Seamless Apple ecosystem integration
- Supports audio streaming simultaneously
Cons:
- Apple ecosystem only
- Requires an Apple TV or compatible receiver
- Some latency with 4K content
Google Cast (Chromebooks, Android)
Google Cast works similarly to AirPlay but for Google's ecosystem. You can cast your Chromebook screen or use a Chromecast device plugged into your monitor's HDMI port.
To connect:
- Plug a Chromecast Ultra or Chromecast with Google TV into your monitor.
- On your Chromebook or Android device, open Chrome.
- Click the three-dot menu, select Cast, and choose your device.
Pros:
- Works across Chromebooks, Android, and even Chrome browser on Windows/Mac
- Affordable hardware ($30 to $50)
- Good video quality for media
Cons:
- Not ideal for productivity (text compression)
- Requires Wi-Fi connection
- 4K casting depends on the specific Chromecast model
Option 2: Wireless Display Adapter / Dongle
If your monitor doesn't have built-in wireless display support, a plug-in adapter is the easiest upgrade. These dongles connect to your monitor's HDMI port and receive wireless signals from your source device.

How They Work
A wireless display adapter is essentially a tiny computer that receives a compressed video signal over Wi-Fi and outputs it through HDMI. Your source device sees it as an external display, just like plugging in a cable.
Popular Options
| Adapter | Protocol | Max Resolution | Price Range | Best For |
|---|---|---|---|---|
| Microsoft Wireless Display Adapter | Miracast | 4K @ 30Hz | $50 to $60 | Windows PCs |
| ScreenBeam Miracast Adapter | Miracast | 1080p @ 60Hz | $60 to $80 | Enterprise/education |
| Chromecast Ultra | Google Cast | 4K @ 60Hz | $50 to $70 | Media streaming |
| Chromecast with Google TV | Google Cast | 4K @ 60Hz | $40 to $50 | General use |
Setup Steps
- Connect the adapter to your monitor's HDMI port.
- Power the adapter via USB (most use the monitor's USB port or a wall adapter).
- Switch your monitor to the correct HDMI input.
- On your source device, open your wireless display settings and select the adapter.
- Adjust resolution in your OS display settings if needed.
What to Watch For
- HDCP issues. Some streaming apps (Netflix, Disney+) won't output to certain wireless adapters due to HDCP handshake failures. Check compatibility before buying.
- Driver requirements. Some adapters require you to install software on your source device. Microsoft's adapter is usually plug-and-play on Windows.
- Power delivery. If the adapter is powered by your monitor's USB port, make sure that port provides enough amperage. Some monitors' USB ports are charge-only and don't supply enough power.
Option 3: Wireless HDMI Kit (Dedicated Transmitter-Receiver)
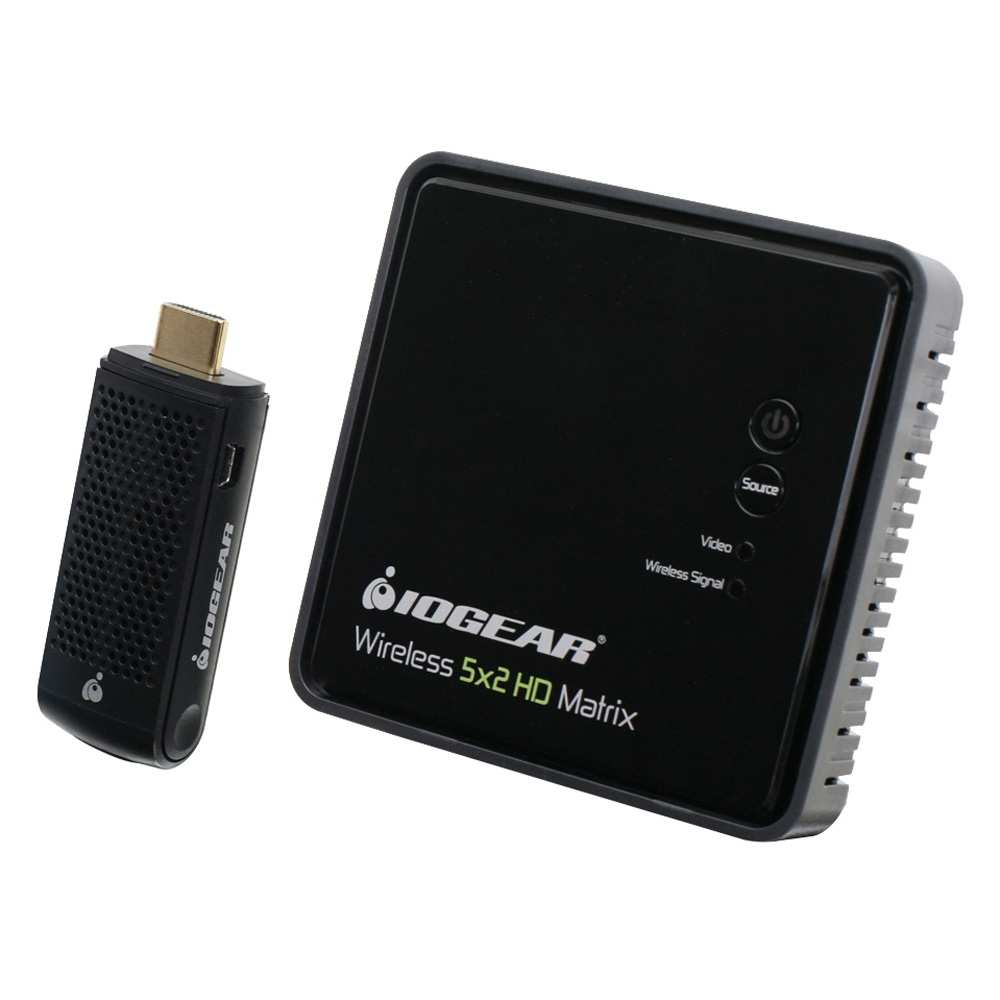
This is the premium option. A wireless HDMI kit consists of a transmitter (connected to your source device) and a receiver (connected to your monitor). They communicate directly, often on a dedicated 5GHz or 60GHz channel, bypassing your Wi-Fi network entirely.
How It Differs From Miracast
Miracast adapters receive a signal. Wireless HDMI kits transmit a signal directly from your source device to the monitor. The transmitter plugs into your laptop's HDMI or USB-C port, and the receiver plugs into your monitor.
There's no Wi-Fi network involved, no software to install, and no operating system dependency.
When This Is Worth the Money
- You need 4K at 60Hz. Most Miracast adapters cap at 30Hz. Wireless HDMI kits from brands like IOGEAR, Diamond Multimedia, and J-Tech Digital can push 4K at 60Hz.
- You're doing photo or video editing. The compression is significantly less aggressive than Miracast.
- You can't tolerate Wi-Fi congestion. Since these use their own direct signal, your network traffic doesn't affect them.
- You're connecting from a device that doesn't support Miracast or AirPlay. These kits are OS-agnostic. If your device has HDMI out, it works.
Limitations
- Price. Expect to pay $100 to $300 for a quality 4K-capable kit.
- Range. Most kits work up to 30 feet, and walls degrade the signal. Line of sight is ideal.
- Size. The transmitter dongle is bulkier than a simple Miracast stick. It sticks out of your laptop.
- 60GHz kits (WiGig) have very short range, often under 10 feet with no obstructions. They're great for same-desk use but terrible for passing through walls.
Setup Steps
- Connect the transmitter to your source device's HDMI or USB-C port.
- Connect the receiver to your monitor's HDMI port.
- Power both units (usually via USB or included power adapters).
- Wait for pairing. Most kits auto-pair out of the box.
- Adjust display settings on your source device to set resolution and refresh rate.
Option 4: Wireless Docking Station
A wireless docking station combines the functionality of a traditional USB-C dock with wireless display technology. It's designed for professionals who want to connect to their monitor, keyboard, mouse, and peripherals without plugging in a single cable.
How It Works
You place the dock near your monitor and connect your peripherals to it. Your laptop connects wirelessly, typically via WiGig (60GHz) or a proprietary 5GHz link. The dock handles display output, USB peripherals, and sometimes even charging.
Who This Is For
- Hot-desking environments where multiple people use the same desk.
- Corporate IT setups that want to reduce cable clutter across an office.
- Professionals who present frequently and need to connect and disconnect quickly.
Current Options
- Dell Wireless Dock (WD19DC): Uses WiGig, supports dual 4K monitors, around $300 to $400.
- HP Elite USB-C Dock with Wireless Charging: Similar concept, enterprise-focused.
- Kensington SD4700P Wireless Docking Station: Supports single 4K display.
Drawbacks
- Expensive. $200 to $500+ depending on features.
- WiGig range is limited. You need to be within 10 feet, line of sight works best.
- Compatibility varies. Check your laptop's WiGig support before purchasing.
- Latency is higher than wired. Fine for productivity, not for gaming or precision work.
Side-by-Side: Which Method Fits Your Situation
Here's a comparison to help you decide at a glance.
| Method | Max Resolution/Refresh | Latency | Price | Best For |
|---|---|---|---|---|
| Miracast (built-in) | 4K @ 30Hz | 50 to 100ms | Free (built in) | Windows productivity |
| AirPlay | 4K @ 30Hz | 30 to 60ms | $100+ (Apple TV) | Apple ecosystem |
| Google Cast | 4K @ 60Hz (Chromecast Ultra) | 40 to 80ms | $30 to $50 | Media streaming |
| Wireless Display Adapter | 4K @ 30Hz | 50 to 100ms | $30 to $80 | Budget productivity |
| Wireless HDMI Kit | 4K @ 60Hz | 5 to 15ms | $100 to $300 | Gaming, video editing |
| Wireless Docking Station | 4K @ 60Hz (dual monitor possible) | 20 to 50ms | $200 to $500 | Corporate, hot-desking |
Step-by-Step: Setting Up Your Chosen Wireless Connection
Regardless of which method you pick, the general setup flow is similar. Here's a universal checklist.
Before You Start
- Update your source device's operating system. Wireless display protocols get regular fixes.
- Update your monitor's firmware. Some monitors receive Miracast or wireless firmware updates.
- Check your Wi-Fi band. If using Miracast or Cast, ensure your router's 5GHz band is available and not overcrowded.
- Know your adapter's power requirements. Some adapters need a 2A USB power source. Monitor USB ports often only supply 500mA.
Universal Setup Steps
- Connect your wireless receiver to your monitor's HDMI (or DisplayPort) input.
- Power the receiver via USB or wall adapter.
- Switch your monitor to the correct input source.
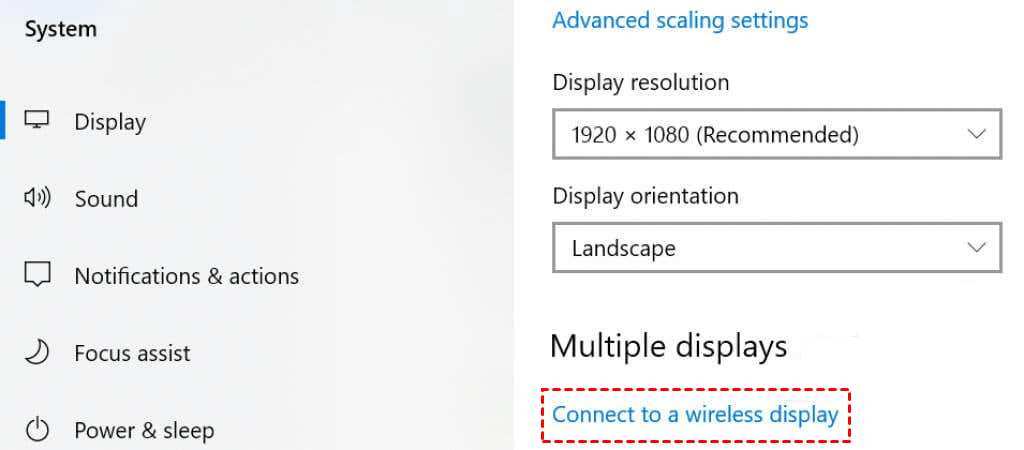
- On your source device, open display settings: , Windows: Settings > System > Display > Connect to a wireless display
, Mac: Control Center > Screen Mirroring
, Chromebook: Click the clock area > Cast
, Android: Settings > Connected devices > Cast (varies by manufacturer)
- Select your wireless display from the list of available devices.
- Choose your display mode: Duplicate (mirror) or Extend (second screen).
- Adjust resolution to 3840×2160 if it doesn't auto-detect.
- Set the refresh rate if your adapter supports 60Hz (check display settings > advanced).
Troubleshooting Common Issues
- No display detected: Make sure the adapter is powered and the monitor is on the correct input. Restart the adapter.
- Resolution stuck at 1080p: Check that your adapter supports 4K. Update your source device's graphics drivers.
- Audio not working: Wireless display connections sometimes default to the source device's speakers. Change the audio output in your sound settings.
- Connection drops: Move your source device closer to the adapter. Check for Wi-Fi interference on the 5GHz band.
- HDCP error on streaming apps: Some apps block wireless display output. Try a different adapter or use the app's built-in casting feature instead.
What Real-World Performance Actually Looks Like
Let's set expectations. Wireless 4K is usable, but it's not identical to wired.
Productivity and Office Work
For spreadsheets, documents, web browsing, and email, wireless 4K at 30Hz is perfectly fine. You'll notice a slight delay when moving windows quickly, but it's not distracting. Text rendering is good on AirPlay and wireless HDMI kits.
Miracast can show slight fringing on small text due to compression.
Media Streaming
Video looks good across all methods. AirPlay and Google Cast are optimized for this. Miracast handles it well too.
Dark scenes may show slight compression artifacts, but it's rarely bothersome for casual watching.
Gaming
This is where wireless falls short. Even the best wireless HDMI kits add 5 to 15 milliseconds of latency. For casual single-player games, it's playable.
For competitive shooters or fast-paced titles, you'll feel the delay. Wired is strongly recommended for gaming.
Photo and Video Editing
Color accuracy over wireless is decent but not perfect. Compression can slightly alter color values. For professional color work, wired remains the standard.
For hobbyist editing, wireless HDMI kits are acceptable.
The Mistakes That Waste Your Money
Avoid these common pitfalls when going wireless with your 4K monitor.
- Buying a cheap Miracast adapter for gaming. The $20 adapters on Amazon cap at 1080p or have 100ms+ latency. Read the specs before buying.
- Assuming all 4K is equal. 4K at 30Hz and 4K at 60Hz feel completely different. Know which one you're getting.
- Ignoring HDCP compatibility. If you plan to stream Netflix or Disney+, make sure your adapter supports HDCP 2.2. Many budget adapters don't.
- Placing the adapter behind the monitor. Heat buildup can cause throttling. If possible, position the adapter where it gets airflow.
- Using a 2.4GHz Wi-Fi network. Wireless display needs 5GHz for 4K. 2.4GHz doesn't have enough bandwidth.
- Forgetting about audio. Some adapters don't carry audio. Check before you buy if you need sound through the monitor.
Quick Decision Guide: Pick Your Method in 60 Seconds
Answer these questions in order:
- Are you on a Mac or iPhone? Use AirPlay with an Apple TV or AirPlay-compatible display.
- Are you on a Windows PC and just need productivity? Use built-in Miracast. No purchase needed.
- Do you need 4K at 60Hz for video editing or smooth motion? Buy a wireless HDMI kit ($100 to $300).
- Are you streaming media from a phone or Chromebook? Get a Chromecast with Google TV ($40 to $50).
- Do you work in a corporate hot-desk environment? Look at a wireless docking station ($200 to $500).
Frequently Asked Questions
Can I connect a 4K monitor wirelessly without any extra hardware?
Yes, if both your source device and monitor support the same wireless display protocol. Many modern monitors have Miracast built in. Windows PCs can connect directly without any adapter.
Macs need an Apple TV or AirPlay-compatible receiver.
Does wireless 4K work for gaming?
It's not recommended. Even the best wireless HDMI kits add 5 to 15 milliseconds of latency. For competitive or fast-paced gaming, a wired connection is significantly better.
Casual single-player games are playable over wireless.
What's the difference between Miracast and AirPlay?
Miracast is an open standard managed by the Wi-Fi Alliance. It works over Wi-Fi Direct and is built into Windows and Android. AirPlay is Apple's proprietary protocol.
It requires Apple hardware or an Apple TV. They're not cross-compatible.
Why does my wireless 4K display look blurry?
This is usually compression artifacts. Miracast compresses the video signal to transmit it wirelessly. Text and fine details suffer the most.
A wireless HDMI kit reduces this significantly because it uses less aggressive compression.
How far away can I be from my wireless monitor?
Most wireless display adapters work up to 30 feet in open air. Walls and furniture reduce this. WiGig-based kits (60GHz) typically max out around 10 feet and require line of sight.
For best results, keep your source device within 15 feet of the receiver.
Do I need Wi-Fi for wireless display?
Not always. Miracast creates a direct Wi-Fi Direct connection between your device and the adapter. No router needed.
AirPlay and Google Cast typically require both devices on the same Wi-Fi network. Wireless HDMI kits use their own dedicated signal and need no Wi-Fi at all.

Similar Posts