How to Fix Ghosting on 4K Monitor
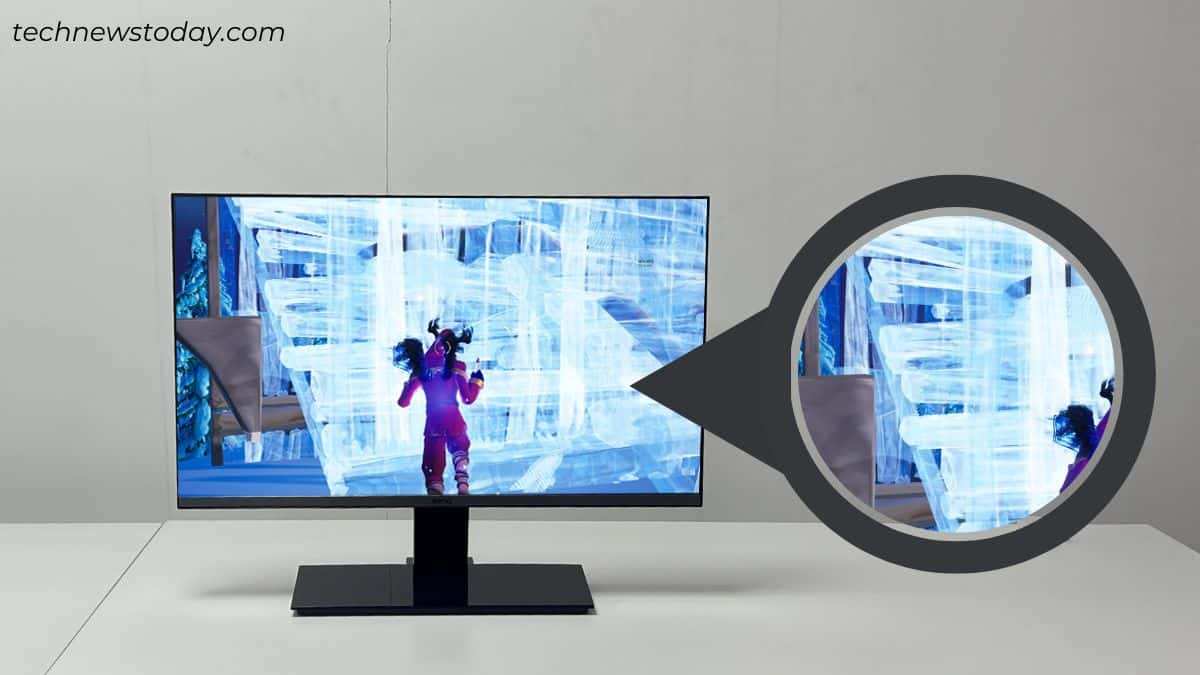
When you're trying to figure out how to fix ghosting on 4K monitor setups, the answer depends entirely on what's actually causing the problem. Ghosting isn't one single issue. It can come from your panel technology, your overdrive setting, your cable, your refresh rate, or even your GPU driver.
And if you apply the wrong fix, you'll make it worse.
The good news is that most ghosting issues on 4K monitors are fixable through settings adjustments, no hardware swap required. But you need to understand what type of ghosting you're looking at first, because the two main kinds demand opposite solutions. Let's walk through it step by step.
Image source: Bing (Web (fair-use with source credit))
Quick Answer
Most 4K monitor ghosting is fixed by adjusting the overdrive setting in your monitor's on-screen display menu. Overdrive is labeled as "Response Time," "OD," or "RTC" on most monitors. Set it to Medium or Normal first, then test.
If you see bright halos behind moving objects, you've gone too high. Use a free web test like UFO Test on Blur Busters to judge the difference objectively. If overdrive adjustment doesn't help, check your cable connection, refresh rate settings, and GPU driver.
What Ghosting Actually Is (And Why Your 4K Monitor Might Look Worse Than a 1080p One)
Ghosting is a visible trail or shadow that appears behind moving objects on screen. It happens when pixels can't change color fast enough to keep up with the image being displayed. You'll notice it most during fast motion: a cursor dragging across a desktop, a character turning quickly in a game, text scrolling on a webpage.
The trail looks like a faint smear, and on some monitors it's subtle. On others it's genuinely distracting.
Here's why 4K monitors can be more susceptible. At 3840 × 2160, your GPU and panel are pushing four times as many pixels as a 1080p display. That's more data per frame and more transitions per second at high refresh rates.
If your pixel response time and overdrive tuning aren't optimized for that resolution, the smearing becomes more visible simply because you're looking at a sharper, more detailed image where motion artifacts stand out in higher contrast against crisp static elements.
It's also worth noting that ghosting is not the same thing as input lag. Input lag is the delay between your action and the display responding. Ghosting is a visual artifact that lingers after the pixel has technically changed.
You can have one without the other. But in practice, both affect how "responsive" your monitor feels in motion.
The Two Types of Ghosting — And Why Fixing the Wrong One Makes It Worse
This is where most generic advice falls apart. There are two fundamentally different types of ghosting, and they require opposite fixes. If you misdiagnose which one you have, your "solution" will make the problem more obvious.
So before you touch any settings, you need to know what you're actually looking at.
Normal Ghosting: Slow Pixel Transitions
This is the classic smearing you probably picture when you hear the word "ghosting." The pixel starts transitioning from one shade to another but doesn't fully arrive before the next frame. The result is a faint, blurred trail trailing behind moving objects. It's most visible on darker transitions, especially on VA panels, which are naturally slower when shifting between near-black shades.
Normal ghosting gets worse at lower refresh rates too. At 60Hz, each frame persists for 16.67 milliseconds. If your pixel transition takes longer than that, the incomplete color change carries into the next frame.
That's your trail.
The fix for normal ghosting is typically to increase overdrive. We'll get into exactly how in the step-by-step section.
Inverse Ghosting: Overdrive Gone Wrong
Inverse ghosting looks different. Instead of a dark smear behind the object, you see a bright halo or corona that appears in front of the moving element. A white cursor dragging across a dark background might have a glowing white outline racing ahead of it.
That's inverse ghosting, and it's caused by overdrive being set too high.
Here's what's happening technically. Overdrive applies extra voltage to the liquid crystals to make them twist faster. But too much voltage causes the crystal to overshoot its target color and then correct back.
That overshoot creates the bright ghost image you see ahead of the moving object. On some monitors, the "Extreme" or "Highest" overdrive setting exists purely as a marketing checkbox. It introduces terrible inverse ghosting with virtually no one using it in practice.
The fix for inverse ghosting is to lower overdrive. Which is the exact opposite of what you'd do for normal ghosting. This is why diagnosis comes first.
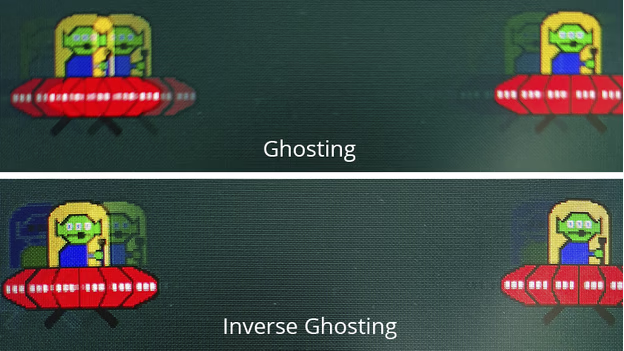
Image source: Bing (Web (fair-use with source credit))
Quick Diagnostic: Which Type Are You Actually Dealing With?
Before you change anything, run a proper visual test. Your eyes alone can mislead you, especially if you've been staring at ghosting for a while and your brain has started filtering it out. An objective test takes thirty seconds and removes the guesswork.
Go to testufo.com/ghosting in your browser. Set your browser to fullscreen. You'll see a series of UFO shapes moving across a plain background with a grid of colored blocks behind them.
Watch the space immediately behind and immediately in front of each UFO.
- If you see a dark, smeared trail behind the UFO but nothing in front of it: you have standard ghosting. Your overdrive is probably too low or off.
- If you see a bright, outlined ghost image slightly ahead of the UFO or a white corona hugging the UFO's leading edge: you have inverse ghosting. Your overdrive is too high.
- If you see both, your monitor likely has aggressive overdrive at its current setting with some transitions overshooting while others smear. You want to find a middle ground.
Write down what you see. Take a photo with your phone if it helps. This gives you a baseline to compare against after each setting change.
It saves you from the frustrating loop of "did that actually help or am I imagining it?"
Step-by-Step: How to Fix Ghosting Based on Your Situation
Now we get into the actual process. The steps here aren't strictly linear. Some of them depend on your current configuration.
So treat this as a priority order rather than a rigid sequence.
Image source: Bing (Web (fair-use with source credit))
Step 1: Confirm You're Actually Running at the Right Refresh Rate
This sounds obvious, but it's one of the most common causes of persistent ghosting complaints. Your monitor might be capable of 144Hz at 4K, but if Windows or your GPU driver has it locked to 60Hz, you're running at double the frame persistence with none of the motion clarity benefit. Ghosting will look dramatically worse.
On Windows 11:
- Right-click the desktop. Select Display settings.
- Click Advanced display.
- Look at the Refresh rate dropdown. Select the highest available number.
- If your maximum isn't showing, the problem is likely your cable, your port, or your GPU driver.
In NVIDIA ControlPanel:
- Open NVIDIA Control Panel. Navigate to Change resolution under Display.
- Set the refresh rate to the highest value listed for your resolution.
In AMD Radeon Software:
- Open AMD Software. Go to Display tab.
- Toggle Custom Resolution if needed. Set the refresh rate to the maximum supported.
If the refresh rate dropdown only shows 60Hz, skip ahead to the cable section below before continuing. No amount of overdrive tuning will compensate for a 60Hz bottleneck on a high-refresh panel.
Step 2: Find and Adjust Your Overdrive Setting
Every monitor with an adjustable response time setting has it buried somewhere in the On-Screen Display menu. The naming varies by manufacturer:
| Brand | Common OSD Names for Overdrive |
|---|---|
| ASUS | Response Time, Trace Free |
| LG | Response Time, Overdrive |
| Samsung | Response Time, Game Mode settings |
| Dell/Alienware | Response Time, Overdrive |
| BenQ/Zowie | AMA (Advanced Motion Acceleration) |
| Acer | Overdrive, VRB |
| Gigabyte | Overdrive, Response Time MSI |
Open your monitor's OSD, navigate to the picture or gaming settings, and locate the overdrive option. It'll usually offer levels like Off / Low / Medium / High / Extreme or a numerical scale from 1 to 5 (or 0 to 100).
Start at Medium or the middle value. This is the safest baseline for almost every panel on the market.
If your diagnostic showed standard ghosting (too low):
Increase by one level. Wait thirty seconds. Re-test with UFO Test.
Repeat until the trail behind the UFO shrinks. The moment you see any bright halo appearing around the leading edge of the UFO, back off one level. You've just crossed into inverse ghosting territory and that last step was too far.
If your diagnostic showed inverse ghosting (too high):
Decrease by one level. The bright corona should start fading. Keep stepping down until it disappears, but stop before the dark smear becomes worse than the halo was.
The best setting is almost always the highest level where inverse ghosting is not visible.
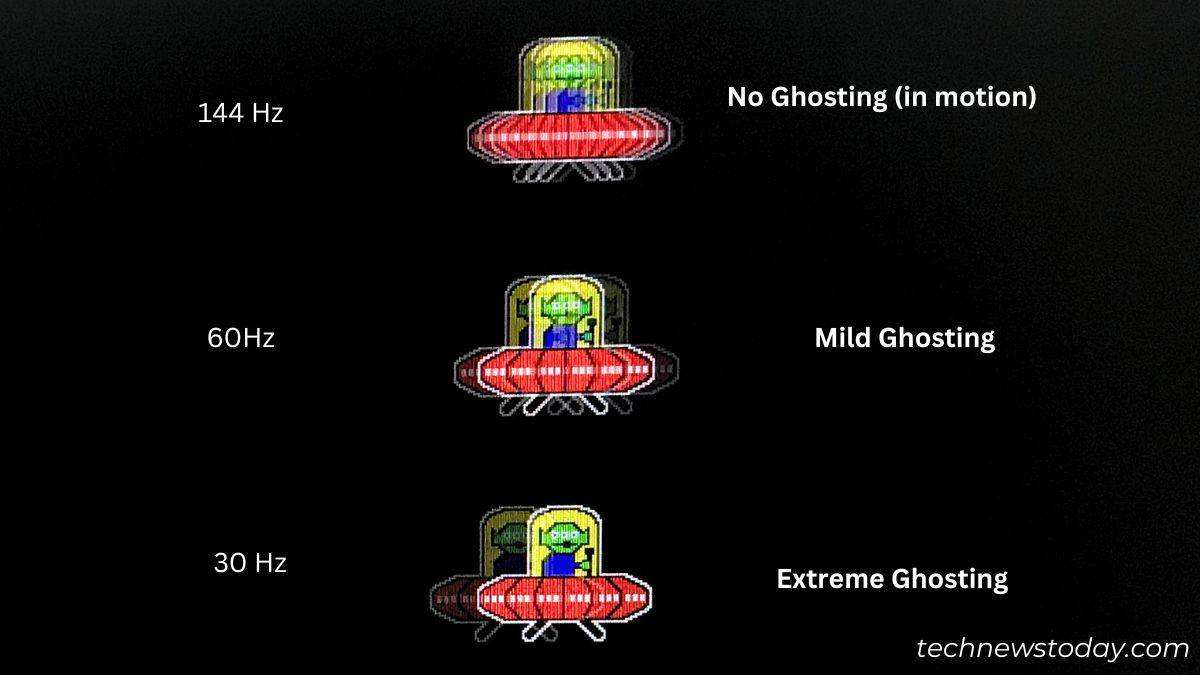
Image source: Bing (Web (fair-use with source credit))
Step 3: Test Each Overdrive Level Properly
Don't just change the setting and assume you can tell the difference. Your eyes adapt fast, and a single quick glance won't reveal subtle overshoot or residual smearing. Here's how to actually evaluate each level.
- Use the UFO Ghosting Test at testufo.com/ghosting. It's purpose-built for this. The colored background grid makes overshoot and smearing obvious.
- Step back from the monitor slightly. You want to view it at a normal seated distance, not two inches away.
- Screenshot or photograph the screen at each overdrive level if your phone captures it well enough. Side-by-side comparison is ten times more reliable than memory.
- Test in your actual use case too. Open a game you play often. Scroll through a long text document on a dark background. Move your cursor quickly across the screen. Real-world tests catch artifacts that standardized UFO tests sometimes miss, especially on VA panels where dark-level transitions behave differently than mid-tone transitions.
- Let your eyes rest between levels. Stare at something else for ten seconds. Fresh eyes catch differences that fatigued eyes smooth over.
Step 4: Check for Adaptive Sync Conflicts
If you have G-Sync, FreeSync, or FreeSync Premium enabled, it can interfere with how your overdrive behaves. Some monitors use different overdrive algorithms in variable refresh rate mode versus fixed refresh rate mode. And on certain panels, overdrive is tuned specifically for the monitor's maximum refresh rate.
At lower refresh rates within the VRR range, that same overdrive level can cause visible overshoot.
What to try:
- Open your GPU control panel and temporarily disable adaptive sync. Test ghosting at your maximum fixed refresh rate. If it looks significantly better, your monitor's variable overdrive tuning is the issue.
- Re-enable adaptive sync and test at the low end of your VRR range (often 48Hz on FreeSync monitors). If ghosting or overshoot appears at low refresh rates but not high ones, your monitor likely has poor variable OD tuning.
- Some newer monitors address this with per-frame dynamic overdrive that adjusts based on the current refresh rate. If your monitor supports it, it may be listed as "Variable Overdrive" or "Adaptive Overdrive" in the OSD. Enable it if available. Otherwise, you may need to compromise on your overdrive setting to find a level that works reasonably well across your entire VRR range.
Step 5: Investigate HDR Mode Interference
This one catches people off guard. On many monitors, switching to HDR mode locks certain picture settings, including overdrive or response time adjustment. The panel may default to a lower or higher overdrive level that you can't override while HDR is active.
The result is that your perfectly tuned SDR ghosting fix means nothing the moment you enable HDR in Windows.
How to check:
- Enable HDR in Windows display settings (Windows 11: Settings > System > Display > HDR).
- Open your monitor's OSD and check if the overdrive/response time setting is grayed out.
- If it's locked, test ghosting in HDR mode using the UFO test or your regular use content.
- If ghosting is worse in HDR and you can't change overdrive while HDR is active, your options are limited. You'd need to either accept the HDR ghosting or keep HDR off when motion clarity matters. Some monitors receive firmware updates that unlock OD control in HDR mode. Check your manufacturer's support page.
This is a real problem on mid-range 4K gaming monitors where HDR support is present but the firmware implementation is incomplete. Flagship monitors typically handle this better.
Step 6: Rule Out the Cable and Connection
If your refresh rate was stuck at 60Hz earlier, this is almost certainly why. Not all cables and ports can carry a 4K signal at high refresh rates. The bandwidth requirement is enormous.
A standard HDMI 2.0 cable tops out at 18 Gbps. That handles 4K at 60Hz with full color, but it can't do 4K at 144Hz without compromises.
What you need for common 4K refresh rates:
| Target Refresh Rate | Minimum Connection | Cable Requirement |
|---|---|---|
| 4K 60Hz | HDMI 2.0 or DP 1.2 | Standard HDMI or DP cable |
| 4K 120Hz | HDMI 2.1 or DP 1.4 | Ultra High Speed HDMI or DP 1.4 certified |
| 4K 144Hz | DP 1.4 (with DSC) or HDMI 2.1 | DP 1.4 with DSC support |
| 4K 240Hz | DP 1.4 (with DSC) or HDMI 2.1 | DP 1.4 with DSC, verified cable |
Check both your cable and your ports. A DisplayPort 1.4 cable plugged into a USB-C port that only supports DP 1.2 Alt Mode will bottleneck you regardless of the cable rating. Laptop users need to verify their USB-C or Thunderbolt port's display output capability in the machine's specification sheet.
Not every USB-C port supports the full DP 1.4 bandwidth, especially on business-class laptops.
Also check that you're not accidentally running through a docking station or KVM switch. Many docks limit the display output to 4K 60Hz even if the laptop and monitor are both capable of more. This is a known limitation of most USB-C docks using DP 1.2 alt mode or HDMI 2.0 downstream connections.
Step 7: Update GPU Drivers (And Check GPU Control Panel Settings)
Outdated GPU drivers can cause timing issues, incorrect refresh rate reporting, and poor adaptive sync behavior. All of these can manifest as or worsen visible ghosting. Driver updates frequently include fixes for specific monitor compatibility issues as well.
Update through official channels only:
- NVIDIA: Download from nvidia.com/drivers or use GeForce Experience.
- AMD: Download from amd.com/en/support or use AMD Software.
- Intel Arc: Download from intel.com for Arc GPU owners.
After updating, open your GPU control panel and verify the settings. In NVIDIA Control Panel, check that G-Sync is enabled for your monitor under Display > Set up G-Sync if you have a compatible unit. Verify the resolution and refresh rate under Change Resolution match your intended configuration.
Also check that Low Latency Mode is not set to a level that conflicts with your game settings.
In AMD Radeon Software, confirm FreeSync is enabled under Display. Check that the Radeon Anti-Lag feature isn't introducing unusual frame pacing behavior that could affect motion appearance.
Step 8: Check for a Monitor Firmware Update
Monitor firmware updates are less common than GPU driver updates, but they matter for ghosting more than people realize. Manufacturers occasionally release firmware updates that adjust overdrive algorithms, fix VRR range behavior, or resolve timing issues at specific refresh rates.
Visit your monitor manufacturer's support page. Find your exact model number. Check the downloads or firmware section.
If a newer firmware is available, follow the manufacturer's update instructions precisely. Most require a USB drive formatted to FAT32 with the firmware file placed in the root directory, then triggered through the monitor's OSD update menu. A few support updates over USB directly.
Some manufacturers like Dell and LG occasionally release firmware specifically to improve adaptive sync compatibility or overdrive performance. It's worth checking even if you bought your monitor recently. A unit manufactured six months before your purchase could have shipped with an older firmware revision.
When Tuning Doesn't Work: Panel Technology Limitations
If you've adjusted overdrive, confirmed cable bandwidth, updated everything, and ghosting is still unacceptable, you're facing a panel limitation. Not all 4K monitors are created equal. Some panel technologies inherently have slower pixel transitions at certain color levels.
Image source: Bing (Web (fair-use with source credit))
IPS Panels
In-plane switching panels offer good viewing angles and solid color accuracy. Their typical grey-to-grey response time sits around 4 to 8 milliseconds in real-world performance, despite what the box says. Most decent IPS 4K panels can be tuned to acceptable ghosting with the right overdrive setting.
Budget IPS panels with poor overdrive tuning may have a narrow sweet spot. You might find that no level feels quite right because low settings smear and high settings overshoot on the same transitions.
For competitive gaming at 4K, IPS is a solid middle ground. But if ghosting sensitivity is your top priority, there are faster options.
VA Panels
Vertical alignment panels deliver the best contrast ratios on LCD technology. The tradeoff is well documented. VA panels are significantly slower on dark shade transitions.
You'll see pronounced smearing when dark grey shifts to near-black, which happens constantly in games with dimly lit scenes or when scrolling through dark-themed interfaces.
Aggressive overdrive on a VA panel can eliminate that dark smearing, but it replaces it with heavy overshoot on lighter transitions. There's no perfect setting. You pick your compromise.
For users primarily sensitive to dark-transition smearing on VA, the best solution is often simply not choosing a VA panel for fast-motion content. No amount of tuning fully eliminates the underlying physics of slow dark-state switching.
TN Panels
Twisted nematic panels have the fastest response times among LCD technologies. Ghosting is generally minimal at the settings where IPS and VA panels would still show visible trails. The downsides are well known: worse color accuracy and very narrow viewing angles.
TN panels have become increasingly rare in the 4K monitor market as of 2022 onward. If you already have a 4K TN panel and ghosting is a complaint, it's more likely a settings issue than a panel limitation.
OLED and QD-OLED
OLED pixels change state in under 0.1 milliseconds for most transitions. That's roughly fifty to a hundred times faster than even the best LCD overdrive. Ghosting as LCD users experience it simply doesn't exist on OLED in any meaningful sense.
What you might see on OLED is related to sample-and-hold blur at lower refresh rates, not pixel transition lag.
For 4K gaming without ghosting concerns, OLED and QD-OLED are the definitive answer. The tradeoffs are burn-in risk, higher cost, and lower peak brightness on full-screen white content compared to LED-backlit LCDs. If ghosting is the problem and budget allows, an upgrade to a 4K OLED or QD-OLED monitor eliminates the issue entirely rather than managing it through settings.
The Overdrive Sweet Spot: Why Every Monitor Is Different
Here's something that frustrates people. Two monitors with the same panel model number can behave differently at the same overdrive level. Manufacturing variance in liquid crystal layers, driver IC calibration, and panel revision means each unit has its own response curve.
One unit's "Medium" might be another unit's "High" in terms of actual voltage applied.
This is why generic advice like "set overdrive to Medium" is a starting point, not a guarantee. Your specific unit might need Low or High to achieve the same result. The only reliable method is the one we covered earlier: test each level yourself using the UFO Test and your own visual assessment.
Some high-end monitors from brands like ASUS, LG, and Gigabyte now include variable overdrive that adjusts per-frame based on the current refresh rate and transition type. This technology dramatically reduces the "no good setting" problem. If your monitor supports it, it's almost always the best option.
It's typically labeled as "Variable Overdrive," "Adaptive OD," or similar in the OSD.
GPU Control Panel Settings That Can Sabotage Your Motion Clarity
Your GPU driver has its own set of image processing features that can interfere with motion clarity. These settings are easy to overlook because they're separate from the monitor's OSD. But they directly affect what the panel receives and how it processes motion.
NVIDIA Control Panel
Low Latency Mode: Set to "On" or "Ultra" for gaming. "Off" can introduce additional frame buffering that increases perceived input lag and can make motion feel less crisp.
Image Sharpening: This post-processing filter can create edge artifacts that resemble ghosting on high-contrast boundaries. If you see halos around text or UI elements that look like motion trails, try disabling this.
Color depth and format: Ensure you're outputting the correct color format. A mismatch between GPU output and panel native format can cause subtle visual artifacts. Most 4K monitors perform best at 8-bit or 10-bit color, RGB full range.
AMD Radeon Software
Radeon Anti-Lag: Generally beneficial for input latency. But in some titles it can cause unusual frame delivery patterns that affect perceived smoothness. If motion feels "off" after enabling it, test with it disabled.
Radeon Image Sharpening: Similar to NVIDIA's sharpening, this can introduce edge artifacts. Disable it temporarily to rule it out as a ghosting contributor.
Frame Rate Target Control: If enabled, this caps your frame rate. A cap below your monitor's maximum refresh rate means you're not using the panel's full motion capability. Ghosting will be more visible at lower frame rates.
Console Gaming at 4K
PS5 and Xbox Series X output 4K at 60Hz or 120Hz depending on the game. If your monitor only supports high refresh rates over DisplayPort and you're connected via HDMI, you may be limited to 60Hz. Use an Ultra High Speed HDMI 2.1 cable.
Check that your monitor's HDMI port is 2.1 on the specification sheet. Many 4K monitors have one HDMI 2.1 port and one HDMI 2.0 port. Check the label next to the physical port before you assume.
The Cable Mistake That Keeps You Stuck at 60Hz
The cable that ships in the box is not always the cable you need. Many monitors include a basic HDMI 2.0 cable even when the panel supports higher refresh rates over HDMI 2.1. The cable will work.
You'll get a picture. But you won't get the full refresh rate capability. Check the printing on the cable jacket itself for "Ultra High Speed" or "48G" labeling.
Don't assume an included cable is appropriate for your target resolution and refresh rate combination.
Firmware Updates and Why They Actually Matter
Some of the worst ghosting complaints trace back to bad factory firmware. Manufacturers have improved overdrive algorithms months after launch through firmware updates. A monitor with severe inverse ghosting at Medium overdrive can ship with erratic pixel transitions at all levels.
Until you update. Check your support page. Follow the instructions exactly.
And retest after the process completes with your baseline UFO Test.
Common Mistakes People Make Trying to Fix Ghosting
Using the monitor's "Fastest" or "Extreme" overdrive preset immediately. This guarantees inverse ghosting on most panels. Start at the middle setting and work from Adjust by only one step per test. Let your eyes settle before deciding if it's any better.
Confirm what you saw with a screenshot. And don't expect overdrive to overcome a slow panel. A VA panel at Medium overdrive will still smear more than an IPS panel at Medium overdrive in dark transitions.
There's a ceiling to what settings can fix.
What If Nothing Works? When It's a Hardware Problem
If every overdrive level produces visible artifacts and your connection chain is confirmed working at the monitor's maximum refresh rate, you may have a defective panel or a model with known poor response time performance. Check aggregate professional reviews of your specific model. Sites that measure response time with photodiodes can reveal whether a monitor's ghosting is within spec or an outlier.
Some units have panel lottery variations where response time quality varies between purchases of the same model. If your unit measures significantly worse than professional reviews for the same model and your settings are optimized, contact the manufacturer's warranty support about a potential panel defect.
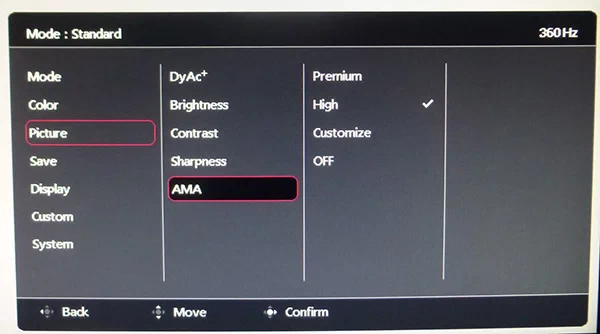
Image source: Bing (Web (fair-use with source credit))

Similar Posts