How to Check Refresh Rate on Budget Monitor
Here's the deal. Figuring out how to check refresh rate on budget monitor setups is usually a 30-second job, but it can turn into a headache fast when Windows defaults to 60Hz or your cable's bottlenecking your panel. The good news is you've got at least four solid ways to verify what you're actually running, and we'll walk through every one of them.
Budget monitors often ship with the right panel but the wrong configuration. A 2023 analysis of budget display specs found that a significant number of high-refresh-rate monitors default to 60Hz out of box. Let's fix that.
Image source: Bing (Web (fair-use with source credit))
Quick Answer
You can check your refresh rate through Windows Display Settings. Right-click your desktop and go to Display Settings > Advanced Display Settings. The refresh rate appears in a dropdown menu there.
If the number looks wrong, check your cable and GPU control panel. You can also verify with a free browser test at testufo.com.
Why Your Budget Monitor Might Be Stuck at 60Hz (Even When It's Not)
This is the single most common complaint we see with budget high-refresh monitors. You bought a 144Hz or 165Hz panel, fired up your PC, and Windows is showing 60Hz. Nothing's broken.
The monitor's probably fine.
Here's what's usually going on. Windows defaults to 60Hz whenever it can't confidently read the monitor's capabilities. That happens for a few specific reasons.
- EDID handshake failure. The monitor tells Windows what it can do through something called EDID (Extended Display Identification Data). Budget monitors sometimes have sloppy EDID data. Windows plays it safe and locks you at 60Hz.
- Wrong cable in the wrong port. Plugged in via HDMI 1.4 when your monitor needs DisplayPort 1.2 or HDMI 2.0 to hit 144Hz? You'll get 60Hz. Period.
- GPU driver not fully installed. Generic Windows display drivers don't always expose the full refresh rate range. You need your actual NVIDIA, AMD, or Intel driver.
- Laptop integrated graphics limitation. If you're on a laptop using Intel UHD or basic integrated graphics, the hardware itself might not output above 60Hz through the available port.
The fix depends on which of these is your actual problem. That's why we're going through multiple verification methods below. Each one catches a different failure point.
The 30-Second Check: Windows Display Settings First
This is where everyone should start. It's the fastest method and it works on any version of Windows from 10 onward.
Here's the exact path.
- Right-click on your desktop background.
- Click Display settings.
- Scroll down and click Advanced display settings (Windows 11) or Display adapter properties (Windows 10).
- Look for the Refresh rate dropdown.
- Select the highest number available.
That dropdown tells you what Windows thinks your monitor can do. If it only shows 60Hz, don't panic yet. That doesn't mean your monitor is capped.
It means Windows isn't seeing the full picture.
Windows 11 note. Microsoft moved things around a bit. You'll find it under Settings > System > Display > Advanced display. The refresh rate dropdown sits right under the resolution picker.
Windows 10 note. The path is Settings > System > Display > Display adapter properties for Display 1 > Monitor tab. The refresh rate dropdown is in the Monitor Settings section.
If you see 144Hz, 165Hz, or whatever your panel advertises, great. You're done. If not, keep reading.
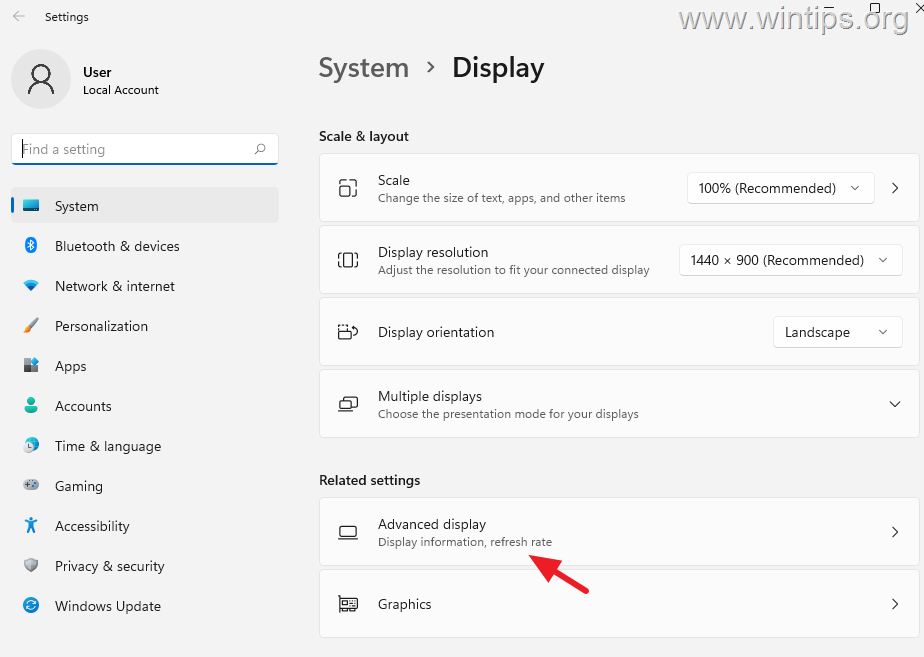
Image source: Bing (Web (fair-use with source credit))
When Windows Lies to You: GPU Control Panel Override
Windows Display Settings doesn't always tell the truth. Your GPU control panel often has more accurate information and more options. This is especially true on budget monitors where the EDID data is incomplete.
NVIDIA users. Open the NVIDIA Control Panel (right-click desktop > NVIDIA Control Panel). Go to Display > Change Resolution. The refresh rate dropdown here often shows options that Windows hides.
You can also create a custom resolution with a higher refresh rate if needed.
AMD users. Open AMD Radeon Software. Click the gear icon, then Display. The refresh rate shows under Specifications.
You can toggle custom resolutions from the Custom Resolutions tab if your panel supports overclocking.
Intel users. Open Intel Graphics Command Center. Go to Display > General Settings. The refresh rate dropdown is right there.
Intel's panel is less common for gaming monitors but it matters for budget office setups using integrated graphics.
Why this matters. The GPU control panel talks directly to the display driver, bypassing some of Windows' safety checks. If your monitor's EDID is reporting 60Hz as the "safe" default but the panel actually does 144Hz, the GPU panel will often let you force the correct rate.
One warning. If you force a refresh rate the panel doesn't actually support, you'll get a black screen. Most monitors revert after 15 seconds. But don't go crazy with random numbers.
Stick to the manufacturer's rated spec.
The OSD Check: What Your Monitor's Own Menu Tells You
Your monitor has a built-in On-Screen Display menu. Most budget gaming monitors show the current refresh rate right in that menu. This is useful because it tells you what the monitor itself is receiving, independent of what Windows or your GPU thinks.
Here's how to use it.
- Find the physical buttons on your monitor (usually on the bottom edge or back right).
- Press the menu button to open the OSD.
- Look for a section called Information, Status, or Display.
- The refresh rate should show as something like "144Hz" or "60Hz."
Budget monitor quirk. Some cheap panels bury this info deep in the OSD. AOC and ViewSonic budget models often put it under System > Information. LG and Samsung usually show it on the main info screen.
If you can't find it, check the manual (or just search "[your model number] OSD refresh rate location").
Why this is useful. If your OSD shows 144Hz but Windows shows 60Hz, you know the problem is on the PC side (cable, driver, or settings). If the OSD also shows 60Hz, the signal arriving at the monitor is 60Hz, and you need to fix the output chain.
Some budget monitors also let you "overclock" the refresh rate through the OSD. You might see an option to switch from 144Hz to 165Hz or 180Hz. This is a real overclock, not just a setting change.
It works on many panels, but it can introduce frame skipping. More on that later.
The Real Test: Browser-Based Verification (UFO Test)
Windows settings and your OSD tell you what refresh rate is selected. They don't tell you what's actually being displayed. That's a critical difference, especially with budget monitors.
The best free tool for this is the UFO Test at testufo.com. It's been around for years and it's the standard for quick refresh rate verification.
Here's how to use it.
- Open your browser (Chrome, Firefox, Edge, whatever).
- Go to testufo.com.
- The test runs automatically. Look at the number at the top of the screen.
- It should match your expected refresh rate (144, 165, etc.).
What you're looking for. The UFOs should move smoothly across the screen. If the number at the top says 144 but the motion looks choppy, something's wrong. You might have V-Sync forced on globally, or your browser might be capping frame delivery.
Browser-specific notes. Chrome and Edge use hardware acceleration by default, which is what you want. Firefox sometimes needs you to enable it manually in settings. If the UFO test shows a weird number like 59 or 61 instead of a clean 60 or 144, that's normal.
Refresh rates aren't always exact to the decimal.
The frame skipping check. Go to testufo.com/frameskipping. This test shows a grid of squares moving at a steady pace. Take a photo or short video of your screen with your phone.
If you see gaps between the squares, your monitor is dropping frames. It claims 144Hz but it's not actually displaying every frame.
This is more common on budget monitors than people realize. A panel can accept a 144Hz signal and report 144Hz while physically skipping frames due to panel response time limitations or scaler issues. The frame skipping test catches that.
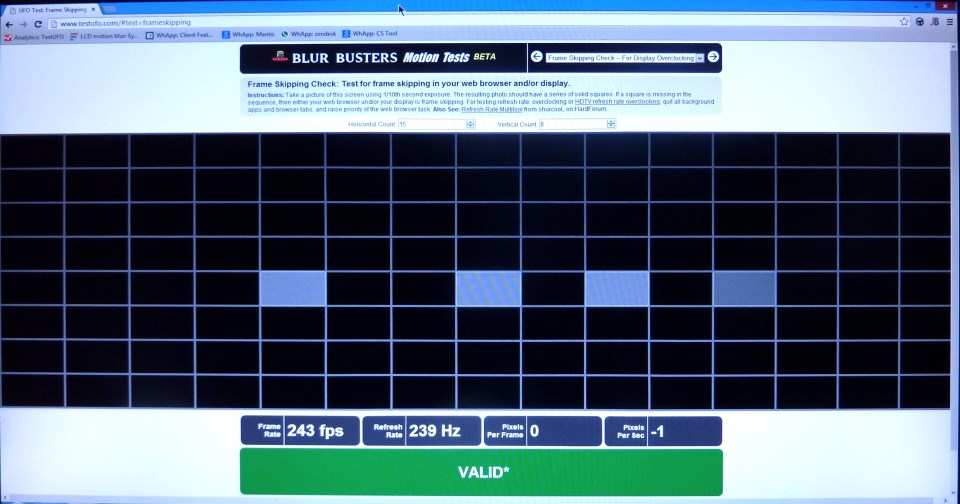
Image source: Bing (Web (fair-use with source credit))
The Cable Problem Nobody Talks About
This is where most budget monitor headaches actually live. You've got the right monitor. You've got the right settings.
But the cable you're using can't carry enough data for high refresh rates at your resolution.
Here's the quick reference.
| Cable Version | Max 1080p Refresh Rate | Max 1440p Refresh Rate | Notes |
|---|---|---|---|
| HDMI 1.4 | 120Hz | 60Hz | Very common in budget setups |
| HDMI 2.0 | 240Hz | 144Hz | Most common on budget monitors |
| HDMI 2.1 | 240Hz+ | 240Hz+ | Rare on true budget panels |
| DisplayPort 1.2 | 165Hz | 144Hz | Standard on most gaming monitors |
| DisplayPort 1.4 | 240Hz | 240Hz | Found on newer budget models |
The trap. Many budget monitors ship with an HDMI 1.4 cable in the box even though the panel supports 144Hz. The manufacturer assumes you'll use DisplayPort (which they often don't include). If you're stuck at 60Hz and you're on HDMI, check your cable version first.
How to check your cable version. Look at the cable itself. Most cables print the version or speed rating on the connector housing. If there's no labeling, check the packaging or look up the model number.
When in doubt, swap to a known good DisplayPort cable.
Port matters too. Some monitors have both HDMI and DisplayPort, but only the DisplayPort supports the full refresh rate. Check your manual. The spec sheet will say something like "144Hz via DisplayPort, 120Hz via HDMI." That's not a defect.
That's just how that specific panel is wired.
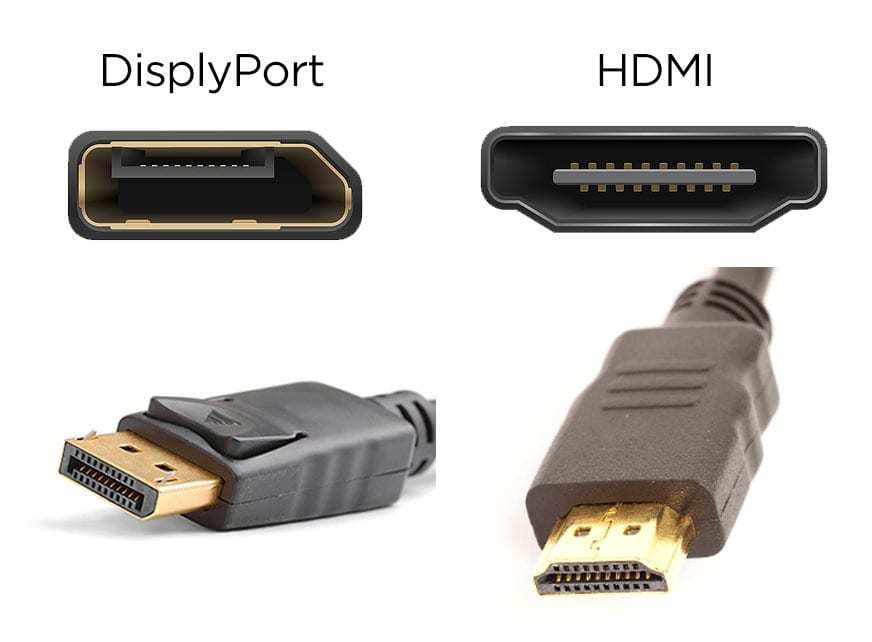
Image source: Bing (Web (fair-use with source credit))
HDMI vs. DisplayPort: Which One Unlocks Your Full Refresh Rate
For budget gaming monitors in 2025, DisplayPort is almost always the better choice. But HDMI works fine if you've got the right version.
DisplayPort advantages. Higher bandwidth at the base level. DP 1.2 handles 144Hz at 1080p without breaking a sweat. FreeSync and G-Sync Compatible work more reliably over DisplayPort.
Most budget gaming monitors are designed with DisplayPort as the primary high-refresh input.
HDMI advantages. More universal. Every laptop, console, and TV has HDMI. HDMI 2.0 is plenty for 144Hz at 1080p.
If you're connecting a PS5 or Xbox Series X, HDMI is your only option.
The practical recommendation. If you're on a desktop PC with a dedicated GPU, use DisplayPort. If you're on a laptop with only HDMI, make sure you're on HDMI 2.0 at minimum. If you're on a console, HDMI 2.0 will get you 120Hz at 1080p on PS5 and Xbox Series X.
Cable quality matters less than you think. You don't need expensive cables. A certified HDMI 2.0 or DisplayPort 1.2 cable from a reputable brand is fine. The $40 "gaming" cables don't do anything the $8 ones don't.
Just make sure the cable is rated for the correct version.
When the Refresh Rate Option Simply Doesn't Appear
Sometimes the refresh rate dropdown in Windows only shows 60Hz and there's no other option. This is frustrating but usually fixable.
Try these steps in order.
- Update your GPU driver. Go to NVIDIA, AMD, or Intel's website and download the latest driver. Don't rely on Windows Update for this. It often gives you an outdated generic driver.
- Install the monitor driver. Most monitors work without a specific driver, but budget panels sometimes need an INF file. Check the manufacturer's support page for your exact model. Install it, restart, and check again.
- Try a different cable. Swap to a known good DisplayPort cable. This fixes the problem more often than you'd expect.
- Try a different port. If your GPU has multiple DisplayPort outputs, try another one. Same for HDMI.
- Check for a firmware update. Some budget monitors have firmware updates that fix EDID reporting issues. This is rare but worth checking if nothing else works.
Custom Resolution Utility (CRU). If you're comfortable with advanced tools, CRU lets you manually edit the EDID data that Windows reads. You can add a 144Hz or 165Hz profile that the monitor's EDID isn't reporting. This is a last resort, but it works.
Download it from ToastyX's site, add your desired refresh rate as a detailed resolution, restart, and check Windows Display Settings again.
When to give up. If you've tried all of the above and Windows still won't show anything above 60Hz, the monitor's scaler board might genuinely be limited. Some budget panels advertise high refresh rates but the hardware can't sustain them. Check the exact model's specs on the manufacturer's site, not just the retailer listing.
Retailer listings are wrong more often than people realize.
Console Gamers: Checking Refresh Rate on PS5 and Xbox
Console setups add another layer of complexity. Both PS5 and Xbox Series X support 120Hz, but only under specific conditions.
PS5. Go to Settings > Screen and Video > Video Output > 120Hz Output. Set it to Automatic. Then go to Settings > Screen and Video > Video Output > Information for TV.
This shows the current output refresh rate. If it says 60Hz, your game doesn't support 120fps or your HDMI cable/port is limiting you.
Xbox Series X. Go to Settings > General > TV & Display Options > Refresh rate. You can toggle between 60Hz and 120Hz. The Xbox will gray out 120Hz if it detects your setup can't handle it.
The HDMI requirement. Both consoles need HDMI 2.1 for 120Hz at 4K. For 120Hz at 1080p or 1440p, HDMI 2.0 works. Most budget monitors with 144Hz panels only have HDMI 2.0, which is fine for 1080p 120Hz but won't do 4K 120Hz.
Budget monitor tip. If your monitor has both HDMI and DisplayPort, use HDMI for consoles. The PS5 and Xbox don't output over DisplayPort at all. Make sure you're plugged into the HDMI port that supports the highest refresh rate if your monitor has multiple HDMI ports with different specs.
Frame Skipping: Your Monitor Says 144Hz But Isn't Actually Showing 144Hz
This is the dirty secret of the budget monitor market. A monitor can accept a 144Hz signal, display 144Hz in its OSD, and still drop frames. The panel's response time or scaler chip can't keep up, so some frames never make it to your eyes.
How to test for frame skipping.
- Go to testufo.com/frameskipping.
- Set your phone camera to a fast shutter speed (1/30 or faster).
- Take a photo of the screen while the test is running.
- Look at the photo. You should see a solid grid of white squares.
- If you see gaps or missing squares, your monitor is skipping frames.
What causes it. Slow panel response times. A monitor that advertises 1ms MPRT (Moving Picture Response Time) but actually has 5ms GTG (Gray to Gray) will skip frames at high refresh rates. Budget TN and VA panels are the most common offenders.
IPS panels at this price point are getting better, but they're not immune.
Can you fix it? Sometimes. Overdrive settings in the monitor's OSD can help. Look for a setting called Response Time, Overdrive, or OD.
Set it to Medium or Strong. Avoid the highest setting, which can cause inverse ghosting (bright trails behind moving objects).
When to return it. If frame skipping is severe at the monitor's rated refresh rate, you've got a legitimate defect. Most retailers accept returns for this. Document the frame skipping test results with photos and include them in your return request.
Common Budget Monitor Traps and How to Spot Them
Budget monitors cut corners. That's how they hit their price points. Here are the most common traps and how to catch them.
- Advertised refresh rate requires overclocking. The panel natively runs at 144Hz but the box says 165Hz. You have to manually enable 165Hz in the OSD or GPU control panel. This is normal and fine, but it means the "stock" spec is lower than advertised.
- Single-port high refresh rate. Only one DisplayPort or HDMI port supports the full refresh rate. The other ports are limited to 60Hz or 120Hz. Check the manual for port-specific specs.
- Resolution vs. refresh rate tradeoff. Some 1440p budget monitors only hit 144Hz at 1080p. At 1440p, they drop to 120Hz or 100Hz. The spec sheet will list both. Make sure you're looking at the right combination.
- FreeSync range. FreeSync might only work between 48Hz and 144Hz. Below 48fps, you get tearing or stuttering. Some monitors have a wider range (30-144Hz) but it's not guaranteed on budget models.
- HDR that isn't real HDR. Many budget monitors claim HDR support but lack the brightness and color depth to actually display it. Windows will show an HDR toggle, but turning it on makes the image look worse. This isn't a refresh rate issue, but it's a common budget monitor complaint worth knowing about.
Quick Reference: Max Refresh Rate by Cable and Resolution
Keep this table handy. It'll save you a lot of troubleshooting time.
| 1080p | 1440p | 4K | |
|---|---|---|---|
| HDMI 1.4 | 120Hz | 60Hz | 30Hz |
| HDMI 2.0 | 240Hz | 144Hz | 60Hz |
| HDMI 2.1 | 240Hz+ | 240Hz | 120Hz+ |
| DP 1.2 | 165Hz | 144Hz | 60Hz |
| DP 1.4 | 240Hz | 240Hz | 120Hz |
Key takeaway. If you're running 1080p at 144Hz, HDMI 2.0 or DisplayPort 1.2 is the minimum. If you're on HDMI 1.4, that's your bottleneck. Swap the cable.
Frequently Asked Questions
How do I check my refresh rate in Windows 11?
Right-click your desktop, select Display settings, then click Advanced display. The refresh rate dropdown shows your current Hz. If multiple options appear, select the highest one your monitor supports.
Why is my 144Hz monitor only showing 60Hz?
The most common cause is an HDMI cable that doesn't support high refresh rates. Switch to DisplayPort or HDMI 2.0. Also check that your GPU driver is up to date and that you've selected the higher refresh rate in Display Settings.
Can I overclock a budget monitor?
Many budget monitors support overclocking from 144Hz to 165Hz or 180Hz through the OSD or GPU control panel. Results vary by panel. Test for frame skipping after overclocking using testufo.com/frameskipping.
Does refresh rate matter for non-gaming use?
For office work and web browsing, 60Hz is fine. The difference between 60Hz and 144Hz is noticeable in scrolling and mouse movement, but it's not transformative unless you've already experienced high refresh rate. For gaming, higher refresh rates provide a genuine competitive advantage.
How do I know if my cable supports high refresh rates?
Check the version printed on the cable connector. HDMI 2.0 or DisplayPort 1.2 is the minimum for 144Hz at 1080p. If the cable isn't labeled, assume it's an older version and replace it with a certified one.
My monitor's OSD shows 144Hz but the UFO test shows 60Hz. What's wrong?
This usually means your browser is capping frame delivery. Make sure hardware acceleration is enabled in your browser settings. Also check that V-Sync isn't forced globally in your GPU control panel, as this can limit frame output to your desktop refresh rate.
Final Checklist: Making Sure You're Actually Running at Your Advertised Hz
Before you close this tab, run through this quick checklist. It covers every failure point we've discussed.
- Windows Display Settings shows the correct refresh rate in the dropdown.
- GPU control panel confirms the same number (NVIDIA, AMD, or Intel).
- Monitor OSD shows the correct refresh rate under Information or Status.
- UFO Test at testufo.com reports the expected Hz at the top of the screen.
- Frame skipping test at testufo.com/frameskipping shows a solid grid with no gaps.
- Cable is correct version (HDMI 2.0+ or DisplayPort 1.2+ for 144Hz at 1080p).
- Cable is in the right port (some monitors only support full Hz on one specific port).
- GPU driver is up to date from the manufacturer's website, not Windows Update.
If all eight check out, you're genuinely running at your monitor's rated refresh rate. If any one of them fails, go back to the matching section above and fix that specific issue.
One last thing. Budget monitors have come a long way in the last few years. A $150 144Hz panel in 2025 is legitimately good.
You just have to make sure the signal chain from your GPU to your eyes isn't bottlenecked somewhere in the middle. Now you know exactly how to verify that.

Similar Posts