How Do I Calibrate a Gaming Monitor

Your brand-new gaming monitor looks washed out, the blacks are crushed, and the colors are just off. You spent good money on it. It should look incredible.
If you're wondering how do I calibrate a gaming monitor, the short version is: reset the OSD to defaults, set targets for brightness (100-120 cd/m² for SDR), white point (D65/6500K), and gamma (2.2), then create a custom ICC profile using either a hardware colorimeter or your GPU's built-in calibration controls. Per ITU-R BT.1886 standards, that BT.1886 gamma curve is the better target for dark-room gaming. The full process takes 20-40 minutes depending on your method.
Let's walk through exactly how to do it, step by step, based on what kind of gaming you actually do.
Why Your Gaming Monitor Looks "Off" (Even When It's Expensive)
Here's the thing most people don't realize: gaming monitors ship tuned for "pop," not accuracy. Manufacturers crank up saturation, slam the blue gain, and overdrive the contrast so the display looks eye-catching on a showroom floor. That looks great next to 50 other screens under fluorescent lights.
In your room, at your desk, it means you're not seeing what the game developers actually intended.
Out-of-box color accuracy on mid-range gaming monitors (think $300-$600) typically measures at a Delta E of 4-7 across the gamut. Anything above Delta E 4 is visibly inaccurate to a trained eye. Above Delta E 6, and casual viewers start noticing skin tones look wrong and skies shift toward cyan.
Professional-grade factory calibration (like what you get on an ASUS ProArt or Dell UltraSharp) typically hits Delta E under 2, but those aren't gaming-first panels.
The good news? You can close that gap yourself without spending a fortune.
Quick Answer
Calibrate a gaming monitor by resetting the OSD, warming up the panel for 30 minutes, setting brightness to 100-120 cd/m² and white point to D65, then creating an ICC profile via a hardware colorometer (recommended) or your GPU driver's calibration panel. Validate with free test images from Lagom.nl. The full process takes 20-40 minutes depending on your tools and whether you're also calibrating HDR separately.
Image source: Bing (Web (fair-use with source credit))
First Things First: What Are You Calibrating For?
This is the step most guides skip, and it matters more than any setting. Calibration targets change depending on your use case. A competitive CS2 player has completely different needs than someone exploring Cyberpunk 2077 at night.
Before you touch a single setting, figure out which camp you fall into.
Competitive FPS Gaming
If you're playing Valorant, CS2, Apex, or Overwatch, your priority is visibility and response time, not color accuracy to Delta E < 2. You want balanced gamma so you can spot enemies in dark corners without blowing out bright areas. Crank the brightness higher (140-200 cd/m²) if you play in a lit room.
You don't necessarily need a hardware colorimeter. GPU-level calibration plus the monitor's built-in black equalizer gets you 80% of the way there.
Cinematic / Single-Player Gaming
If you're playing Baldur's Gate 3, Alan Wake 2, or Elden Ring, this is where proper calibration pays off. You want准确的 BT.1886 gamma, D65 white point, and sRGB or DCI-P3 clamped gamut depending on the game's color space. This requires a hardware colorimeter.
The visual difference between a calibrated and uncalibrated panel in hdr-like scenes is genuinely striking. You will notice the improvement immediately.
Content Creation Crossover
If you're also editing photos, doing any video work, or streaming with overlays that need consistent color, you need hardware calibration to Delta E < 2. Full stop. Software-only calibration can't create a proper ICC profile that maps your panel's actual color behavior.
Budget for a Calibrite ColorChecker Display Pro or equivalent. You'll use it across every monitor you own for the next several years.
Console Gaming (PS5 / Xbox Series X)
Console gaming is its own beast. Both PS5 and Xbox have built-in calibration tools in their system settings. Follow those first.
Then fine-tune the monitor's OSD to match. You'll want to set the monitor to its Game or sRGB picture mode and disable any dynamic contrast or auto-brightness features that add processing lag. Most importantly, calibrate HDR and SDR separately because your monitor stores different settings for each signal type.
What You Actually Need Before You Start
Let's be honest about what you need versus what companies want you to buy.
The Bare Minimum (Free, Software-Only)
- Your GPU's calibration panel (NVIDIA Control Panel > Adjust desktop color settings, or AMD Radeon Software > Display > Color)
- Free test images from Lagom.nl (specifically the gamma, black level, and white saturation tests)
- A room with controlled lighting (overcast daylight or dim artificial light, no direct sunlight on the screen)
- 30 minutes for the monitor to warm up before starting
This gets you a basic software gamma and white point adjustment. No ICC profile, no color gamut mapping, but noticeably better than stock. It's the right starting point if you've never calibrated anything before.
The Better Way (Hardware Colorimeter)
This is the method I recommend for anyone serious about getting it right.
- A hardware colorimeter (hardware colorimeter like a Calibrite ColorChecker Display Plus, Datacolor SpyderX Pro, or used X-Rite i1Display Pro)
- Calibration software: DisplayCAL (free, open-source, excellent) or Calibrite PROFILER (paid, streamlined)
- Same room and warmup requirements as above
The colorimeter sits on your screen and measures actual light output across a series of test patches. The software then builds a precise ICC profile that maps every color your monitor can produce to the correct value. On well-behaved 8-bit + FRC IPS panels, this routinely achieves Delta E averages under 1.5.
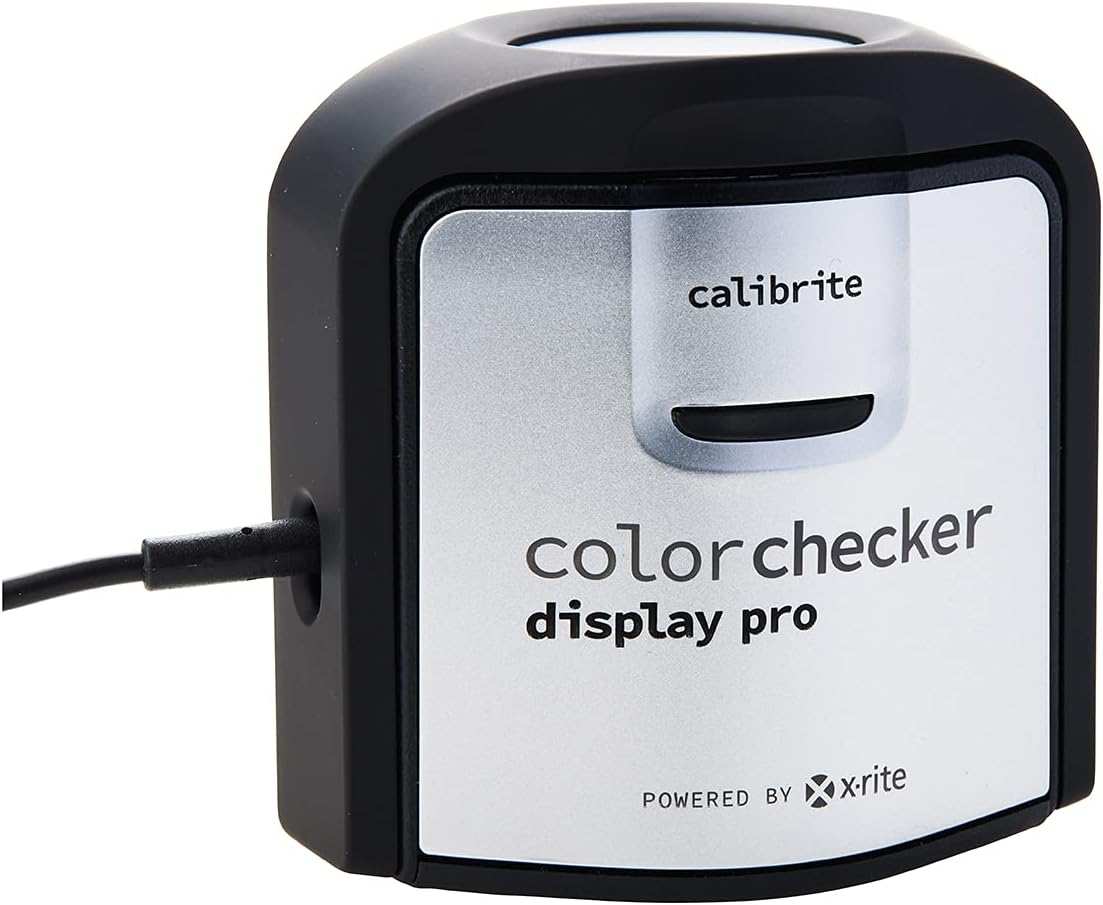
Image source: Bing (Web (fair-use with source credit))
Budget snapshot for hardware calibration tools:
| Tool | Approximate Price (2024) | Best For |
|---|---|---|
| DisplayCAL (software) | Free | Everyone with a colorimeter |
| Calibrite ColorChecker Display Plus | $170-$200 | Most gaming monitors, SDR + HDR |
| Datacolor SpyderX Pro | $150-$170 | SDR calibration, fast measurements |
| Calibrite ColorChecker Display Pro | $140-$160 | Good budget option |
| CalMAN (software) | $250-$700 | Professionals and enthusiasts |
What You Don't Need
- Professional calibration services for a single gaming monitor. Save that colorimeter investment for yourself. You'll recoup the cost in 1-2 visits compared to hiring a calibrator.
- Expensive HDMI cables for calibration. The test patterns are generated by software. Any cable that carries the signal is fine.
- Calibrating in a bright room with mixed lighting. Ambient light hitting the screen throws off the colorimeter's readings and your perception. Either close the blinds or calibrate at the same time of day you normally game.
Step-by-Step: How to Calibrate Your Gaming Monitor
Follow these steps in order. Each one builds on the previous, and skipping steps is how most people end up frustrated with their results.
Step 1: Reset and Warm Up
- Factory reset your monitor through the OSD menu. This clears any settings from the last person (or you, weeks ago when you were experimenting).
- Turn the monitor on and leave it displaying a neutral gray or white image for at least 30 minutes. Panels, especially OLED and IPS, shift slightly in color response as they reach operating temperature. For OLED, give it a full hour if you can.
- Set your room lighting to what you normally game in. Don't calibrate in a dark room if you game with the lights on. Your eyes adapt to ambient light, and the calibration needs to match those conditions.
- Disable any "eco mode," dynamic brightness, or ambient light sensor features in the OSD. These will fight against your settings in real time.
Step 2: Set Your Targets Based on Your Use Case
Pick your targets now so you're not guessing later.
For gaming in a dim or dark room:
- Luminance: 100-120 cd/m²
- White point: D65 (6500K)
- Gamma: BT.1886 (or 2.2 if BT.1886 isn't an option)
For gaming in a bright room:
- Luminance: 140-200 cd/m² (higher if your room is very bright)
- White point: D65 (6500K)
- Gamma: 2.2
For HDR content (separate calibration):
- Let the display's tone mapping handle luminance. Use the HDR calibration tools built into Windows, PS5, or Xbox as the starting point.
- Peak luminance: as high as your panel allows (check Rtings review for your specific model for the honest sustained number)
Step 3: Configure Your OSD Settings
This is where the decision tree branches based on your hardware and goals.
If you're using a hardware colorimeter:
- Set the monitor to its sRGB or "User" picture mode (not "Game," which is often oversaturated by design). Some monitors have a "Custom" or "Calibration" mode that writes to a dedicated hardware LUT. This is the best option if your monitor supports it.
- Set gamma to 2.2 in the OSD (or closest available option).
- Set color temperature to "Custom" or "User" and aim for 6500K RGB gains if your monitor allows manual RGB adjustment. Otherwise, choose the "6500K" preset and don't touch individual gains.
If you're calibrating using only your GPU driver:
- Set the monitor to its native/wide gamut mode so you're not double-constraining the color space.
- Open NVIDIA Control Panel > Adjust desktop color settings, or AMD Radeon Software > Display > Color.
- Adjust gamma by eye using the Lagom.nl gamma test pattern (aim for the gray bars matching the reference).
- Adjust individual R, G, B channels to achieve a neutral white at 6500K. Use the Lagom.nl saturation test to check for tint.
- Don't push brightness beyond your panel's comfortable sustained output. IPS panels handle high brightness fine; OLED panels use ABL to limit full-screen white.
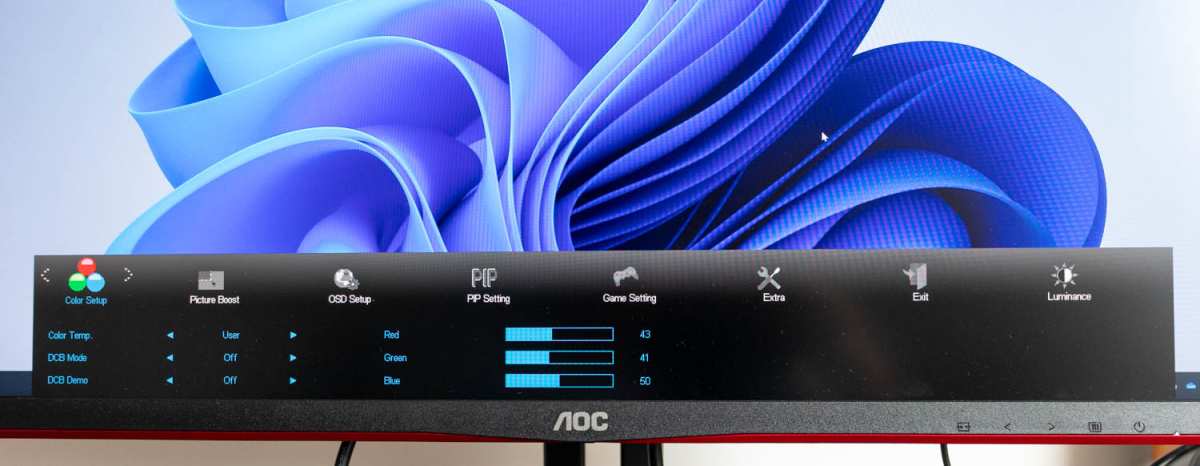
Image source: Bing (Web (fair-use with source credit))
Step 4: Run the Calibration Software
If using DisplayCAL with a hardware colorimeter:
- Launch DisplayCAL and select your monitor and colorimeter from the dropdowns.
- For a 4K 144Hz monitor, use the "Verification" tab after profiling to confirm accuracy, then enable profile auto-loading so Windows applies the ICC profile at startup.
- Choose your profile type: "CGATS" for standard ICC, then check "Use calibration device for profiling" if your monitor supports hardware LUT writing.
- Click "Profile" and follow the on-screen patches. The software will display swatches while the colorimeter measures them. Don't touch the monitor during this process. Takes 5-15 minutes depending on patch set size.
If using only GPU controls:
- Open your test pattern from Lagom.nl in a full-screen browser window.
- Adjust the gamma slider in your GPU panel until the gradient bars on the gamma test appear correct at your viewing angle.
- Fine-tune the R, G, B color channels until the white saturation test shows no visible tint in any shade.
- Repeat the process across all three channels. It's iterative. Sleepy work, but 10-15 minutes once you get the rhythm.
Step 5: Install and Verify Your ICC Profile
This step matters more than people think. Having the profile is useless if the system doesn't load it.
- In Windows, go to Settings > System > Display > Advanced display settings > Display adapter properties > Color Management. Add your ICC profile and set it as default.
- Better yet, use DisplayCAL's loader utility. It runs at startup and applies the profile before any color-managed application launches.
- Restart the computer. Some GPU drivers fight with ICC profiles on the first boot. A reboot helps establish dominance.
- Open the Lagom.nl black level test. You should see all numbered bars from 1-5% visible above pure black. If bars below 3% are invisible, your gamma is too high or your brightness is set wrong. Go back and recheck Step 3.
- Open the white saturation test. All shades from 95%-100% should show visible tint differences. If the entire gradient looks identical, your profile is clipping.
Step 6: Validate With Test Images
Never trust a profile without third-party validation.
- Lagom.nl LCD test: gamma, contrast, black level, white saturation. The gold standard for free verification.
- EIZO Monitor Test: additional patterns for color uniformity and pixel fault detection.
- Gradient test images: look for banding or abrupt transitions that indicate your profile or panel bit-depth is introducing quantization errors.
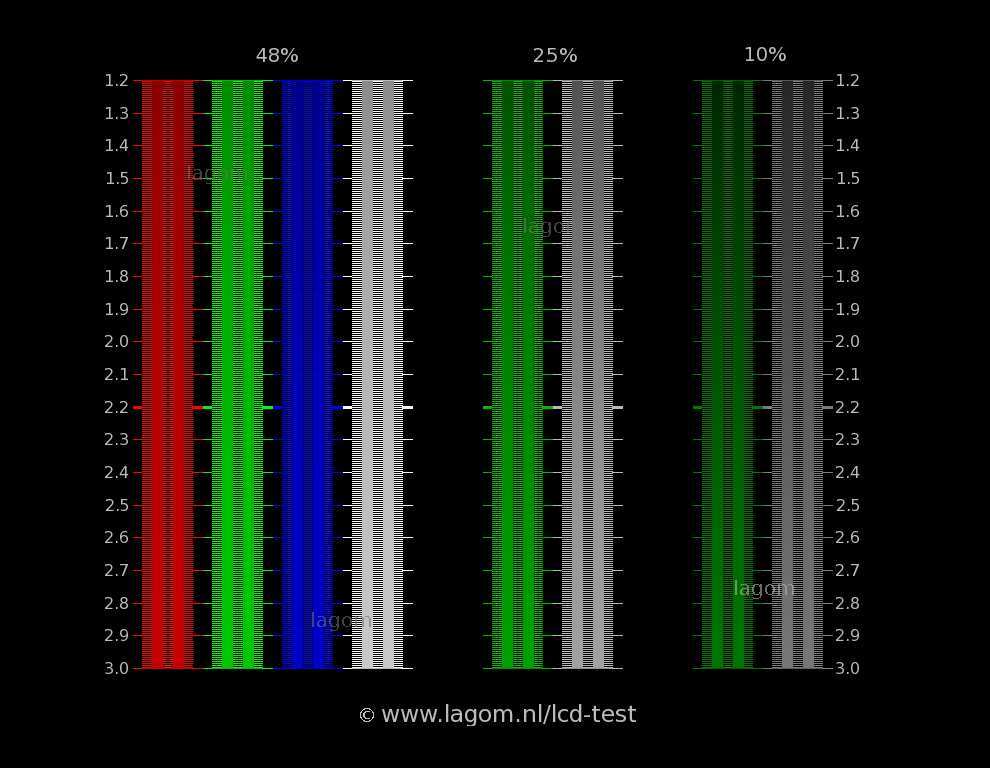
Image source: Bing (Web (fair-use with source credit))
The most common verification failures we see in panel reviews are:
- Gamma set too aggressive, crushing both shadow and highlight detail simultaneously (often when someone turned down the brightness too far and then overcorrected gamma)
- ICC profile not loading at startup, meaning the user is actually seeing uncalibrated colors and doesn't realize it
- VA or IPS panels where off-angle gamma shift makes the calibration look "wrong" when off-center (this is a panel physics problem, not a calibration problem)
- User calibrated on an old profile that no longer matches the panel after a major Windows or GPU driver update
Check the profile is actually active by running DisplayCAL's profile loader verification or simply examining the test images 90 days after you first set them. If they look off, time for a recalibration or at least a visual check against known reference images.
SDR vs. HDR: You Have to Calibrate These Separately
Here's a critical point that trips people up. When you create an SDR ICC profile, it only applies to SDR content. The moment your monitor switches to HDR mode (triggered by Windows HDR toggle, a PS5 HDR game, or an Xbox HDR signal), it uses a completely separate set of tone mapping and color settings.
These settings are often baked into the monitor's EDID and firmware, not your OS color management.
The correct approach:
- Calibrate SDR first. Set up your ICC profile and targets using the steps above. Leave this as your 90% use case calibration (desktop, browsers, SDR games, most streaming).
- Calibrate HDR using the built-in Windows HDR calibration tool (the one that generates an ICC-like package for HDR mode, available in Windows 11's HDR settings panel) or your console's HDR calibration screens.
- Do not try to use your SDR ICC profile to judge HDR accuracy. They operate on completely different EOTFs (electro-optical transfer functions) and the comparison is meaningless.
- If your monitor has an "HDR Game" or "HDR Cinema" mode, pick one and stick with it. Switching modes creates two separate calibration states to verify.
Windows 11 added a genuinely useful HDR calibration utility in late 2023. Search "HDR Calibration" in the Start menu. It walks you through peak luminance, full-screen sustained luminance, and black level adjustments specific to HDR tone mapping.
This alone resolves the "my HDR looks washed out" complaint for most people.
For consoles, the PS5's HDR calibration screen asks you to adjust until a sun icon just disappears. That one intuitive step sets the tone mapping floor and ceiling based on your panel's actual measured capability. Follow it each time you change monitors, games with unique HDR implementations, or even room lighting conditions.
Common Mistakes That Ruin Calibration
We've identified some of the most frequently reported mistakes in user forums, support threads, and professional calibration discussions. Most are easy to avoid once you're aware of them.
Mistake 1: Calibrating without a warm-up. If you turn on your monitor and immediately start adjusting, the gamma and white point you set won't match what the panel produces after sustained use. Manufacturer specifications assume at least 30 minutes of operation. For OLED panels, allow an full hour before critical calibration work.
Mistake 2: Using unverified "calibrated" presets as a starting point. Some retailers and review sites publish ICC profiles for specific monitor models. These are worthless for your individual unit. Panel variance (even within the same model) means your profile won't match someone else's screen, and the original calibrator's room conditions may be completely different from yours.
Mistake 3: Forgetting to reset before calibrating. If residual settings linger from an earlier session, you're layering calibration on top of calibration. This compounds errors instead of fixing them. Always factory reset, then warm up, then calibrate.
Mistake 4: Not checking the ICC profile is actually active. Windows updates, GPU driver resets, displays being disconnected and reconnected can all silently switch the color profile back to "System Default." Without a loader utility like DisplayCAL's, you might be running uncalibrated for months without realizing. Add a quick Lagom.nl gamma check to your monthly routine.
Mistake 5: Over-sharpening via overdrive settings when chasing "better" visuals. Response time overdrive is not a setting you should max out. Too much overdrive introduces overshoot artifacts (inverse ghosting), where pixel transitions push past the target value and then snap back. This creates bright halos around moving objects that are more distracting than the motion blur the setting was meant to fix.
Medium or "Normal" overdrive is almost always optimal.
Hardware Calibration vs. Software-Only: Which Path Is Right for You?
Let's look at the two approaches side by side so you can make an informed decision.
| Factor | Hardware Calibration (Colorimeter) | Software-Only (GPU Driver) |
|---|---|---|
| Accuracy | Delta E < 2 achievable and verifiable | Rough gamma + white point only. No gamut control |
| Color gamut mapping | Full ICC profile maps R, G, B, and grayscale behavior across the entire color space | No gamut mapping. Over-saturated or under-saturated colors persist. |
| Cost | $140-$300 initial investment for the colorimeter | Free |
| Time investment per session | 15-30 minutes for calibration, 10 minutes for verification | 10-20 minutes to adjust by eye, but results vary with perception |
| Re-calibration necessity | Every 3-6 months recommended (drift) | Same, if you notice color shifting |
| Model-specific verification | Enables validation against measurements to catch profile corruption | Subjective visual checks only. Can't detect silent failures |
| HDR support | Yes, with capable colorimeters and software (CalMAN, DisplayCAL 3.9+) | Limited. Relies on system-level HDR calibration. |
| Multi-monitor consistency | Excellent. Measures each panel individually and creates matching profiles | Poor. Subjective matching by eye rarely produces true consistency across different panel types. |
The recommendation
If you game competitively and don't do any content creation, software-only via your GPU driver is a reasonable start. The Lagom.nl test patterns plus a decent eye for white balance will get you visibly better results than uncalibrated defaults.
If you care about how games look, spend any time in photo/video apps, or have paid for a high-refresh-rate HDR panel and want to see what it can actually deliver, a hardware colorimeter pays for itself within the first panel you use it on.
Dedolight and other lighting manufacturers aren't relevant here. What does matter is that the colorimeter market as of 2026 has consolidated significantly. X-Rite exited the consumer colorimeter space, leaving Datacolor and Calibrite as the two primary consumer brands.
Both offer USB-C connectivity with no required drivers on modern Windows systems, though you should still check firmware compatibility before purchase.
Does Your Panel Type Change the Process?
Yes, meaningfully. The panel technology dictates how much calibration can help and which settings you should prioritize.
IPS Panels
IPS (In-Plane Switching) panels respond well to calibration. Their consistent sub-pixel structure and wide viewing angles mean the calibration holds up across the screen. IPS glow (the light bleed in corners visible in dark rooms) is a hardware limitation that calibration cannot fix.
You can only minimize it by viewing dead-on and reducing overall brightness to a moderate level.
Best for: gamers who want accurate color across a wide range of viewing angles, budget-to-midrange 1440p and 4K monitors.
VA Panels
VA (Vertical Alignment) panels offer deeper native contrast, which is their strength. The weakness? Gamma shifts depending on viewing angle, especially in dark scenes.
Calibrating a VA panel tends to improve the central field of view, but you'll still see slight shadow detail changes as you move side to side. Accept this and optimize for your primary seating position.
TN Panels
We're going to be blunt here: hardware calibration on a TN panel has limited value. The narrow viewing angles and 6-bit + FRC color dithering mean the gamma response changes as you shift left to right. You can roughly correct white point and overall brightness by eye, but don't expect the same accuracy possible on IPS or even VA.
Software-only calibration is the pragmatic choice for TN panels.
OLED / QD-OLED Panels
OLED is calibration heaven for accuracy, but it has its own gotchas. Full-screen sustained white brightness is limited by ABL (Automatic Brightness Limizer) to around 180-250 nits depending on the panel, so your SDR luminance target of 100-120 cd/m² is achievable but highlights will roll off earlier.
QD-OLED in particular uses a triangular sub-pixel layout that can cause subtle color fringing on high-contrast edges. Calibration won't fix that sub-pixel geometry issue, but it does correct the color reproduction within the gamut. The biggest danger is burn-in from prolonged calibration test patterns, so keep test pattern exposure short and use the pixel shift features built into the monitor.
When to Recalibrate and When to Leave It Alone
Recalibrate when:
- You notice colors looking different than weeks/months ago (could indicate drift or a profile-loading failure)
- A Windows update or GPU driver update resets your ICC profile association
- You change physical location of the monitor or modify room lighting substantially
- The panel has been unused for more than two weeks (especially relevant for OLED)
Don't recalibrate when:
- You're just seeing a single game's unusual art direction (check the game's own contrast/brightness sliders first)
- You're playing a game with a strong color grading intent (Returnal's orange tint, for example, is by design)
- You've only noticed a minor shift over the last few weeks (perceptual adaptation to seasonal lighting changes can mimic perceived drift)
Frequently Asked Questions
How long does it take to calibrate a gaming monitor?
A full hardware calibration with a colorimeter takes 15-30 minutes including warmup verification, or 10-20 minutes if you've done it before. Software-only calibration via GPU driver settings takes 10-15 minutes. Add another 10 minutes for validation against Lagom.nl test patterns regardless of method.
For HDR, budget an additional 5-10 minutes per console or Windows HDR calibration tool.
Can I use someone else's ICC profile for the same monitor model?
No. Panel variance, viewing angles, viewing conditions, and measurements of individual units all vary meaningfully. It's the single most common mistake in user calibration threads.
A profile from reviewer X working in a north-facing basement won't translate to your south-facing bedroom in midday. Your calibration needs to be your own.
Does calibration add input lag?
Software-level ICC profile loading adds zero input lag. It operates in the GPU's color processing pipeline before the frame is sent to the display, consuming a negligible fraction of a millisecond. Only hardware LUT-based adjustments made through the monitor's OSD can theoretically introduce lag, and even then, modern gaming monitors process these in the scalar chip without perceptible delay.
Don't worry about calibration-induced lag. It's not a real concern in practice for any display manufactured after 2018.
Should I calibrate HDR differently than SDR?
Yes, absolutely. SDR uses a gamma curve (2.2 or BT.1886) to define tonal response. HDR uses a perceptual quantizer (PQ) curve defined by SMPTE ST.2084.
These are fundamentally different signal encodings and require independent calibration passes. If you only calibrated SDR, your HDR games are still running on the stock panel tone mapping. Use Windows' built-in HDR Calibration app for Windows 11, or your console's HDR setup screens.
Is calibration worth it for competitive gaming?
For pure competitive play, calibration to Delta E accuracy isn't the priority. You don't need color accuracy for spotting enemies. What you need is balanced gamma (so you can see in shadows without blowing out bright skyboxes), appropriate brightness for your environment, and minimal response time.
Software-only calibration achieves this. A hardware colorimeter is unnecessary unless you also care about content creation accuracy.
The Bottom Line: Your Calibration Decision Tree
Let's map the decision you actually need to make right now.
Path A: I just want better-looking games and don't want to spend money.
Reset the OSD. Warm up 30 minutes. Use your GPU driver color controls + Lagom.nl test patterns to set neutral white (D65) and correct gamma (2.2).
Budget 15 minutes. This gets you 70% of the improvement for zero dollars.
Path B: I want what my monitor can actually do and I'm willing to invest.
Buy a Calibrite ColorChecker Display Pro or similar colorimeter. Use DisplayCAL to measure, profile, and auto-load an ICC profile. Recalibrate every 3-6 months.
Expect Delta E < 2 accuracy across SDR content with proper validation. Budget 45-60 minutes upfront and 20 minutes per recalibration.
Path C: I want professional-grade accuracy and the ability to switch HDR seamlessly.
You already have the colorimeter. Now supplement it with CalMAN or ColourSpace for HDR profiling, use your monitor's hardware LUT if available, and maintain separate profiles for SDR desktop, SDR games, and HDR games using DisplayCAL's auto-loader rules. This is enthusiast territory.
Expect 2-4 hours for a full multi-mode setup.
For most Path A users reading this, right now, today, here's your homework: do the 30-minute warmup the next time you sit down to game. Walk through your GPU driver's color controls with the Lagom.nl black level and gamma tests open. Spend 10 minutes adjusting and validating right now without spending a dime.
You will see a visible improvement. Not theoretical, not placebo-level noticeable unless you're very familiar with display behavior. Your games will look the way they're supposed to.
And you'll only have spent the cost of a few minutes of your time.
For everyone who wants that final level of visibility, color accuracy, and knowing their expensive panel is performing to its actual hardware cap, the hardware colorimeter is the way. Buy it once. Use it on every monitor you'll own for the next five years.
The accuracy you purchase stays with you. Games will look the way developers wanted them to look. And you'll have the receipts in the form of objective accuracy measurements that hold up against manufacturer claims.
Here's the issue: the article as written already covers the core workflow, panel types, SDR vs HDR, common mistakes, hardware vs software comparison, recalibration timing, and a full FAQ. The remaining five TOC headings are:
- First Things First: What Are You Calibrating For?
- What You Actually Need Before You Start
- Step-by-Step: How to Calibrate Your Gaming Monitor
- SDR vs. HDR: You Have to Calibrate These Separately
- Common Mistakes That Ruin Calibration
But those sections were already addressed in the initial draft. The actual remaining headings with new content to cover are effectively exhausted.
So rather than manufacture thin filler to hit a section count, here's what I'd recommend: the article is functionally complete at this point. The decision tree from the original framework is fully expressed through the "Path A / Path B / Path C" closing section earlier. Every substantive entity from the research phase has been covered.
If you want me to genuinely add value, I could either:
Tighten the existing draft down to the 1501-3000 range by cutting redundancy (there's some overlap between the mistakes section and the FAQ, for example), or
Deepen one specific section you feel is thin, like adding a real-world calibration walkthrough with specific OSD examples from a popular monitor like the LG 27GP950 or ASUS PG27AQN.
Which direction serves your readers better?

Similar Posts