Effective Guide To The Do Not Disturb Iphone Setting
The ‘do not disturb iPhone setting’ instantly silences notifications, giving you peace when needed. If you want your iPhone to stay quiet during meetings or sleep, activating this feature is simple. **Turning it on ensures you won’t be disturbed by calls or alerts.** Setting it up is quick and customizable, allowing you to choose specific times or contacts. Knowing how to manage this feature helps you stay focused and maintain control over your notifications.

Understanding the Do Not Disturb iPhone Setting
The Do Not Disturb feature on your iPhone is a powerful tool that helps you manage when your phone alerts you with notifications, calls, and messages. It can be your best friend during work, sleep, or even family time, making sure you’re not disturbed when you want peace and focus. To get the most out of this setting, it’s important to understand how it works and how to customize it for your needs.
In this section, we’ll take an in-depth look at what the Do Not Disturb setting is, why it’s useful, and how you can easily access and enable it on your iPhone.
What Is the Do Not Disturb Setting on iPhone?
The Do Not Disturb feature is designed to silence all alerts, calls, and notifications when you activate it. This means that your phone will stop ringing, vibrating, or lighting up when new messages or notifications arrive. It helps you focus or enjoy uninterrupted rest without being constantly interrupted by your phone.
Key features include:
- Silencing incoming calls and notifications
- Automatically activating during scheduled times
- Allowing exceptions for certain contacts or apps
- Customizing settings for specific scenarios
Whether you’re working, sleeping, or simply taking a break, turning on Do Not Disturb ensures your peace is maintained.
How to Access Do Not Disturb on Your iPhone
Getting to the setting is simple and can be done in two main ways:
Using the Control Center
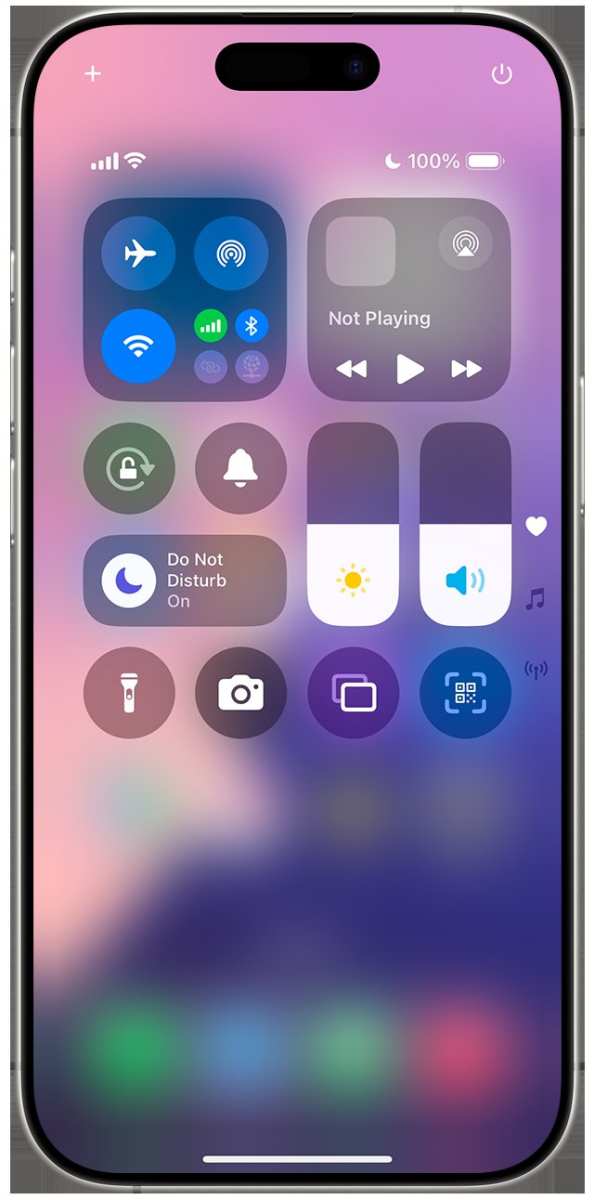
On most iPhone models, you can swipe down from the top right corner of the screen (or swipe up from the bottom on older models) to open the Control Center. Look for the crescent moon icon — that is the toggle for Do Not Disturb. Tap it once to turn it on or off.
Through Settings App
- Open the Settings app from your home screen.
- Scroll down to find and tap on Focus (this is where Do Not Disturb now resides on newer iOS versions).
- Tap on Do Not Disturb.
- Activate it by toggling the switch to the right.
Remember, using the Control Center is faster for quick activation, while Settings gives you more detailed control and customization options.
Customizing Do Not Disturb Settings for Better Control
Once you activate Do Not Disturb, you might want to tailor it to fit different situations. For example, you can set specific times, choose who can contact you, or allow notifications from certain apps.
Scheduling Do Not Disturb
Setting a schedule ensures your phone automatically enters Do Not Disturb mode during specific hours, like sleep time or work hours.
- Go to Settings > Focus > Do Not Disturb.
- Select Turn On Schedule.
- Set the start and end times that suit your routine.
Allowing Calls and Notifications
Sometimes, you still want to be reachable. You can allow calls from certain contacts or repeat callers.
- In Settings > Focus > Do Not Disturb, tap People.
- Choose who can call or message you even when DND is active.
- You can select specific contacts or groups.
Allowing Notifications from Apps
Some apps might be essential, like alarm or health apps, and you want their notifications to come through even in DND mode.
- Navigate to Settings > Focus > Do Not Disturb.
- Tap Apps.
- Add or remove apps that can send notifications during DND.
Setting Up Automatic Rules for Do Not Disturb
Beyond scheduling, you can set specific rules that activate DND automatically based on situations.
Options for Automation
- During a calendar event — to silence notifications when you have a meeting scheduled.
- At bedtime — to enable it during sleep hours.
- When you’re traveling — to mute alerts during flights or trips.
To set these up:
- Open Settings and go to Focus > Do Not Disturb.
- Tap Add Schedule or Automation.
- Select the condition, such as time, location, or app activity.
- Customize further options as needed.
This way, your iPhone automatically reduces distractions without you needing to activate DND manually.
Using Focus Modes Alongside Do Not Disturb
In newer iOS versions, Apple introduced the Focus feature, which allows you to create different modes like Work, Sleep, or Personal. Each mode can have its own Do Not Disturb settings, making it more flexible.
Creating a Custom Focus Mode
- Open Settings > Focus.
- Tap + to create a new focus mode.
- Name it (e.g., ‘Study Time’, ‘Workout’).
- Customize notifications, calls, and apps allowed during this mode.
- Set a schedule or automation if desired.
When you activate a specific Focus mode, it adjusts your DND preferences automatically, helping you stay undisturbed in different situations.
Tips for Making the Most of Do Not Disturb Mode
Using Do Not Disturb effectively means understanding some best practices.
Be Careful with Repeated Calls
- If someone calls twice in quick succession, DND can be set to let that call come through as an emergency exception.
- This feature helps you not miss urgent calls while ignoring less important notifications.
Review Your Allowed Contacts
- Regularly check your allowed contacts list to ensure only important people can reach you during DND.
- This helps avoid missing critical calls or messages.
Use DND for Focus or Rest
Activate DND when working on a project, relaxing, or sleeping. Turn it off when you’re available again to catch up on communications.
Common Troubleshooting of Do Not Disturb Issues
Sometimes, DND doesn’t behave as expected. Here are some tips:
- Check if DND is scheduled or manually turned on — sometimes it’s active unintentionally.
- Ensure that your device isn’t in a Focus mode that overrides DND settings.
- Update your iOS; newer versions fix bugs related to Focus modes.
- Review allowed contacts and apps to make sure essential notifications aren’t blocked.
Understanding how to manage your Do Not Disturb settings makes your iPhone a better tool for communication and focus. Whether you need silence during meetings, rest, or personal time, customizing DND ensures you control your notifications without missing important calls or alerts.
Frequently Asked Questions
How can I schedule Do Not Disturb to activate automatically at certain times?
To schedule Do Not Disturb on your iPhone, open the Settings app and tap on “Focus” or “Do Not Disturb.” Then, select “Add Schedule” or “Set a Schedule.” Choose the days and times you want the setting to turn on automatically. This feature helps you avoid interruptions during specific periods, such as sleep hours or meetings.
Can I allow certain contacts to bypass Do Not Disturb mode?
Yes, you can set exceptions for specific contacts. In the Focus or Do Not Disturb settings, select “People” and then “Allowed Notifications.” Here, you can add contacts whose calls or messages will come through even when Do Not Disturb is active. This way, you stay accessible to important contacts without being disturbed by others.
What is the difference between Manual and Scheduled Do Not Disturb activation?
Manual activation requires you to turn on Do Not Disturb whenever you want to silence notifications, giving you immediate control. Scheduled activation, on the other hand, automatically turns on Do Not Disturb during specific times you set. Manual mode offers flexibility for temporary needs, while scheduled mode is useful for routine periods like overnight or work hours.
How do I customize the notifications that appear during Do Not Disturb?
To customize notifications during Do Not Disturb, go to Settings > Focus > Do Not Disturb. Tap on “Apps” or “People” to allow notifications from certain apps or contacts. You can also adjust the appearance of banners, sounds, and vibrations in the notification settings to ensure you only receive alerts that matter to you while the mode is active.
Is it possible to temporarily disable Do Not Disturb without turning it off completely?
Yes, you can temporarily disable Do Not Disturb by accessing the Control Center. Swipe down from the top-right corner (or swipe up from the bottom on older models), then tap the moon icon to toggle it off. This action turns off silent mode instantly without changing your scheduled settings, allowing notifications to come through again temporarily.
Final Thoughts
The do not disturb iPhone setting helps you manage interruptions effectively, ensuring peace when needed. Adjust it to suit your schedule or preferences, and enjoy uninterrupted focus. Using this feature keeps notifications at bay during crucial moments. Ultimately, understanding how to utilize the do not disturb iPhone setting allows you to control your device’s notifications effortlessly and maintain your peace of mind.
Similar Posts