How to Optimize Windows for 4K Monitor
If you just plugged in a 4K monitor and everything looks either tiny, blurry, or locked to 30Hz, you're not alone. Learning how to optimize Windows for a 4K monitor comes down to getting four things right: resolution, refresh rate, scaling, and color format. Miss one of them and the whole experience falls apart.
Most real-world setups don't hit all four out of the box. Aggregate user reports and display forums confirm that default configurations frequently fail to achieve advertised specifications, particularly when bandwidth limitations or incorrect cables are involved. Below, we'll walk through exactly what to check and how to fix it.
Quick Answer
Set your resolution to 3840×2160 in Windows display settings. Adjust scaling to 150% for 27-inch screens or 125-150% for 32-inch. Use DisplayPort 1.4 or HDMI 2.1 to unlock high refresh rates.
Enable ClearType and set your GPU to full RGB 4:4:4 output.
Why Your 4K Monitor Looks Wrong on Windows (And How to Fix It)
Here's the thing about 4K monitors on Windows. The panel is almost never the problem. The issue is somewhere in the signal chain between your GPU and the display, and Windows defaults to safe but underwhelming settings.
The most common culprits:
- Windows set scaling to 100%, making text microscopic at typical 4K panel sizes
- The cable or port caps your refresh rate at 30Hz, making everything feel sluggish
- Chroma subsampling is enabled, which smears fine text and color edges
- HDR is on when it shouldn't be, washing out SDR desktop content
- A legacy app ignores system scaling, rendering blurry or incorrectly sized windows
These are all fixable. Each one requires a different setting in a different place, which is why people get stuck. Let's start by identifying your specific problem before we go fixing things you don't actually need to touch.
Quick Diagnostic: Identify Your Specific Problem First
Before you change anything, take five minutes to see what's actually happening. This saves you from fiddling with settings that are already correct.
Check your connection type and cable
Open Settings > System > Display > Advanced display settings. Look at the display adapter properties and note what it says next to the output. If it says HDMI, check the HDMI version in your GPU driver panel.
If it's HDMI 2.0, you're bandwidth-limited.
Also check whether your cable is certified for the right spec. A cable that came bundled with a monitor in 2018 might only handle HDMI 1.4, which absolutely cannot do 4K60 at full RGB.
Check what resolution and refresh rate Windows is actually using
Head to Settings > System > Display > Advanced display and look at the listed resolution and refresh rate.
- Resolution should read 3840 × 2160
- Refresh rate should match your monitor's spec (60Hz, 120Hz, 144Hz, etc.)
If you see 1920×1080 as the resolution, Windows didn't detect your panel correctly. If you see 30Hz as the refresh rate, your cable or port is the bottleneck.
Check your current scaling percentage
Go to Settings > System > Display and look at the Scale dropdown. Windows recommends a value based on panel size and resolution. But Windows doesn't always get it right.
Here's a quick reference:
| Screen Size | Recommended Scaling | Pixel Density (PPI) |
|---|---|---|
| 24-inch 4K | 175-200% | ~184 |
| 27-inch 4K | 150-175% | ~163 |
| 32-inch 4K | 125-150% | ~138 |
| 43-inch 4K | 100-125% | ~103 |
If you're sitting at 27 inches reading this at 100%, no wonder your eyes hurt. Let's fix the scaling next.
The Decision Tree: What to Optimize Based on Your Situation
Not every 4K setup needs the same optimizations. Here's how to figure out what matters for your specific use case.
You're using your 4K monitor for office work and productivity
Priority order: scaling, ClearType, refresh rate, color.
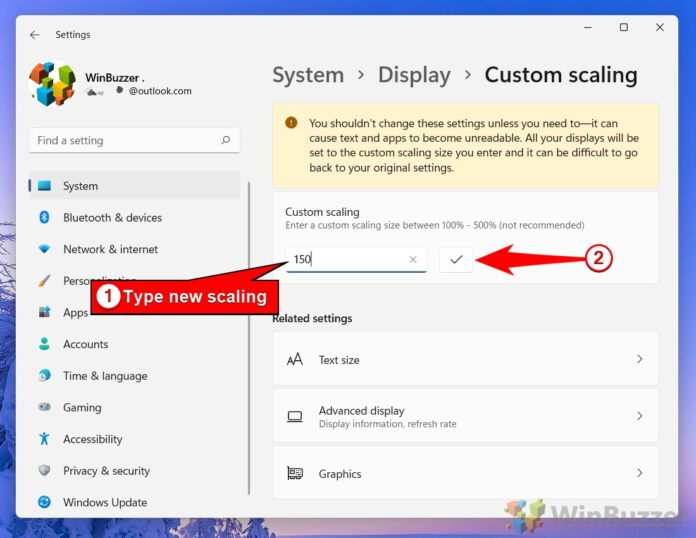
You want text to be crisp and readable all day. Set scaling to 150% (27-inch) or 125-150% (32-inch). Run the ClearType tuner to optimize subpixel rendering for your specific panel type.
Refresh rate matters less here; 60Hz is perfectly fine for desktop work. Color accuracy is not critical unless you're doing photo editing.
You're using your 4K monitor for gaming
Priority order: refresh rate, resolution, color depth, scaling.
You need your refresh rate unlocked first. A 144Hz monitor stuck at 60Hz is leaving performance on the table. Check your cable and port as described above, then select the highest available refresh rate in Advanced display settings.
Scaling stays at 100-150% depending on game UI preferences. In your NVIDIA Control Panel or AMD Adrenalin, force the color depth to 10-bit if your GPU supports it and confirm 4:4:4 chroma.
You're using your 4K monitor for creative work (photo/video/color-critical)
Priority order: color accuracy, color format, scaling, resolution.
You need full RGB 4:4:4 output with correct bit depth. Go into your GPU control panel and confirm the digital color format is set to "Full RGB" or "PC Standard (Full RGB)" with 10-bit color if supported. Set the monitor to sRGB emulation mode if it offers that option, this prevents oversaturation that misleads your editing decisions.
Then, calibrate ICC profiles using a hardware colorimeter like a Calibrite ColorChecker Display. Without hardware calibration, your eyes cannot reliably judge accuracy. Disable HDR for SDR content work; Windows HD Color settings should have HDR toggled off when you're editing SDR material.
You're running a multi-monitor setup with mixed resolutions
Priority order: per-monitor scaling, DPI behavior, alignment.
This is where most people hit their worst scaling bugs. When one monitor is 4K and the other is 1080p, you have a ~83 PPI panel next to a ~163 PPI panel. Windows has to scale each differently.
In Windows 11, go to Settings > System > Display, click the specific monitor thumbnail, then set its scaling independently. This works well on Windows 11, but Windows 10 has known issues with mixed DPI. If you're on Windows 10, consider updating to Windows 11 for this reason alone; its per-monitor DPI handling is substantially improved.
For per-application fixes on Windows 10, right-click the executable > Properties > Compatibility > "Change high DPI settings" > check "Override high DPI scaling behavior" and select "System (Enhanced)" from the dropdown. This forces bitmap scaling on legacy apps without requiring app-side DPI awareness.
Step-by-Step: Optimize Display Scaling for Sharp, Readable Text
How Windows scaling actually works (and why it breaks)
DPI scaling is supposed to be invisible. Windows increases the effective size of UI elements so that at 150% on a 27-inch 4K panel, text appears the same physical size as it would at 100% on a 1080p panel of the same size, just much sharper.
The problem is that not all applications are "DPI aware." Older software and some current applications don't properly respond to system scaling and get bitmap-stretched, which looks blurry. Others declare themselves as DPI aware but handle it poorly, resulting in cut-off text, overlapping buttons, or misaligned UI elements. This is where most "my 4K monitor looks blurry" complaints actually originate.
The panel is fine; the software simply doesn't scale correctly.
Adjusting scaling in Windows 10 vs. Windows 11
Windows 11:
- Open Settings > System > Display
- Click the monitor you want to adjust (in multi-display setups)
- Under "Scale & layout," select the scaling percentage
- Text and UI resize instantly after a brief flicker
- Important: Sign out and back in for full effect, some apps only respect scaling at login
Windows 10:
- Right-click the desktop > Display settings
- Under "Scale and layout," choose a percentage from the dropdown
- Windows will suggest a value based on your display. That suggestion is usually right for single-monitor setups
- For custom values, click "Advanced scaling settings" and enter a specific percentage (like 175%). Windows needs to be told to apply this to all apps: under "Fix scaling for apps," toggle "Let Windows try to fix so apps are not blurry"
Windows 11 handles mixed DPI far better. When you move a window between a 4K and 1080p display, it recalculates scaling on the fly. Windows 10 falls back to bitmap scaling in the same situation, which causes momentary blurriness or requires a restart to resolve.
Fixing blurry legacy applications with DPI override
For any application that still looks blurry after setting system scaling:
- Navigate to the application's .exe file
- Right-click > Properties > Compatibility tab
- Click "Change high DPI settings"
- Check "Override high DPI scaling behavior"
- From the "Scaling performed by" dropdown, select "System (Enhanced)"
This forces Windows to bitmap-scale the application instead of letting the app handle it (which it clearly isn't doing well). It's not perfect because it technically produces a slightly softer result. But it fixes cut-off UI and misaligned text, which matters more for daily usability.
For Microsoft Office (particularly older versions), this override often resolves blurry ribbon interfaces. For legacy accounting or LOB applications that were designed for 96 DPI, this is almost always necessary.
Running the ClearType text tuner
ClearType is Microsoft's subpixel rendering engine. It exploits the red-green-blue stripe layout of LCD pixels to make text appear sharper than the native resolution would suggest. It needs to be calibrated for your specific panel type because different panels have different subpixel arrangements.
To run it:
- Press Win + S and search for "ClearType"
- Open "Adjust ClearType text"
- Make sure "Turn on ClearType" is checked
- Click Next and walk through the wizard
- At each step, pick the text sample that looks best to you
- Complete all five comparisons and click Finish
The differences look subtle in screenshots, but in person it matters noticeably, especially at smaller font sizes. If you switched monitors or panel types, rerun this. The previous calibration won't match your new display.
Step-by-Step: Correct Resolution and Refresh Rate
Verify you're actually running at 3840×2160
This sounds obvious, but checking saves hours of frustration:
- Settings > System > Display should list 3840 × 2160 under Display resolution
- If the correct option is missing, you likely need a GPU driver update or better cable
- Open your GPU control panel (NVIDIA Control Panel / AMD Adrenalin / Intel Graphics Command Center) and verify resolution there as well
- If both confirm 1080p and 4K isn't listed, the connection negotiation failed. Try a different cable or port
Unlock your monitor's full refresh rate
Your monitor might be 120Hz or 144Hz capable, but Windows doesn't always select the maximum by default.
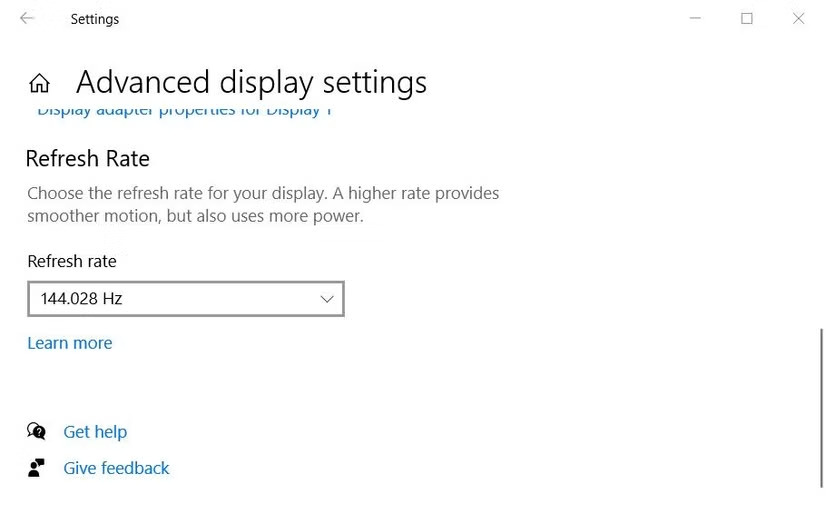
Here's how to check and fix it:
- Settings > System > Display > Advanced display settings
- Under "Refresh rate," open the dropdown
- Select the highest available rate
- If your maximum is missing, you're hitting a cable or port bandwidth limit
Then confirm via your GPU panel:
- NVIDIA: NVIDIA Control Panel > Change resolution > select refresh rate
- AMD: AMD Adrenalin > Display > toggle "Custom Resolutions" if needed
- Intel: Intel Graphics Command Center > Display > General Settings > Resolution and Refresh Rate
When you're stuck at 30Hz (and how to fix it)
A 30Hz refresh rate makes even mouse movement feel like you're wading through mud on desktop. This is almost always a connection issue.
Common causes:
- HDMI 2.0 at 4K60 4:4:4: Needs 18 Gbps, HDMI 2.0 maxes out at 18 Gbps theoretically but many implementations can't sustain it. Switch to DisplayPort.
- HDMI 1.4: Maxes out at 4K30. Upsgrade your cable to certified HDMI 2.1 or use DP 1.2+.
- Using a USB-C hub that only mirrors at 30Hz: Many cheaper USB-C hubs only support DP Alt Mode at half bandwidth. Check the hub's specs for "4K60" support specifically.
- Wrong port on your GPU: Some GPUs have mixed HDMI/DP generations across different ports. Check your manual.
If you're on a laptop without DisplayPort, a USB-C to DisplayPort cable is the most reliable path to 4K60+. USB-C Alt Mode carries native DisplayPort signal, which bypasses HDMI bandwidth constraints entirely. Just verify your laptop's USB-C port supports DP Alt Mode (most modern Intel/AMD laptops do, but some budget models only support data + charging).
Step-by-Step: Color Depth, Chroma Subsampling, and HDR
Fix washed-out or blurry colors with correct color format settings
This is the setting most people don't know exists, and it causes more 4K display problems than it should.
Your GPU outputs color in a specific format. If the format doesn't match what the desktop expects, you get crushed blacks, washed-out colors, or blurry text edges.
Here's what to check:
- Open NVIDIA Control Panel (or AMD Adrenalin / Intel Graphics Command Center)
- Navigate to Display > Change resolution (NVIDIA) or Display > Color (AMD)
- Look for "Output color format" and "Output color depth"
Set these values:
| Setting | Correct Value for Desktop Use |
|---|---|
| Color format | RGB (Full / PC Standard) |
| Color depth | 8-bit (or 10-bit if monitor supports it) |
| Dynamic range | Full (not Limited / 16-235) |
If "Limited" range is selected, blacks look gray and whites look dim. Video content sometimes looks correct in Limited range because TV standard expects it, but desktop use demands Full range. If you see "YCbCr" options, avoid those for general use.
YCbCr with 4:2:0 or 4:2:2 chroma subsampling is for bandwidth saving, not fidelity.
For AMD users: Adrenalin labels the depth and range separately. Set pixel format to "RGB 4:4:4 Pixel Format PC Standard (Full RGB)." For Intel: Look under "Color Format" in Intel Graphics Command Center, select RGB and Full range.
Enable HDR properly without ruining your SDR content
HDR on Windows has gotten better since the Windows 11 2022 and 2024 updates, but it still requires a specific chain to work correctly.
The requirements for HDR to function properly:
- Monitor with genuine HDR capability (HDR10 at minimum, not just "HDR compatible")
- GPU that supports HDR output (generally HD Graphics 630+, RX 470+, GTX 900 series or newer for most display use cases)
- Correct cable carrying the right signal
- Windows HDR toggle turned on in Settings > System > Display > HDR
Once HDR is enabled, you need to calibribrate the SDR content appearance within HDR mode. Windows renders SDR content in an HDR signal, and by default it can look dim or desaturated. In the HDR settings page, drag "SDR content brightness" up until desktop apps look correct at 4K resolution.
Typically this needs to be set between 40-60 for comfortable desktop use, depending on your monitor's peak brightness capability.
Good HDR monitors hit at least 600 nits peak brightness. Many budget "HDR" panels only reach 300-350 nits, which cannot deliver good HDR performance for video as intended. On budget HDR, we recommend leaving HDR off and using SDR mode.
There is no benefit to running fake HDR; it introduces tone mapping artifacts without brightness impact. HDR is like surround sound at low volume: it loses its impact entirely.
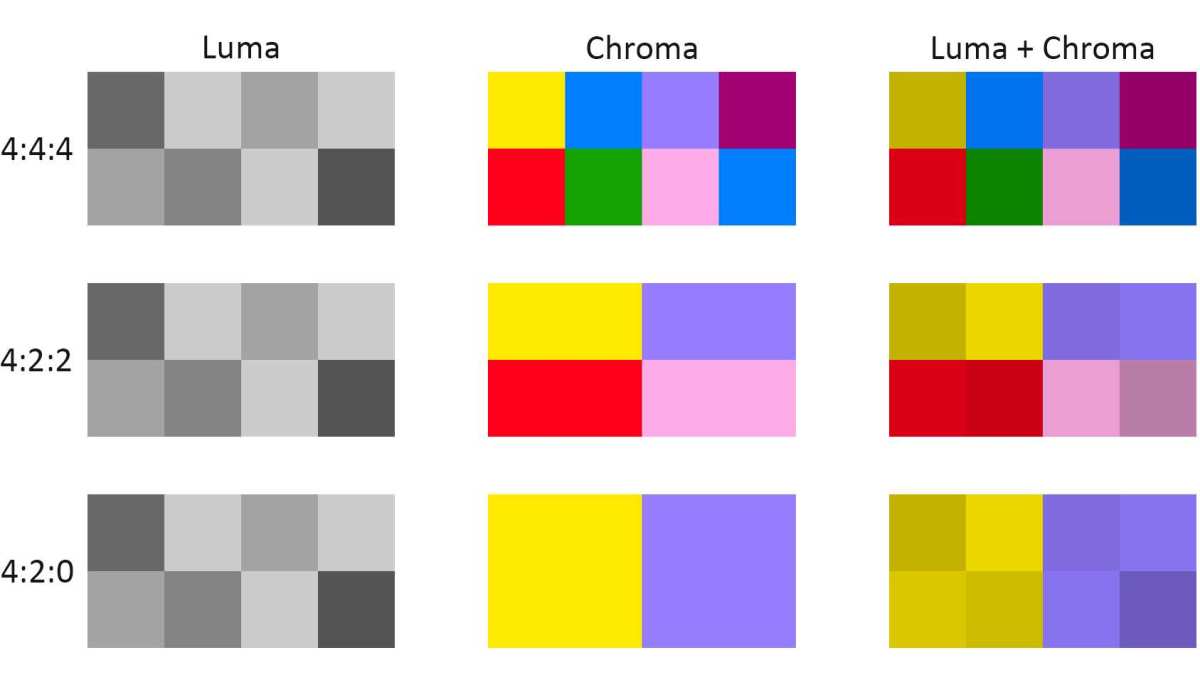
The image above illustrates the same text displayed with different chroma subsampling levels; notice how 4:4:4 maintains clear edges while 4:2:0 softens all pixel boundaries.
How to check if chroma subsampling is killing your text clarity
The classic test is to display small colored text on a contrasting background. If the edges of each letter look fuzzy or rainbow-fringed, you're dealing with chroma subsampling from a limited-bandwidth connection. Switching to a high-quality certified DisplayPort 1.4 or HDMI 2.1 cable will resolve this in most cases.
If the problem shrinks with a shorter cable built to the correct spec, your previous cable was either too long or too old for the required bandwidth.
Another check: visit testufo.com/chromasubsampling on your browser. The site shows a specific test pattern that makes chroma subsampling immediately visible. You should see all edges sharply rendered with each color channel crisply defined in your desktop and video use.
Common Mistakes That Ruin 4K Monitor Performance
Mistake #1: Scaling set to 100% at 27 inches or smaller
At 100% scaling on a 27-inch 4K panel, text renders at roughly 163 pixels per inch. That density is physically very small. Your eyes strain.
You lean in. You eventually get headaches that you blame on the monitor instead of the setting. The fix is straightforward: select 150% scaling in Display Settings.
Windows and most modern applications handle 150% scaling cleanly. The small hit to usable desktop space from higher scaling is worth the comfort gain for most people
Mistake #2: Using HDMI 2.0 cable and wondering why 144Hz doesn't work
HDMI 2.0 has 18 Gbps of bandwidth. At 4K resolution, 60Hz is achievable but 120Hz requires chroma subsampling that degrades text clarity. For 4K at 120Hz or 144Hz on a PC monitor, use a DisplayPort 1.4 or HDMI 2.1 cable instead.
Both have the bandwidth to handle 4K high-refresh without compromise. We recommend certified cables to avoid intermittent handshake failures that can blank your display
Mistake #3: Enabling HDR on an SDR-only monitor or without proper pipeline
Many monitors claim "HDR support" in marketing but cannot display wide-gamut or high-contrast content with actual impact. Turning on Windows HDR with these displays forces sent SDR content through a tone-mapping shader that can wash out blacks and create banding in gradients. This makes many games and design tools look worse than in SDR mode.
If your display only supports HDR10 without local dimming, turn off the feature for everyday design tasks, or stick with the sRGB colour profile to prevent clipped highlights and muted colours
Mistake #4: Ignoring per-monitor DPI behavior in multi-display setups
When you run a 4K display alongside a 1080p panel, some applications may draw their text and toolbars at a single DPI value. Re-anchoring the window between halves sometimes fixes blurriness until the next launch. A quick compatibility toggle, as described in the DPI override section, often resolves the mismatch.
Keeping all panels at a similar physical pixel density is even better for a smooth multi-tasking workflow
Mistake #5: Not updating GPU drivers after a major Windows update
Major Windows feature updates can reset monitor settings or confuse the EDID handshake. Install the latest drivers from your graphics vendor's website to restore recommended scaling, resolution, and colour depth. Recent releases from as late as 2026 still contain scaling-related fixes and performance tuning that smooth out everyday desktop responsiveness and full-screen HDR transitions.
Mistake #6: Using "Recommended" scaling when it's wrong for your panel size
"Recommended" assumes a standard desk setup of 19 to 29 inches at the listed DPI. For users who work closer or prefer larger interface elements, increase scaling by 25% increments. For users who prioritize screen real estate at 32 inches or above, drop it to 100% for sharper multi-pane layouts.
Test the sweet spot while browsing a well-formatted website or your usual editing application
Side-by-Side: Settings Comparison by Use Case
Office/productivity optimal settings
| Setting | Recommended Value |
|---|---|
| Resolution | 3840 × 2160 |
| Scaling | 150% (27") / 125% (32") |
| Refresh rate | 60Hz |
| Color format | RGB Full 4:4:4 |
| Bit depth | 8-bit |
| HDR | Off |
| ClearType | Enabled, tuned |
Gaming optimal settings (performance vs. quality)
| Setting | Recommended Value |
|---|---|
| Resolution | 3840 × 2160 |
| Scaling | 100-150% (in-game, not desktop) |
| Refresh rate | Maximum supported |
| Color format | RGB Full / YCbCr 4:4:4 if needed |
| Bit depth | 8-bit or 10-bit if supported |
| HDR | On, if monitor has genuine HDR capability |
| Adaptive sync | On (G-Sync / FreeSync) |
Gaming optimal settings (competitive FPS)
| Setting | Recommended Value |
|---|---|
| Resolution | 3840 × 2160 (or lower for frame rate) |
| Scaling | Not applicable, handled in-game |
| Refresh rate | Maximum |
| Color format | RGB Full |
| Bit depth | 8-bit (performance priority) |
| HDR | Off |
| Adaptive sync | Off or On depending on frame rate consistency |
Photo/video editing optimal settings
| Setting | Recommended Value |
|---|---|
| Resolution | 3840 × 2160 |
| Scaling | 150% |
| Refresh rate | 60Hz, HDR 10-bit |
| Color format | RGB Full |
| Bit depth | 10-bit (in GPU panel) |
| HDR | Off for SDR work / On for HDR mastering |
| Calibration | ICC profile via hardware colorimeter |
Real Scenarios: Specific Fixes for Common Hardware Combos
Scenario: 27-inch 4K monitor on integrated Intel graphics
Intel UHD 630 and newer integrated graphics handle 4K60 over DP 1.2 or HDMI 2.0. If you're stuck at 30Hz, your laptop likely routes HDMI through a limited pinout. Use a USB-C to DisplayPort cable instead of HDMI, which bypasses the routing limitation and gives you a native DP signal through the USB-C Alt Mode pinout.
Scenario: 32-inch 4K 144Hz on NVIDIA RTX 30/40 series with DisplayPort
You must use DisplayPort 1.4 with DSC (Display Stream Compression) to achieve 4K144 with full RGB 4:4:4 and 10-bit color. Enable DSC in the monitor's OSD if there's an option, then set the refresh rate in NVIDIA Control Panel. For gaming at 4K, lower in-game resolution scaling to 85-90% if frame rates cannot match the monitor's refresh.
Scenario: Laptop docked to 4K monitor via USB-C/Thunderbolt
Verify the dock's specs before troubleshooting with the display settings. Many popular USB-C docks and hubs support 4K30 only while claiming "4K support." A Thunderbolt 4 dock with DP 1.4 tunneling, on the other hand, can drive 4K60 with full chroma accuracy. If you cannot get the correct refresh rate, connect directly to the laptop's USB-C port first to isolate the dock as the bottleneck.
Scenario: Dual-monitor setup with one 4K and one 1440p
Set the 4K to 150% scaling and the 1440p to 125% for a similar interface size. Per-monitor DPI adjustments in Windows 11 keep each display independent. If applications still misbehave when dragged across, disable display scaling on the high-DPI display temporarily and use a global resolution step, then re-enable after testing.
A clean driver install often resolves mismatched DPI behavior across dual displays.
Calibration and Long-Term Maintenance
When to recalibrate
You might need to adjust ClearType if you swap to a different panel technology that uses a new subpixel layout. Color accuracy calibration should be performed monthly for professional photo and video work, or at least annually for general use. Any major Windows update deserves a quick check on your scaling and refresh rate settings, as these can occasionally revert to defaults.
Keeping settings stable across driver updates
Before installing downloads from your GPU manufacturer's website, note your custom resolution and refresh rate settings in case they are removed. Export custom color profiles as .icc files so you can restore them without hunting through old menus. Avoid using "Express Install" because it can replace your saved settings with the default options.
Monitor firmware updates worth checking
Many display issue complaints are resolved with a firmware update that fixes EDID tables. Check the support page of the manufacturer to see if a newer BIOS-style package is available. Applying the update usually requires a USB cable to the monitor's service port or a download that runs via the included utility over USB.
Frequently Asked Questions
Do I need a special cable for 4K gaming?
Yes, for 4K60 with full RGB 4:4:4 chroma you'll need at least an HDMI 2.0 cable or a standard DisplayPort 1.2 cable, both of which support the full signal at 8-bit color. For 4K120 and beyond, an HDMI 2.1 or DisplayPort 1.4 cable is mandatory to achieve the extra pixel throughput.
Why does my 4K monitor look blurry at 100% scaling?
The panel shows pixel-perfect content at 100%, but as the pitch gets small (around 163 ppi on a 27-inch display) the on-screen text feels uncomfortable for reading. Most scaling recommendations suggest increasing to 125, 150%. If edges still appear fuzzy after you adjust, the ClearType tuner utility can optimize small-text sharpness, or a legacy app may need its compatibility override set to "System (Enhanced)."
Should I use HDR for everyday desktop work?
Only if your display meets the real HDR brightness threshold of around 600 nits. On typical SDR office monitors, enabling HDR can flatten contrast and wash out white backgrounds, making long reading sessions more tiring. The Windows HDR pipeline is better suited for media playback with supported content.
Can I run 4K 144Hz on any GPU?
You'll need at least a DisplayPort 1.4 output with DSC support for 4K144 at full RGB 4:4:4 8-bit when using cables that do not require DSC fallback. NVIDIA's GeForce GTX 10-series and newer, along with AMD's Radeon RX Vega and newer, support a wide range of refresh rates and chromas on modern drivers. Some older GPUs can reach 120Hz with 4:4:4 by dropping to 8-bit or using DP 1.4 without DSC if the rates fit within raw bandwidth.
Why do some apps look blurry after I change scaling?
Applications written without per-monitor DPI awareness in legacy models rely on bitmap stretching when the system applies a scale factor larger than 100 percent. To fix this, right-click the executable, open the Compatibility tab, click "Change high DPI settings," and select the "System (Enhanced)" override. This can solve blurry rendering in older productivity apps and some plugins that ignore the system DPI mode.
Final Checklist: Before You Optimize
The 5-step optimized 4K setup checklist
Before you start changing settings, run through this quick checklist to make sure your foundation is solid.
1. Cable check: Confirm you're using certified DisplayPort 1.4 / 2.0 or HDMI 2.1 cable. Cheap cables cause the majority of 4K issues.
If you bought a no-name cable online, consider spending US$15 to US$25 on a certified VESA DisplayPort cable as a baseline replacement.
2. Driver check: Install latest GPU drivers from the official NVIDIA, AMD, or Intel download pages. Avoid theones bundled through Windows Update, which may be months outdated and can limit your refresh rate options.
3. Connection check: Plug directly into your GPU, not your motherboard's rear I/O. If using a laptop, confirm whether your USB-C port supports DP Alt Mode by checking the laptop manufacturer's technical specifications.
Many materials mention that USB-C ports with a lightning bolt logo typically indicate Thunderbolt with full Alt Mode support.
4. Monitor OSD check: Verify the monitor's input mode is set to "PC" not "TV" mode. This restricts overscan handling and ensures a 1:1 pixel mapping.
Many displays also let you configure chroma subsampling and color depth from their built-in menu, so it's worth checking if text appears overly soft. Additionally, explicitly enable 16:9 aspect ratio and confirm that the refresh rate is not capped at 30 Hz in the monitor's system settings.
5. Windows settings check: Walk through the four key settings: resolution, refresh rate, scaling, and color format. Confirm each one matches the values in the comparison tables above for your use case.
If you're still seeing issues after this, the problem is likely a specific application's DPI behavior, which you can address with the per-app compatibility override.

Similar Posts