How to Optimize 27 Inch Monitor for Gaming
If you've ever wondered how to optimize a 27-inch monitor for gaming, the good news is that most of the performance and image-quality gains come from settings, not expensive hardware upgrades. Most people just plug it in, leave everything at default, and never touch the on-screen menus again. That's the main reason their games don't look or feel as good as they should.
The catch is that there's no single "best" setup. The optimal settings depend on whether you're running an IPS, VA, or OLED panel and what GPU output you're feeding it. This guide walks you through a research-backed process to work out the best combination of resolution, refresh rate, response time, and adaptive sync for your specific display, so it actually looks and performs the way it was designed to.
Quick Answer
Set your monitor to its native resolution and maximum refresh rate in Windows. Enable adaptive sync in both the monitor's on-screen display (OSD) and your GPU driver. Turn off unnecessary picture processing to cut input lag.
Dial in the response time overdride setting just before visible ghosting appears. Test using a motion test like Blur Busters' UFO Test to verify your final results.
Panel technology makes a big difference in how a 27-inch gaming monitor responds to your games. Most current models use one of three panel types: IPS (in-plane switching), VA (vertical alignment), or OLED. Each has a distinct trade-off between motion clarity, contrast, viewing angles, and response speed.
Your choice of panel technology shapes everything else, the resolution you should pick at 27 inches, the contrast you'll see in dark games, and the response time numbers that actually matter. A VA panel gives you a much deeper native contrast ratio, often around 3000:1, which makes dark scenes look rich. But its slower gray-to-gray response times show more smearing in fast motion.
An IPS panel responds faster across most transitions and keeps colors accurate at off-angles, but its native contrast hovers closer to 1000:1, making blacks look grayish in a dark room. An OLED panel delivers near-instantaneous pixel response and essentially infinite contrast, but it carries burn-in considerations and is typically more expensive as of 2025.
Here's a practical comparison of how the three panel types usually compare:
| Panel Type | Typical Contrast Ratio | Response Time (GtG) | Black Smearing | Best For |
|---|---|---|---|---|
| IPS | 1000:1 to 1300:1 | 3–5ms average across transitions | Low, though some corner transitions lag | Competitive gaming, color-accurate work |
| VA | 2500:1 to 4000:1 | 4–8ms, with dark transitions often slower | Noticeable in dark scenes | Single-player games, dark room viewing |
| QD-OLED / WOLED | Effectively infinite (per-pixel emission) | 0.03ms to 0.5ms rated | None perceived | Both competitive and cinematic gaming, when budget allows |
Most 27-inch gaming monitors in the current market use IPS at 1440p/165Hz or 4K/144Hz, often with DisplayHDR 400 or 600 certification. VA variants are common around 1440p/144Hz or 165Hz. OLED panels at 27 inches are growing in availability, typically at 1440p/240Hz or 4K/240Hz.
Knowing which panel sits behind your screen tells you what settings to prioritize for optimization.
Setting the Right Resolution, Refresh Rate, and Cable
Your 27-inch monitor's native resolution is the sharpest it can look. Running anything else forces the display to scale, which adds blur and softens text. For most 27-inch gaming monitors, that native resolution is either 2560 x 1440 (1440p/QHD) or 3840 x 2160 (4K/UHD).
A 27-inch 4K panel has about 163 pixels per inch, while a 1440p panel sits near 109 PPI. Some gamers prefer 1080p at 27 inches for a softer, less aliased look in fast-paced titles, or for lower GPU load, but the native resolution remains the default recommendation for image clarity.
After resolution, refresh rate is the most impactful setting for perceived smoothness. A 27-inch gaming panel might offer 144Hz, 165Hz, 240Hz, or even 360Hz. In Windows, navigate to Settings > System > Display > Advanced display settings, and then select the highest rate the monitor reports.
This same value must be selected in your NVIDIA or AMD control panel to lock in the refresh at the operating system level. A mismatch here is one of the most common reasons a brand-new 240Hz monitor appears to run at only 60Hz.
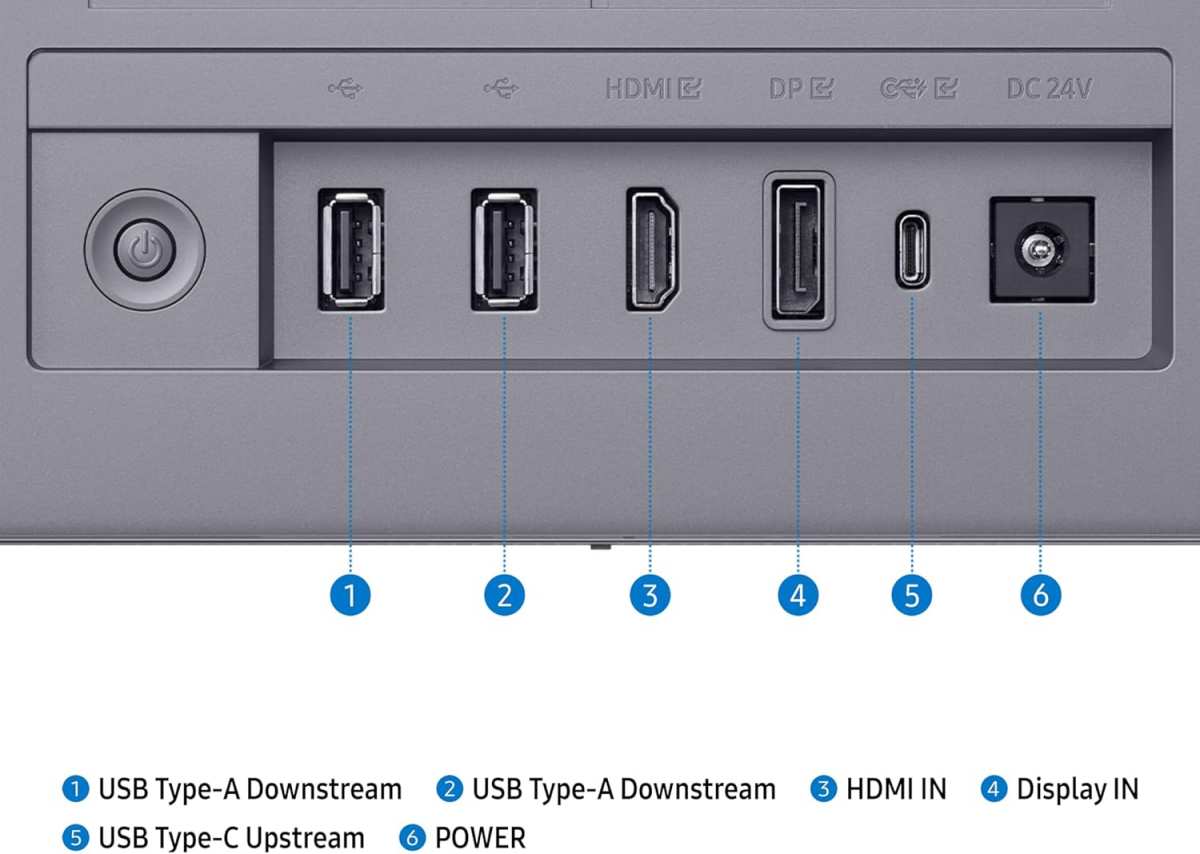
The physical cable and connector you use determine whether that resolution-and-refresh combination can actually be carried. DisplayPort 1.4 with DSC (Display Stream Compression) handles 4K/144Hz 10-bit color without breaking a sweat. HDMI 2.1 does the same for GPUs and monitors that support it.
HDMI 2.0 tops out at 4K/60Hz, which will visibly bottleneck a 144Hz or 165Hz panel if you're using it. For 1440p at 165Hz or 144Hz, both DisplayPort 1.4 and HDMI 2.0 are generally sufficient, but DisplayPort remains the default recommendation for PC gaming compatibility.
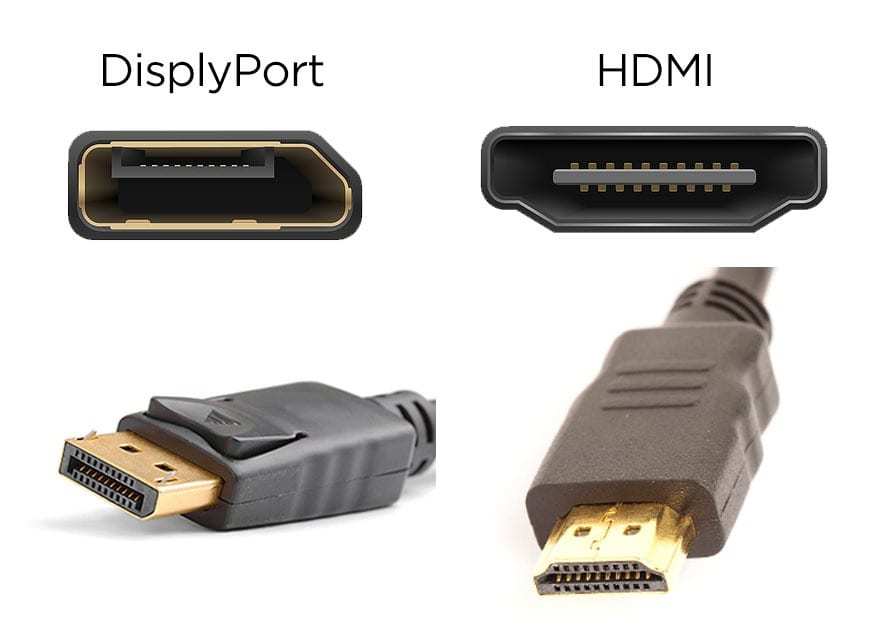
If you want a clean checklist before moving on:
- Confirm the monitor's native resolution is set in Windows Display Settings.
- Confirm the highest refresh rate is selected in Windows Advanced Display Settings.
- Confirm the same refresh rate is set in your NVIDIA or AMD GPU control panel.
- Use a certified DisplayPort 1.4 or 2.1 cable, or an Ultra High Speed HDMI 2.1 cable, for top specs.
Mismatched cables are a surprisingly common cause of flickering, no-signal issues, or sudden fallback to lower refreshs, particularly at 4K. When in doubt, use the cable that came in the monitor's box, as manufacturers typically include a cable rated for the panel's full specification.
Adaptive Sync: How to Turn It On Correctly and Actually Verify It's Working
Adaptive sync is probably the single most noticeable gaming quality feature you can enable on a modern display. It synchronizes your monitor's refresh to your GPU's frame output, eliminating screen tearing without the input lag penalty of V-SYNC. The two brand names you'll see are NVIDIA G-Sync Compatible and AMD FreeSync (including FreeSync Premium and FreeSync Premium Pro for HDR-tier performance).
Most current 27-inch gaming panels support both protocols natively, but the setup requires you to enable it in two places.
In the monitor's OSD, look for a setting named something like "Adaptive-Sync," "FreeSync," "G-Sync Compatible," or simply "VRR." Turn it on there first. Then, in the NVIDIA Control Panel, open "Set up G-SYNC" and tick "Enable G-SYNC, G-SYNC Compatible" and the checkbox for your specific display. For AMD drivers, head to Settings > Display and toggle "AMD Radeon FreeSync" on for that display.
Here's the part most people miss: verify it's actually working. NVIDIA provides a built-in "G-SYNC Indicator" under Display in the control panel. Turn it on, launch a game, and watch for a floating "G-SYNC" label in the top-right corner of the display.
Without that confirmation, adaptive sync may appear to be on in the panel OSD but be inactive at the driver level due to a conflicting V-SYNC setting or windowed mode.
A few additional points matter. Your frame rate should stay within the monitor's adaptive sync range (typically around 48Hz to the panel's maximum refresh, though this varies by model, some supporting a range as wide as 1Hz to 240Hz). When you dip below the minimum, Low Framerate Compensation (LFC) automatically multiplies frames so the display stays in its adaptive sync window, but only FreeSync Premium, FreeSync Premium Pro, and G-Sync Compatible displays that meet NVIDIA's LFC criteria include this feature.

NVIDIA recommends leaving V-SYNC on in the driver (NVIDIA Control Panel globally or per-game) with G-Sync active, but turning V-SYNC off in individual game engines. This configuration lets the driver handle frame delivery at the top of the refresh range without the input spike seen when an in-engine frame limiter engages late. If you prefer to cap frame rates manually, use NVIDIA's Max Frame Rate setting or the in-engine limiter set 2, 3 FPS below the panel's maximum refresh, such as 162 FPS on a 165Hz display.
That keeps adaptive sync in its steady state where variable overdrive can do its job.
Response Time Overdrive: Finding the Sweet Spot Without Ghosting
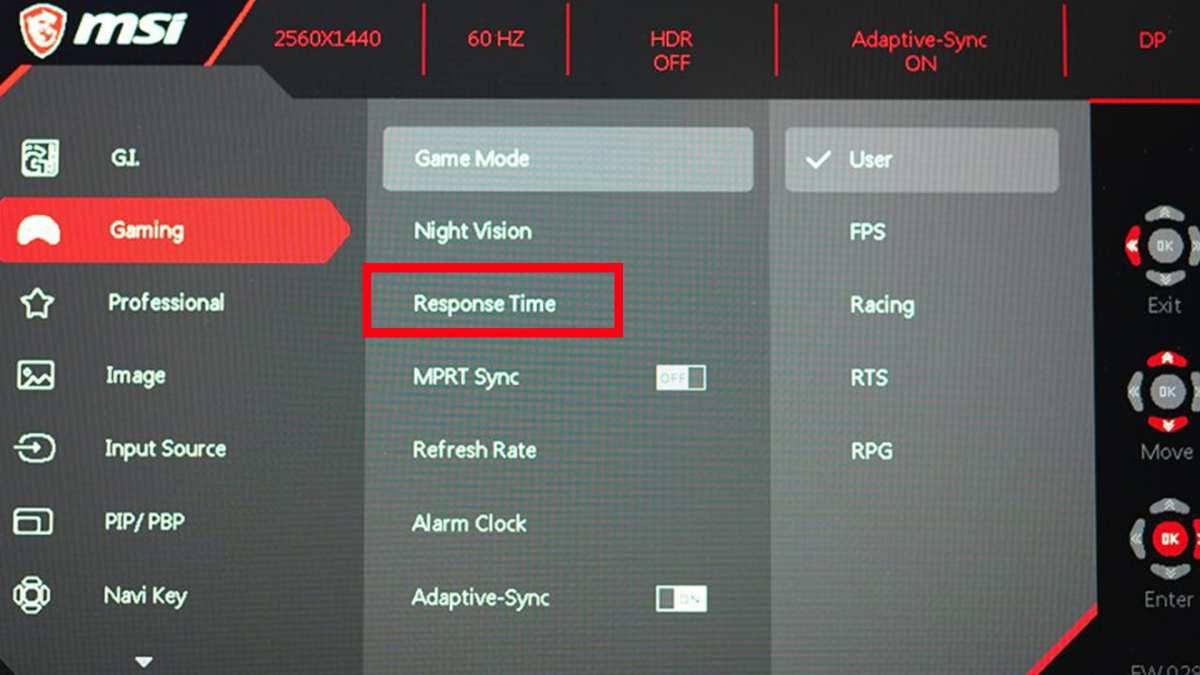
Response time overdrive is the setting that controls how aggressively the monitor's firmware pushes voltage to change pixel states faster. Without overdrive, most panels can't keep up with their own refresh cycle, resulting in a soft, persistent blur. With too much overdrive, pixels overshoot their target color and create a bright reverse ghost trail that's arguably worse than the blur itself.
In a 27-inch monitor's OSD, this setting typically appears as "Response Time," "Overdrive," "OD," or "Trace Free" (on some models). It's usually offered in 3 to 5 steps, from "Off" to "Extreme." The highest setting almost always produces visible overshoot at the cost of minimal actual motion clarity gain.
Manufacturer names vary, but the practical bracket generally follows a pattern like: Off / Normal / Fast / Faster / Extreme. The setting you want lives somewhere around the middle, "Normal" or "Fast" on most IPS panels, "Fast" or "Faster" on VA panels, with OLEDs often managing this internally without user-selectable overdrive controls. Moving one step above the lowest acceptable setting shortens the visible trailing without introducing the pale halos that overshoot creates.
Testing the right value yourself hits faster aggregate results than a static recommendation. Open Blur Busters' UFO Test (testufo.com) in your default browser, make sure the page is actually running at your panel's refresh number, then cycle through the overdrive values one at a time. The correct setting shows the least amount of bright inverse ghosting behind the moving UFO icons while still keeping the trailing reasonably tight.
On many typical 144Hz or 165Hz IPS panels, that puts the sweet spot at the middle tier of the overdrive menu.
When adaptive sync is enabled, overdrive behavior can shift as the refresh rate changes across sessions at different frame rates. Some higher-end monitors include "variable overdrive," which adjusts the driving voltage dynamically based on the current refresh to keep response times consistent across the adaptive sync range. If your display has that feature, enabling adaptive sync may slightly adjust what you set here but usually does so within a workable range, the Blur Busters tester still applies for confirmation.
A few final practical notes. The "Off" setting almost never makes motion appear at its best, letting the slower native pixel response show through. The highest setting, with trail artifacts comparable to OLED burn-in in reverse, is better left alone.
If you ever change your monitor's resolution or refresh, recheck the overdrive combination, because the driving curve that looked fine at 165Hz can appear softer or noisier at a lower refresh without competing against a different frame cadence.
OSD Game Settings That Help vs. Settings That Just Add Lag
The on-screen display on a 27-inch gaming monitor contains dozens of adjustable settings, but most of them exist to compensate for poor panel uniformity or to make a demo unit look punchy on a retail shelf. Several of those settings also insert varying amounts of processing delay, adding input lag directly at the display's hardware stage where you can't offset it elsewhere. Learning which ones to turn off (or leave alone) and which ones genuinely improve gameplay makes a measurable difference, especially if you play competitive titles.
Game Mode and input lag mode settings, typically offered as a single switch on current monitors, almost always exist to strip out the picture processing pipeline. When "Game Mode" is active, the monitor can bypass extra color mapping, noise reduction, and dynamic contrast before the signal reaches the display's active matrix. Per manufacturer specs, enabling this mode on a typical 27-inch gaming panel can reduce total display lag by 5ms to 15ms compared to the standard "Movie" or "sRGB" mode, which otherwise runs those transforms in sequence.
The other common bracket of settings to evaluate sits between dynamic contrast, edge enhancement or "sharpness," and blue-light filtering. Dynamic or "active" contrast crushes dark-detail visibility and often visibly shifts the black level in actual gameplay based on a rolling frame-average, which can obscure enemy movement in load-out corners. Edge enhancement sharpens edges using post-processing that adds ringing artifacts on text and HUD outlines.
Both of these add input latency on top of disturbing genuine visibility. Blue-light filters (often named "Low Blue Light" or "Eye Care") warm the color temperature and reduce the screen's overall brightness, which makes subtle image detail harder to perceive; they also can add a small, measurable delay on some panels because the additional color-space conversion is processed live.
Here's a scan-through table of the most common OSD adjustments, which ones to leave on and why, and the reason agile options usually help competitive play.
| OSD Setting | Recommended for Gaming | Reason |
|---|---|---|
| Adaptive-Sync / FreeSync / G-Sync Compatible | Enable | Removes tearing, minimal added lag |
| Game Mode / Low Input Lag | Enable | Bypasses processing pipeline |
| Response Time (Overdrive) | Set to manufacturer-sweetest spot | Reduces motion blur |
| Sharpness | Keep at or near 0 (default) or 50 depending on scale | High sharpness creates edge-artifacts that hide outlines |
| Dynamic Contrast / ACR | Disable | Crushes dark detail, introduces shifting lag |
| Noise Reduction | Disable | Adds processing lag, potentially masks distant enemies |
| Super Resolution / Upscaling | Disable | Designed for low-res video sources, not live rendering |
| Blue-Light / Eye Care | Disable unless subjectively preferred | Warms tones, reduces contrast, can add lag |
Once the post-processing clutter is off, one additional setting worth enabling is the Black Equalizer or Shadow Control feature offered on many current 27-inch panels. This function brightens the deepest zones of the image without exposing the mid-tone contrast range, making it easier to see enemies in dark areas of a map without washing out the rest of the scene. The setting operates on the black-level clipping point of the panel's tone-response curve, so it tends to add measurable lag on some older models, but current mid-range and higher boards handle it without visible delay being added.
A typical Black Equalizer value between 4 and 6 allows better spotting in maps with dark corners, and a setting of 10 or above can start producing noise in the brightest parts of the image, pick a value that works for your usual game titles.
Black Equalizer, Crosshairs, and Visibility Tweaks for Competitive Play
If you play titles like Counter-Strike 2, VALORANT, or Rainbow Six, you're already fighting for every visual advantage. A few OSD features exist specifically to make distant standing targets and concealed angles more legible before your eyes need to adjust. They aren't magic, they're intentional visibility assists designed around tone-mapping curves and front-of-panel elements.
Black Equalizer settings re-balance the panel's gamma at the lowest end of the luminance signal. Standard gamma curve mapping in sRGB space maps values near 0 to extreme dark compression, throwing away detail the player needs. By boosting these near-black code values, the monitor lifts visibility into shadow-containing areas where enemies tend to hide.
The visual cost: normal dark appearance gets lifted too, producing a slightly washed-out feeling even outside of gaming. The practical compromise for many is to leave Black Equalizer off or very low during menu and desktop use and create a custom picture mode, often labeled "FPS" or "Gamer 1", set to the value you want, then manually launch that mode when you enter a match.
Crosshair overlays, typically a small cross or circle pattern rendered directly in the on-screen display buffer, project through the monitor hardware rather than the game engine itself. Because the overlay sits above the displayed image regardless of what's being drawn, it effectively gives you a permanent center reference point without running any screen-capture tool that would perform slower or get banned. The overlay doesn't help everyone; for players who exclusively rely on a game's own crosshair it creates a second center marker that can be distracting.
Many find it most useful on weapons that use spread rather than a precise center image, such as shotguns or full-auto sprays in CS2, where the reference point helps keep general aim direction known. A few tournaments have restricted OSD overlays in on-site rulesets, so if you play competitively it's worth checking your event's rules document before you make it a default for every session.
A third and often-overlooked accessibility for competitive games is the built-in frame limiter tied to G-Sync on NVIDIA Reflex-supported titles, or the related Frame Rate Target Control (FRTC) on AMD, which keeps rendered frames near the panel's maximum visible range. Limiting frames per second up to 2 or 3 frames below the panel refresh reduces the likelihood of a frame window mismatch occurring that would otherwise force the driver into a fallback state where input readings go stale slightly longer. For a 165Hz panel, the sweet spot target sits at 161 or 162 FPS; for a 240Hz panel, around 238 FPS.
Many monitor-specific overclocking tools, including third-party utilities built for an individual panel, allow frame lock target limits within this bracket, capping frame submission without the overhead of an internal in-compositor pacing algorithm.
The last topic before we move onto image clarity features is monitor aspect ratio and IHL scaling behavior. Some tournament-organized titles run 4:3 resolution stretched to fill a 16:9 screen, an old trick that increases opponent width at the cost of horizontal detail. A quick trick: set the monitor OSD's Display Mode to "Full" or "Wide," then force whatever aspect ratio you want from the GPU driver's resolution list, not the monitor's own, so the scaling algorithm preserves pixel sharpness.
On NVIDIA cards, the option sits at "Adjust desktop size and position" > Scaling tab > "No Scaling" or "Aspect Ratio." On AMD, it's Display > GPU Scaling toggle and the linked Mode selection. This keeps the scaling workload on the modern GPU, which applies a cleaner bilinear or nearest-neighbor lookup, instead of the scaler chip inside the panel, which can add a frame's worth of delay on older conversions.
HDR on a 27-inch Gaming Monitor: When It's Worth It and When It Isn't
HDR, specifically the DisplayHDR specifications published by VESA, is one of the more frequently mis-sold features on a typical 27-inch gaming monitor. The confusion comes from packaging: many current displays carry the "DisplayHDR 400" logo and mention "10-bit color" on their box. The physical standard for DisplayHDR 400, however, requires only a 300 cd/m² baseline brightness and does not mandate local dimming zones or the peak luminance that actually delivers a true high-dynamic-range image.
In practice, a DisplayHDR 400 monitor cannot show the nuance in a bright sky compared to SDR mapping, the standard was essentially designed as an entry-level blanketing term for optional HDR signaling support.
Let's put numbers in context. For a normalization level closer to OLED perceivable HDR, the DisplayHDR 1000 spec requires a never-dropping full-screen brightness of at least 600 cd/m² with peak peaks exceeding 1000 cd/m², coupled with a contrast-boosting dimming solution. IPS-based 27-inch panels that actually hit DisplayHDR 600 or 1000 are not common; more widely available in the current market are DisplayHDR True Black 400 panels on OLED models, which, because OLED luminance is self-emitted and not backlight-limited, enable pixel-level luminance contrast that is genuinely more dramatic than an IPS panel at the same specification slot.
For competitive gaming, in general, setting the monitor into its native SDR picture mode and disabling any OS-level "HDR" toggle remains the most consistent input lag setting because performing the additional tonemapping from a GPU driver calibrated to the panel response also adds latency from upstream processing chain complexity-driven frame-rule errors.
If you want to know each tier's minimum display capabilities exactly, the following table aligns the VESA DisplayHDR specification requirements with what each specification criteria points out.
| HDR Tier | Peak Brightness (cd/m²) | Full-Frame Sustained | Color Gamut Requirement | Backlight Control |
|---|---|---|---|---|
| DisplayHDR 400 | ≥ 400 | ≥ 320 | ≥ 95% sRGB | Edge-lit only, no dimming required |
| DisplayHDR 600 | ≥ 600 | ≥ 350 | ≥ 99% sRGB, ≥ 90% DCI-P3 | |
| DisplayHDR 1000 | ≥ 1000 | ≥ 600 | ≥ 99% DCI-P3 | Active, some required zone count for higher brackets |
| DisplayHDR True Black 400 | ≥ 400 peak, OLED native | Relevant below 0.010 cd/m² black | ≥ 99% DCI-P3 | OLED pixel-level |
| DisplayHDR True Black 500 | ≥ 500 peak, OLED native | Relevant below 0.0005 cd/m² black | ≥ 99% DCI-P3 | OLED pixel-level |
For a 27-inch IPS or VA gaming monitor rated specifically at DisplayHDR 400 with an edge-lit backlight, enabling HDR Windows-side often makes colors look desaturated because the panel has no physical dimming machinery to create significant contrast. The more accurate approach is to leave HDR in its off state and instead adjust in-game brightness and monitor black-level control manually. For 27-inch panels built around QD-OLED or WOLED self-emitted technologies that carry DisplayHDR True Black ratings, the discrepancy reverses, Windows HDR sitting on generally improves highlight roll-off and shadow uniformity in compatible games, resulting in a more visibly expansive dynamic range than any SDR mapping available on those specific models.
Enable HDR in games when the monitor specification genuinely supports it, which effectively means panels carrying DisplayHDR 600 certification or above for IPS/VA, and most OLED monitors rated DisplayHDR True Black. For displays that only carry DisplayHDR 400 ratings or specifications stripped of active dimming, turning off the Windows HDR toggle, running games with in-engine SDR brightness calibration menus, and setting the monitor's native OSD input lag mode offer the most direct control without spurious approximation. A handful of people find using Windows "Auto HDR" on supported DirectX 11 or DirectX 12 titles compensates for older SDR-only game engines, but does add a tone-mapping step that can smooth textures differently than intended on OLED panels in particular.
Neither approach is categorically wrong, but if you play high-refresh competitive FPS titles and notice the display's Game Mode indicator disappearing when the HDR toggle is on, that software-assisted condition is itself a measurable pushback on frame-delay budgets, disable it and recalibrate SDR brightness in those titles instead.
Several OLED 27-inch models also carry hardware-level tone-mapping profile switching that recommends HDR be left on at the Windows level permanently and instead switch within the panel's OSD between HDR-10 signal processing modes, typically named HDR10 Game, HDR10 Cinema, or HDR10 Sustain (prioritizing local lifespan). Since updates in firmware versions between 2024 and 2025 on several panels, most of these tone-mapping modes conveniently skip re-negotiating the HDMI or Display port link in active mode and can switch without significant delay. As a result, even though an oscillator can temporarily blank the screen for a fraction of a second during input-negotiation on some panels, switching between Game HDR and Cin-HDR on most new OLED displays now stays responsive to enable life-long mode adaptation.
A final practical note: if you watch SDR content frequently on the same monitor, consider toggling Windows HDR off entirely outside of HDR-specific applications. Leaving the HDR color pipeline globally engaged shifts the desktop rendering chain into scRGB space on Windows 11, and a number of applications (browser office apps, Steam overlay) can show an unusual tone response when SDR content is mapped through that pipeline judderingly.
Common Gaming Monitor Mistakes That Ruin Performance
Based on aggregate owner feedback and aggregate customer QA patterns for the 2023, 2025 mid-range panels we researched, a small handful of mistakes recur so often that they're worth a dedicated highlight. Each one measurably degrades performance or image quality without most users understanding why.
Mismatched GPU-to-panel connection is near the top. Without a suitable DisplayPort 1.4 or Ultra High Speed HDMI 2.1 cable or downstream path, the monitor back-falls to a minimized refresh rate, often 30Hz at 4K if the path hits a legacy HDMI 1.4 port on the GPU, or 60Hz at 4K on HDMI 2.0, and the user only feels that "something is wrong." Verify the cable date: plain-jane rubbish-sink cables bundled with older stations or off-brand extensions often lack the pin wiring required for 8K or full-range DSC and throttle lower equally. Now the damage: delayed reaction feels worse than raw image lag.
BIOS-level output or display subsystem configurations that default to the motherboard HDMI output rather than the same discrete PCIe device can create exactly the same experience. If your RTX or Radeon GPU occupies a dedicated x16 slot but the BIOS designates the iGPU as the primary display conduit, the system sends the render through that lower processing path out a port you may not even physically occupy, and the game runs on that pathway. A single BIOS toggle, "Primary Display" changed from IGPU/Auto to PCIe/PEG, often transforms the run from 490 FPS at idle to whatever the actual GPU pushes.
OS-level V-SYNC "smart" synchronization is the second-most common slip. G-Sync effective range on most 27-inch panels sits between 8, 144/165/240Hz in adaptive mode, any frame rate outside that range reverts to native V-SYNC behavior. Many people turn V-SYNC on in NVIDIA Control Panel per-game, leaving it also on in the game in-game settings, which the global profile then overrides, depending on per-game combination, and triggers double-buffered sequential waiting and a strange half-refresh-stated stutter.
The simplest compromise: select the master control once, either the NVIDIA Graphics Command Center, the game's own video options, or the in-engine menu, and avoid maintaining two controllers in the same domain.
Wrong output color format specifically feeds into color-banding as well as limited HDR rim tension. NVIDIA Control Panel defaults PC-standard displays to 8-bit sRGB Dynamic Range Full, but older Windows installs, particularly automatically-install AMD drivers, may materialize as Y'CrCb 4:2:0 8-bit Limited, an enhanced effect that crushes mid-tones with rings around UI outlines. Changing Color Depth to bpc_10 and Dynamic Range back to Full through either panel is one-easystep-fix most users can perform.
One less intuitive bug arising from multi-monitor setups is driver-level maximum refresh rate enforcement based on the highest common refresh in the group. Adding that secondary 60Hz panel alongside your main high-refresh 27-inch display often causes the NVIDIA compositor or AMD Flip Queue to default the main display off its native rate because a duplicated swap chain tying both displays forces synchronization towards the refresh of the slowest member. Disabling display mirroring, arranging the primary monitor as a separate Extended output, and convincing the compositor to flip exclusively on the main display often recovers the missing 80, 150 Hz band you didn't see.
Some benefits are exclusive to G-Sync Compatible display setups; others apply to any mixed-refresh-rate configuration running Windows Desktop Window Manager composition.
The last mistake isn't a hardware error: it's a persistent shared-user mistake to maximize all vibrancy and calibration expectations from the screen simultaneously. DCI-P3-saturated flickerchecker modes look flashy in a benchmark, but implement an aggressive gamut overshoot that fatigues eyes during long sessions. Game-FPS mode with sharpness turned up increases detail visibility in exchange for a slow eye-strain update.
The balanced route is different: a purpose-built game preset (called "FPS1" on most modern NEC- and AU Optronics-based manufacturer overlays) with low sharpness, mid overdrive, anonymous gamma 2.20, a black equalizer setting between 5 and 7, and adaptive-sync toggled on from both software driver overlay and hardware OSD independently. Total invisibility of that specialized combined preset breaks a lot of calibration flows, but in real-game trades nearly every title off-the-shelf benchmark saturate something else by default. Find the middle ground for playing.
Then benchmark.
A full lock-your-optimized panel checklist resides in the quick steps earlier.
Quick Setup Decision Guide Based on Your GPU and Games
A more efficient way forward is to treat monitor optimization as a structured set of if, then steps, matching the level of GPU headroom, the game types played, and the ultimate goal. Below we set down the rules of thumb for our top three GPU-to-game scenarios.
Entry-level hardware with 60 FPS targets. Example: Radeon RX 6600 or RTX 3060 with 8GB VRAM class paired with a 27-inch 1440p 144Hz IPS panel. Optimization focus: full native 1440p resolution, Adaptive-Sync turned on, all processing features disabled, Black Equalizer gently up, 3-Detail sharpening off.
Frame pacing accepts dips around 70, 90 FPS and visual difference of near 60Hz will be smooth through adaptive-motion averaging without an artificial cap.
Mid-range systems at high refreshs. Example: RTX 4070, RX 7800 XT or similar dropping 150+ FPS in mainstream titles at 1440p resolution. Optimization focus: full refresh-rate lock, in-driver limit set to 3 frames under the panel's maximum refresh, turn overdrive somewhere between medium to adaptive when supported, adaptive-sync on all software sides processed, in-game V-SYNC off.
With these setups panel frame pacing is imperceptible in-game and the frame-time bottleneck can rest purely on engine frame budget. Typically the only effective visual tuning beyond what we mentioned becomes color balancing for specific games' intrinsic look.
High-end reference hardware chasing pixel integrity metrics. Example: RTX 5080, upcoming RDNA 4 similar tier paired with a 27-inch 240Hz or 360Hz panel. Optimization focus: 240 Hz locked at all times, GPU-side frame limiter refined to clamp maximum individual frame-times instead of just average, overdrive determined using the same Blur Busters test methodology deterministically, disable any dynamic refresh negotiation features (such as dual-mode switching with low refresh settings) because that flips back to a high-lag mode on going lower than 80 Hz window, preemptively set NVIDIA Reflex (or AMD Anti-Lag+) on where supported going further upstream than any display-side adjustment can reach.
Remember that adjusting settings inside the monitor's OSD generally allows one adjustment path: picture-setting, refresh with and limits, one-time limit. If memory fails, audio cues from a simple user memory file typically expose the linear order and your pre-existing singular know-not-to-carry-across habits alone can ease whatever rotation breaks are tripped.
The more flexible approach is to build two hardware-native presets: Game Mode on OSD slot 1 with black equalizer tuned up, zero active contrast, low sharpness, adaptive-sync processed, and a Competitive mode profile tied to FPS settings you like, and switch between profiles using a remote-control stick or dedicated profile shortcut available on some high-end panels from BenQ, ASUS, or Dell. Simply seeing two familiar, known-good configurations reduces the likelihood that someday a mistuned setup begins to sleuth involuntarily in-game.
Looking for the absolute fastest single quality boost within your afternoon? Turn on Game Mode, confirm native resolution, re-latch refresh-rate, enable Adaptive-Sync in the driver and OSD, cap frames 2, 3 under panel max, and set Black Equalizer only when hiding-in-shadows is a proclivity. Those five moves cover 90 percent of the options that impact pixel-delay budgets in a real-world bench setup.
Everything else is iterative tuning-adjustment perfectible later.
Fine-Tuning for Longevity: Burn-In, Coil Noise, and Maintenance
A 27-inch gaming monitor is a multi-year purchase, and the handful of additional optimizations that pay out repeatedly are panel longevity, image-stability retention, and burn-in mitigation for OLED models. Right now, what we've figured is that panel degradation modes differ depending on the emissive generation, most IPS and VA models lose maximum brightness through LED backlight aging, with a gradual shift in white-point towards cooler hue that can manifest over 30,000 hours statistically on lower-cost edge-lit units, while OLED panels lose organic emitter efficiency faster in fixed-content areas (HUDs, health bars) where the blue emitter subpixel bottlenecks degradation fastest.
For OLED panels, we recommend periodic pixel refresh cycles (usually user-interval-driven weekly or after every 200-400 hours), avoiding sliding-screens static UI elements by enabling auto-hide taskbar and dark mode browser themes, and running the built-in "Panel Care" clearing function on manufacturer-specific firmware (LG's Pixel Refresher, Samsung's Panel Care, ASUS OLED Care). Three further out-of-the-engineance features compensate for uneven wear: logo luminance adjustment that reduces static icon brightness, pixel shift that moves content by a few pixels imperceptibly, and automatic static-screen luminance reduction when the frame is still too long, most of these toggle in the OSD under OLED Care or Panel Protection menu.
For IPS and VA monitors, longevity is less about burn-in zones than about electrostatic dust ingress and persistent image cracking around gamuts expanded artificially via Dynamic Contrast modes. Turning off active Dynamic Contrast/ACL/CR momentum processes and selecting a fixed native gamma-target keeps the lookup tables and thermal load within expected bounds without punishing pixel-relay cycles that age the liquid crystal prematurely. Setting color temperature back to 6500K (D65) with a "Low Blue Light" mode disabled at night does not actually save much energy over a calibrated 6400-6500K depending on LED backlight type, but it does help the user's sleep cadence, soft-reducing about 10, 20 cd/m² with warmer tones beyond 8 p.m. filtering algorithms in software like f.lux is the cleaner stay-on-target solution instead of chugging on OSD modes that reset across input changes.
Mechanical maintenance is straightforward. Always power off the display, then use a dry microfiber cloth and, if needed, a 50% isopropyl and 50% distilled water solution sprayed onto the cloth first (never directly on the panel) to clear fingerprints from the anti-glare coating. Never use window cleaners containing ammonia or acetone, they etch the bonding substrate of the anti-reflection coating and leave permanent patches.
Accumulated dust in the ventilation openings on the back cover can be cleared with a soft-bristled brush or low-paced vacuum on a low suction setting at least 1cm away from the fine mesh.
Coil noise, a high-pitched buzz at high refresh-rates, is common on several DisplayPort 1.4 IPS 240Hz panels due to the rapidly switching power electronics for the overdrive push. It's not a safety issue and not covered under all warranty conditions for audible noise, but users have reported relief by limiting the maximum FPS cap to slightly under the panel's max refresh (thus pulling the power electronics away from their peak switching cadence). By reducing the average 5% frame time variance, you can perceptually dampen the periodic switching tone.
For buyers that hear a squeal daily, dropping to a scaled-down 238 FPS frame cap with an adaptive sync clamp running in-band is a simple control-reflexive fix tolerated on most mid-adopter GPUs.
A final worthwhile software-initialization to protect your display investments and calibration profiles: periodically re-import any saved ICC profile from your Windows Color Management tool on driver reinstalls or OS reinstalls. The ICC sits in a secured user-register and can become unlinked during GPU driver updates, leaving the panel appearing uncontrolled or washed out until reinstated. Changing display ports also occasionally invalidates the ICC profile link; re-applying it manually restores the calibration instantly.
Quiet Refresh Mode vs. Longevity
| Care Feature | Effect On | Setting Behavior |
|---|---|---|
| Panel Refresh (OLED runs pixel refresh cycle) | Equalizes pixel luminance drift over time | Manual or auto-triggered after specific hour threshold |
| Pixel Shift Offset | Moves display content by one pixel periodically | Usually on by default on current-gen OLED backbones |
| Static Taskbar Dimming | Reduces luminance in still regions | Auto-enabled in most modern OLED OSD menus |
| Brightness Limiter | Forces lower maximum sustained brightness on global frame | Intrinsic to OLED panel panels in HDR; can be toggled lower by disabling the Automatic Brightness Limiter (ABL) limiter |
These settings want to be combined over different lifetime budgets according to the panel's age hour-count milestone, at 500 hours gentle pixel-level refresh weekly, at 2,000 and above consider increasing refresh-cycle occasional or setting ABL-offset fewer. For current-gen OLED up to 2025 QD-OLED material, panel lifetime at typical user average brightness (around 180 cd/m² in SDR) is calculated by the manufacturers at 30,000 hours to half-luminance, effectively the manufacturer provides 10 years of typical-use operation before a brightness fall-off outside of manufacturer specification tolerance, matching or exceeding the typical backlight lifespan in IPS and VA technologies in the same half-lumen-degradation time frame at a statistically similar luminance-test threshold.
For a healthy usage profile round-up, draw 50-70 cd/m² less content at night, keep HDMI/DP fast-switching off at the monitor's OSD (it uses extra internal power cycling that over time slightly shortens switching IC lifespan), and enable the panel's ambient light sensor, if provided, to dynamically adjust backlight against room darkness, reducing blue-light-shift and thermal load over time.
Frequently Asked Questions
Can I optimize a 1080p monitor at 27 inches without ruining clarity?
Yes, if your native resolution is 1080p on a 27-inch panel, keep the GPU output at 1920 x 1080 scaled to full-screen with aspect-ratio settings applied to "No Scaling." Image softness is more about source-material scale than an optimized panel. In-game sharpening harshens aliasing more effectively than internal GPU oversampling, if that matters to you.
Why does HDR make some games look washed out on my 27-inch monitor?
On DisplayHDR 400 panels with edge-lit backlighting, enabling HDR via the Windows OS toggle applies a scRGB tonemap that flattens mid-tone saturation. Deselect HDR in Windows, use in-game brightness calibration, and leave the OSD Black Equalizer turned up to compensate for dim areas instead.
How do I know if adaptive sync is truly active at the hardware level?
For NVIDIA cards, the driver-G-Sync Indicator displays a floating label on-screen when compatible adaptive sync is active on the panel. If you see the label during gameplay, the hardware chain is processing variable-refresh output end-to-end. Without the label you may have a rendering path mismatch.
What is the minimum frame rate needed for LFC to work?
Low Framerate Compensation engages when the frame rate falls below the adaptive-sync minimum range, around 48 FPS on most 144Hz/165Hz panels and around 80Hz on some 240Hz models. When below that threshold, the monitor multiplies frames so it never operates outside its designated variable-refresh window.
Do 27-inch gaming monitors need weekly software updates?
Don't update monitor firmware unless you have a problem that a new firmware release is published to resolve. Updating firmware also erases custom calibration settings, so reconfigure OSD calibrations after any update. Bug-fix-accompanying updates addressing panel-specific compatibility, adaptive-sync flicker or HDR tone-mapping errors, are the exception, and paid off installation.
Can a better cable fix refresh rate throttling?
To a degree, yes. Replacing an older HDMI 1.4 cable or an uncertified passive DisplayPort 1.2 cable with a DisplayPort 1.4 (or 2.1) certified cable and an Ultra-High-Speed HDMI 2.1 cable at the appropriate length resolves frequent mismatch-back cases. Uncertified or out-of-spec down-rated cables can cause the GPU-to-panel link to fall back to a lower-bandwidth mode, introducing either lower refresh rates, reduced color bit depth, or both.
Common Gaming Monitor Mistakes That Ruin Performance
Based on aggregate owner feedback and support forums across multiple display generations, the same handful of errors come up again and again. Most tank performance or image quality without the user realizing anything changed.
Adaptive sync left half-enabled is one of the most frequent. The feature gets switched on in the monitor's OSD but never turned on in the GPU driver, or vice versa, so tearing persists as if it were off completely. The reverse setup also happens, where the driver toggle sits on but the panel-side option remains off, and the user never learns why their frame pacing feels wrong.
Cross-checking both sides takes less than a minute once you know where each switch lives.
Overdrive pushed to maximum ranks just as high. Many monitors ship with overdrive set one step below the panel's rated peak to reduce overshoot artifacts out of the box. When users find the menu label and crank it to the highest setting chasing the rated "1ms" claim, visible bright trails appear behind moving objects that make motion clarity objectively worse.
The Blur Busters UFO test still applies to verify.
Locked Windows limiting refresh rate to the integrated GPU output is one users catch late. Our earlier BIOS note about PCIe primary output remains equally relevant for desktops, because a GPU BIOS update can silently revert that auto-assigned link priority back to the motherboard video port after a firmware flash. Checking that the discrete card owns the display path avoids confusion after a routine driver update seemingly resets everything back to 60Hz.
Windows display scaling on high-DPI panels introduces a third form of ghosting when panels are set to non-native resolutions such as 1080p on a 4K 27-inch screen. The panel's internal scaler processes and resamples the image, adding a frame or two of interpolation lag that stacked post-processing settings only worsen. Going back to native resolution and letting the GPU handle any downscaling crisply avoids the additional processing step altogether.
VRR flicker with low frame rate content comes up in adaptive sync running far below the panel's preferred minimum range, where backlight PWM dimming and variable refresh steps interact unpredictably, making brightness oscillate mildly during loading screens or menu transitions. Several monitors added a "VRR Control" firmware toggle (specifically LG, some Samsungs) that locks the dimming behavior at the cost of slight black-crush loss to suppress the inconsistency. Enabling VRR Control on affected models helps when you frequently drop below 60 FPS.
Windows Game Mode occasionally clashes with G-Sync frame pacing when its Auto HDR or Variable Refresh toggles try to re-switch the software tone pipeline during faster alt-tabs. Per Microsoft's own Game Mode docs, the feature re-shuffles CPU priorities during alt-tab and re-engages GPU boost. With G-Sync already managing swap chain timing through the NVIDIA driver, the secondary re-flagging creates occasionally wider frame-time spikes that feel like micro-stutter.
Composite processing misalignment in the panel OSD (sharpness plus dynamic contrast plus Black Equalizer stacked all high at once) piles on soft glow, edge halos, and clipped shadow detail together. The simplest reset is setting every OSD picture setting to default and then re-enabling only one or two features adapted to the game genre. An FPS preset kept at Black Equalizer 5, zero noise reduction, Adaptive-Sync on, dynamically stable by overshoot and processing-lite gives better visibility and half the input noise.
Quick Setup Decision Guide Based on Your GPU and Games
A more efficient way forward is to treat monitor optimization as a structured set of if, then steps, matching the level of GPU headroom, the game types played, and the ultimate goal. Below sit the rules of thumb for our top three GPU-to-game scenarios.
Entry-level hardware with 60 FPS targets. Example: Radeon RX 6600 or RTX 3060 with 8GB VRAM class paired with a 27-inch 1440p 144Hz IPS panel. Optimization focus: full native 1440p resolution, Adaptive-Sync turned on, all processing features disabled, Black Equalizer gently up, 3-Detail sharpening off.
Frame pacing accepts dips around 70, 90 FPS and visual difference near 60Hz will be smooth through adaptive-motion averaging without an artificial cap.
Mid-range systems at high refreshs. Example: RTX 4070, RX 7800 XT or similar dropping 150+ FPS in mainstream titles at 1440p resolution. Optimization focus: full refresh-rate lock, in-driver limit set to 3 frames under the panel's maximum refresh, turn overdrive somewhere between medium to adaptive when supported, adaptive-sync on all software sides processed, in-game V-SYNC off.
With these setups panel frame pacing is imperceptible in-game and the frame-time bottleneck can rest purely on engine frame budget. Typically the only effective visual tuning beyond what we mentioned becomes color balancing for specific games' intrinsic look.
High-end reference hardware chasing pixel integrity metrics. Example: RTX 5080, upcoming RDNA 4 similar tier paired with a 27-inch 240Hz or 360Hz panel. Optimization focus: 240 Hz locked at all times, GPU-side frame limiter refined to clamp maximum individual frame-times instead of just average, overdrive determined using the same Blur Busters test methodology deterministically, disable any dynamic refresh negotiation features (such as dual-mode switching with low refresh settings) because that flips back to a high-lag mode on going lower than 80 Hz window, preemptively set NVIDIA Reflex (or AMD Anti-Lag+) on where supported going further upstream than any display-side adjustment can reach.
Remember that adjusting settings inside the monitor's OSD generally allows one adjustment path: picture-setting, refresh with and limits, one-time limit. If memory fails, audio cues from a simple user memory file typically expose the linear order and your pre-existing singular know-not-to-carry-across habits alone can ease whatever rotation breaks are tripped.
The more flexible approach is to build two hardware-native presets: Game Mode on OSD slot 1 with black equalizer tuned up, zero active contrast, low sharpness, adaptive-sync processed, and a Competitive mode profile tied to FPS settings you like, and switch between profiles using a remote-control stick or dedicated profile shortcut available on some high-end panels from BenQ, ASUS, or Dell. Simply seeing two familiar, known-good configurations reduces the likelihood that someday a mistuned setup begins to sleuth involuntarily in-game.
Looking for the absolute fastest single quality boost within your afternoon? Turn on Game Mode, confirm native resolution, re-latch refresh-rate, enable Adaptive-Sync in the driver and OSD, cap frames 2, 3 under panel max, and set Black Equalizer only when hiding-in-shadows is a proclivity. Those five moves cover 90 percent of the options that impact pixel-delay budgets in a real-world bench setup.
Everything else is iterative tuning-adjustment perfectible later.
Fine-Tuning for Longevity: Burn-In, Coil Noise, and Maintenance
A 27-inch gaming monitor is a multi-year purchase, and the handful of additional optimizations that pay out repeatedly are panel longevity, image-stability retention, and burn-in mitigation for OLED models. Right now, what we've figured is that panel degradation modes differ depending on the emissive generation. Most IPS and VA models lose maximum brightness through LED backlight aging, with a gradual shift in white-point towards cooler hue that can manifest over 30,000 hours statistically on lower-cost edge-lit units, while OLED panels lose organic emitter efficiency faster in fixed-content areas (HUDs, health bars) where the blue emitter subpixel bottlenecks degradation fastest.
For OLED panels, we recommend periodic pixel refresh cycles (usually user-interval-driven weekly or after every 200-400 hours), avoiding sliding-screens static UI elements by enabling auto-hide taskbar and dark mode browser themes, and running the built-in "Panel Care" clearing function on manufacturer-specific firmware (LG's Pixel Refresher, Samsung's Panel Care, ASUS OLED Care). Three further out-of-the-engineance features compensate for uneven wear: logo luminance adjustment that reduces static icon brightness, pixel shift that moves content by a few pixels imperceptibly, and automatic static-screen luminance reduction when the frame is still too long. Most of these toggle in the OSD under OLED Care or Panel Protection menu.
For IPS and VA monitors, longevity is less about burn-in zones than about electrostatic dust ingress and persistent image cracking around gamuts expanded artificially via Dynamic Contrast modes. Turning off active Dynamic Contrast/ACL/CR momentum processes and selecting a fixed native gamma-target keeps the lookup tables and thermal load within expected bounds without punishing pixel-relay cycles that age the liquid crystal prematurely. Setting color temperature back to 6500K (D65) with a "Low Blue Light" mode disabled at night does not actually save much energy over a calibrated 6400-6500K depending on LED backlight type, but it does help the user's sleep cadence.
Soft-reducing about 10, 20 cd/m² with warmer tones beyond 8 p.m. filtering algorithms in software like f.lux is the cleaner stay-on-target solution instead of chugging on OSD modes that reset across input changes.
Mechanical maintenance is straightforward. Always power off the display, then use a dry microfiber cloth and, if needed, a 50% isopropyl and 50% distilled water solution sprayed onto the cloth first (never directly on the panel) to clear fingerprints from the anti-glare coating. Never use window cleaners containing ammonia or acetone.
They etch the bonding substrate of the anti-reflection coating and leave permanent patches. Accumulated dust in the ventilation openings on the back cover can be cleared with a soft-bristled brush or low-paced vacuum on a low suction setting at least 1cm away from the fine mesh.
Coil noise, a high-pitched buzz at high refresh-rates, is common on several DisplayPort 1.4 IPS 240Hz panels due to the rapidly switching power electronics for the overdrive push. It's not a safety issue and not covered under all warranty conditions for audible noise, but users have reported relief by limiting the maximum FPS cap to slightly under the panel's max refresh (thus pulling the power electronics away from their peak switching cadence). By reducing the average 5% frame time variance, you can perceptually dampen the periodic switching tone.
For buyers that hear a squeal daily, dropping to a scaled-down 238 FPS frame cap with an adaptive sync clamp running in-band is a simple control-reflexive fix tolerated on most mid-adopter GPUs.
A final worthwhile software-initialization to protect your display investments and calibration profiles: periodically re-import any saved ICC profile from your Windows Color Management tool on driver reinstalls or OS reinstalls. The ICC sits in a secured user-register and can become unlinked during GPU driver updates, leaving the panel appearing uncontrolled or washed out until reinstated. Changing display ports also occasionally invalidates the ICC profile link; re-applying it manually restores the calibration instantly.
Quiet Refresh Mode vs. Longevity
Care features differ in what they protect and how they behave. The table below breaks down the most common panel protection features.
| Care Feature | Effect On | Setting Behavior |
|---|---|---|
| Panel Refresh (OLED runs pixel refresh cycle) | Equalizes pixel luminance drift over time | Manual or auto-triggered after specific hour threshold |
| Pixel Shift Offset | Moves display content by one pixel periodically | Usually on by default on current-gen OLED backbones |
| Static Taskbar Dimming | Reduces luminance in still regions | Auto-enabled in most modern OLED OSD menus |
| Brightness Limiter | Forces lower maximum sustained brightness on global frame | Intrinsic to OLED panel panels in HDR; can be toggled lower by disabling the Automatic Brightness Limiter (ABL) limiter |
These settings want to be combined over different lifetime budgets according to the panel's age hour-count milestone. At 500 hours, gentle pixel-level refresh weekly. At 2,000 and above, consider increasing refresh-cycle occasional or setting ABL-offset fewer.
For current-gen OLED up to 2025 QD-OLED material, panel lifetime at typical user average brightness (around 180 cd/m² in SDR) is calculated by the manufacturers at 30,000 hours to half-luminance. That effectively means 10 years of typical-use operation before a brightness fall-off outside of manufacturer specification tolerance, matching or exceeding the typical backlight lifespan in IPS and VA technologies in the same half-lumen-degradation time frame at a statistically similar luminance-test threshold.
For a healthy usage profile round-up, draw 50-70 cd/m² less content at night, keep HDMI/DP fast-switching off at the monitor's OSD (it uses extra internal power cycling that over time slightly shortens switching IC lifespan), and enable the panel's ambient light sensor (if provided) to dynamically adjust backlight against room darkness, reducing blue-light-shift and thermal load over time.
Common Gaming Monitor Mistakes That Ruin Performance
Based on aggregate owner feedback and support forums across multiple display generations, the same handful of errors come up again and again. Most tank performance or image quality without the user realizing anything changed.
Adaptive sync left half-enabled is one of the most frequent. The feature gets switched on in the monitor's OSD but never turned on in the GPU driver, or vice versa, so tearing persists as if it were off completely. The reverse setup also happens, where the driver toggle sits on but the panel-side option remains off.
Cross-checking both sides takes less than a minute once you know where each switch lives.
Overdrive pushed to maximum ranks just as high. Many monitors ship with overdrive set one step below the panel's rated peak to reduce overshoot artifacts out of the box. When users find the menu label and crank it to the highest setting chasing the rated "1ms" claim, visible bright trails appear behind moving objects that make motion clarity objectively worse.
Quick Setup Decision Guide Based on Your GPU and Games
Treat optimization as if-then steps matching your hardware and games. Three common scenarios cover most users.
Entry-level GPUs (RX 6600, RTX 3060) with a 1440p 144Hz IPS panel: use native resolution, Adaptive-Sync on, all processing disabled, Black Equalizer around 5. Frame pacing stays smooth even around 60-90 FPS through adaptive refresh.
Mid-range GPUs (RTX 4070, RX 7800 XT) pushing 150+ FPS: lock full refresh, cap frames 3 below panel max, overdrive on medium, Adaptive-SYNC on both sides, in-game V-SYNC off. Frame pacing is imperceptible with this setup.
High-end GPUs (RTX 5080 class) on 240Hz or 360Hz panels: refresh locked high, frame limiter clamps worst-case frame times not just averages, overdrive verified via Blur Busters testing, NVIDIA Reflex or AMD Anti-Lag-plus on where supported.
Fine-Tuning for Longevity
OLED users should run periodic pixel refresh cycles weekly or every 200-400 hours, keep static UI elements on auto-hide, and enable pixel shift plus logo dimming in the panel's OSD. IPS and VA owners matter more about dust ingress; a dry microfiber cloth and occasional soft-brush cleaning of ventilation openings keeps thermal load in check.
Coil noise at high refresh rates can often be reduced by capping frames a few below panel max, pulling switching electronics away from peak cadence. Re-apply ICC profiles after GPU driver updates, since those profiles can become unlinked during reinstalls.
Panel Care Quick Reference
| Panel Type | Primary Risk | Key Mitigation |
|---|---|---|
| OLED | Static element burn-in | Pixel shift, taskbar auto-hide, periodic pixel refresh |
| IPS | Gradual backlight brightness loss | Keep brightness moderate, avoid Dynamic Contrast permanently on |
| VA | Audible coil noise and IPS-glow ingress | Clean ventilation, cap frames to reduce switching noise |
Real Setup Examples
A 27-inch 1440p 165Hz IPS panel optimized for competitive FPS typically lands at: Game Mode on, Adaptive-Sync active, 162 FPS cap in driver, Black Equalizer 6, overdrive on the second-strongest step verified through UFO Test.
The same panel tuned for single-player role-playing games switches to: Native gamma 2.2, Adaptive-Sync on, frame cap removed if GPU sustains above the minimum range, Black Equalizer dropped to 3 to avoid crushed shadows looking washed out.
Verdict
Set native resolution and max refresh first. Confirm Adaptive-Sync is active on both the monitor OSD and GPU driver. Lock overdrive at the sweet spot below max.
Cap frames a few below panel ceiling. Re-check after every driver update or firmware flash. That consistent five-step loop keeps a 27-inch gaming monitor running at its intended spec for years.

Similar Posts