How to Fix Overscaling on 4K Monitor
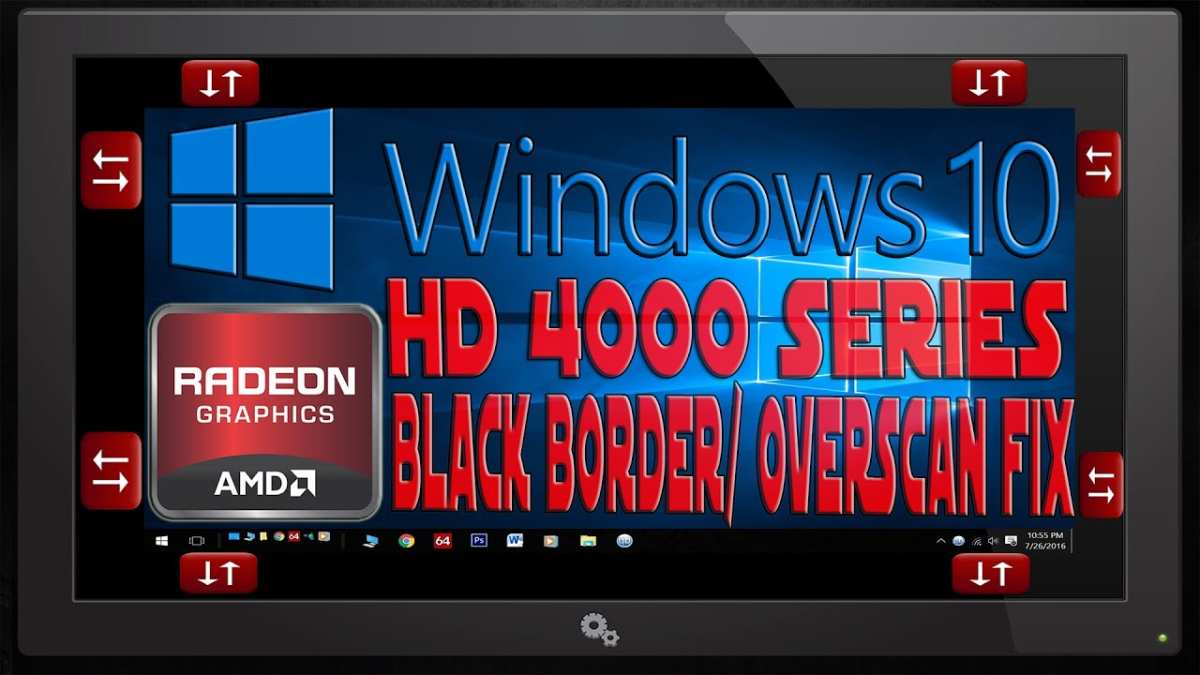
If you've just connected a 4K display and the edges of your screen are cut off or there are black borders where there shouldn't be, you're dealing with an overscaling issue. Knowing how to fix overscaling on 4K monitor setups starts with understanding that the fix depends entirely on what kind of display you have, which cable you're using, and what GPU is running the show.
Overscaling happens when the output image is larger than the visible display area, or when the display itself zooms in on the signal it receives. The most common culprit is a TV applying broadcast-style overscan to a PC signal, but GPU driver settings and incorrect aspect ratio configurations cause it too. The native 4K resolution of 3840 × 2160 at 16:9 should fill the screen edge to edge, so if it doesn't, something in the chain is misconfigured.
Quick Answer
Fix overscaling on a 4K monitor by adjusting scaling settings in your GPU control panel. For TVs, disable overscan in the TV's picture or display menu. Set the correct aspect ratio to 16:9 or "Just Scan." Check that your HDMI or DisplayPort cable supports the full 4K signal.
What Overscaling Actually Looks Like on a 4K Monitor
Overscaling means the image being sent to your display doesn't match the visible panel area. You'll notice one of two things. Either the desktop extends beyond the screen edges and you lose taskbars and window borders, or there are black borders running around the entire image because the display is underscanning instead.
The first scenario is far more common when people use a 4K TV as a monitor. TVs historically apply a 2-5% zoom to incoming video signals, a leftover from the broadcast era where analog signals had noise at the edges. The second scenario, black borders, usually points to a GPU scaling mismatch or a resolution detection error.
Here's what to look for:
- Edges cut off: Taskbar partially hidden, window edges unreachable, mouse disappears at screen boundaries
- Black borders: Visible gap between the desktop image and the physical bezel on all four sides
- Blurred text: The display is scaling a non-native resolution, making everything soft
- Wrong aspect ratio: Circles look like ovals, or the image looks stretched vertically or horizontally
The fix path changes depending on which of these you're seeing. That's why we need to identify your setup before jumping to solutions.
Why Your 4K Display Is Cutting Off the Edges
The root cause almost always comes down to one of three things. Either the display itself is applying overscan, the GPU is scaling the image incorrectly, or the resolution and aspect ratio aren't set to native values.
TV overscan is the most frequent offender. Many 4K TVs ship with overscan enabled by default on their HDMI inputs. The TV assumes it's receiving a broadcast signal and zooms in slightly.
This behavior persists even when you're feeding it a PC signal.
GPU scaling mismatches happen when your graphics card's scaling settings conflict with the display's native resolution. If GPU scaling is enabled and set to a percentage above 100%, the image will overflow the visible area.
Connection issues can also cause this. An older HDMI cable that doesn't have enough bandwidth for 4K at 60Hz might force the display into a lower resolution, which then gets scaled incorrectly.
First: Figure Out What You're Actually Working With
Before you change any settings, you need to know exactly what hardware and connection you're dealing with. The right fix for a 4K TV on HDMI is completely different from the fix for a dedicated 4K monitor on DisplayPort.
Is it a 4K monitor or a 4K TV?
This matters more than you'd think. Dedicated PC monitors from brands like Dell, LG, ASUS, or Samsung almost never have overscan enabled out of the box. They're designed for pixel-perfect 1:1 mapping.
If you're seeing overscaling on a dedicated monitor, the issue is almost certainly in your GPU settings.
TVs from Samsung, LG, Sony, TCL, and Hisense frequently have overscan turned on by default. Even when you switch to "Game" or "PC" mode, some models still apply a small amount of zoom. Check your display's model number if you're not sure whether it's a monitor or a TV.
What cable and port are you using?
HDMI and DisplayPort handle scaling differently. HDMI inputs on TVs are more likely to trigger overscan because the HDMI standard was designed with consumer electronics in mind. DisplayPort was built for PCs and typically sends a pixel-accurate signal.
Also check your cable version. HDMI 2.0 and above handle 4K at 60Hz properly. Older HDMI 1.4 cables can do 4K but only at 30Hz, which sometimes causes handshake issues that affect scaling detection.
DisplayPort 1.2 and above support 4K at 60Hz without issues.
Which GPU is driving the display?
NVIDIA, AMD, and Intel all have different control panels with different scaling options. Knowing which one you have determines exactly where you'll find the fix.
- NVIDIA: Look for the NVIDIA Control Panel (right-click desktop)
- AMD: Look for AMD Radeon Software (right-click desktop)
- Intel: Look for Intel Graphics Command Center (Microsoft Store or right-click desktop)
If you're not sure, open Device Manager in Windows and expand the "Display adapters" section. That will tell you exactly which GPU is active.
Fix Overscaling on Windows (Step by Step)
Windows gives you multiple places to adjust scaling, and they don't always agree with each other. Start with the OS-level settings, then move to your GPU control panel if the problem persists.
Windows display settings first
Right-click on your desktop and select "Display settings." Scroll down to the "Scale & layout" section. Make sure the scale is set to 100% for a standard 4K monitor, or whatever percentage feels comfortable for your screen size and viewing distance. For a 27-inch 4K display, 150% is common.
For a 32-inch, 100-125% works better.
Next, check the resolution setting. It should read "3840 × 2160" and show "(Recommended)" next to it. If it doesn't, click the dropdown and select the recommended option.
Windows pulls this from the display's EDID data, so if it's wrong, there's a deeper detection issue.
Also look for "Multiple displays" settings if you have more than one monitor. Each display in a multi-monitor setup can have its own scaling value, and mismatched scaling between monitors causes all sorts of weird behavior.
NVIDIA Control Panel scaling
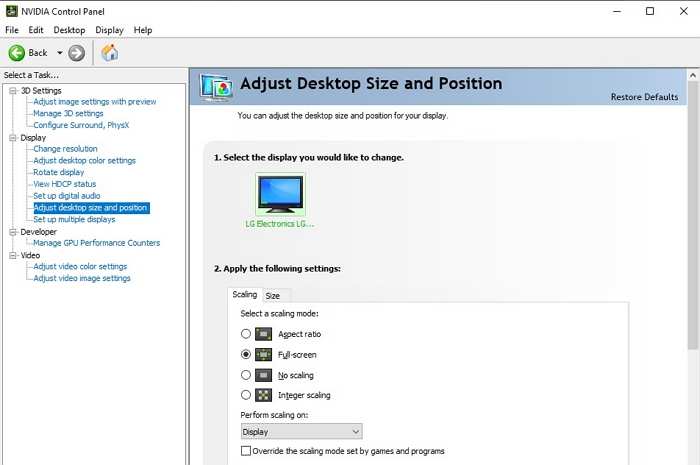
Right-click your desktop and open NVIDIA Control Panel. Navigate to "Adjust desktop size and position" under the "Display" section on the left.
You'll see two key options here:
- Scaling: Set this to "Aspect ratio" or "No scaling." Avoid "Full-screen" as it can stretch the image.
- Perform scaling on: This is the critical one. Choose "Display" to let the monitor handle scaling, or "GPU" to let the graphics card handle it. For overscaling issues, "Display" is usually the right choice.
There's also a checkbox for "Override the scaling mode set by games and programs." Leave this unchecked unless you're troubleshooting a specific application.
If you see an "Adjust desktop size" slider, make sure it's at 100%. Some driver versions show an underscan/overscan slider here. If yours does, drag it until the desktop fills the screen perfectly.
AMD Radeon Software scaling
Open AMD Radeon Software by right-clicking the desktop. Click the gear icon in the top right, then go to the "Display" tab.
Look for "GPU Scaling" and turn it off if it's on. When GPU scaling is enabled, AMD cards can apply their own scaling on top of whatever the display is already doing, which causes double-scaling and overscan.
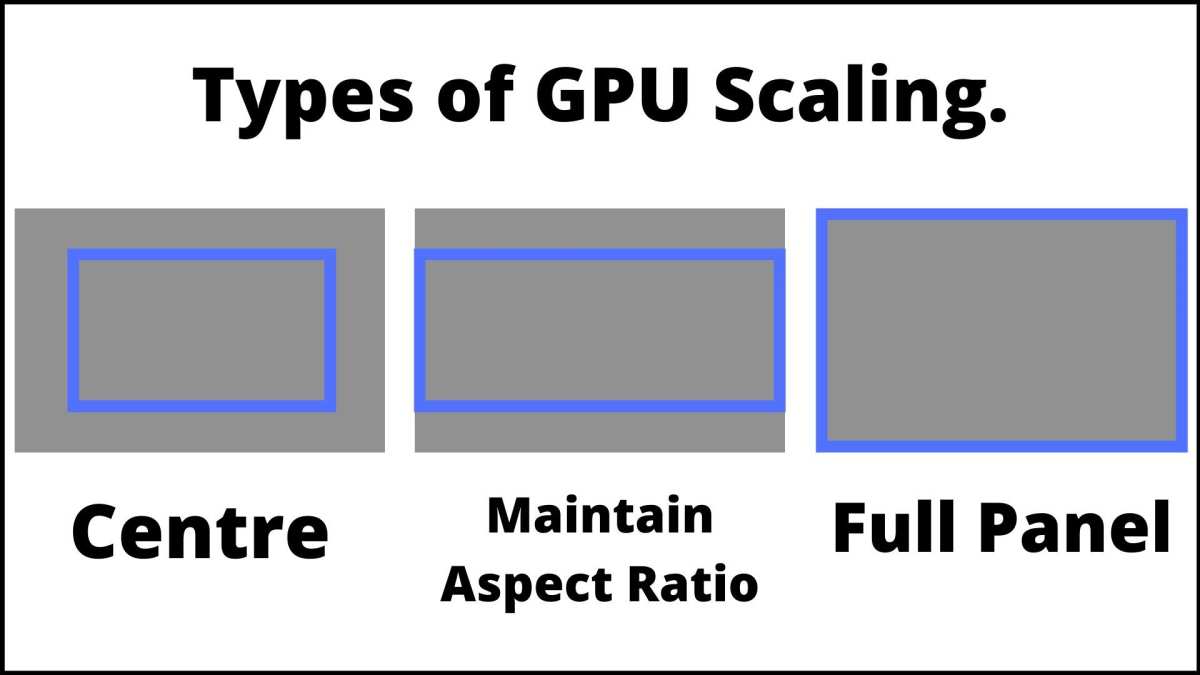
If you see a "Scaling Mode" option, set it to "Preserve aspect ratio" or "Center." "Full panel" will stretch the image to fill the screen, which can look distorted.
Some AMD driver versions also have an "Underscan" slider in the same section. If your image has black borders, drag this slider to 0% to remove the underscan.
Intel Graphics Command Center scaling
Open Intel Graphics Command Center (available from the Microsoft Store if it's not already installed). Go to the "Display" section.
Under "Resolution," make sure it's set to 3840 × 2160. Under "Scale," you should see options like "Maintain display scaling," "Maintain aspect ratio," or "Stretch." Choose "Maintain display scaling" or "Maintain aspect ratio" to avoid overscaling.
Intel's scaling controls are less granular than NVIDIA's or AMD's, so if you're not seeing the options you need, check for driver updates. Intel has been improving their control panel significantly since 2024, and newer versions offer better per-display configuration.
Fix Overscaling on macOS
Macs handle 4K scaling differently than Windows. Apple uses a "Retina" scaling system that renders at double the resolution then downsamples, which means a 4K display on macOS defaults to an effective 1920 × 1080 look at 2x pixel density. This should fill the screen without overscan, but issues can still appear when using a TV as the display.
macOS display scaling options
Click the Apple menu, then System Settings (or System Preferences on older macOS versions). Go to Displays. You'll see a "Default resolution" option and several "Scaled" resolution choices.
macOS shows five or six scaled options represented as "Larger Text" through "More Space." The middle option is typically the default and maps correctly to the panel. If you're seeing black borders, try a different scaled option. If the image extends past the edges, macOS may have detected the display incorrectly as a TV rather than a monitor.
Hold the Option key while clicking "Scaled" to see a full list of available resolutions. Look for the resolution marked "(HiDPI)" or checkered to ensure you're getting proper pixel doubling without interpolation artifacts.
Forcing a specific resolution on Mac
If macOS isn't offering the right resolution, you can use a free utility like BetterDisplay or SwitchResX. These tools let you create custom EDID overrides that tell macOS to treat the display as a monitors rather than a TV, which often eliminates overscan behavior.
BetterDisplay is free for basic features and available from GitHub. Once installed, you can override the display's reported EDID and force a specific resolution at a specific refresh rate. This is especially useful for older 4K TVs that don't properly report their capabilities over HDMI.
Fix Overscaling on Linux
Linux gives you the most control over scaling, but it also requires more technical knowledge. The fix depends on whether you're running X11 or Wayland, and which desktop environment you're using.
xrandr commands for X11
If you're running X11, xrandr is your primary tool. Open a terminal and type xrandr to see a list of connected displays and their available resolutions. You'll see your display listed with "3840×2160" as the preferred mode.
To adjust scaling manually, use:
xrandr --output HDMI-1 --mode 3840x2160 --panning 3840x2160
If the image has black borders, you can add an underscan compensation:
xrandr --output HDMI-1 --set underscan on --set "underscan hborder 40" --set "underscan vborder 20"
Adjust the border values (in pixels) until the desktop fills the screen. Different displays need different values, so start at 0 and increase gradually.
Wayland fractional scaling
On Wayland-based setups (default on modern Fedora, Ubuntu 22.04+, and most GNOME or KDE Plasma installations), scaling is handled by the compositor. GNOME's Settings app has a "Displays" section where you can set scale to 100%, 150%, or 200%.
KDE Plasma's System Settings has a similar option under "Display and Monitor" with a "Scale" slider. Both environments now support fractional scaling (like 125% or 175%) in their settings, though this was experimental until recent releases.
Wayland doesn't have xrandr. Use your desktop environment's display settings or wlr-randr for wlroots-based compositors like Sway.
When the Problem Is the TV, Not the PC
If you've checked your GPU settings and the resolution is correct in your OS, the TV itself is almost certainly applying overscan. This is the most common setup issue people run into with 4K displays, and it's the one most likely to fly under the radar because you'd never think to look in the TV's own menu.
TV processors are designed for video content. They assume incoming signals might have noise, overshoot, or timing issues at the edges. So they crop the image slightly by default, a behavior that made perfect sense in 2005 but looks terrible on a PC desktop.
Find and disable overscan in your TV's settings
Every TV brand hides this setting in a slightly different place. Here's where to look:
- Samsung: Settings → General → External Device Manager → HDMI Black Level (for signal) or Picture → Picture Size Settings → Fit to Screen
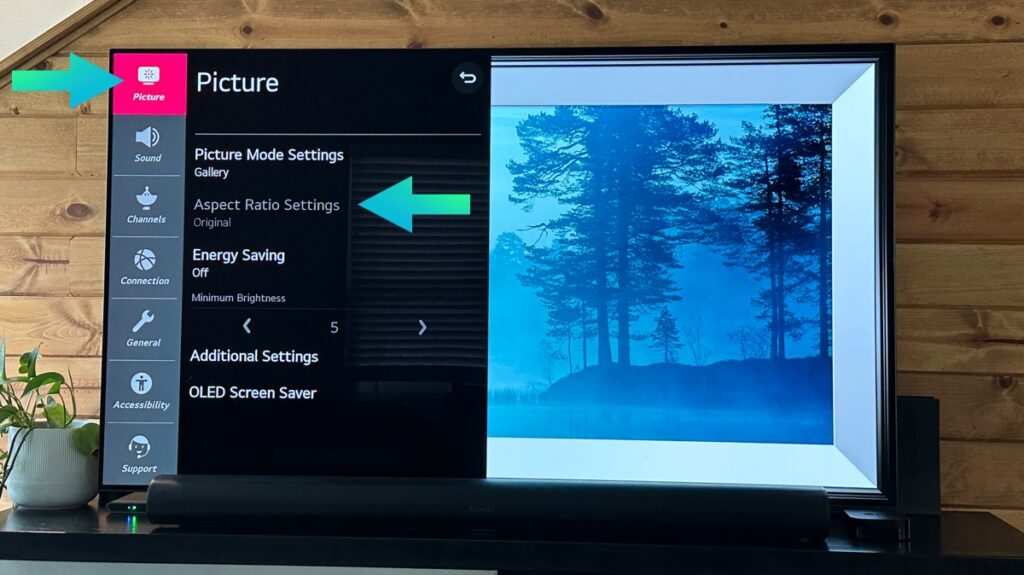
- LG: Settings → Picture → Aspect Ratio → Just Scan (This is the one that disables overscan)
- Sony: Settings → Display & Sound → Screen → Area Display or Full Pixel
- TCL/Hisense: Settings → Picture → Advanced → Screen Aspect or Overscan
- Vizio: Menu → Picture → Picture Size or Full
If you can't find it, search your specific TV model number plus "disable overscan" or "fit to screen." The terminology varies wildly between manufacturers and even between model years. "Just Scan," "Screen Fit," "Dot by Dot," "1:1 Pixel Mapping," and "Original" all mean the same thing, disable overscan.
Enable PC mode or Game mode on your TV
Many 4K TVs have a dedicated PC or Game mode that automatically disables overscan and reduces input lag. This is often the quickest fix because it changes multiple settings at once.
Look for a "Picture Mode" or "Scene Select" option in your TV's picture settings. "Game" mode and "PC" mode (sometimes called "Computer" or "Game Console") typically disable all post-processing, including overscan, motion smoothing, and edge enhancement.
On some Samsung TVs, you need to rename the HDMI input to "PC" in the Source menu for the TV to automatically switch to 1:1 pixel mapping. On LG TVs, you may need to set the icon to "PC" in the Home Dashboard for the same effect.
Rename the HDMI input to "PC" or "Computer"
This is a hidden trick that works on many TVs from Samsung, Sony, LG, and others. Go to your TV's source or input list, find the HDMI port your PC is connected to, and edit the input label. Select "PC" or "Computer" from the available labels.
This tells the TV's processor to treat that input as a data signal rather than video. The TV will automatically disable overscan, turn off unnecessary processing, and sometimes enable a lower-latency mode. It's the single most effective one-step fix for TV overscaling from a PC.
The exact steps vary by manufacturer. On Samsung, it's Settings → Connection → External Device Manager → Input Signal Plus (and edit the name). On Sony, it's Settings → Watching TV → External Inputs → HDMI Signal Format.
On LG, it's Home → All Settings → General → Devices → External Devices → HDMI Input Label.
GPU Scaling vs. Display Scaling: Which Should You Use?
There are two places scaling can happen in your display chain. Either your GPU scales the image before sending it to the display, or the display scales the image after receiving it. Choosing between them affects image quality and how much control you have.
GPU scaling is better for gaming and applications that run at resolutions lower than native. The GPU handles the interpolation, which is typically higher quality than a display's built-in scaler.
You'll want GPU scaling if:
- You run games at lower than 4K and want them to fill the screen
- You connect to a display that has a poor internal scaler (common on budget TVs)
- You want consistent scaling behavior across multiple displays
Display scaling is better for desktop use at native resolution. The display receives the full 4K signal and handles any minor adjustments (like overscan compensation) directly on the panel.
You'll want display scaling if:
- Viewing the desktop and productivity apps at native resolution
- Using a high-quality monitor with a good internal scaler
- You want the simplest possible setup with the fewest processing steps
The key is to make sure only one of them is doing the scaling. If both GPU scaling and display scaling are active, you get double scaling, which causes blurriness and can create overscaling artifacts. Turn off GPU scaling in your control panel if you're letting the display handle it, and vice versa.
Common Mistakes That Keep Overscaling Alive
Even after following the right steps, overscaling can persist if you're making one of these common errors. These are the things that trip people up after they think they've fixed the problem.
Not checking the TV's own settings first. People spend an hour tweaking GPU drivers when the TV has a simple "Just Scan" option that would fix it in ten seconds. Always check the display's OSD before diving into driver settings.
Using the wrong HDMI port. Some TVs only support full 4K at 60Hz on specific HDMI ports. If you're plugged into HDMI 1 when only HDMI 2 and HDMI 3 support the full bandwidth, the TV might not receive the signal correctly and fall back to a scaled mode.
Forgetting to apply changes. In NVIDIA Control Panel, you have to click "Apply" for scaling changes to take effect. The preview might look correct, but the change doesn't stick until you confirm it. Same goes for AMD Radeon Software.
Ignoring driver updates. GPU driver updates sometimes reset scaling settings to defaults. If overscaling suddenly appears after a driver update, check your control panel settings before assuming something is broken.
Mixing scaling methods. If you've set underscan in your GPU control panel and also adjusted the TV's picture size, you're fighting yourself. Pick one method and stick with it.
Not restarting after changes. Some scaling changes require a full restart of the display pipeline. If you've made changes and the problem persists, try turning the display off and back on, or restarting your PC entirely.
Quick Reference: Where to Find Scaling Controls by Setup
Here's a fast lookup table for the most common configurations. Find your setup and go straight to the right setting.
| Setup | Where to Fix It | What to Look for |
|---|---|---|
| Windows + NVIDIA + TV | NVIDIA Control Panel → Adjust desktop size and position | Set "Perform scaling on" to Display |
| Windows + AMD + TV | AMD Radeon Software → Display | Turn off GPU Scaling |
| Windows + Intel + TV | Intel Graphics Command Center → Display | Set Scale to "Maintain display scaling" |
| macOS + TV | System Settings → Displays | Hold Option + click Scaled for full list |
| Linux + X11 + TV | Terminal: xrandr | Use --set underscan on with border values |
| Any OS + TV | TV's own OSD menu | Look for "Just Scan," "Screen Fit," or "PC Mode" |
| Any OS + Dedicated Monitor | GPU control panel | Check scaling is set to 100% or "No scaling" |
When Nothing Else Works
If you've tried everything above and overscaling persists, you're likely dealing with an EDID communication issue. The display is telling your PC the wrong capabilities, and your PC is sending a signal the display doesn't handle correctly.
Custom Resolution Utility (CRU)
CRU is a free tool that lets you edit the EDID data your display reports to your PC. You can remove unsupported resolution flags, adjust timing parameters, and force the display to report itself as a monitor rather than a TV.
Download CRU from the developer's GitHub page. Open it, select your display from the dropdown, and look for the "Extension blocks" section. Find the "CEA-861" block (this defines TV-style resolutions) and either delete it or modify it.
Restart your PC after making changes.
Use CRU with caution. Incorrect EDID data can cause the display to go blank if the PC sends an unsupported signal. CRU includes a reset64.exe tool that restores your original EDID data if something goes wrong.
Driver clean install
Sometimes driver corruption causes scaling settings to stick incorrectly. Use Display Driver Uninstaller (DDU) in Safe Mode to completely remove your GPU drivers, then install the latest version fresh from NVIDIA, AMD, or Intel. This clears any cached EDID data and forces a fresh handshake with the display.
Monitor factory reset
As a last resort, reset your display to factory defaults through its OSD menu. This clears any custom picture settings, including overscan adjustments that might have been changed accidentally. After the reset, reconfigure your preferred settings and check if the overscaling issue is resolved.
Frequently Asked Questions
Does overscaling damage the monitor?
No. Overscaling is purely a signal processing issue. It doesn't harm the panel or any components.
It just means the image isn't mapping correctly to the display's native resolution.
Why does overscaling happen after a Windows update?
Windows updates can reset display settings or install a generic GPU driver that overrides your custom scaling. Check your GPU control panel after any major update and reapply your settings.
Can a bad HDMI cable cause overscaling?
Yes, indirectly. A cable that can't handle the full bandwidth of 4K at 60Hz can cause handshake failures. The display or GPU may fall back to a lower resolution, which then gets scaled incorrectly.
How do I fix overscaling on a Samsung TV specifically?
Go to Settings → Picture → Picture Size Settings → Fit to Screen. Also rename the HDMI input to "PC" in the Source menu. This combination fixes overscaling on most Samsung models.
Is GPU scaling or display scaling better for gaming?
GPU scaling is generally better for gaming. The GPU's scaler is typically higher quality than a TV's internal scaler, and it adds less latency. Set "Perform scaling on" to GPU in NVIDIA Control Panel for the best gaming experience.
Why is there no overscan option in my TV's menu?
Some TVs hide the overscan setting behind a specific picture mode. Switch to "PC" or "Game" mode first, then check the picture size options. If you still can't find it, search your exact model number online, as the setting name and location vary significantly between manufacturers.

Similar Posts