How to Adjust Scaling on 4K Monitor
So you just plugged in your shiny new 4K monitor and everything's tiny. Text looks like you need a magnifying glass, icons are barely readable, and you're wondering what went wrong. Learning how to adjust scaling on a 4K monitor is the fix, but the right answer depends on your OS, your screen size, and what you actually use it for.
There's no single magic number.
Here's the thing most guides skip. A 27-inch 4K panel packs about 163 pixels per inch, while a 32-inch 4K panel drops to roughly 138 PPI. Same resolution, very different experience at 100% scaling.
Windows, macOS, and Linux each handle this differently, and picking the wrong setting can leave you with blurry apps or wasted screen space. Let's walk through it step by step.

Quick Answer
Adjust scaling on your 4K monitor through your operating system's display settings. Windows users go to Settings, System, Display, and change Scale. macOS users open System Settings, Displays, and pick a Scaled option. Use 150 percent for a 27-inch panel.
Use 100 to 125 percent for a 32-inch panel. Log out after changing for full effect.
How 4K Scaling Actually Works (And Why It's Confusing)
The Core Problem: Pixels vs. Perceived Size
Your 3840×2160 resolution means exactly one thing. There are 8.3 million physical pixels on that panel. The question is how big the operating system draws interface elements relative to those pixels.
At 100% scaling, one software pixel maps to one physical pixel. On a 27-inch 4K panel that makes everything razor sharp but painfully small. At 150% scaling, the OS renders UI elements as if the display were 2560×1440, then upscales to the panel.
You get larger, readable elements with still-crisp results on most modern apps.
Think of it like zooming in on a photo. The detail stays clean when you scale intelligently. But not all apps cooperate, and not all operating systems use the same math underneath.
Why 4K on 27" Feels Different Than 4K on 32"
Pixel density is everything here. The numbers tell the story clearly.
| Panel Size | Resolution | PPI | Comfortable Scaling |
|---|---|---|---|
| 27" | 3840×2160 | ~163 | 150% |
| 32" | 3840×2160 | ~138 | 100–125% |
| 42" | 3840×2160 | ~105 | 100% |
A 32-inch 4K screen at 100% scaling feels similar to a 1080p 15-inch laptop screen in terms of UI element size. You've got more physical room to sit back. On a 27-inch panel, you're sitting closer and the pixels are tighter, so 100% makes text uncomfortably small for most people.
This is why blanket advice fails. Someone with a 32-inch 4K doesn't need the same scaling as someone with a 27-inch 4K. Same resolution, totally different experience.
How Each Operating System Handles Scaling Differently
Windows uses percentage-based scaling tied to DPI. At 150%, the system tells applications to render at 1.5× size. Modern apps respond well.
Older apps that aren't DPI-aware get bitmap-stretched, which causes blur.
macOS takes a different approach. It renders the desktop at a higher internal resolution then downsamples to the panel. That's why non-native scaled resolutions on macOS can introduce a slight softness and a small performance hit. macOS works cleanest at exact 2× scaling, which is why Apple's own 5K and 6K displays feel so crisp.
Linux depends heavily on your desktop environment and display server. GNOME on Wayland handles fractional scaling reasonably well. X11-based setups often force you into integer multiples, leaving awkward gaps between 100% and 200%.
Decision Path: Find Your Setup and Follow the Steps
Before diving into menus, identify where you sit. The right workflow changes based on three things: your operating system, your monitor size, and what you do most on that screen.
Step 1: Identify Your Operating System
This is your fork in the road. Each OS has its own settings location and its own quirks.
- Windows 10/11: Settings → System → Display → Scale and Layout
- macOS Ventura and later: System Settings → Displays → Scaled
- macOS Monterey and earlier: System Preferences → Displays → Scaled
- GNOME (Ubuntu, Fedora): Settings → Displays → Scale
- KDE Plasma: System Settings → Display Configuration → Scale
- Chrome OS: Settings → Device → Displays → Display size
If you're on Windows, keep reading to the Windows section. Mac users jump to the macOS section. Linux folks have the most variability, covered in its own section.
Step 2: Check Your Monitor Size and PPI
Right-click your desktop, go into display properties, and confirm the native resolution is 3840×2160. Then check your panel size, usually printed on the back of the monitor or listed in the manual.
Quick math if you want to verify: diagonal in pixels divided by diagonal in inches. Or look up your model's PPI on the manufacturer's spec sheet. Most 27-inch 4K panels hit around 163 PPI.
Most 32-inch 4K panels land near 138 PPI.
This number determines which scaling percentages actually work well for you. More on that in the sections below.
Step 3: Determine Your Primary Use Case
What you do on this monitor matters more than you'd think.
Text-heavy work (writing, coding, spreadsheets): You want comfortable text size without sacrificing workspace. Lean toward the higher end of the recommended range. On a 27-inch, that's 150%.
On a 32-inch, 125% gives you generous text with room for multiple windows.
Photo and video editing: You want maximum workspace for timelines, toolbars, and panels. If your eyesight is good and you sit close, 125% on a 27-inch or 100% on a 32-inch gives you the most real estate.
Gaming: Most modern games handle resolution and UI scaling independently. Set OS scaling for desktop comfort, then adjust in-game UI scaling separately. For retro or pixel-art games, look into GPU integer scaling for crisp pixels.
Mixed use: Start at the middle of the recommended range and adjust after a few days. Your eyes need time to adapt.
Windows: How to Adjust Scaling on a 4K Monitor
Windows gives you the most granular control and also the most ways to break things. Here's the clean path.
The Standard Fix (Scale and Layout)
This solves the problem for 90% of users.
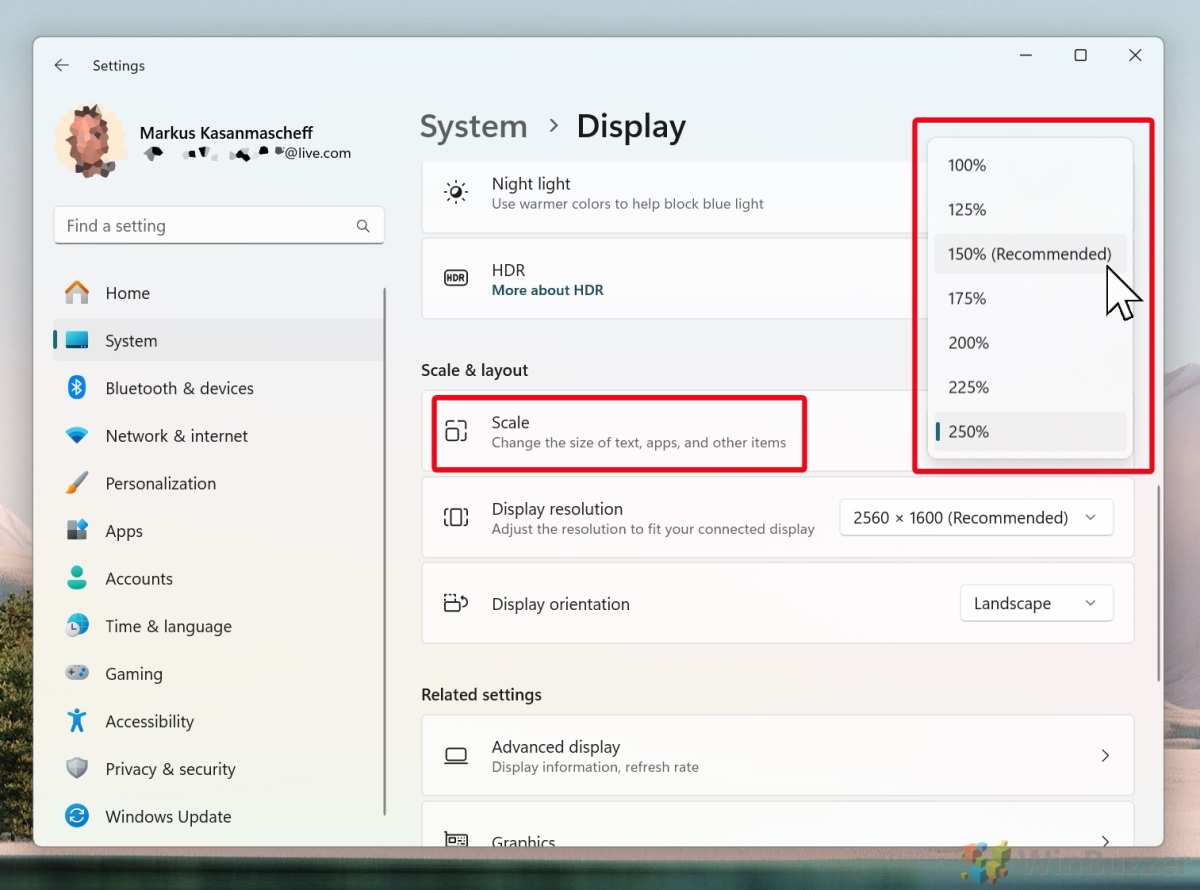
- Right-click on your desktop background
- Select Display settings
- Under Scale and Layout, find the dropdown for Scale
- Choose from the preset options: 100%, 125%, 150%, 175%, 200%, and so on
- Sign out and sign back in for changes to fully apply
Windows 11 as of 2026 recommends the best option for your display automatically. On a 27-inch 4K, it'll suggest 150%. On a 32-inch 4K, it'll usually suggest 125%.
These recommendations are solid starting points.
The dropdown only shows preset increments in 25% steps on most systems. You're not locked into those, but non-standard values introduce more compatibility headaches.
When You Need Custom Scaling
If the presets don't feel right, you can set a custom percentage.
- In Display settings, click Advanced scaling settings
- Enter a value between 100% and 500% in the custom field
- Click the checkmark and sign out
Custom scaling is rarely worth the trouble on a 4K monitor. Values like 142% or 167% can cause blurriness in apps that aren't perfectly DPI-aware. You'll spend more time fixing individual apps than enjoying the slight size adjustment.
There's one exception. If 150% is slightly too large and 125% is too small on a 27-inch panel, 140% might work for you. Test it with your most-used apps before committing.
Fixing Blurry Apps on Windows
This is the real pain point with Windows scaling. Older apps, some enterprise software, and certain legacy tools don't respond to DPI changes gracefully. They appear blurry while everything around them stays sharp.
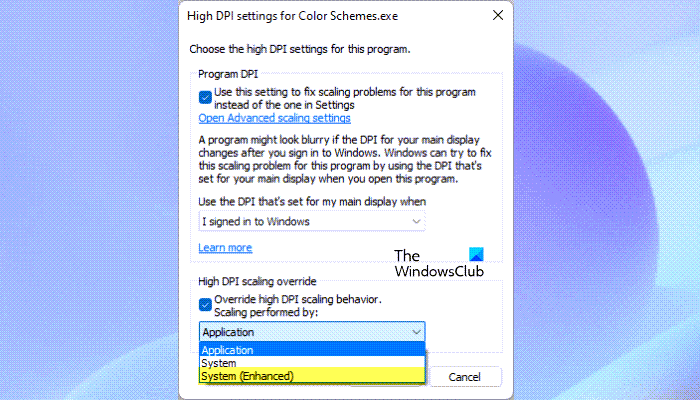
Here's the per-app fix.
- Right-click the app's executable or shortcut
- Select Properties
- Click the Compatibility tab
- Click Change high DPI settings
- Check Override high DPI scaling behavior
- Set the dropdown to Application or System (Enhanced)
- Click OK, then Apply
Application lets the app handle its own scaling, which fixes apps that were built DPI-aware but misbehave under Windows scaling. System (Enhanced) uses a newer Windows scaling engine that improves blurriness for GDI-based apps. Try Application first. If that makes the UI too small, switch to System (Enhanced).
Not every app responds to these overrides perfectly. Some older software simply doesn't support high-DPI displays. In those cases you're stuck with blur at anything above 100%, or you run at 100% and accept the tiny interface.
GPU Scaling vs. Display Scaling (NVIDIA, AMD, Intel)
These are different from OS scaling and often get mixed up.
GPU scaling is handled by your graphics driver. It adjusts how the GPU outputs the image to match the panel. You'll find it in:
- NVIDIA Control Panel: Display → Adjust desktop size and position
- AMD Radeon Software: Display → GPU Scaling
- Intel Graphics Command Center: Display → Scale
Display-side scaling is handled by the monitor's internal scaler. You access it through the monitor's on-screen display (OSD) menu, usually under Image Size or Scaling options.
For standard desktop use, let Windows handle scaling and turn off GPU scaling. GPU scaling is useful when you're running a non-native resolution, like dropping to 2560×1440 for gaming. In that scenario, GPU scaling generally produces a sharper image than display scaling because the graphics card has more processing power than the monitor's built-in scaler.
One important note. GPU scaling can add a frame or two of input latency. If you're gaming at non-native resolutions, test it and see if you notice.
Competitive players usually prefer no scaling at all, running the game at its native output with black borders if needed.
macOS: How to Adjust Scaling on a 4K Monitor
Apple's approach to scaling is fundamentally different from Windows, and it trips up a lot of people making the switch.

Using Scaled Resolution in Display Settings
macOS doesn't use percentages. It shows you scaled resolution options that look like resolution choices but are actually scaling presets.
- Open System Settings (or System Preferences on older macOS)
- Click Displays
- Click Scaled
- Choose from the available options, usually five choices
On a 4K monitor, macOS typically offers these scaled options:
| Scaled Option | Effective Workspace | Best For |
|---|---|---|
| Looks like 1920×1080 | Large UI, less space | Accessibility, tired eyes |
| Looks like 2560×1440 | Balanced | Most users on 27" 4K |
| Looks like 3008×1692 | More space | Users wanting extra room |
| Looks like 3360×1890 | Compact | Maximum workspace |
| Looks like 3840×2160 | Native, tiny UI | 32"+ panels, close viewing |
The default middle option, "Looks like 2560×1440," is the sweet spot for most 27-inch 4K users. It gives you the same usable workspace as a 1440p monitor but with sharper text and graphics thanks to the 2× pixel density.
The Hidden Performance Cost of Non-Native Scaling
Here's what Apple doesn't advertise prominently. Every scaled option except native 3840×2160 forces the GPU to do extra work.
macOS renders the desktop at a higher internal resolution, then downsamples it to your panel's native 4K. For the "Looks like 2560×1440" option, the system actually renders at 5120×2880 internally, then scales down. That's significantly more pixels for the GPU to push.
On Apple Silicon Macs (M1 and later), this overhead is usually manageable. You might notice slightly higher GPU memory usage and a small bump in fan activity under heavy load. On Intel-based Macs, the performance hit is more noticeable, especially with integrated graphics.
The practical takeaway: if you're on an older Intel Mac and notice sluggishness after switching to a scaled resolution, try the next option up (closer to native). Less internal rendering work means smoother performance.
Why macOS Works Best with 5K/6K Monitors
Apple's Retina display philosophy relies on exact 2× scaling. A 5K display (5120×2880) at "Looks like 2560×1440" renders internally at native resolution with zero quality loss. Every pixel maps perfectly.
On a 4K display, true 2× scaling would only give you "Looks like 1920×1080," which is too large for most productivity work. So macOS uses fractional scaling (1.5×, 1.75×, etc.), which introduces that slight softness and performance overhead.
This isn't a flaw in your 4K monitor. It's a mathematical reality of how Apple's scaling system works. For the absolute crispest macOS experience, 5K or higher resolution panels are the intended target.
But 4K at the 2560×1440 equivalent setting still looks excellent for daily use.
Linux: How to Adjust Scaling on a 4K Monitor
Linux gives you the most control and the most headaches. Your experience depends heavily on your desktop environment and display server.
GNOME Display Settings
GNOME on Ubuntu, Fedora, and similar distributions offers the smoothest 4K scaling experience on Linux.
- Open Settings
- Click Displays
- Find the Scale dropdown
- Choose 100%, 150%, 200%, or a custom value
GNOME on Wayland supports fractional scaling natively. You can set 125%, 150%, 175%, and other values without major issues. Toggle "Fractional Scaling" in the display settings if the grayed-out options aren't available.
On X11, fractional scaling is technically available but often produces blurry results. GNOME renders at 2× then downscales, which works but isn't as clean as Wayland's approach. If you're on X11 and want sharp results, stick to 100% or 200%.
KDE Plasma Display Configuration
KDE Plasma handles scaling through System Settings.
- Open System Settings
- Go to Display and Monitor → Display Configuration
- Adjust the Scale slider or set a custom percentage
KDE Plasma on Wayland has improved fractional scaling support significantly in recent releases. Plasma 6 handles 150% and similar values well on Wayland. On X11, KDE's experience mirrors GNOME's limitations.
One advantage KDE offers: you can set different scaling per monitor more easily than GNOME in some configurations. This matters a lot if you're running a 4K panel alongside a 1080p secondary display.
Fractional Scaling on X11 vs. Wayland
This is the core issue with Linux 4K scaling.
X11 was designed decades ago without HiDPI awareness. Fractional scaling on X11 works by rendering at an integer multiple (usually 2×) then scaling down. This causes blur, increased GPU load, and occasional rendering glitches.
Wayland was built with modern display needs in mind. Fractional scaling on Wayland renders at the target resolution natively. The result is sharper text and fewer artifacts.
If you're setting up a 4K monitor on Linux in 2026, use Wayland if your distribution and desktop environment support it. Ubuntu defaults to Wayland. Fedora defaults to Wayland.
Most major distributions have made the switch. If you're still on X11 for specific reasons, consider sticking to 200% scaling for the sharpest result, or 100% if you prefer the smallest UI.
Common Mistakes That Make Your 4K Monitor Look Worse
Using the Wrong Scaling Percentage for Your Screen Size
The most common error is blindly following someone else's recommendation. A friend with a 32-inch 4K swears by 100% scaling. You have a 27-inch 4K.
You try 100% and everything's microscopic.
Match your scaling to your panel size and viewing distance. Sitting two feet from a 27-inch 4K at 100% is uncomfortable for most people. Sitting four feet from a 32-inch 4K at 150% wastes the resolution advantage.
Ignoring Per-Monitor Scaling in Multi-Display Setups
Running a 4K monitor next to a 1080p monitor? This is where things get messy.
Windows handles per-monitor scaling reasonably well in 2026, but you'll still encounter issues. Moving a window between monitors with different scaling can cause the window to resize awkwardly or render blurry momentarily. Some apps don't handle the transition gracefully.
The cleanest solution is matching scaling percentages across monitors. If your 4K runs at 150% and your 1080p runs at 100%, the physical size of UI elements will be similar on both. That consistency makes window movement less jarring.
Forgetting to Log Out After Changing Scaling
Windows and macOS both apply scaling changes immediately for new windows, but the login screen, system dialogs, and some background processes need a full sign-out to update. Linux often requires a restart of the display server or at minimum a logout.
Always sign out and back in after changing scaling. It takes 30 seconds and prevents half-applied settings that cause inconsistent behavior.
Not Calibrating ClearType on Windows
ClearType is Microsoft's subpixel rendering engine for text. It's tuned for standard 100% scaling by default. When you bump to 150% or higher, ClearType can look slightly off.
Search for "ClearType" in the Windows Start menu and run the ClearType Text Tuner. It walks you through four screens of text samples, picking the ones that look best to your eyes. Takes about two minutes and makes a noticeable difference in text clarity at scaled resolutions.
Quick Reference: Recommended Scaling by Monitor Size and Use Case
Here's a consolidated reference for the most common 4K monitor configurations.
| Monitor Size | PPI | General Use | Text-Heavy Work | Content Creation | Gaming |
|---|---|---|---|---|---|
| 27" 4K | ~163 | 150% | 150% | 125–150% | 150% (desktop), in-game varies |
| 32" 4K | ~138 | 100–125% | 125% | 100% | 100–125% |
| 24" 4K | ~184 | 175–200% | 175% | 150–175% | 175% |
These assume typical desktop viewing distances of 24 to 30 inches. If you sit further back, lean toward the lower end. If you sit closer or have vision difficulties, go higher.
For multi-monitor setups with mixed resolutions, try to match the effective UI size across panels rather than matching the scaling percentage. A 27-inch 4K at 150% and a 24-inch 1080p at 100% produce similarly sized UI elements, which makes moving between screens much smoother.
FAQs
Does scaling affect gaming performance?
OS scaling itself has negligible impact on gaming. Games render at their own resolution independently. However, running a game at non-native resolution while the desktop is scaled can introduce blur.
Set in-game resolution to your panel's native 3840×2160 for the sharpest result.
Why does my 4K monitor look blurry at 100%?
It's not blurry. The UI elements are simply very small at native pixel density. On a 27-inch 4K panel, 100% scaling makes text and icons roughly the same size as a 1080p 15-inch laptop screen.
Bump to 150% for comfortable readability.
Can I use different scaling on two 4K monitors?
Yes. Windows supports per-monitor scaling. macOS handles it well too. Linux supports it on Wayland, though X11 can be finicky.
Set each display independently based on its size and your viewing distance.
What if an app looks blurry after changing scaling?
On Windows, right-click the app's shortcut, go to Properties, Compatibility, and click "Change high DPI settings." Try "Application" first, then "System (Enhanced)." On macOS, the app likely needs an update from the developer for proper Retina support.
Is 4K at 150% the same as 1440p?
Functionally, yes. You get the same effective workspace size as a 2560×1440 monitor. The difference is sharpness. 4K at 150% renders more detail because the panel has four times the pixels of 1440p.
Text and edges look noticeably cleaner.
Does HDMI vs DisplayPort affect scaling?
No. The connection type doesn't change how scaling works. Both carry the same resolution and scaling is handled by the OS or GPU.
Use whichever port supports your desired refresh rate. DisplayPort 1.2 or HDMI 2.0 minimum for 4K at 60Hz.
Final Recommendation: The Decision Guide
If you take one thing from this guide, let it be this: match your scaling to your panel size and viewing distance, not to what someone else uses.
For a 27-inch 4K monitor, start at 150%. That's the consensus sweet spot across user reports and manufacturer recommendations. It gives you readable text, comfortable UI sizing, and a workspace equivalent to a 1440p display with sharper rendering.
For a 32-inch 4K monitor, start at 125%. You'll get larger text without sacrificing too much screen real estate. If you sit further than three feet from the panel, 100% works fine.
For multi-monitor setups, prioritize consistent UI element size across displays rather than matching scaling percentages. Your eyes care about physical size, not numbers in a settings menu.
And always sign out after changing scaling. Thirty seconds of inconvenience saves you from hours of wondering why some windows look wrong.

Similar Posts