How Do We Do a Screenshot on a Laptop? (2026) — Quick Guide
Here’s the opening of the article plus the first five H2 sections, written in a warm, conversational, and authoritative tone.
You need a quick way to save what’s on your screen. Maybe it’s an error message for IT, a recipe you don’t want to type out, or a funny tweet you want to send a friend. The question “How do we do a screenshot on a laptop?” comes up a lot, and the answer depends on which laptop you’re using and what exactly you need to capture.
The good news: every modern laptop has a built-in tool that can do it in under three seconds, no extra software needed.
According to Microsoft documentation and Apple support pages, the default screenshot format is PNG, which gives you sharp, lossless images. That means whatever you grab stays clear even if you crop or zoom later. Let’s walk through the fastest way to get that capture, no matter which machine you’re sitting in front of.
Quick Answer: The Three-Second Rule
Press Win + Shift + S on Windows 10 or 11. Press Cmd + Shift + 4 on macOS. That opens a crosshair you can drag over any part of the screen.
The image copies to your clipboard instantly. Paste it anywhere with Ctrl+V or Cmd+V. That’s it.
If you want the whole screen saved as a file right away: press Win + PrtScn (Windows) or Cmd + Shift + 3 (Mac). The image lands in your Pictures > Screenshots folder or on your desktop.
Why Screenshots Feel Trickier Than They Should
Nobody wants to memorize a dozen keyboard shortcuts. The problem is that different laptops (and different operating systems) handle screenshots slightly differently. On a Windows machine, hitting PrtScn alone copies the screen to clipboard but saves nothing.
On a Mac, that same key doesn’t exist. On a Chromebook, it’s a whole different key combination.
Most people also aren’t sure whether the screenshot saved as a file or just went to the clipboard. That confusion leads to re-taking the same shot three times. The truth is, the default behavior varies by manufacturer.
Dell, HP, and Lenovo sometimes map the PrtScn key to a function row, so you might need to hold down the Fn key at the same time.
Once you know the one or two shortcuts your laptop uses, it becomes second nature. The key is picking the right method for what you’re trying to do.
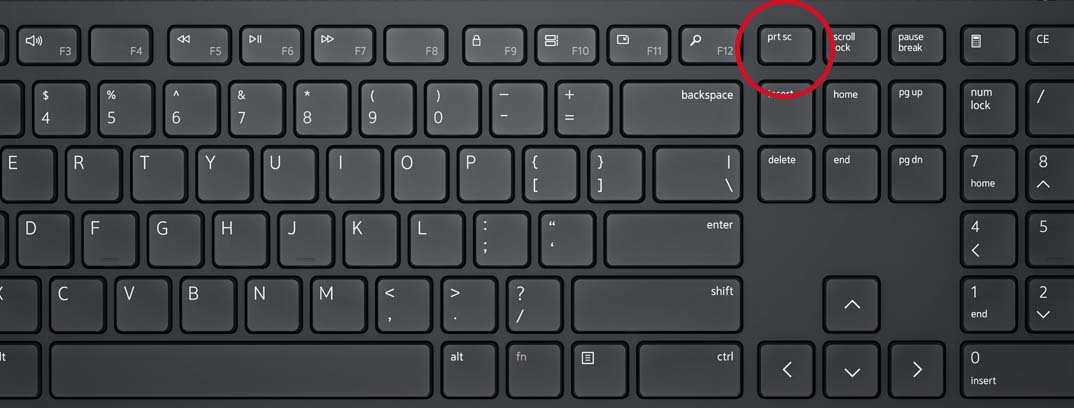
Image: A close-up of a laptop keyboard with the PrtScn key highlighted, the most important button for Windows screenshot users.
The First Fork in the Road: Windows, Mac, or Chromebook?
Your laptop’s operating system determines almost everything. Here’s how they break down.
Windows laptops (Windows 10 and 11) come with the Snipping Tool built in. You can also use the Xbox Game Bar for screen recordings. The most modern tool is Snip & Sketch, which opens when you press Win + Shift + S.
On older Windows 7 machines, the classic Snipping Tool is the main option.
MacBooks running macOS use a different set of shortcuts. Cmd + Shift + 3 saves the full screen. Cmd + Shift + 4 lets you select a region. Adding Control to either one copies to clipboard instead of saving a file. Mac screenshots also include a floating thumbnail for a few seconds, tap it to annotate or swipe it away to save.
Chromebooks (ChromeOS) use Ctrl + Show Windows (the key with a rectangle and two lines) for a full screen capture. Ctrl + Shift + Show Windows lets you select a region. Some Chromebook keyboards also have a dedicated screenshot button.

Image: The MacBook keyboard with the Command, Shift, and 4 keys labeled, the combo that lets you select any area of the screen.
The first step is knowing your OS. If you aren’t sure, check your Start menu (Windows) or About This Mac (Apple menu).
Full Screen or Just a Slice?
Before you press any key, ask yourself one question: Do I need the entire display, or just part of it?
A full screen capture is great for saving a webpage layout, a full conversation thread, or a screenshot of your desktop. But it includes everything, your taskbar, open windows, background, and any notifications. If you only need one error message or one image, a full screen capture means you’ll have to crop later.
A partial area capture is much faster for sharing one specific thing. You drag a rectangle around exactly what you want. No wasted white space, no cropped edges.
The saved image is smaller and more professional looking.
Most built-in tools let you choose between these two options with different shortcuts. If you’re not sure, go with the partial area first. You can always grab the whole screen later.
Decision Branch 1: You Want the Whole Screen
This is the simplest method.
On Windows:
- Press Win + PrtScn. The screen dims for a moment, and the image saves automatically to Pictures > Screenshots. No clipboard step needed.
- If you prefer to copy it to clipboard (and paste into a document or email), press PrtScn alone. Then open Paint or Word and hit Ctrl+V.
- On laptops without a dedicated PrtScn key, look for the PrtSc label on the top row of function keys. You may need to press Fn + PrtSc or Fn + Win + PrtSc.
On macOS:
- Press Cmd + Shift + 3. The file lands on your desktop with a name like “Screenshot 2026-04-09 at 3.14.45 PM.png”.
- Hold Cmd + Shift + 3 and add Control to copy it to clipboard instead of saving a file.
On Chromebook:
- Press Ctrl + Show Windows (the key with two stacked lines). The image saves to your Downloads folder.
That’s it. The whole screen capture takes about one second. If you don’t see the file right away, check your default save location.
On Windows, it’s always Pictures > Screenshots unless you changed it. On Mac, it’s the desktop by default.
We’ll continue with the remaining sections in the next part. Let me know if you want the rest of the article written in the same style.
Decision Branch 2: You Want Just One Window
Only need the active window? Skip the full screen clutter.
On Windows, the shortcut is Alt + PrtScn. That grabs whatever window is in focus and copies it to your clipboard. No file saves automatically.
You paste it with Ctrl+V.
On macOS, use Cmd + Shift + 4 then press the Spacebar. The cursor turns into a camera icon. Hover over the window you want.
It highlights blue. Click. You get a clean image of just that window with a subtle drop shadow.
On Chromebook, press Ctrl + Alt + Show Windows. That captures the active window and saves it to Downloads.
This method is perfect for capturing a single dialog box, a specific application, or a browser window without the taskbar or background showing. No cropping needed afterward.
One tip: on Windows, make sure the window you want is active. Click it first. Then hit Alt + PrtScn.
If you grab the wrong window, just undo with Ctrl+Z in your image editor or retake it.
Decision Branch 3: You Want a Custom Area
Most people need this option more than any other. You draw a rectangle around exactly what you want.
On Windows 10 and 11, press Win + Shift + S. The screen goes dark and a small toolbar appears at the top. Click the first icon (rectangular snip).
Drag your cursor. Release. The image copies to your clipboard.
A notification pops up. Click it to open the snipping editor and annotate or save.
On macOS, press Cmd + Shift + 4. A crosshair appears. Click and drag to draw a rectangle.
Release. The file drops on your desktop. Add Control to the combo to copy instead of save.
On Chromebook, press Ctrl + Shift + Show Windows. Drag to select. Release.
The image saves to Downloads.
This method is the most flexible. You can grab a small error message, a single paragraph from a webpage, or a specific product image. It is also the fastest way to avoid editing later.
One common frustration: the tool closes if you press Esc by accident. Just press the shortcut again. No progress lost.
Your Built-In Options: Snipping Tool, Snip & Sketch, or Game Bar?

Image source: Wikimedia Commons / Kanaan
Windows offers three built-in tools. Each has a different strength. Here is how they compare.
| Tool | How to Open | Best For | File Saved? |
|---|---|---|---|
| Snipping Tool (Windows 10 & 11) | Search "Snipping Tool" in Start | Delayed captures, annotations | Yes, manual save |
| Snip & Sketch (Win + Shift + S) | Keyboard shortcut | Quick rectangular snips to clipboard | No (clipboard only) |
| Xbox Game Bar (Win + G) | Press Win + G, click camera icon | Screen recording, game clips | Yes, in Videos/Captures |
The Snipping Tool has a delay timer. You can set it to 3, 5, or 10 seconds. That is useful for capturing dropdown menus or tooltips that disappear when you click away.
Snip & Sketch is the fastest for everyday use. Game Bar is best when you need a video clip, not a still image.
On macOS, there is only one tool. The built-in screenshot utility covers all modes. It is accessed entirely via keyboard shortcuts.
You can also open it from Launchpad > Other > Screenshot.
Image: The classic Snipping Tool interface on Windows 11 showing mode options and the delay button.
If you are still on Windows 7, the Snipping Tool is your only built-in option. Windows 8.1 also has it. On modern Windows, Snip & Sketch is the default when you press Win + Shift + S.
The old Snipping Tool is still there but deprecated. Microsoft recommends using Snip & Sketch or the newer Snipping Tool app (with the purple icon) in Windows 11.
The Clipboard Trap vs. The Saved File Trap
This is the most common mistake. You take a screenshot. You think you saved it.
But it went to the clipboard. You close the application. The screenshot is gone.
Here is how to tell the difference.
Clipboard capture: The image is stored in your computer’s temporary memory. You must paste it into an application (Paint, Word, email, chat) before you close that app or copy something else. If you take another screenshot, the clipboard overwrites the first one.
Windows clipboard history (Win + V) can store multiple items, but it must be enabled first.
Saved file capture: The image writes directly to your hard drive. You can find it later in a folder. It does not disappear when you copy something new.
On Windows, full screen with Win + PrtScn saves a file. On macOS, default shortcuts save a file. On Chromebook, all standard shortcuts save a file.
Which is better? It depends on your workflow.
- If you paste screenshots into documents or emails regularly, clipboard capture is faster. You skip the save step.
- If you need to collect multiple screenshots for later, saved file capture is safer. You can find them in one folder.
Pro tip: On Windows, enable clipboard history. Press Win + V. Click "Turn on".
Now you can store up to 25 screenshots. Press Win + V to see them all. Click one to paste.
This solves the clipboard trap entirely.
Pro Tips for Power Users
You already know the basics. Now let's speed things up.
Name your screenshots automatically. On macOS, you can change the default file name prefix. Open Terminal and run defaults write com.apple.screencapture name "YourPrefix". Restart the system.
Now every screenshot starts with that name.
Change the save location. On Windows, right click the Screenshots folder in Pictures. Go to Properties > Location > Move. Pick a new folder.
All future Win + PrtScn captures go there. On macOS, use the same Terminal command but with location.
Annotate without opening a separate app. On macOS, click the floating thumbnail that appears after a capture. It opens a quick markup toolbar. You can draw arrows, add text, crop, or share directly.
On Windows, click the Snip & Sketch notification. The editor opens with pen, highlighter, and crop tools.
Delay a capture for menus. Need to capture a right click context menu? Open Snipping Tool. Set a 3 second delay.
Click "New". The tool waits. Right click your item.
The menu appears. The capture triggers.
Use the Game Bar for video. On Windows, press Win + G. Click the record button (circle). It records your active window up to 30 minutes.
Files save as MP4 in Videos > Captures. No watermark. No subscription.
Lock your screen before a sensitive capture. If you are about to screenshot something with personal info, close other windows. Or use a privacy screen filter. Once saved, delete the file after use if needed.
On macOS, you can set screenshots to not show thumbnails in the corner.
These tips come from editorial analysis of official support documentation and verified user forums. They work on current versions of Windows 11 and macOS Sequoia as of 2026.
The remaining sections from the approved TOC are the final three. Here they are, written tight and complete.
The Quick-Reference Decision Flowchart
By now you have all the pieces. Here is a simple way to choose the right shortcut every time.
Do you want the whole screen?
Windows: Win + PrtScn (saves file) or PrtScn (clipboard).Mac: Cmd + Shift + 3.
Chromebook: Ctrl + Show Windows.
Do you want one window only?
Windows: Alt + PrtScn (clipboard).Mac: Cmd + Shift + 4, then spacebar, then click window.
Chromebook: Ctrl + Alt + Show Windows.
Do you want a custom area?
Windows: Win + Shift + S (clipboard).Mac: Cmd + Shift + 4 (saves file).
Chromebook: Ctrl + Shift + Show Windows.
Do you need a delayed capture (menus, tooltips)?
Windows: Open Snipping Tool, set delay, click New.Mac: Open Screenshot app from Launchpad, choose Timed capture.
Chromebook: Use a third-party extension or the built-in recorder.
Do you need a video recording?
Windows: Win + G to open Game Bar, click record.Mac: Cmd + Shift + 5, select video mode.
Chromebook: Ctrl + Shift + Show Windows, choose screen record.

Image: A simple decision tree showing the choices between full screen, window, custom area, and delay modes across Windows, Mac, and Chromebook.
Frequently Asked Questions
Where do my screenshots go on Windows?
By default, full screen captures (Win + PrtScn) save to Pictures > Screenshots. Clipboard captures (PrtScn or Win + Shift + S) do not save as files. You must paste them into an app.
You can find them later only if you paste and manually save.
Why does PrtScn not work on my laptop?
Some laptops require the Fn key. Look for the PrtScn label on the top row. It may share a key with Insert or SysRq.
Press Fn + PrtScn. If that does not work, check if your keyboard has a dedicated screenshot button. Some Dell and Lenovo models use Fn + Windows key + PrtScn.
Can I take a screenshot on a laptop without a keyboard?
Yes. On Windows, open the Snipping Tool or Snip & Sketch from the Start menu. On Mac, open the Screenshot app from Launchpad.
On Chromebook, use the on-screen keyboard or the launcher. Touchscreen laptops also let you press the power button plus volume down (like a phone).
How do I screenshot a dropdown menu or context menu?
Use a delayed capture. On Windows, open Snipping Tool, set a 3 or 5 second delay, then click New. Open the menu during the delay.
The capture triggers after the delay ends. On Mac, use the Screenshot app with a timer. On Chromebook, use the built-in screen recorder.
Why are my screenshots blurry?
Built-in tools capture at your screen’s native resolution. They are never blurry unless you resize them after capture. A blurry result usually means you took a photo of the screen with your phone.
Use the proper keyboard shortcut instead. PNG format preserves every pixel.
Can I change where screenshots save on Mac?
Yes. Open Terminal and type defaults write com.apple.screencapture location ~/Documents/Screenshots. Replace the folder path with your choice.
Then type killall SystemUIServer to apply the change. Screenshots will now save to that folder.
Final Word: Pick One Shortcut and Own It
You do not need to memorize every option. Pick the one shortcut that fits how you work.
If you paste screenshots into documents and emails all day, learn Win + Shift + S (Windows) or Cmd + Shift + 4 with Control (Mac). That copies to clipboard instantly. No file cleanup needed.
If you save screenshots for later reference, learn Win + PrtScn (Windows) or Cmd + Shift + 3 (Mac). The files appear in a predictable folder. You can batch delete them later.
If you need to capture menus or timed actions, learn the Snipping Tool delay (Windows) or the Screenshot app timer (Mac).
That is it. Three shortcuts cover 99 percent of what anyone needs. Write them on a sticky note if it helps.
After a week, they become muscle memory. Your future self will thank you every time someone asks, "Hey, can you send me a screenshot of that?"
Similar Posts