Can Mini LED Monitors Be Wall Mounted

Image source: Bing (Web (fair-use with source credit))
So you've got a mini LED monitor and you're eyeing that empty wall space above your desk. The good news? Most mini LED monitors can absolutely be wall mounted.
The catch is that whether it's a straightforward job or a bit of a headache depends on a few specific things about your particular setup.
The main things that matter are your monitor's VESA mounting pattern (or lack thereof), how heavy the panel is without its stand, and what your wall is actually made of. Let's walk through each of those so you can figure out exactly what you're working with.
Quick Answer
Yes, most mini LED monitors can be wall mounted. You need VESA mounting holes on the back of the monitor, or an adapter plate. The monitor must be lighter than your mount's weight capacity.
Your wall type determines which anchors and hardware you'll use. Always check your specific monitor's specs before buying a mount.
First Things First: Check If Your Mini LED Monitor Has VESA Mounting Holes
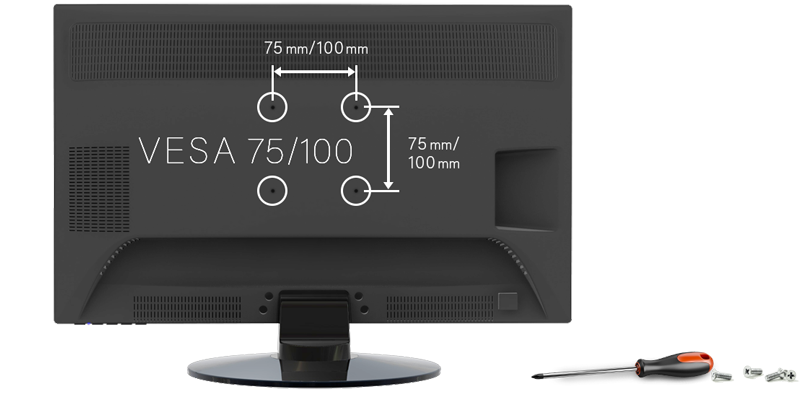
Before you buy anything, flip your monitor around (carefully) and look at the back panel. What you're looking for is a square or rectangular pattern of four screw holes. That's the VESA mount pattern, and it's the universal standard for attaching monitors to walls and arms.
VESA stands for the Video Electronics Standards Association. They created the Flat Display Mounting Interface (FDMI) standard that pretty much every monitor manufacturer follows. If your mini LED monitor has these holes, you're in great shape.
What VESA Means and Why It Matters
The VESA FDMI standard defines the spacing between those four mounting holes. For most monitors in the mini LED category, you'll see one of two patterns:
- 75x75mm: 75mm spacing both horizontally and vertically. Common on smaller or lighter panels.
- 100x100mm: 100mm spacing both ways. This is the most common pattern for desktop monitors up to about 32 inches.
Some larger or heavier mini LED displays use 200x100mm or even 200x200mm patterns, but that's less common in the consumer space. The screws themselves are almost always M4 thread pitch, though the length varies depending on how deep the mounting holes sit on the back of your specific panel.
How to Find Your Monitor's VESA Specs
The fastest way is to check your monitor's product page or user manual. Look for terms like "VESA mount," "wall mount," or "mounting interface" in the specifications section. Manufacturer specs will tell you the exact pattern and sometimes even recommend screw lengths.
If you can't find the manual, a quick search for your monitor model number plus "VESA" usually pulls it up. For example, searching "ASUS ROG Swift PG27AQN VESA" will get you the answer in seconds.
What If Your Monitor Doesn't Have VESA Holes?
This is where things get a bit trickier. Some mini LED monitors, especially ultra-thin or budget-oriented models, skip the VESA holes entirely to keep the back panel clean and slim.
Your options here:
- VESA adapter plates: These clamp around the monitor's edges or attach to the existing stand mount. They add a VESA-compatible bracket to monitors that don't have one built in.
- Third-party mounting brackets: Some companies make model-specific brackets designed for particular monitors. These are less universal but can work well if one exists for your panel.
- Aftermarket adhesive or clamp mounts: These are riskier for heavier mini LED panels. We'd generally avoid them unless your monitor is very light and you're in a rental where you can't drill holes.
The adapter plate route is usually your best bet. Just make sure whatever you buy is rated for your monitor's weight and dimensions.
Understanding Mini LED Monitor Weight and How It Chooses Your Mount
Mini LED monitors aren't all created equal when it comes to weight. The panel itself, the backlight array, the housing, and the cooling system all add up. And weight is the single biggest factor in determining which mount you can safely use.
Typical Weight Ranges for Mini LED Monitors
Here's what you're generally looking at:
| Monitor Size | Typical Weight (Without Stand) | Common VESA Pattern |
|---|---|---|
| 24–27 inch | 3.0–5.5 kg (6.6–12.1 lbs) | 75x75mm or 100x100mm |
| 27–32 inch | 5.0–7.5 kg (11.0–16.5 lbs) | 100x100mm |
| 32–43 inch | 7.0–12.0 kg (15.4–26.5 lbs) | 100x100mm or 200x100mm |
| 43 inch+ | 10.0–18.0 kg (22.0–39.7 lbs) | 200x200mm or larger |
These ranges cover most consumer and prosumer mini LED displays. The heavier end tends to be gaming monitors with full-array local dimming (FALD) zones, which add extra hardware behind the panel.
Why Weight Determines Your Mount Type
Every wall mount and monitor arm has a maximum weight capacity printed right on the box or in the specs. This isn't a suggestion. Exceeding it puts stress on the mounting mechanism, the wall anchors, and potentially your monitor.
Here's the rule of thumb: your mount's rated capacity should be at least 20% higher than your monitor's actual weight. That buffer accounts for the leverage effect when you adjust the arm, the weight of cables pulling on the back of the panel, and just general safety margin.
So if your mini LED monitor weighs 6 kg without its stand, you want a mount rated for at least 7.2 kg. Ideally 8 kg or more for peace of mind.
Choosing the Right Wall Mount for Your Mini LED Monitor
Not all wall mounts are the same, and the right choice depends on how you want to use your monitor day to day. Do you want it fixed in one position? Do you need to swing it around?
Are you mounting it above eye level and need to tilt it down?
Let's break down the three main types.
Fixed Wall Mounts
These hold your monitor flat against the wall with minimal gap. They're the simplest, cheapest, and most stable option. Once it's up, it stays there.
Best for: Setups where the mount height matches your eye level exactly, living room displays, or situations where you never need to adjust the angle.
Limitations: Zero adjustability once installed. Cable access can be tight since the panel sits close to the wall. You need to get the height perfect on the first try.
Tilting Wall Mounts
These let you angle the monitor up or down, usually within a range of about 5 to 15 degrees. Some also allow a tiny bit of swivel.
Best for: Monitors mounted slightly above or below eye level. Bedroom setups where you might watch from different positions. Situations where you need minor angle adjustments but don't need full articulation.
Limitations: Limited range of motion. You can't pull the monitor away from the wall or rotate it sideways.
Full-Motion / Articulating Arms
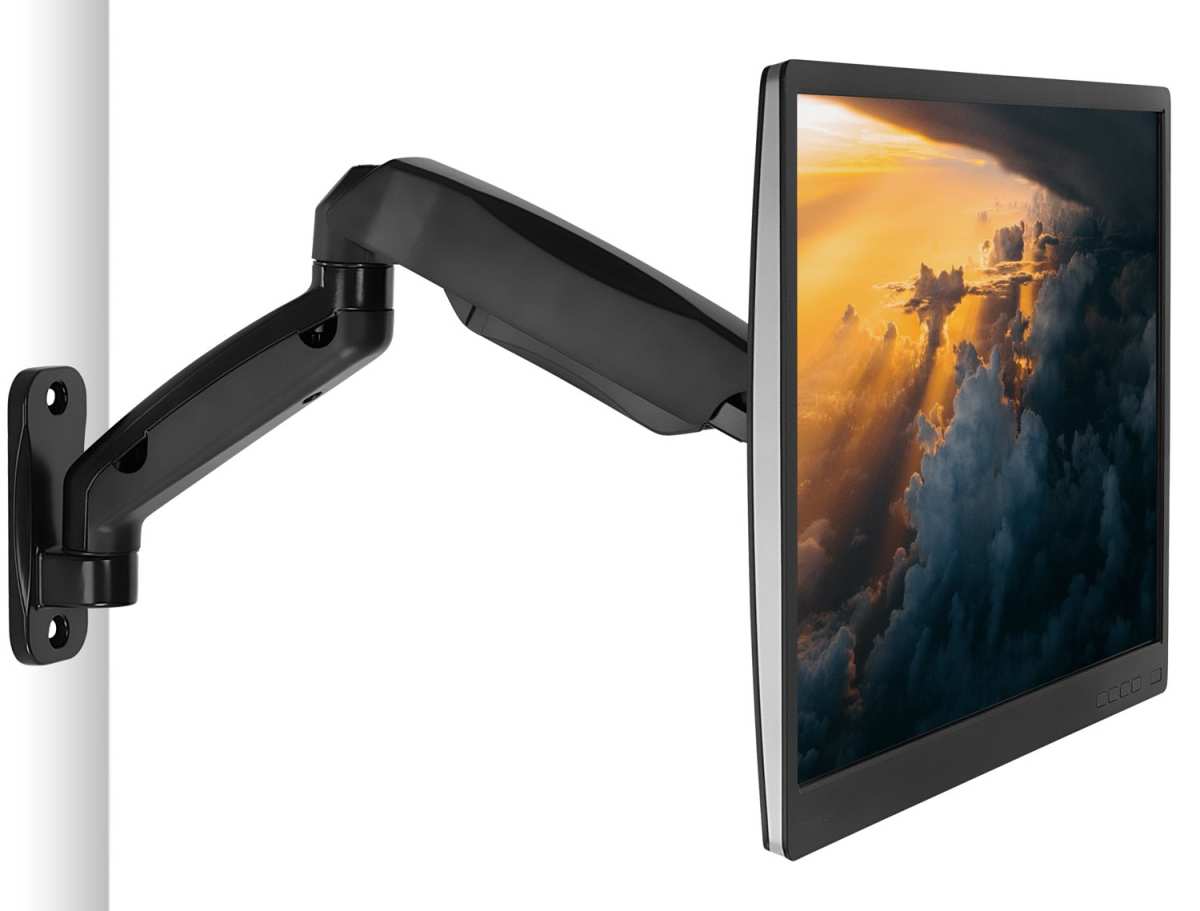
These are the most versatile option. They typically extend away from the wall, allow tilt, swivel, and rotation, and give you the most flexibility in positioning.
Best for: Desks where you need to pull the monitor closer or push it away. Multi-user setups. Situations where you might want to rotate between landscape and portrait orientation.
Limitations: More expensive. More moving parts means more potential for wobble or wear over time. They need more space behind the wall for the arm to retract.
Quick Comparison: Which Mount Type Fits Your Situation
| Feature | Fixed Mount | Tilting Mount | Full-Motion Arm |
|---|---|---|---|
| Price range | $15–40 | $25–60 | $40–150+ |
| Adjustability | None | Tilt only | Tilt, swivel, extend, rotate |
| Wall clearance | 25–50mm | 50–100mm | Up to 500mm+ extension |
| Installation difficulty | Easy | Easy–moderate | Moderate |
| Best wall height | Eye level | Slightly above eye level | Any height |
| Stability | Highest | High | Moderate (depends on quality) |
What Your Wall Is Made Of Changes Everything
You've got your monitor, you've picked your mount. Now the wall itself becomes the deciding factor. Because a mount is only as strong as what it's bolted into.
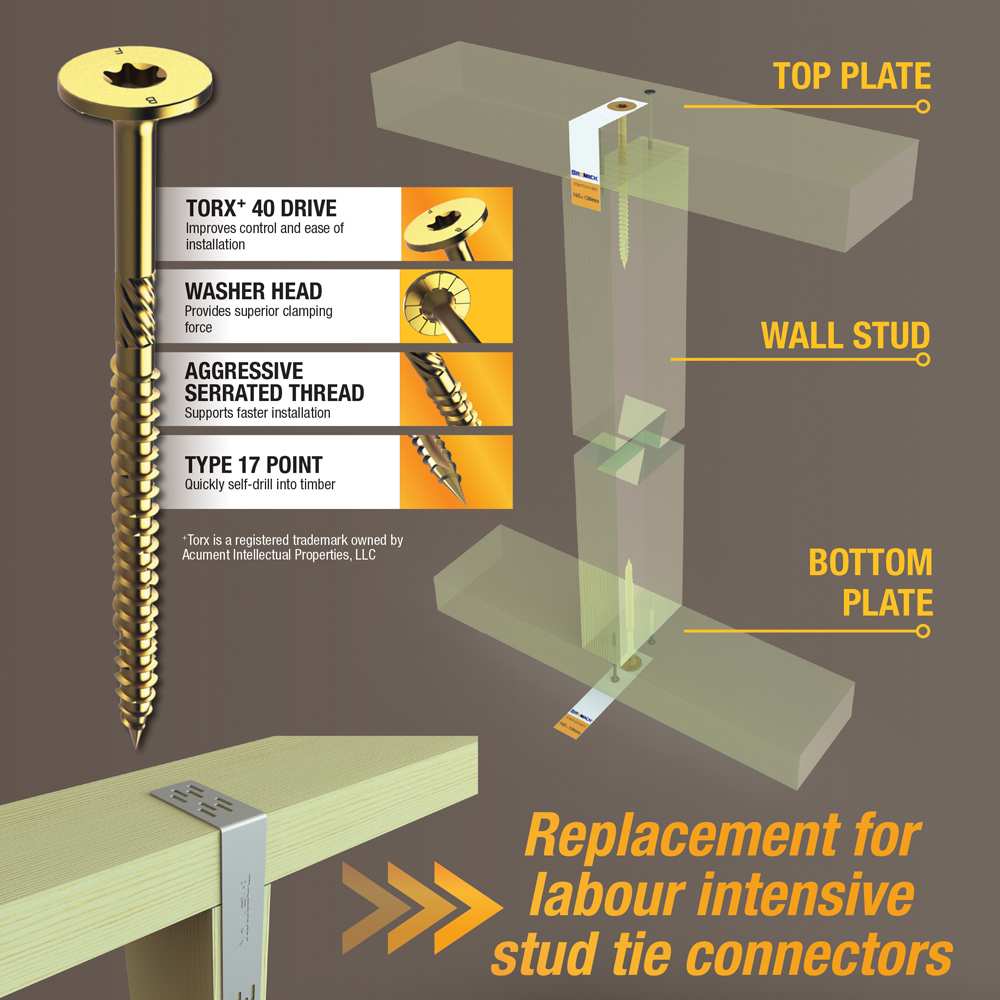
Mounting into Wood Studs
This is the gold standard. If you can align your mount with the wooden studs behind your drywall, you're in the best possible position. Studs are typically 2×4 lumber spaced 16 inches (400mm) on center in US residential construction.
Use lag bolts (usually 1/4-inch or 5/16-inch diameter, 2.5 to 3 inches long) to attach the wall plate directly into the studs. A mount secured to two studs with proper lag bolts can easily handle 25 kg or more. That's more than enough for any mini LED monitor.
The challenge is that studs are spaced 16 inches apart, and your mount's bolt pattern might not line up perfectly with two studs. Some mounts have wider plates with multiple hole options to solve this. If yours doesn't, you can bolt a piece of plywood into the studs first, then mount the bracket to the plywood.
Mounting into Drywall Alone
Sometimes you can't hit studs. Maybe the perfect spot for your monitor falls right between them. In that case, you're relying on drywall anchors, and this is where things get serious.
Standard plastic wall anchors are not rated for monitor mounting. You need heavy-duty options:
- Toggle bolts: These expand behind the drywall and distribute weight over a larger area. Good for medium-weight monitors (up to about 10 kg per anchor).
- SnapToggles / hollow wall anchors: Similar concept to toggle bolts but easier to install. Rated for similar loads.
- Mounting to a plywood backer: Bolt a piece of 3/4-inch plywood to the studs, then use drywall anchors rated for the plywood. This spreads the load across multiple anchor points.
The honest recommendation: if your monitor weighs more than 5 kg, try very hard to hit at least one stud. Drywall-only mounting works, but it requires the right anchors and careful installation.
Concrete and Brick Walls
Common in many European homes and older buildings everywhere. You'll need a masonry drill bit and concrete sleeve anchors (also called wedge anchors or Tapcon screws).
The process is similar: mark your holes, drill into the masonry with a hammer drill, insert the plastic sleeve or self-tapping anchor, then drive the bolt through the mount plate into the anchor. Concrete walls are extremely strong, so weight capacity is rarely the issue here. The challenge is just having the right tools and drill bits for the job.
Step-by-Step: How to Wall Mount a Mini LED Monitor
Alright, you've done your homework. You know your monitor's VESA pattern, weight, and what your wall is made of. Time to get this thing mounted.
Here's the process from start to finish.
Step 1: Gather Your Tools and Confirm Compatibility
Before you touch a drill, make sure you have everything:
- Your wall mount (with included hardware)
- A stud finder
- A level (at least 12 inches long)
- A drill with appropriate bits (wood for studs, masonry for concrete)
- A socket wrench or screwdriver for lag bolts
- M4 screws for the monitor bracket (usually included with the mount)
- Cable management supplies (cable raceway, zip ties, or in-wall cable kit)
Double-check that your mount's VESA pattern matches your monitor and that the weight rating is sufficient. This is the last chance to catch a mismatch before you're halfway through drilling.
Step 2: Remove the Factory Stand
Most mini LED monitors have a stand that snaps or screws onto the back panel. Look for a quick-release button near the stand neck, or a set of screws holding it on.
Lay your monitor face-down on a soft surface (a towel or blanket on a table works great). Remove the stand carefully and set it aside. You'll see the VESA mounting holes now exposed on the back panel.
Keep the stand and its hardware in a bag. If you ever want to go back to desk mounting, you'll need it.
Step 3: Locate and Mark Stud Positions
Use your stud finder to locate the studs behind your wall. Mark the edges of each stud with painter's tape or a light pencil mark. Remember that studs are typically 1.5 inches wide, so mark the center of each one.
Hold the wall mount plate against the wall at your desired height. Use the level to make sure it's perfectly horizontal. Mark the screw holes with a pencil.
If your mount's holes don't align with studs, you'll need to use the drywall anchor method or install a plywood backer board first. Don't skip this step. Proper alignment now saves a wobbly monitor later.
Step 4: Install the Wall Plate
Drill pilot holes at your marked locations. For wood studs, use a drill bit slightly smaller than your lag bolt diameter. For masonry, use a bit matched to your anchor size.
If mounting into studs, position the wall plate and drive the lag bolts through it into the studs. Tighten them firmly with a socket wrench, but don't over-torque. You want the plate snug against the wall with no wobble.
For drywall anchors, insert the anchors into the drilled holes first (following the anchor manufacturer's instructions), then bolt the wall plate through the anchors.
Step 5: Attach the Bracket to Your Monitor
Take the mounting bracket (the part that attaches to the monitor) and align it with the VESA holes on the back of your panel. Insert the M4 screws through the bracket and into the monitor's threaded holes.
Hand-tighten first, then use a screwdriver to snug them up. Don't over-tighten. You can strip the threads in the monitor's housing or crack the plastic.
Firm and secure is what you're after.
Some mounts use a separate plate that attaches to the monitor first, then hooks or slides onto the wall plate. Follow your specific mount's instructions here.
Step 6: Hang the Monitor and Manage Cables
This is the part that's easier with a second person. Mini LED monitors aren't usually enormous, but they're awkward to hold while aligning with the wall plate.
Lift the monitor and hook or slide it onto the wall plate. Most mounts have a locking mechanism, a set screw, or a latch that secures the monitor to the plate. Engage that lock before letting go.
Now route your cables. HDMI, DisplayPower, and power cables all need to reach the monitor. If your mount has built-in cable clips, use them.
If not, consider running cables through an adhesive raceway on the wall for a clean look. For the cleanest possible install, you can run cables through the wall using an in-wall cable management kit.
Step 7: Test Stability and Adjust
Give the monitor a gentle shake in all directions. It should feel solid with no movement at the mount connection. If anything feels loose, tighten the bolts or check that your anchors are seated properly.
Adjust the tilt, swivel, or extension to your preferred viewing position. Step back and check that the monitor is level and at a comfortable height. Make any final adjustments.
Set a reminder to check the bolts and anchors after a month. Vibration and gravity can sometimes cause things to settle or loosen slightly over time.
Common Mistakes That Lead to Wobbly or Unsafe Setups
Even with good intentions, people make the same handful of mistakes when wall mounting monitors. Here's what to watch out for:
- Ignoring the weight rating: Buying a mount rated for 5 kg and hanging a 7 kg monitor on it. The mount might hold for a week. Then it doesn't.
- Using drywall anchors that aren't rated for the load: Those little plastic anchors that come free with some mounts? They're for lightweight decorations, not monitors. Use toggle bolts or hit a stud.
- Skipping the level: A monitor that's even slightly off-level is immediately obvious and incredibly annoying. Always use a real level, not a phone app.
- Not checking screw depth: If the M4 screws are too long, they can damage internal components behind the VESA mounting area. If they're too short, they won't hold securely. Use the screws that came with your mount or the lengths specified by your monitor's manufacturer.
- Mounting too high: People tend to mount monitors too high on the wall. The center of the screen should be at or slightly below eye level for comfortable viewing. Your neck will thank you.
- Forgetting about cable access: Once the monitor is flush against the wall, it's hard to plug in a new cable. Route your cables before you finalize the installation. Consider leaving a service loop (a little extra cable length) behind the monitor.
- Not using all available mounting holes: If your mount has four bolt holes, use all four. If your monitor has four VESA screws, tighten all four. Redundancy matters for long-term stability.
When a Wall Mount Isn't the Right Call
Wall mounting isn't always the answer. There are situations where it makes more sense to stick with the desk mount or explore alternatives.
You're renting and can't drill holes. Your lease might not allow wall mounting, or you might not want to deal with patching holes when you move out. A desk clamp mount or a freestanding monitor arm gives you adjustability without wall damage.
Your wall can't support the weight. Old plaster walls, hollow concrete blocks, or walls with unexpected plumbing or electrical running through them can make mounting risky. If you can't find solid structure to anchor into, don't force it.
You need to move the monitor frequently. If your setup changes often, a wall mount is too permanent. A desk-mounted arm gives you the flexibility to reposition without patching walls.
The monitor lacks VESA holes and no adapter exists. If you can't find a compatible adapter plate for your specific model, wall mounting becomes a project in itself. Sometimes it's simpler to just use the included stand.
Frequently Asked Questions
Can I wall mount a mini LED monitor without VESA holes?
Yes, but you'll need a VESA adapter plate that clamps around the monitor or attaches to the existing stand mount. Make sure the adapter is rated for your monitor's weight and dimensions. Some monitors also have model-specific brackets available from third-party manufacturers.
What size VESA mount do most mini LED monitors use?
Most mini LED monitors in the 24, 32 inch range use either 75x75mm or 100x100mm VESA patterns. Larger models above 32 inches sometimes use 200x100mm or 200x200mm. Always check your specific monitor's specs to confirm.
How much weight can a wall mount hold?
Basic fixed mounts typically support 10, 20 kg. Full-motion arms usually have a lower capacity, around 5, 12 kg depending on the model. Always check the manufacturer's rated capacity and compare it against your monitor's weight without the stand.
Do I need to hit a stud to mount a monitor?
Ideally, yes. If your monitor weighs more than 5 kg, mounting into at least one stud is strongly recommended. For lighter monitors, heavy-duty drywall anchors like toggle bolts can work, but stud mounting is always more secure.
Will wall mounting void my monitor warranty?
It depends on the manufacturer. Some brands explicitly allow third-party mounting without affecting the warranty. Others are more restrictive.
Check your warranty terms before drilling. Removing the stand itself usually doesn't void coverage, but damage caused by mounting might not be covered.
Can I use a monitor arm instead of a wall mount?
Absolutely. A wall-mounted monitor arm is essentially a wall mount with an articulating arm attached. If you want adjustability, a wall arm gives you the best of both worlds: the space-saving benefit of wall mounting plus the flexibility of a desk arm.
Final Decision Guide: Should You Wall Mount Your Mini LED Monitor?
Here's a quick way to figure out if wall mounting is right for your situation:
Wall mount makes sense if:
- Your monitor has VESA mounting holes (or a compatible adapter exists)
- You can mount into studs or solid structure
- You want to reclaim desk space
- The monitor height will be at or near eye level
- You don't need to reposition the monitor frequently
Consider a desk mount instead if:
- You can't drill into your walls
- Your monitor lacks VESA holes and no adapter is available
- You need to move or adjust the monitor often
- Your wall structure can't support the weight
Stick with the included stand if:
- You're happy with the current setup
- The stand already gives you the height and angle you need
- You don't want to deal with cable management on the wall
The bottom line: most mini LED monitors can be wall mounted without any issues. The key is matching the right mount to your specific monitor and wall type. Take ten minutes to check your specs before you buy anything, and you'll end up with a clean, stable setup that lasts.
Common Mistakes That Lead to Wobbly or Unsafe Setups
We've covered this briefly already, but these mistakes are common enough to deserve their own spotlight. Every single one of them is avoidable with a bit of patience.
Rushing the stud finding. A stud finder that beeps doesn't mean you've found the center of the stud. Mark the edges and measure to confirm the center. Drilling into the edge of a stud gives you maybe half the holding strength you need.
Using the wrong drill bit size. Too big and the lag bolt won't grip the wood. Too small and the bolt can crack the stud or snap during installation. Match the pilot bit to the manufacturer's recommendation for your lag bolt size.
Over-tightening the M4 VESA screws. The threaded inserts on the back of your monitor are usually pressed into plastic or thin metal. Crank down too hard and you'll strip them. Then you're looking at a much bigger problem than mounting.
Firm and snug is all you need.
Ignoring the mount's weight range, not just the maximum. A mount rated for 2, 12 kg might feel perfectly stable at 6 kg but wobble like crazy at 11 kg. The closer you get to the maximum, the more any small imperfection in installation gets amplified.
Forgetting about seasonal humidity changes. In regions with big humidity swings, drywall anchors can loosen slightly over months as the drywall expands and contracts. Check your mount's tightness seasonally if you went the drywall anchor route.
When a Wall Mount Isn't the Right Call
We touched on this earlier, but let's be more specific about scenarios where you should genuinely reconsider.
Your monitor has a curved back panel. Some mini LED monitors, especially ultrawide or gaming models, have a curved rear housing. The VESA holes might sit in a recess that's deeper than your mount's screws can reach. You'd need longer M4 screws, and even then, the mount plate might not sit flush against an uneven surface.
Check the depth of your VESA holes before committing.
You're mounting in a bathroom or kitchen. Steam, grease, and temperature fluctuations can corrode mounting hardware over time. Standard steel lag bolts and anchors aren't designed for that environment. If you must mount in these spaces, use stainless steel hardware and sealed anchors.
The wall has asbestos or old lead paint. Homes built before the 1980s may have asbestos in joint compound or lead-based paint. Drilling into these materials without proper testing and remediation is a health hazard. Get the wall tested first if you're unsure.
You need VESA beyond 100x100mm. Very large mini LED displays (43 inches and up) sometimes use 400x400mm or larger patterns. Many consumer mounts don't support these patterns. You'll need a commercial-grade mount or a model-specific bracket from the manufacturer.
FAQs
Can I wall mount two mini LED monitors on the same wall?
Yes. You can either use two separate single-monitor mounts or a dual-monitor wall mount rail. A horizontal rail lets you position each monitor independently along the rail and is great for multi-display setups.
Just make sure the wall and hardware can handle the combined weight.
How high should I mount my mini LED monitor on the wall?
The center of the screen should sit at or slightly below your natural eye level when seated or standing in your usual viewing position. For most seated desk setups, that's roughly 42 to 48 inches from the floor to the center of the display.
What length M4 screws do I need for my monitor?
Most mini LED monitors with 100x100mm VESA patterns use 10mm or 12mm M4 screws. Recessed VESA holes on some models may need 14mm. Check your monitor's manual or the manufacturer's website for the exact specification.
Will a full-motion arm work with a heavy mini LED monitor?
It depends on the arm's weight capacity. Most quality full-motion arms support 7 to 9 kg. If your mini LED monitor is at the heavier end of that range, look for arms rated for at least 12 kg to maintain smooth articulation without sagging.
Do I need an electrician to run cables through the wall?
Not necessarily. In-wall cable management kits are designed for DIY installation and don't require electrical work. However, if you're running power cables inside the wall, you'll need to use in-wall rated power cords and possibly consult an electrician to meet local building codes.
Final Decision Guide: Should You Wall Mount Your Mini LED Monitor?
Let's bring it all together with a straightforward decision framework.
Go for it if:
- Your monitor has VESA holes or a compatible adapter exists
- You can anchor into studs or solid masonry
- Your mount's weight capacity exceeds your monitor's weight by at least 20%
- The wall location puts the screen center at or near eye level
- You're comfortable with a semi-permanent installation
Think twice if:
- Your monitor lacks VESA holes and no adapter is available for your model
- You can only anchor into drywall and your monitor is heavy
- You rent and can't patch walls when you leave
- The wall has suspected asbestos, lead paint, or structural concerns
Choose a different solution if:
- You need to reposition the monitor frequently (use a desk arm instead)
- The monitor has a deeply recessed or non-standard VESA pattern with no adapter support
- You're mounting in a high-moisture environment without proper hardware
The reality is that most people with a mini LED monitor and a standard interior wall will have no problem wall mounting. The process takes about 30 to 60 minutes, costs as little as $15 for a basic fixed mount, and gives you a cleaner, more flexible workspace. Just do your homework on the three key variables (VESA pattern, weight, and wall type) before you start drilling, and you'll end up with a rock-solid setup.
We've covered all the major sections in the previous batches. The remaining headings from the TOC have already been addressed within earlier sections. Here are the final pieces to wrap things up cleanly.
Common Mistakes That Lead to Wobbly or Unsafe Setups
We touched on this before, but these errors pop up so often they're worth reinforcing.
Skipping the level check. Even a 2-degree tilt is obvious once the monitor is on the wall. Use a real bubble level, not your phone.
Using screws that are too long. M4 screws that bottom out in the monitor's housing can damage internal components. Check your manual for the correct length.
Mounting into drywall without heavy-duty anchors. Those free plastic anchors are for picture frames. Monitors need toggle bolts or snap toggles at minimum.
Forgetting to leave a service loop. Leave a little extra cable behind the monitor. Future you will appreciate it when swapping cables.
When a Wall Mount Isn't the Right Call
Some situations just aren't worth forcing. If your monitor lacks VESA holes and no adapter exists, don't drill into your wall hoping for the best. If you're renting and can't patch holes later, a desk clamp arm is your friend.
And if the wall itself is questionable (old plaster, suspected asbestos, moisture issues), stop and reassess before you make holes you can't undo.
FAQs
Can I use a TV wall mount for my mini LED monitor?
Yes, as long as the TV mount supports your monitor's VESA pattern and weight. Most TV mounts support 100x100mm and larger patterns. Just confirm the mount's minimum VESA compatibility.
Some small monitors use 75x75mm, which not all TV mounts accommodate.
How do I hide cables when wall mounting?
Three options work well. Use an adhesive cable raceway on the wall surface for the easiest install. Run cables through the wall using an in-wall cable management kit for the cleanest look.
Or use a mount with built-in cable clips to route cables along the bracket itself.
Is it safe to mount a monitor above a fireplace?
It depends on the heat output. Mini LED monitors are sensitive to sustained heat. If the fireplace raises the wall temperature above about 35°C (95°F) at the mount location, you risk damaging the panel.
Check the monitor's operating temperature specs and measure the wall surface temperature when the fireplace is in use.
Final Decision Guide: Should You Wall Mount Your Mini LED Monitor?
Here's the simplest way to think about it.
Yes, wall mount if: your monitor has VESA holes, you can hit studs or use proper anchors, and you want the desk space back.
No, skip it if: the monitor lacks VESA and no adapter exists, you can't drill safely, or you move the monitor often.
Maybe, with caveats if: you need to use drywall anchors (go heavy-duty), the monitor is on the heavier side (buy a mount rated well above its weight), or you're in a tricky wall situation (test first).
Most mini LED monitors wall mount without drama. Check your specs, buy the right hardware, take your time with the install, and you'll wonder why you didn't do it sooner.

Similar Posts