How to Setup 144Hz Monitor for Gaming
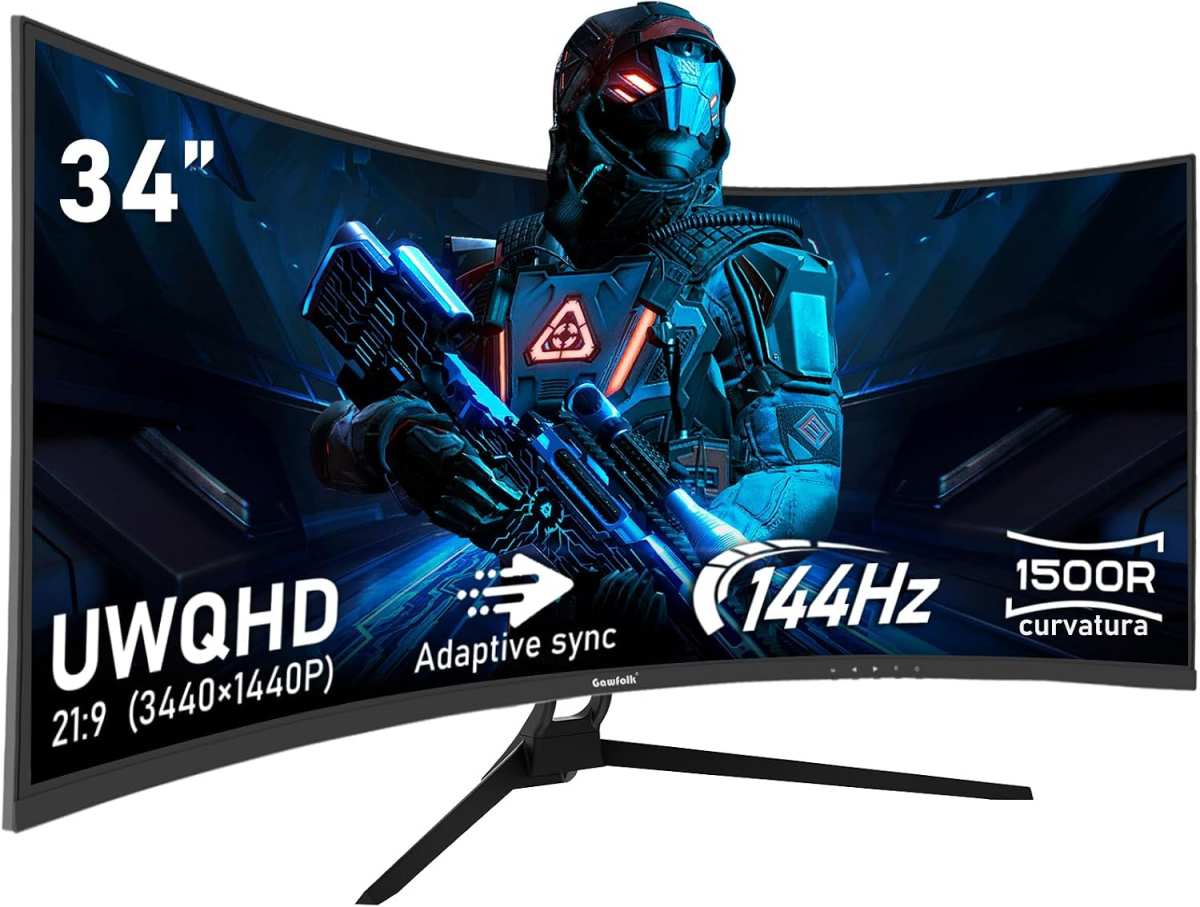
If you've just bought a 144Hz gaming monitor but everything still feels like 60Hz, you're not alone. Learning how to setup a 144Hz monitor for gaming is the step most people skip entirely, and it's exactly why their expensive display never delivers what it promised.
The fix isn't complicated. But it does involve checking the right settings in the right order, because one wrong cable or one buried Windows toggle is usually all that's standing between you and the smooth gameplay you paid for.
Image source: Bing (Web (fair-use with source credit))
Quick Answer
Here's the short version. To get 144Hz working, you need a compatible DisplayPort or HDMI 2.0 cable plugged into your GPU. Then go to Windows Settings → System → Display → Advanced Display and select 144Hz from the refresh rate dropdown.
If the option isn't there, check your cable and monitor's on-screen display settings. You should also enable G-Sync or FreeSync through your GPU control panel to eliminate screen tearing.
That's the path. Now let's walk through every step in detail so nothing gets missed.
The Real Reason Your 144Hz Monitor Isn't Running at 144Hz
Here's the thing nobody tells you when you unbox a 144Hz monitor: the monitor itself is only half the equation. Your cable, your GPU port, your driver version, and even your monitor's own internal menu settings all have to agree on 144Hz. One weak link in that chain and Windows quietly defaults you back to 60Hz with no warning.
Manufacturer specifications confirm that most 144Hz monitors ship with the panel capable of 144Hz natively, but some require you to enable an overclocking setting in the monitor's on-screen display (OSD) menu first. Others need DisplayPort 1.2 or higher rather than HDMI. The exact requirement varies by model, which is why a one-size-fits-all guide doesn't work.
The most common culprits, in order of how often they cause the problem:
- Wrong cable type (HDMI 1.4 instead of HDMI 2.0 or DisplayPort)
- Cable plugged into the motherboard video output instead of the GPU
- 144Hz option not enabled in Windows display settings
- Monitor OSD overclocking setting left at default (60Hz)
- Outdated GPU drivers not recognizing the monitor's refresh rate capabilities
If you've checked Windows and don't see 144Hz as an option, don't panic. That's actually the most common symptom, and we'll solve it step by step.
Step 1: Identify What's Limiting Your Refresh Rate
Before touching any software settings, you need to look at the physical setup. This is where most people trip up, and it's the easiest thing to fix once you know what to check.
Does Your Cable Support 144Hz?
Not all cables are created equal, and this is the single most common reason people can't get 144Hz working. The cable that shipped in your monitor's box is usually the right one, but if you grabbed a random cable from a drawer, it might not cut it.
Here's what you need:
| Resolution | Minimum Cable Standard | Recommended Cable |
|---|---|---|
| 1080p at 144Hz | DisplayPort 1.2 or HDMI 2.0 | DisplayPort 1.4 |
| 1440p at 144Hz | DisplayPort 1.4 or HDMI 2.1 | DisplayPort 1.4 |
| 4K at 144Hz | DisplayPort 1.4 with DSC or HDMI 2.1 | HDMI 2.1 or DP 1.4a |
DisplayPort is generally the safer choice for PC gaming. It's been the standard for high-refresh gaming for years, and most 144Hz monitors are designed with DisplayPort as the primary input. HDMI works fine too, but only if it's HDMI 2.0 or newer.
HDMI 1.4, which is still sitting in plenty of cable drawers, tops out at 60Hz at 1080p.
If you're unsure what version your cable is, check the connector ends or the packaging. Most cables print the version somewhere on the sheath. When in doubt, use the DisplayPort cable that came with the monitor.
Are You Plugged Into the GPU, Not the Motherboard?
This one catches people constantly, especially on their first PC build. Your motherboard has video output ports on the back I/O panel. Your graphics card has its own ports, usually lower down on the case.
If your monitor cable is plugged into the motherboard, you're running off your CPU's integrated graphics, which won't output 144Hz in most cases.
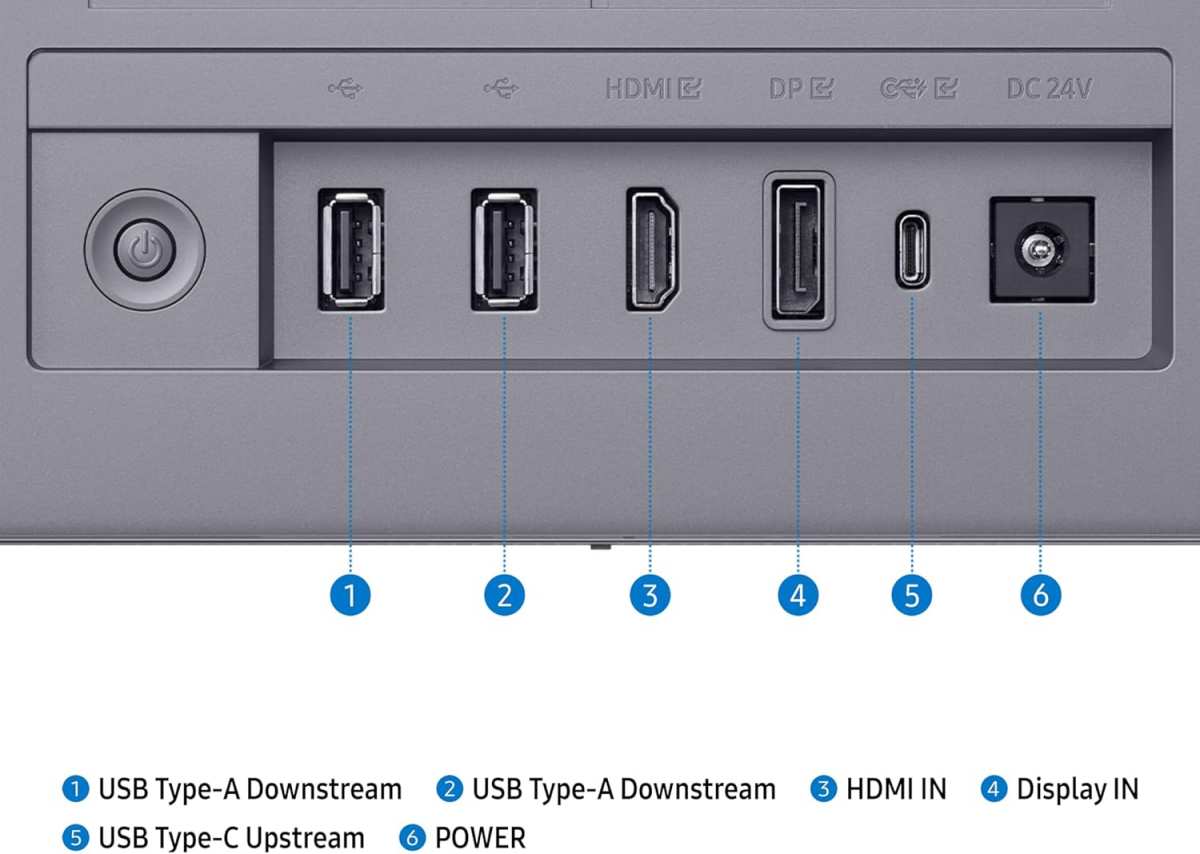
Always plug your DisplayPort or HDMI cable into the ports on your dedicated graphics card. The ones mounted horizontally on the expansion slots at the back of your PC. Not the vertical cluster near the top.
Which Port Are You Actually Using?
Some GPUs have multiple DisplayPort outputs, and on certain models one port may be primary. If 144Hz isn't showing up on one DP port, try another. The same applies to HDMI ports on the GPU.
Also check which port on the monitor itself you're using. Some monitors only support their maximum refresh rate on specific inputs. Your monitor's manual will tell you which port supports 144Hz.
It's almost always DisplayPort, but some monitors require HDMI 2.1 for full refresh at certain resolutions.
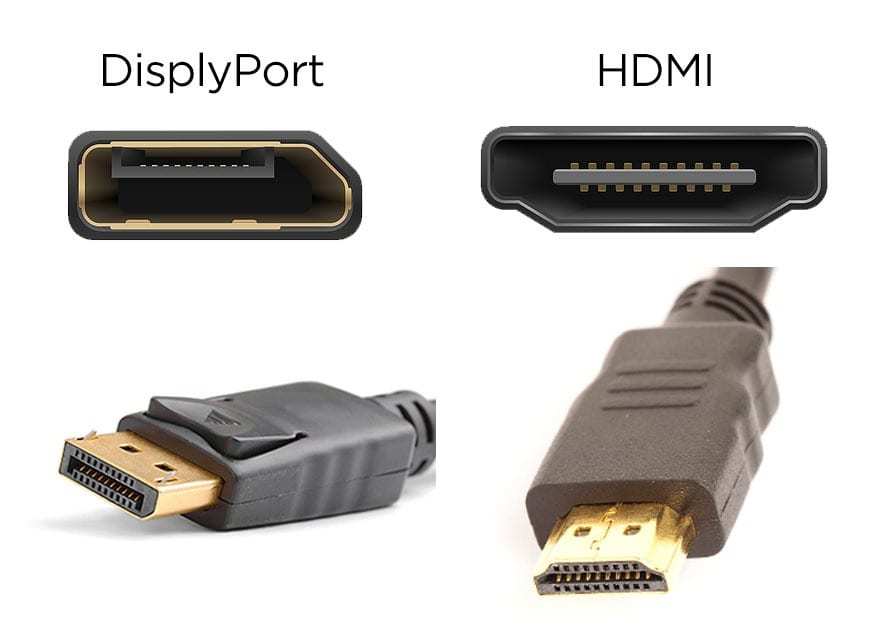
Image source: Bing (Web (fair-use with source credit))
Step 2: Enable 144Hz in Windows Display Settings
Once you've confirmed the physical connections are correct, it's time to tell Windows to actually use 144Hz. This step is straightforward, but if the option doesn't appear, we'll troubleshoot that too.
Windows 11 Path
- Right-click on your desktop background
- Select Display settings
- Click Advanced display at the bottom of the page
- Under Choose a refresh rate, open the dropdown menu
- Select 144Hz (or the highest available option)
Windows should switch immediately. Your screen might flicker for a moment. If it goes black and comes back, that's normal.
It just means the display mode changed.
Windows 10 Path
- Right-click on your desktop background
- Select Display settings
- Scroll down and click Advanced display settings
- Click Display adapter properties for Display 1
- Go to the Monitor tab
- Under Screen refresh rate, select 144Hz from the dropdown
- Click Apply then OK
The Windows 10 path is slightly more nested, but the end result is the same.
What to Do When 144Hz Doesn't Appear in the Dropdown
This is where most people get stuck. You follow the steps above and 144Hz simply isn't in the list. Here's what to check, in order:
- Verify your cable supports 144Hz (Step 1). An HDMI 1.4 cable won't offer 144Hz as an option
- Try a different DisplayPort output on your GPU
- Check if your monitor needs an overclock setting enabled in its OSD (we'll cover this in Step 4)
- Update your GPU drivers to the latest version. Outdated drivers can hide refresh rate options
- Restart your PC with the correct cable connected. Sometimes Windows needs a fresh handshake with the monitor
If none of these work, download and install the monitor driver INF file from the manufacturer's website. Windows uses a generic monitor driver by default, and installing the specific one can unlock the full range of supported refresh rates.
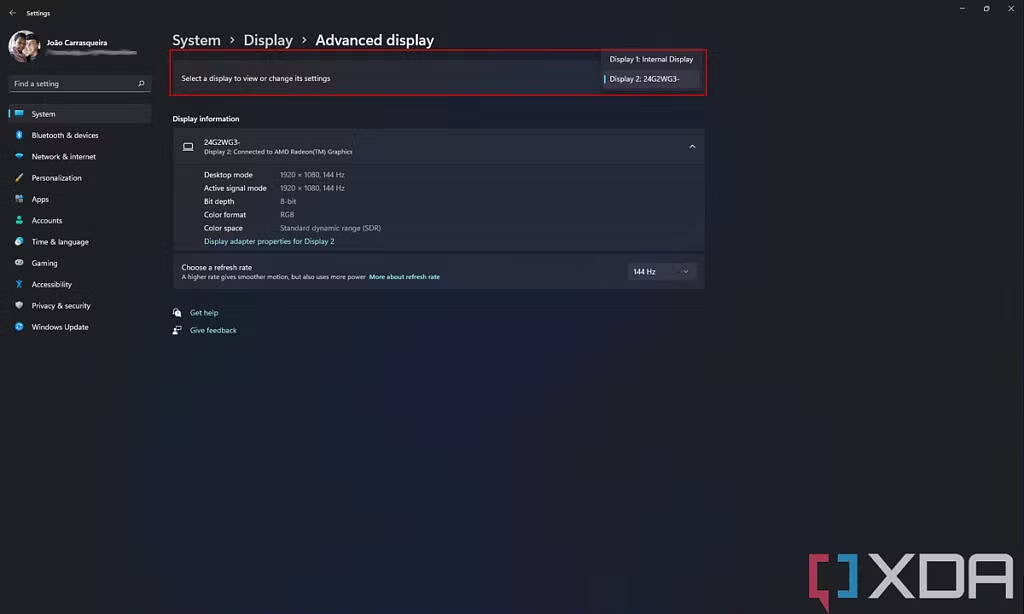
Image source: Bing (Web (fair-use with source credit))
Step 3: Check Your GPU Control Panel Settings
Windows display settings handle the basic refresh rate selection, but your GPU's dedicated control panel gives you deeper control. This is also where you enable adaptive sync features like G-Sync and FreeSync.
NVIDIA Control Panel
- Right-click on your desktop and select NVIDIA Control Panel
- In the left panel, click Change resolution under the Display section
- On the right side, select the resolution you're using
- Below that, find the Refresh rate dropdown and choose 144Hz
- Click Apply
NVIDIA Control Panel also lets you set a different refresh rate than what Windows shows in rare edge cases, so it's worth checking even if Windows already displays 144Hz.
Next, enable G-Sync:
- In the NVIDIA Control Panel left sidebar, click Set up G-Sync
- Check Enable G-Sync
- Select your display
- Choose whether to enable it for full-screen mode or windowed and full-screen mode
- Click Apply
You can also access more refresh rate options through NVIDIA's "Manage 3D Settings" tab. Ensure Preferred refresh rate is set to Highest available under the Global Settings tab.
AMD Radeon Software (Adrenalin)
- Right-click on your desktop and select AMD Software: Adrenalin Edition
- Click the Gaming tab at the top
- Select Display from the sub-menu
- Toggle AMD FreeSync to On if your monitor supports it
- Under Display settings, confirm the Refresh Rate slider shows 144Hz
AMD's software also has a Custom Resolutions section where you can manually create a 144Hz profile if it's not showing up automatically. Use this carefully, as unsupported timing settings can cause display issues.
For FreeSync specifically, make sure your monitor's FreeSync range includes 144Hz. Most do, but some older models cap their adaptive sync range at 120Hz or lower. Check your monitor's spec sheet to confirm.
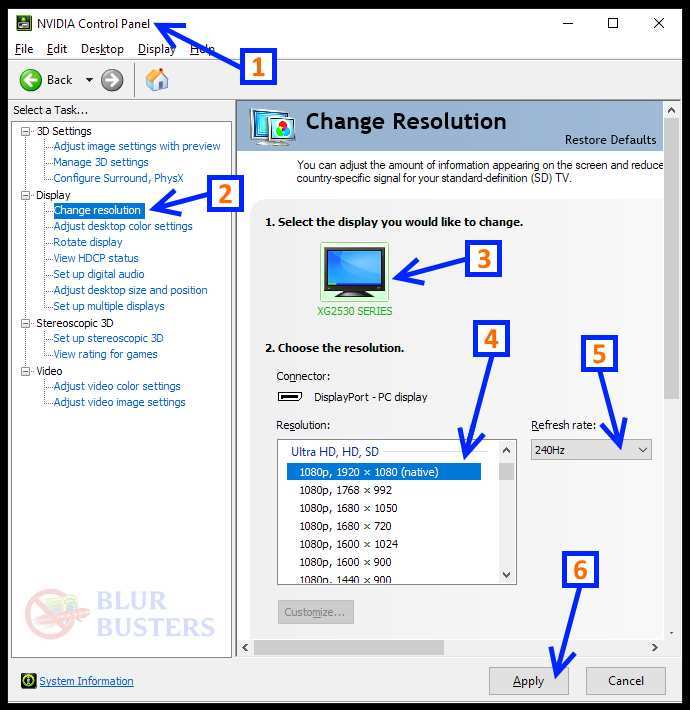
Image source: Bing (Web (fair-use with source credit))
Step 4: Enable Overclocking in Your Monitor's OSD (If Required)
This step surprises a lot of people. Some 144Hz monitors actually ship running at 60Hz by default and require you to manually enable the higher refresh rate inside the monitor's own menu system. The monitor's on-screen display (OSD) controls settings that Windows and your GPU can't override.
When This Step Actually Matters
You need to check your monitor's OSD if:
- 144Hz doesn't appear in Windows display settings even with the correct cable
- Your monitor is advertised as "overclockable" to 144Hz (common with some budget 144Hz models)
- The monitor spec sheet mentions an "OC" mode or a refresh rate setting in the menu
Many 165Hz panels are actually 144Hz native panels that you overclock to 165Hz through the OSD. The same concept applies to some 144Hz monitors that need an explicit toggle.
How to Access Your Monitor's Refresh Rate Overclock Setting
The exact menu location varies by manufacturer. But the general path is usually something like:
- Press the physical buttons on your monitor (usually on the bottom edge or back) to open the OSD
- Look for a menu called Display, Overclocking, Game Settings, or System
- Find an option labeled Refresh Rate, Overclock, or Max Refresh Rate
- Change it from 60Hz or Default to 144Hz
- Confirm and exit the menu
After changing this setting, check Windows display settings again. The 144Hz option should now appear in the refresh rate dropdown.
Some monitors from brands like ASUS, Acer, and ViewSonic place this setting in a dedicated Overclocking submenu inside the OSD. Others like LG and Samsung sometimes bury it under Game Mode or Response Time settings. When in doubt, grab your monitor's manual and search for "refresh rate" or "overclock."
If you don't see any overclock option in the OSD at all, your monitor likely supports 144Hz natively and doesn't need this step. Move on to Step 5.
Step 5: Set Up G-Sync or FreeSync
Now that 144Hz is active, let's make sure your frame delivery is clean. Screen tearing happens when your GPU sends frames to the monitor faster than the display can show them. Adaptive sync fixes this by synchronizing the monitor's refresh rate to your GPU's frame output in real time.
Enabling Adaptive Sync on NVIDIA
- Open NVIDIA Control Panel
- Navigate to Display → Set up G-Sync in the left sidebar
- Check Enable G-Sync, G-Sync Compatible
- Select your 144Hz monitor from the display list
- Choose Enable for full screen mode (most games) or Enable for windowed and full screen mode (if you play borderless windowed often)
- Click Apply
Under Manage 3D Settings, also set Monitor Technology to G-Sync Compatible and ensure Vertical sync is set to On in the NVIDIA Control Panel. This might sound counterintuitive since you're trying to avoid V-Sync input lag. But with G-Sync enabled, the NVIDIA driver's V-Sync acts as a backup to prevent tearing at the top and bottom of the refresh range.
It doesn't add the traditional V-Sync latency penalty when you're within the adaptive sync range.
Enabling Adaptive Sync on AMD
- Open AMD Software: Adrenalin Edition
- Navigate to Gaming → Display
- Toggle AMD FreeSync to On
- If available, also toggle AMD FreeSync Premium or Premium Pro depending on your monitor's certification level
AMD's FreeSync is generally more plug-and-play than NVIDIA's G-Sync setup. Once it's enabled, it just works in the background. You can verify it's active by checking the Radeon Software overlay during gameplay.
When Adaptive Sync Doesn't Activate
If G-Sync or FreeSync won't enable, check these things:
- Your monitor must support adaptive sync over the specific input you're using. Some monitors only support FreeSync over DisplayPort, not HDMI
- For NVIDIA G-Sync, your driver must recognize the monitor as "G-Sync Compatible." Most FreeSync monitors work, but some need manual enablement in the NVIDIA Control Panel under "Set up G-Sync"
- Make sure V-Sync is enabled in the GPU control panel (not in the game itself) for proper frame capping within the adaptive sync range
- Some monitors require you to enable FreeSync or Adaptive Sync in their own OSD before the GPU driver will recognize it
With adaptive sync active and 144Hz confirmed, you're in the best possible position for smooth, tear-free gaming. We'll verify everything is actually working correctly in the next section.
Step 6: Verify Everything Is Working
You've set 144Hz in Windows, configured your GPU control panel, and enabled adaptive sync. Now let's confirm it's actually running at 144Hz and not just displaying the number.
Online Refresh Rate Test Tools
The fastest way to verify your refresh rate is using a browser-based test. UFO Test (testufo.com) is the most widely used tool for this. It displays animated elements at known frame rates and visually confirms what your monitor is actually refreshing at.
- Open your browser and go to testufo.com
- The page should automatically detect and display your current refresh rate
- If it shows 144Hz (or close to it), you're good
- If it shows 60Hz, go back and recheck your Windows display settings
You can also use the Blur Busters UFO Motion Tests for more detailed analysis of motion clarity and frame skipping. These tests will reveal if your monitor is genuinely refreshing at 144Hz or if there's a frame delivery issue.
In-Game FPS and Refresh Rate Confirmation
Most competitive games have built-in frame rate counters. Enable them in the game's video or performance settings. If your game is producing 144+ FPS and your monitor is set to 144Hz with G-Sync or FreeSync active, you should see smooth, tear-free gameplay with no stuttering.
A common misconception is that high FPS alone means you're experiencing 144Hz. You need both: your GPU must produce the frames and your monitor must actually be refreshing at 144Hz to display them. If your FPS counter shows 200 but your monitor is stuck at 60Hz, you're only seeing 60 of those frames per second.
Feeling the Difference: What to Actually Notice
The jump from 60Hz to 144Hz is immediately noticeable in motion. Move your mouse in circles on the desktop. At 60Hz, you'll see multiple ghosted cursors or a blurred trail.
At 144Hz, the cursor stays much sharper and more defined during movement.
In games, the difference shows up most when you turn the camera quickly. At 60Hz, fast camera pans look blurry and choppy. At 144Hz, the same motion looks significantly smoother and clearer.
You'll also notice reduced input lag, your aim will feel more responsive, and tracking moving targets becomes easier.
If everything still feels like 60Hz after all these steps, double-check that your game isn't forcing V-Sync to 60Hz in its own settings. Some games have independent frame rate limiters that override your system settings.
Common Scenarios and What to Fix
Even with the right settings, specific situations can still cause problems. Here are the most common ones and how to solve them.
"I Have an HDMI Cable and It Says 60Hz Maximum"
Your HDMI cable is likely version 1.4, which doesn't support 144Hz at any resolution above 1080p (and even at 1080p it's limited). Swap to a DisplayPort cable or an HDMI 2.0/2.1 cable. DisplayPort is the simpler solution for most desktop gaming setups.
"144Hz Option Is Missing Completely"
This usually means one of three things. Your cable doesn't support 144Hz, your monitor needs an overclock setting enabled in its OSD, or your GPU drivers are outdated. Work through Step 1 and Step 4 in order.
If the option still doesn't appear, try a different DisplayPort cable and update your GPU drivers.
"I Set 144Hz but It Still Feels Like 60Hz"
Check if your game has its own frame rate limiter set to 60 FPS. Also verify that your GPU control panel isn't overriding the refresh rate. Some users report that after a Windows update, the refresh rate resets to 60Hz.
Re-check your settings after major updates.
"G-Sync/FreeSync Won't Turn On"
Make sure adaptive sync is enabled in your monitor's OSD first. Then check that you're using a compatible cable and port. For NVIDIA G-Sync Compatible mode, you may need to manually enable it in the NVIDIA Control Panel under "Set up G-Sync" even if your monitor supports FreeSync natively.
"Dual Monitor Setup, One Screen Stuck at 60Hz"
If you're running two monitors with different refresh rates, Windows can sometimes force both to the lower rate. This depends on your GPU and driver version. Try setting each monitor's refresh rate individually in the Advanced Display Settings.
If the problem persists, check if your GPU has enough bandwidth to drive both displays at their maximum refresh rates simultaneously.
Cable and Port Compatibility Quick Reference
Having the right cable eliminates most 144Hz problems before they start. Here's a clear breakdown of what each standard supports.
DisplayPort Versions and What They Support
| DP Version | Max Resolution at 144Hz | Notes |
|---|---|---|
| DisplayPort 1.2 | 1080p at 144Hz | Also supports 1440p at 60Hz |
| DisplayPort 1.3 | 1440p at 144Hz | Found on GTX 10-series and newer |
| DisplayPort 1.4 | 4K at 120Hz, 1440p at 144Hz | Supports DSC for 4K at 144Hz |
| DisplayPort 1.4a | 4K at 144Hz with DSC | Most common on RTX 20-series and newer |
DisplayPort 1.2 is the minimum for 1080p 144Hz gaming. If you're running 1440p or higher, you need DisplayPort 1.3 or 1.4. Most modern GPUs from NVIDIA (GTX 10-series onward) and AMD (RX 400-series onward) support at least DisplayPort 1.4.
HDMI Versions and What They Support
| HDMI Version | Max Resolution at 144Hz | Notes |
|---|---|---|
| HDMI 1.4 | Not supported for 144Hz | Max 1080p at 60Hz or 120Hz with reduced color |
| HDMI 2.0 | 1080p at 144Hz, 1440p at 60Hz | Common on older GPUs and monitors |
| HDMI 2.1 | 4K at 144Hz | Required for next-gen console 120Hz at 4K |
HDMI 2.0 works for 1080p 144Hz but won't handle 1440p at 144Hz. For anything above 1080p at high refresh rates, DisplayPort is the more reliable choice. HDMI 2.1 is becoming more common on newer GPUs and monitors, but DisplayPort remains the standard for PC gaming.
The Cable Nobody Tells You About
The cable that ships with your monitor is usually the correct one for that panel's maximum refresh rate. If you bought a third-party cable, make sure it's rated for the standard you need. A "DisplayPort cable" label doesn't guarantee it supports DP 1.4.
Look for certification markings on the cable itself or buy from a reputable brand that specifies the version.
Avoid ultra-cheap cables from unknown manufacturers. Poor signal integrity can cause flickering, frame drops, or the monitor failing to report its full capabilities to Windows. A certified DisplayPort 1.4 cable costs a few dollars and eliminates an entire category of troubleshooting headaches.
GPU-Specific Setup Paths
Different GPUs have slightly different setup flows. Here's what to expect based on your hardware.
NVIDIA GeForce (GTX 10-Series and Newer)
NVIDIA's control panel gives you the most granular control over refresh rate and adaptive sync. After setting 144Hz in Windows, open the NVIDIA Control Panel and confirm the refresh rate under "Change resolution." Then enable G-Sync under "Set up G-Sync."
For competitive gamers, also check "Manage 3D Settings" and set "Low Latency Mode" to "On" or "Ultra." This reduces render queue delay, which pairs well with high refresh rates for the lowest possible input lag.
AMD Radeon (RX 500-Series and Newer)
AMD's Adrenalin software handles refresh rate and FreeSync in a single Display settings page. The setup is generally simpler than NVIDIA's. Enable FreeSync, confirm the refresh rate, and you're set.
AMD also offers "Anti-Lag" in the Graphics settings tab. This is AMD's equivalent of NVIDIA's Low Latency Mode and works well with high refresh rate gaming. Enable it for competitive titles where input lag matters.
Laptop GPUs and Optimus Complications
Many laptops with 144Hz displays route the dedicated GPU output through the integrated GPU (NVIDIA Optimus or AMD Switchable Graphics). This can limit refresh rate options or prevent adaptive sync from working correctly.
Check your laptop manufacturer's documentation to see which display output is wired to the dedicated GPU. Some laptops have a "MUX switch" in their BIOS or control software that bypasses the integrated GPU entirely. Enabling this can unlock full refresh rate support and G-Sync functionality.
If your laptop doesn't have a MUX switch, you may need to connect an external 144Hz monitor directly to the dedicated GPU's output (usually the USB-C/Thunderbolt port or a dedicated HDMI/DP port) to bypass Optimus limitations.
Frequently Asked Questions
Can I use HDMI for 144Hz gaming?
Yes, but only HDMI 2.0 or newer. HDMI 2.0 supports 1080p at 144Hz. For 1440p at 144Hz, you need HDMI 2.1.
DisplayPort is generally the safer choice for high-refresh PC gaming.
Why is my 144Hz monitor only showing 120Hz?
Some monitors cap at 120Hz on certain inputs or at certain resolutions. Check your monitor's spec sheet to confirm 144Hz is supported on the input and resolution you're using. You may also need to enable an overclock setting in the monitor's OSD.
Do I need a special cable for 144Hz?
You need at least DisplayPort 1.2 or HDMI 2.0 for 1080p 144Hz. For higher resolutions, you'll need DisplayPort 1.4 or HDMI 2.1. The cable that came with your monitor is usually the right one.
Does 144Hz work with G-Sync or FreeSync?
Yes. G-Sync and FreeSync work at 144Hz and across the monitor's full adaptive sync range. Enable adaptive sync in both your monitor's OSD and your GPU control panel for the best experience.
Will I notice the difference between 60Hz and 144Hz?
Yes, the difference is immediately noticeable. Mouse movement feels smoother, camera pans in games look clearer, and input lag feels reduced. Most people who switch to 144Hz never go back to 60Hz.
Can I run two monitors at different refresh rates?
Yes, but Windows can sometimes have issues with mixed refresh rate setups. Set each monitor's refresh rate individually in Advanced Display Settings. If you experience stuttering on the high-refresh monitor, try running both at the same refresh rate temporarily to isolate the issue.
Final Checklist Before You Game
Run through this quick checklist to confirm everything is set correctly:
- Monitor cable is DisplayPort 1.2+ or HDMI 2.0+, plugged into the GPU
- Windows display settings show 144Hz selected
- GPU control panel confirms 144Hz and adaptive sync enabled
- Monitor OSD shows 144Hz active (or overclock setting enabled if required)
- GPU drivers are current, downloaded from NVIDIA or AMD directly
- TestUFO or similar tool confirms 144Hz is actually active
- In-game frame rate counter shows 144+ FPS with no tearing
If all seven checkmarks are confirmed, you're fully set up. Your 144Hz monitor is delivering exactly what you paid for. Enjoy the smoothness, and may your frame rates stay high and your input lag stay low.

Similar Posts