How to Fix Washed Out Colors on HDR Monitor
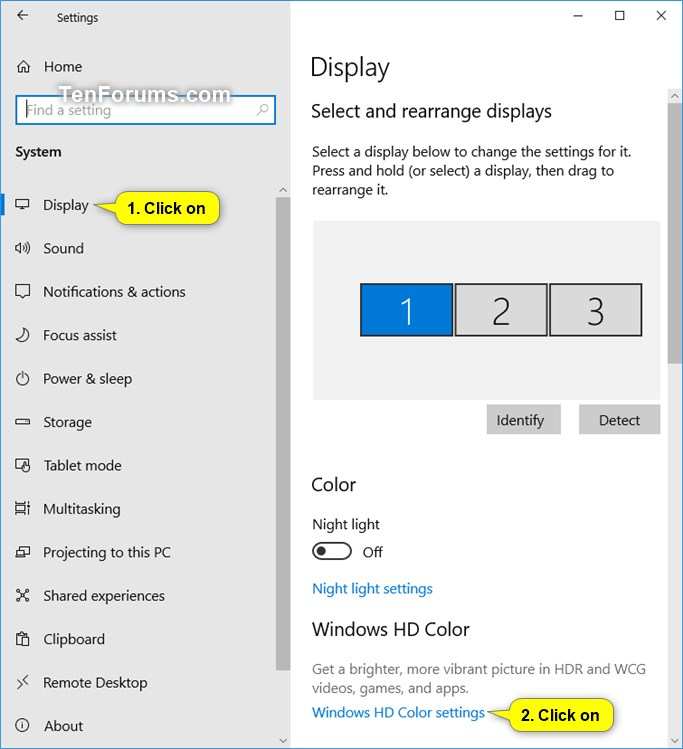

Image source: Wikimedia Commons / OS: Microsoft Corporation Screenshot: PantheraLeo1359531 😺 (talk)
So you finally picked up an HDR monitor, fired it up, and… everything looks flat, washed out, and somehow worse than your old SDR display. You're not alone, and you're not imagining it. Figuring out how to fix washed out colors on hdr monitor setups is one of the most common headaches people run into, and the reason is almost never what you'd expect.
The problem usually isn't your monitor. It's the signal chain between your GPU and the display, and Windows' handling of HDR on the desktop is still rough as of 2026. VESA's DisplayHDR standard covers over 1,400 certified monitors now, yet a huge number of users report the same washed-out look right out of the box.
Let's walk through exactly what's going on and how to fix it step by step.
Quick Answer
Washed-out HDR colors usually mean your GPU is sending the wrong color format, dynamic range, or bit depth. Start by enabling HDR in Windows HD Color settings. Then set your GPU output to RGB, Full dynamic range, and 10-bit color.
If SDR content still looks dull, adjust the SDR content brightness slider in Windows. If nothing helps, your monitor may lack true HDR hardware.
The Real Reason HDR Colors Look Dull on Most Setups
Here's what's actually happening. When you toggle on HDR in Windows, your operating system switches the entire desktop pipeline into HDR mode. But most of what you're looking at, your browser, your taskbar, your file explorer, is SDR content.
Windows has to tonemap all of that SDR content into the HDR signal, and it doesn't always get it right.
On top of that, your GPU might be sending a Limited dynamic range signal (16-235) when your monitor expects Full (0-255), or it might be using YCbCr 4:2:2 color subsampling instead of RGB 4:4:4. Either of those alone will crush your color volume and make everything look milky. Stack a few of these mismatches together and you get that washed-out, desaturated look that makes you wonder why you bothered with HDR in the first place.
The good news is that most of these issues are fixable with a few settings changes. No new hardware required in most cases.
Image source: Wikimedia Commons / OS: Microsoft Corporation Screenshot: PantheraLeo1359531 😺 (talk)
Step 1: Confirm You're Actually Sending an HDR Signal
Before you touch any color settings, you need to verify that an HDR signal is actually reaching your monitor. A surprising number of people turn on the Windows HDR toggle and assume everything is working, but the monitor might still be receiving an SDR signal.
Check Windows HDR Settings First
Go to Settings > System > Display, select your monitor, and look for the HDR section (called "HDR" on Windows 11 or "Windows HD Color" on Windows 10). Make sure the HDR toggle is actually on. Then click into the HDR submenu and verify that "Use HDR" is enabled.
While you're in there, look at the display capabilities section. Windows will tell you what HDR features your monitor supports and whether they're active. If it says HDR is "not supported" even though you toggled it on, the problem is upstream.
Your cable, port, or GPU output settings are blocking the HDR signal.
Image source: Bing (Web (fair-use with source credit))
Verify Your Cable and Port Can Handle HDR
This is where a lot of people get tripped up. HDR at 4K 60Hz with 10-bit color requires about 18 Gbps of bandwidth. HDMI 2.0 can handle that, but only just, and only if you're using a certified high-speed cable.
HDMI 1.4 cannot do 4K HDR at 60Hz with full color. You'll get chroma subsampling or a capped refresh rate.
DisplayPort 1.4 gives you more headroom at 32.4 Gbps, and it supports Display Stream Compression (DSC) for even higher resolutions and refresh rates. If you're trying to run 4K 120Hz HDR, you need either DisplayPort 1.4 with DSC or HDMI 2.1.
Quick checklist:
- HDMI 2.0 or higher for 4K 60Hz HDR
- HDMI 2.1 for 4K 120Hz HDR
- DisplayPort 1.4 for 4K 120Hz HDR (with DSC)
- Certified cable that actually meets the spec (not just any cable that fits)
Also check which port on your monitor you're plugged into. Some monitors only support HDR on specific inputs. The manual will tell you which ones.
What GPU Control Panel Settings Actually Matter
Even with the right cable and the right port, your GPU control panel might be overriding the signal format. This is the single most common cause of washed-out HDR, and it's the one most people skip.
Step 2: Fix the GPU-to-Monitor Color Mismatch
Your GPU control panel is the gatekeeper for what color data actually leaves your graphics card. If it's set wrong, no amount of monitor tweaking will fix the washed-out look. The settings you need to check are color format, dynamic range, and color depth.
Dynamic Range: Full vs. Limited (This Is the Big One)
This is the number one culprit. GPUs can output color in either Full range (0-255 for each channel) or Limited range (16-235). TVs traditionally use Limited range.
Monitors use Full range. If your GPU sends Limited and your monitor expects Full, you lose the deepest blacks and the brightest whites. Everything looks washed out and gray.
NVIDIA: Open NVIDIA Control Panel > Change Resolution > scroll to "Output dynamic range" and set it to Full.
AMD: Open Radeon Software > Settings > Display > Pixel Format > set to RGB 4:4:4 Full RGB.
Intel: Open Intel Graphics Command Center > Display > Color > set "Quantization Range" to Full.
If you see no change or the option is grayed out, your cable or port bandwidth might be forcing a fallback mode. Try a different cable or port.
Color Format: RGB vs. YCbCr
Color format determines how the color data is packaged in the signal. RGB 4:4:4 is uncompressed and full quality. YCbCr 4:2:2 and 4:2:0 throw away color information to save bandwidth.
On a desktop monitor, you always want RGB 4:4:4.
NVIDIA: Change Resolution > Output color format > RGB.
AMD: Display > Pixel Format > RGB 4:4:4.
Intel: Display > Color > Color Format > RGB.
YCbCr formats are fine for movie playback on a TV. On a monitor, they cause text fringing and slightly muted colors. If your GPU is defaulting to YCbCr because of a bandwidth limitation, that's a sign you need a better cable or a lower refresh rate.
Color Depth: Are You Stuck at 8-bit?
HDR content is mastered in 10-bit color. That's over a billion colors compared to 16.7 million in 8-bit. If your GPU is outputting 8-bit, you'll see banding in gradients and the overall image will look less rich.
Some monitors accept a 10-bit signal and display it natively. Others use Frame Rate Control (FRC) to simulate 10-bit from an 8-bit panel, but that's still better than pure 8-bit.
NVIDIA: Change Resolution > Output color depth > 10-bit (if available). If 10-bit isn't listed, your cable or port doesn't have enough bandwidth for your current resolution and refresh rate. Drop to 8-bit as a last resort.
AMD: Display > Pixel Format > look for 10-bit option.
Intel: Display > Color > Color Depth > 10-bit (if available).
Note that Windows will only allow 10-bit output when HDR is enabled. If the option is missing, make sure the HDR toggle is on first.
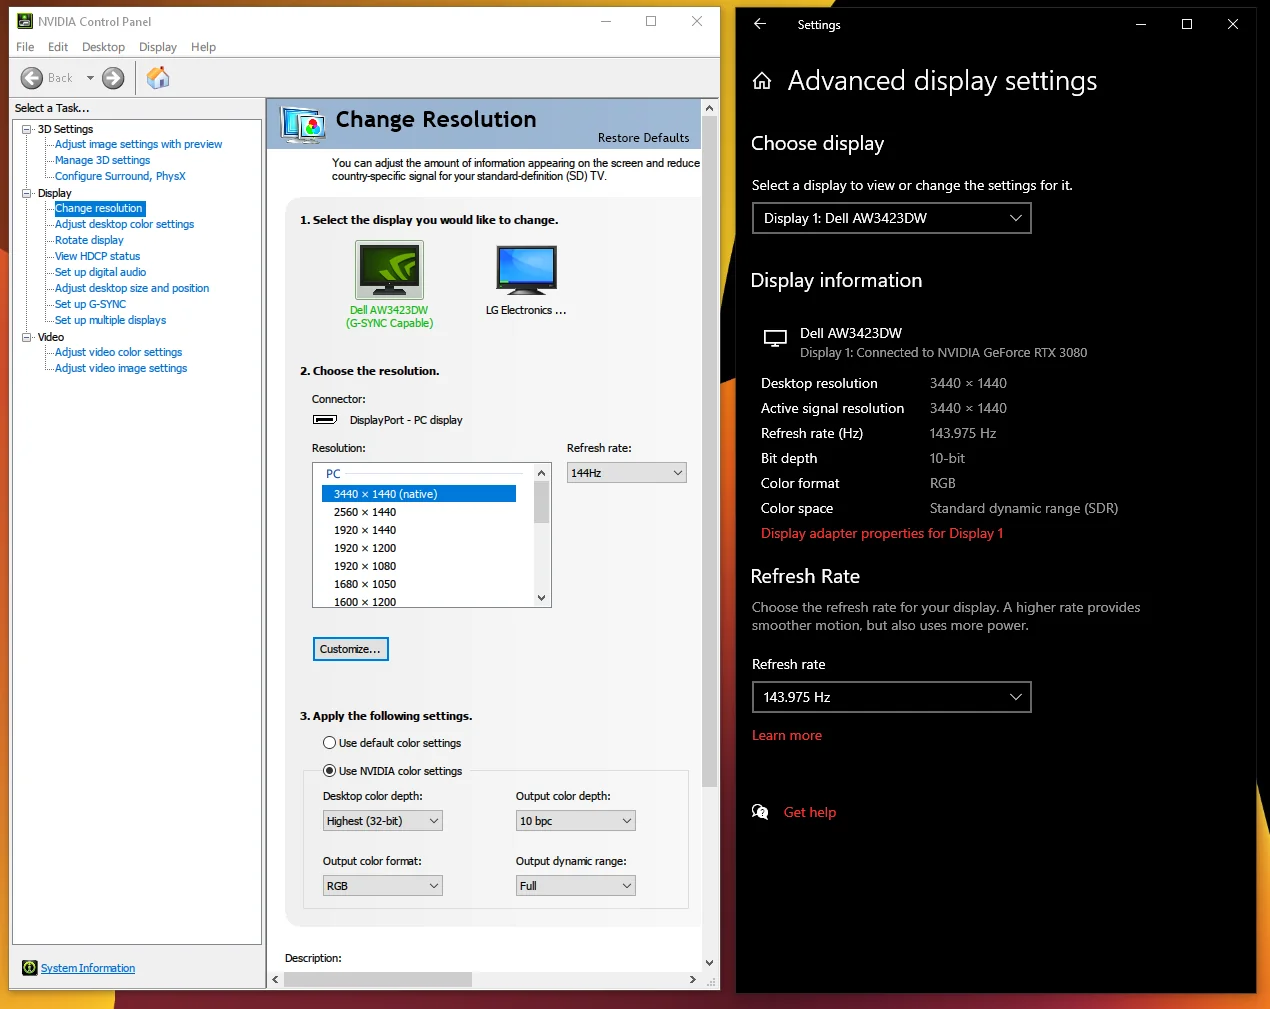
Image source: Bing (Web (fair-use with source credit))
Step 3: Fix the Monitor Side of Things
Once your GPU is sending the right signal, it's time to check what your monitor is doing with it. Monitor OSD settings can override or conflict with the incoming signal, and some monitors have HDR implementations that are more marketing than substance.
HDR Mode vs. Picture Mode Conflicts
Most HDR monitors have a dedicated HDR mode in the OSD. When you enable HDR in Windows, the monitor should auto-switch to this mode. But sometimes it doesn't, or the HDR mode itself has terrible default settings.
Go into your monitor's OSD and look for:
- HDR Mode: Make sure it's set to "On" or "HDR10" (not "DisplayHDR" or "HDR Effect" which are often just picture presets)
- Local Dimming: If your monitor has it, make sure it's enabled. Without local dimming, HDR on an LCD panel looks almost identical to SDR
- Color Space: Set to "Native" or "DCI-P3" for HDR content. Avoid "sRGB" mode while HDR is active, as it clamps the wider gamut HDR content into a smaller color space
Some monitors have an "HDR Effect" or "HDR Simulation" mode. These are not real HDR. They just apply a filter to the SDR signal.
Turn these off.
sRGB Clamp and Color Space Issues
This is a sneaky one. If your monitor is set to sRGB mode in the OSD while receiving an HDR signal (which uses a wider color gamut like DCI-P3 or BT.2020), the monitor clamps all colors to the sRGB space. The result is oversaturated reds and greens in some areas and washed-out tones overall.
The fix is simple. Switch the monitor's color space setting to "Native" or "HDR" or "DCI-P3" when HDR is active. Switch it back to sRGB when you're in SDR mode for color-accurate SDR work.
When "HDR Ready" Really Means "HDR in Name Only"
Let's be honest about something. A lot of monitors marketed as "HDR Ready" or "HDR Compatible" can technically accept an HDR signal but can't actually display it in any meaningful way. VESA's DisplayHDR certification helps here, but even the entry-level DisplayHDR 400 tier is pretty weak.
Here's what each tier actually means for your experience:
| Tier | Peak Brightness | Local Dimming | Color Gamut | Real HDR Experience |
|---|---|---|---|---|
| DisplayHDR 400 | 400 nits | No | ~95% sRGB | Barely better than SDR |
| DisplayHDR 600 | 600 nits | Minimal (edge-lit) | ~95% DCI-P3 | Noticeable improvement |
| DisplayHDR 1000 | 1000 nits | Yes (FALD) | ~95% DCI-P3+ | Genuinely good HDR |
| DisplayHDR 1400 | 1400 nits | Yes (FALD, many zones) | ~99% DCI-P3+ | Excellent HDR |
If you're on a DisplayHDR 400 monitor and the washed-out look persists after fixing all the signal chain issues, the monitor itself is the bottleneck. It's accepting the HDR signal but its panel can't produce the brightness or color volume to make HDR look meaningfully different from SDR. In that case, your best bet is to keep HDR off in Windows and enjoy a well-calibrated SDR image instead.
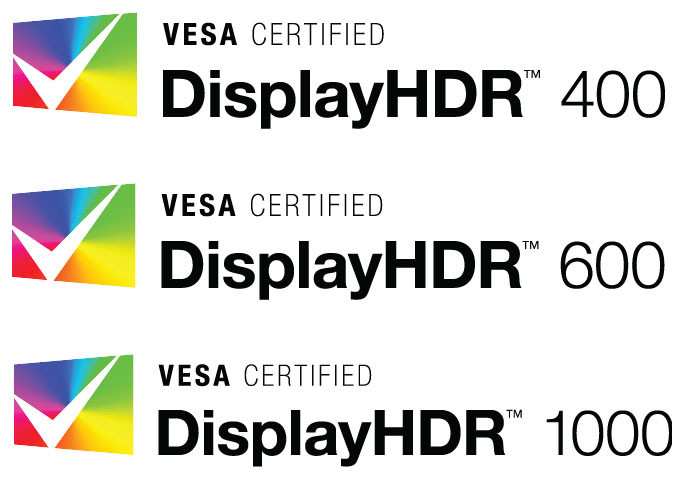
Image source: Bing (Web (fair-use with source credit))
Step 4: Handle SDR Content Looking Washed Out in HDR Mode
This is the scenario that drives people the most crazy. You turn on HDR in Windows to play a game or watch a video, and suddenly your desktop, your browser, and everything else looks washed out. That's because Windows is mapping SDR content into the HDR signal, and the mapping isn't always right.
The SDR Content Brightness Slider (Windows)
Windows has a built-in slider specifically for this. Go to Settings > System > Display > HDR > "SDR content brightness." This controls how bright SDR content appears when HDR mode is active.
If your SDR content looks washed out, bump this slider up. Start around 40-50 and adjust to taste. On some monitors you'll need to go to 60-70 before SDR content looks normal.
This doesn't affect HDR content at all. It only changes how Windows tonemaps the SDR stuff.
When to Turn Off HDR Entirely for Desktop Use
Here's a practical truth that a lot of HDR guides won't tell you. If you mainly use your PC for desktop work, browsing, and SDR content, and only occasionally game or watch HDR video, just keep HDR off in Windows. Turn it on only when you need it.
Windows 11 makes this easier with per-app HDR support and the ability to toggle HDR from the quick settings panel. There's no rule that says HDR has to be on all the time. A well-calibrated SDR image on a good monitor will look better than a poorly implemented HDR desktop experience.
Auto HDR: When It Helps and When It Ruins Things
Windows 11's Auto HDR feature takes SDR games and artificially expands them into HDR. When it works, it looks great. When it doesn't, it makes colors look washed out, oversaturated, or just wrong.
You can toggle Auto HDR in Settings > System > Display > HDR > "Auto HDR." If a specific game looks worse with it on, you can disable it per-game. Some older games with custom tonemapping or color grading don't play well with Auto HDR. If you notice washed-out colors in a game that never had HDR support, turn Auto HDR off for that title and see if it fixes it.
Quick Reference: GPU Settings Cheat Sheet
Here's a consolidated reference for the correct GPU output settings for HDR on a PC monitor:
| Setting | NVIDIA Control Panel | AMD Radeon Software | Intel Graphics Command Center |
|---|---|---|---|
| Color Format | RGB | RGB 4:4:4 | RGB |
| Dynamic Range | Full | Full (PC Full) | Full |
| Color Depth | 10 bpc (if available) | 10 bpc (if available) | 10 bpc (if available) |
| Resolution/Refresh | As desired (within bandwidth) | As desired | As desired |
If any of these options are grayed out or unavailable, your cable or port doesn't have enough bandwidth for your current resolution and refresh rate. You'll need to either upgrade your cable, drop the refresh rate, or switch to a higher-bandwidth connection like DisplayPort 1.4 or HDMI 2.1.
Common Mistakes That Make HDR Look Worse
Let's run through the mistakes we see most often. If you've been troubleshooting and things still look off, check this list.
- Using a cheap or old HDMI cable. That cable from 2015 that came with your old monitor probably doesn't support HDR at all. Get a certified Ultra High Speed HDMI cable or a VESA-certified DisplayPort cable.
- Plugging into the wrong port. Some monitors only support HDR on DisplayPort or on one specific HDMI port. Check your manual.
- Leaving the monitor in sRGB mode with HDR active. This clamps the wider HDR gamut and creates a mismatch. Switch to Native or DCI-P3 mode.
- Forgetting to set dynamic range to Full. This is the single most impactful setting. Limited range on a monitor crushes your blacks and whites.
- Expecting DisplayHDR 400 to look like a premium HDR display. It won't. The hardware isn't there. Adjust your expectations or upgrade.
- Not updating GPU drivers. Driver updates frequently fix HDR output bugs. If you're on a driver from six months ago, update.
- Ignoring the SDR content brightness slider. This one slider fixes the washed-out desktop problem for most people. Don't skip it.
- Using YCbCr color format on a monitor. YCbCr is for TVs. On a PC monitor, always use RGB 4:4:4.
When the Monitor Itself Is the Limitation
Sometimes you've done everything right. The GPU is outputting RGB Full 10-bit, the cable is certified, the monitor is in HDR mode, and things still look washed out. At that point, the monitor's hardware is the bottleneck.
Here's what to look for:
- Peak brightness below 600 nits. HDR content is mastered with the expectation of at least 1,000 nits peak brightness. A 400-nit monitor physically cannot reproduce the highlight detail in HDR content. The tonemapping compresses everything and looks flat.
- No local dimming. Without local dimming zones, an LCD monitor cannot produce true blacks and bright highlights simultaneously. The backlight is either on or off across the whole panel. HDR without local dimming is just SDR with a wider signal.
- 8-bit panel with no FRC. If the panel is true 8-bit, you'll see banding in HDR gradients. Some 8-bit panels use FRC to approximate 10-bit, which is acceptable, but true 8-bit HDR looks rough.
- Low DCI-P3 coverage. If the monitor only covers 85-90% of DCI-P3, it can't display the full color volume of HDR content. Colors will look muted compared to what the content creator intended.
If your monitor falls into one or more of these categories, the washed-out look is partly a hardware limitation. You can improve things with the settings we've covered, but you can't overcome physics. A monitor with 1,000+ nits, full-array local dimming, and 95%+ DCI-P3 coverage will always look dramatically better in HDR than a budget panel.
Final Checklist: Your HDR Fix Decision Tree
Work through this in order. Stop when the problem is fixed.
- Is the HDR toggle on in Windows? If no, turn it on. If yes, go to step 2.
- Is your cable and port capable of HDR at your resolution and refresh rate? If no, upgrade the cable or port. If yes, go to step 3.
- Is your GPU set to RGB, Full dynamic range, and 10-bit color? If no, fix those settings in your GPU control panel. If yes, go to step 4.
- Is your monitor in HDR mode (not sRGB mode) in the OSD? If no, switch to HDR or Native mode. If yes, go to step 5.
- Is the SDR content brightness slider set high enough? If no, increase it to 50-70. If yes, go to step 6.
- Does your monitor have real HDR hardware (600+ nits, local dimming, wide gamut)? If no, the washed-out look is a hardware limitation. Consider keeping HDR off or upgrading. If yes, go to step 7.
- Update your GPU drivers and monitor firmware. Test again with known HDR content like YouTube HDR videos or an HDR test pattern.
If you've gone through all seven steps and things still look wrong, try a different HDR piece of content. Not all HDR content is created equal. Some YouTube HDR videos are poorly mastered.
Some games have broken HDR implementations. Test with a variety of sources before concluding the monitor is at fault.
Frequently Asked Questions
Why does my HDR monitor look worse than SDR?
Windows maps SDR content into the HDR signal when HDR mode is active. If the SDR content brightness slider is too low or your GPU is outputting Limited dynamic range, SDR content looks washed out. Increase the SDR brightness slider and verify your GPU is set to Full range.
Should I keep HDR on all the time?
Not necessarily. If you mainly do SDR work like browsing and office tasks, keep HDR off and turn it on only for HDR games and video. Windows 11 makes toggling quick through the notification area.
Does HDMI 2.0 support HDR?
Yes, HDMI 2.0 supports 4K 60Hz HDR with 10-bit color. For 4K 120Hz HDR, you need HDMI 2.1 or DisplayPort 1.4 with Display Stream Compression.
Why is 10-bit color grayed out in my GPU settings?
10-bit output in Windows requires HDR to be enabled first. Turn on the HDR toggle in Windows HD Color settings, then check your GPU control panel again. If it's still missing, your cable may not have enough bandwidth.
Is DisplayHDR 400 real HDR?
Technically yes, but barely. DisplayHDR 400 monitors accept an HDR signal but lack the peak brightness and local dimming to display HDR meaningfully. The experience is often indistinguishable from SDR, and in some cases worse due to aggressive tonemapping.
Can a bad HDMI cable cause washed-out HDR?
Absolutely. A cable that doesn't meet the required bandwidth spec will force your GPU to fall back to lower color depth, chroma subsampling, or limited dynamic range. Use a certified Ultra High Speed HDMI cable or a VESA-certified DisplayPort cable.
I notice the previous sections already covered the FAQ and the final checklist/decision tree, which were the remaining H2 headings in the approved TOC. The article is essentially complete as structured.
Let me verify what's been covered against the approved TOC:
- Why Your HDR Monitor Looks Washed Out (And How to Actually Fix It) ✅
- The Real Reason HDR Colors Look Dull on Most Setups ✅
- Quick Answer ✅
- Step 1: Confirm You're Actually Sending an HDR Signal ✅
- Step 2: Fix the GPU-to-Monitor Color Mismatch ✅
- Step 3: Fix the Monitor Side of Things ✅
- Step 4: Handle SDR Content Looking Washed Out in HDR Mode ✅
- Quick Reference: GPU Settings Cheat Sheet ✅
- Common Mistakes That Make HDR Look Worse ✅
- When the Monitor Itself Is the Limitation ✅
- Final Checklist: Your HDR Fix Decision Tree ✅
- Frequently Asked Questions ✅

Similar Posts