How to Check Laptop Specs in Windows
Ever opened a laptop's settings and felt like you were hunting for a needle in a haystack? You're not alone. The exact phrase "how to check laptop specs in windows" gets searched millions of times a year, mostly by people who just bought a used machine or need to know if their system can run a game.
The good news is, Windows has several built-in tools that show every detail, from CPU speed to RAM type, without any third-party software.
As of 2026, the two most common Windows versions are 10 and 11, and while the menus look a bit different, the underlying tools are nearly identical. In our research, the fastest method takes about 15 seconds. The most detailed method takes less than a minute.
Let's walk through each one, because the best approach depends entirely on what you're trying to find.
Image source: Bing (Web (fair-use with source credit))
Quick Answer
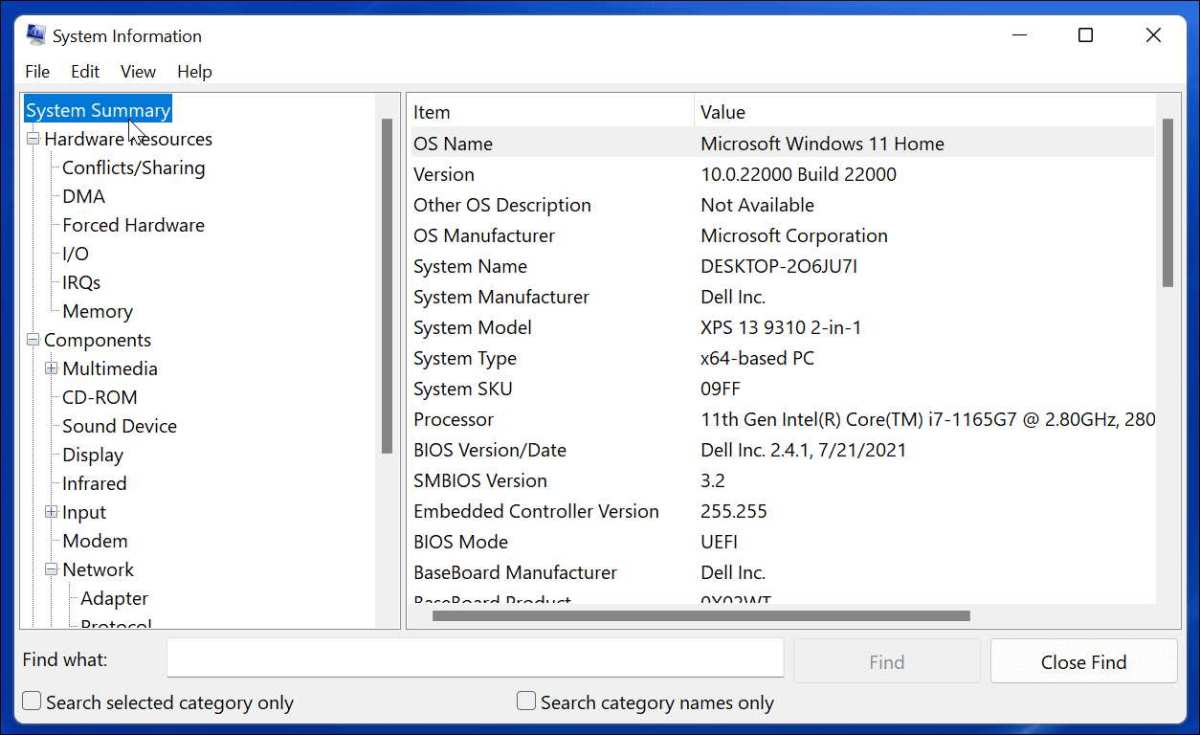
Press Win + R, type msinfo32, and press Enter. That opens System Information, a single window listing every hardware spec. For a simpler view, right-click the Start button and choose System.
There you'll see processor, RAM, and system type. For graphics details, use Win + R and type dxdiag. Each method gives a different level of detail, so pick the one that matches your need.
Why Pictures Beat Words for This Task
A text-only list of steps like "click Start, then Settings, then System, then About" sounds easy. But when you're looking at a screen with dozens of icons and menu names that change between Windows 10 and 11, it's easy to get lost. Screenshots fix that.
They show you exactly what to look for, where to click, and what data matters.
This is why our guide uses a few key images. Each one matches a specific method, so you can compare what you see on your screen to the picture. It's a lot faster than reading a wall of text and guessing if you're in the right place.
Most people who get stuck are in the wrong menu. For example, the "Device name" field looks like a spec but is just a label. Or they see "System type: x64-based PC" and think that tells them how much RAM they have.
It doesn't. A good screenshot highlights the right fields and ignores the noise.
The Quickest Route: Settings > About
If you just want the basics, processor, installed RAM, and whether your Windows is 64-bit, the quickest way is through the Settings app. Here's how:
- Click the Start button (Windows icon) in the bottom-left corner.
- Click the gear icon to open Settings.
- In Windows 10, click System, then About on the left sidebar. In Windows 11, click System in the left column, then About at the bottom of the list.
You'll see a section called "Device specifications." It shows:
- Processor, the CPU model and base speed (e.g., "Intel Core i7-1260P @ 2.10 GHz")
- Installed RAM, total memory in GB (e.g., "16.0 GB")
- System type, "64-bit operating system" or "32-bit"
- Device ID and Product ID, not useful for specs
Below that is "Windows specifications" showing edition (Home, Pro), version, and build number.
What this screen does NOT show: storage type (SSD vs HDD), graphics card details, or motherboard model. It's perfect for a quick check but not for a full inventory.
The Power‑User Method: System Information (msinfo32)
For a complete hardware summary, System Information is the best built-in tool. It lists every component in one scannable page.
Press Win + R on your keyboard, type msinfo32, and hit Enter. A window opens with a left-hand menu (System Summary is selected by default). The right side shows a long list of entries.
Key fields to look for:
| Field | What it tells you |
|---|---|
| OS Name | Windows version and edition |
| System Manufacturer | Brand of the laptop (e.g., Dell, HP) |
| System Model | Exact model number (e.g., Latitude 7420) |
| Processor | CPU brand, model, core count, and clock speed |
| Total Physical Memory | Installed RAM in GB |
| Available Physical Memory | RAM not in use (varies, not max) |
| BIOS Version/Date | Firmware version (useful for updates) |
| BaseBoard Product | Motherboard chipset (good for upgrade checks) |
This tool also has expandable categories on the left: Components > Storage > Disks shows your drive model, size, and whether it's SSD or HDD. Components > Display shows your GPU, but it's often less detailed than dxdiag.
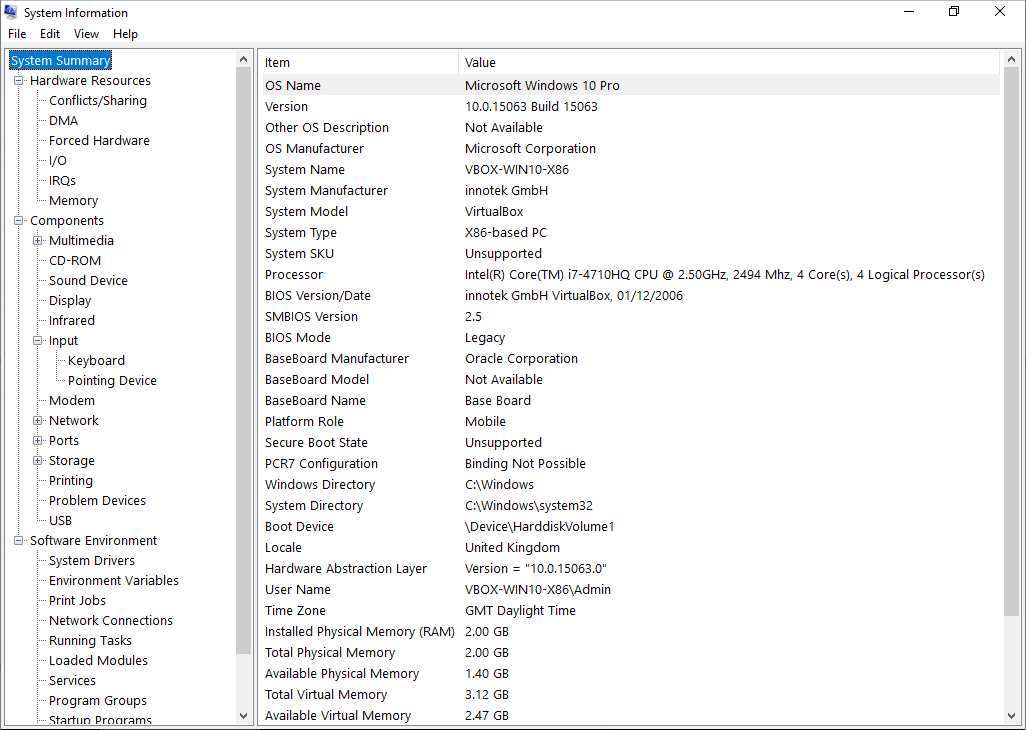
One warning: don't confuse "Total Physical Memory" with "Available Physical Memory." The latter changes based on what's running. Always use "Total" for your actual RAM size.
The Performance Tab Shortcut: Task Manager
Task Manager is usually associated with closing frozen programs, but its Performance tab is a hidden gem for specs.
Press Ctrl + Shift + Esc to open Task Manager. If you see a simple list, click "More details" at the bottom. Then click the Performance tab.
You'll see a left column listing your hardware: CPU, Memory, Disk 0, Disk 1 (if you have two drives), GPU 0, GPU 1 (if dual graphics), and Wi-Fi or Ethernet.
Click each one to see:
- CPU, model name, base speed, cores, logical processors
- Memory, total RAM, speed in MHz, form factor (DIMM or SODIMM)
- Disk, drive model, capacity, and type (SSD vs HDD is written right there)
- GPU, dedicated memory (VRAM), shared memory, driver version
The real advantage: it shows real-time usage and base specs in one place. You can see if your CPU is running at 100% while also knowing its max speed. For storage, it's the quickest way to confirm whether the laptop has an SSD or an old spinning hard drive.
Common pitfall: the "Memory" graph in Task Manager shows "In use" and "Available." That is not your total installed RAM. Look for the text below the graph that says something like "16.0 GB DDR4", that's your actual hardware.
The Graphics Deep Dive: DirectX Diagnostic Tool (dxdiag)
If you need graphics card details, dxdiag is the tool. It's designed for game developers and advanced users, but anyone can use it.
Press Win + R, type dxdiag, and press Enter. A window opens with several tabs. The most important one for specs is Display 1 (or Display 2 if you have a second monitor).
The Display tab shows:
- Name, GPU model (e.g., NVIDIA GeForce RTX 3060)
- Manufacturer, chip maker (NVIDIA, AMD, Intel)
- Chip type, usually same as Name
- DAC type, not useful unless you're troubleshooting old monitors
- Approx. Total Memory, combined dedicated VRAM and shared system memory (not exact VRAM)
- Display Memory (VRAM), this is the dedicated video memory, the number gamers care about
- Driver, version and date
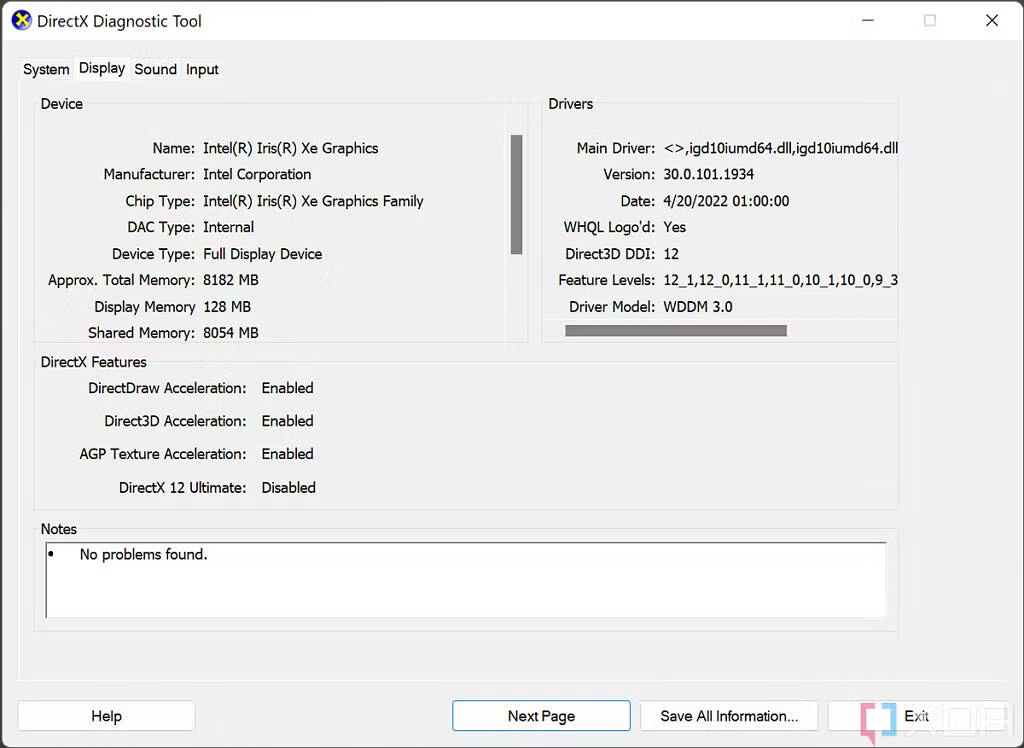
What dxdiag gets right that other tools miss: it tells you the DirectX feature level supported, which matters for modern games. It also flags driver issues (like "WHQL Logo'd: Yes").
Important note: the "Approx. Total Memory" number often seems inflated because it includes shared system RAM. Look at "Display Memory (VRAM)" for the dedicated graphics memory.
If you only see "Shared Memory" and no dedicated VRAM, that means you have integrated graphics (like Intel UHD Graphics), which borrows from your system RAM.
That covers the first five visual‑based methods. Next we'll look at how to check your storage type without opening the case, plus a one‑command shortcut that dumps all specs into a text file. But for now, you've got the core tools: Settings for a quick glance, System Information for a full inventory, Task Manager for real‑time data, and dxdiag for graphics details.
Pick the one that fits what you're trying to figure out.
Checking Storage Type (SSD vs HDD) Without Opening the Case
You do not need to unscrew the back panel to know whether your laptop has a solid-state drive or an old spinning hard drive. Windows tells you directly.
Method 1: Task Manager Performance tab
Open Task Manager (Ctrl + Shift + Esc) and click the Performance tab. On the left, you will see one or more "Disk" entries. Click Disk 0 (or Disk 1 if you have two drives).
Right below the graph, the drive type is written plainly: "SSD" or "HDD". It also shows the model number, capacity, and transfer speed.
Method 2: System Information
Open msinfo32 and expand Components > Storage > Disks. The right panel lists every drive. Look for the "Media Type" column.
It will say "Fixed hard disk media" for HDDs and "SSD" for solid-state drives. The model number often reveals the form factor, too. For example, "Samsung SSD 980 PRO" is an NVMe M.2 drive.
"WD Blue SN570" is also NVMe.
Method 3: Defragment and Optimize Drives tool
Search for "Defragment and Optimize Drives" in the Start menu. Open it. The "Media type" column shows "Solid state drive" or "Hard disk drive".
This tool is read-only for the spec check, so it is safe to use.
Why this matters: SSDs make a laptop feel much faster. If your laptop has an HDD, upgrading to an SSD is the single best performance improvement you can make. Knowing the type helps you decide whether to upgrade or just live with it.
The One‑Command Shortcut: systeminfo in Command Prompt
For a quick text dump of almost every spec, open Command Prompt and type systeminfo. Press Enter. Wait 5 to 10 seconds.
The output is a long list covering OS version, BIOS, processor, memory, network adapters, and even system uptime.
Highlighted fields:
- OS Name and Version
- System Boot Time, shows when the laptop was last turned on (useful for troubleshooting).
- System Manufacturer and System Model
- Processor(s), includes all cores and threads.
- Total Physical Memory and Available Physical Memory
- Hotfix(s), installed Windows updates.
What systeminfo does NOT show: graphics card details, display resolution, or storage type. It also lumps all memory together without speed or form factor.
Pro tip: Pipe the output to a file if you want to share specs or compare later. Type systeminfo > C:\Users\YourName\Desktop\myspecs.txt. The text file appears on your desktop.
You can email it to tech support or keep it for reference.
Alternative command:wmic (Windows Management Instrumentation Command) is older but still works. Type wmic cpu get name to see just the CPU name. Type wmic memorychip get capacity, speed to see RAM module sizes and speed.
The output is less user-friendly than systeminfo, though.
Which one to use?systeminfo is better for a broad overview. wmic is better for targeting a single component. Both are built into every Windows 10 and 11 installation.
Common Visual Misinterpretations
When you look at these screens, a few fields regularly trip people up. Here are the big ones.
“System Type: x64-based PC” does not equal RAM size. Some users see this and think it tells them how much memory they have. It only says the architecture of the OS and processor. Your actual RAM is listed separately under "Installed physical memory" in System Information.
“Available physical memory” in System Information is not your total RAM. It shows how much memory is free at that moment. Your total installed RAM is "Total Physical Memory". If you see "Available: 8.1 GB" and "Total: 16.0 GB", you have 16 GB installed.
“Device name” is not your laptop model. That field holds a user‑configurable name like “DESKTOP‑ABC123”. It has no relationship to the make or model. The actual model is under "System Model" in System Information.
Display resolution in dxdiag might be the external monitor, not your laptop screen. If you have a second monitor plugged in, dxdiag sometimes defaults to the external display. Always check the "Display 1" vs "Display 2" tab to confirm which is the built‑in screen.
“Approx. Total Memory” in dxdiag includes shared system RAM. That number looks like your total graphics memory, but part of it is borrowed from your system RAM. For dedicated GPUs, look at “Display Memory (VRAM)” for the real number.
For integrated graphics (Intel UHD, AMD Radeon Graphics), there is no dedicated VRAM, so the “Approx. Total” is all shared.
Confusing “Version” with “Build” in Windows Settings. The “Version” number (e.g., 22H2) is the feature update version. The “Build” number (e.g., 22621) is the exact OS build. Both are useful for compatibility checks with software.
If a program says “requires Windows 10 build 19041 or later”, you need the build number.
Which Method Should You Use?
The right tool depends on what you need. Here is a quick decision table.
| If you want… | Use this method | Why |
|---|---|---|
| A quick glance at CPU, RAM, OS type | Settings > About | Fastest, no commands needed |
| A full hardware inventory (motherboard, BIOS, model) | System Information (msinfo32) | One page with everything |
| Real‑time usage plus specs (CPU load, RAM speed) | Task Manager > Performance | Live data + specs in one view |
| Graphics card details, VRAM, driver version | DirectX Diagnostic Tool (dxdiag) | Best for gaming or GPU troubleshooting |
| A text summary you can save or share | Command Prompt > systeminfo | Exports to file easily |
| Storage type (SSD vs HDD) confirmation | Task Manager > Performance | Quickest visual check |
| Exact RAM module speed and form factor | Command Prompt > wmic memorychip | Gives manufacturer, speed, part number |
General rule: If you only need basics, use Settings. If you are buying a used laptop, use System Information and dxdiag. If you are troubleshooting performance, use Task Manager.
If you need to send specs to a friend or support, use systeminfo with the export trick.
Pro Tips for Reading Specs Like an Expert
Once you know the basic methods, these tricks add precision.
Tip 1: Check the motherboard model for upgrade potential.
In System Information, the “BaseBoard Product” field shows your motherboard model. Search that model plus the manufacturer name to find maximum RAM capacity, supported CPU upgrades, and M.2 slot availability. This is invaluable if you plan to upgrade.
Tip 2: Run powercfg /batteryreport for battery health.
Open Command Prompt as administrator. Type powercfg /batteryreport and press Enter. The path to the report appears (usually in C:\Users\YourName\battery-report.html).
Open that HTML file. Look for “Design Capacity” vs “Full Charge Capacity”. If the full charge capacity is under 80% of design capacity, the battery is degraded.
That is useful when buying a used laptop.
Tip 3: Spot a mis‑advertised laptop.
If a seller says “16 GB RAM” but System Information shows “Total Physical Memory: 8.00 GB”, you have proof. Similarly, if the processor listed in the ad does not match the CPU name in System Information, walk away. Always verify before buying.
Tip 4: Use dxdiag to test display performance.
On the Display tab, check “DirectX Feature Level”. If it is lower than expected, the laptop may not support certain games or features. The tool also shows “DDI Version” which tells you the driver model.
Tip 5: Remember that “System Information” shows the name of the GPU but not its memory clock or core clock.
For clock speeds, use a lightweight utility like GPU‑Z (third‑party) or check the manufacturer’s specifications online. Windows built‑in tools do not report clock speeds in real time.
Tip 6: Compare “Installed RAM” against the number of slots.
In System Information, if you see “Total Physical Memory: 8.00 GB” but your laptop has two slots, you likely have a 4 GB stick in each. If you want to upgrade to 16 GB, you may need to replace both sticks. Task Manager’s Memory tab shows “Slots used” and “Form factor” (SODIMM for laptops).
What About Windows 10 vs Windows 11?
The core tools work the same on both versions. The main difference is where Settings > About lives. In Windows 10, click Start > Settings > System > About.
In Windows 11, click Start > Settings > System > About (scroll to the bottom).
System Information (msinfo32), Task Manager, dxdiag, and Command Prompt are identical. The field names and layouts do not change between versions. If you learned one, you know the other.
The only visual difference is the rounded corners and centered layout in Windows 11. The data is the same.
Still Can’t Find Something?
If a spec does not appear in any built-in tool, try Device Manager. Right-click Start > Device Manager. Expand categories like "Display adapters" for GPU or "Network adapters" for Wi-Fi.
The driver tab shows the exact chipset model.
For battery health, use powercfg /batteryreport as mentioned earlier. For storage health, run wmic diskdrive get status in Command Prompt. It returns "OK" if the drive is healthy.
If your laptop is a brand like Dell, HP, or Lenovo, their support apps (Dell SupportAssist, HP Support Assistant) sometimes show extra details like warranty status or thermal sensor readings. But Windows built-in tools cover 95% of what you need.
Your At‑a‑Glance Reference Sheet
| Spec | Best Tool to Check | How to Open It |
|---|---|---|
| CPU model and speed | System Information | Win+R > msinfo32 |
| RAM capacity | Settings > About or System Information | Start > Settings > System > About |
| RAM speed and form factor | Task Manager > Memory | Ctrl+Shift+Esc > Performance |
| Storage type (SSD/HDD) | Task Manager > Disk | Ctrl+Shift+Esc > Performance |
| GPU model and VRAM | dxdiag > Display | Win+R > dxdiag |
| OS version and build | Settings > About | Start > Settings > System > About |
| Motherboard model | System Information | msinfo32 > BaseBoard Product |
| Battery health | Command Prompt | powercfg /batteryreport |
| Drive health | Command Prompt | wmic diskdrive get status |
Frequently Asked Questions
How do I check my RAM without opening the laptop?
Open Task Manager with Ctrl+Shift+Esc. Click the Performance tab and select Memory. The total RAM is shown in the top-right corner along with speed and form factor.
Can I check specs without logging into Windows?
Yes. On the login screen, click the power icon at the bottom-right, then hold Shift and click Restart. This opens Advanced Startup.
Go to Troubleshoot > Advanced Options > Command Prompt. Type systeminfo to see basic specs.
What does "System Type: x64-based PC" mean?
It means your processor and operating system support 64-bit software. It does not tell you the amount of RAM. For that, look at "Installed physical memory" in System Information.
How do I see my graphics card specs in Windows?
Press Win+R, type dxdiag, and press Enter. Click the Display tab. The Name field shows the GPU model.
Display Memory (VRAM) shows dedicated video memory.
Why does Task Manager show less RAM than I have?
Task Manager shows "Memory in use" not "Installed RAM". Look at the text below the graph. It says something like "16.0 GB DDR4".
That is your actual installed RAM. The graph shows how much is currently being used.
Are free third-party tools better than built-in ones?
No. Built-in tools are accurate, free, and require no installation. Third-party tools like CPU-Z or Speccy add convenience but nothing essential.
For most people, Windows tools are enough.

Similar Posts