How To Iphone 11 Screen Replacement: Step-By-Step Guide
If your iPhone 11 screen is cracked or unresponsive, replacing it quickly can save you time and money. The process involves removing the damaged screen, disconnecting internal components, and installing a new display—all doable with some basic tools and patience. For a straightforward fix, many prefer professional repair services or DIY kits designed specifically for iPhone 11 screens.
To replace your iPhone 11 screen, you’ll need the right tools, a replacement screen, and a steady hand. Carefully remove the pentalobe screws, open the device using a plastic pry tool, disconnect the display connectors, and then swap out the broken screen with the new one. Reassemble in reverse order, ensuring all connections are secure.
Cracked or malfunctioning screens can make your device difficult to use and diminish its aesthetic appeal. Replacing the iPhone 11 screen might seem intimidating at first, but with the right guidance and tools, it’s entirely manageable. Whether you choose to do it yourself or have a professional handle the job, knowing the process can help you make an informed decision and get your phone looking and functioning like new.

How to iPhone 11 Screen Replacement: A Step-by-Step Guide
Understanding the Importance of a Proper Screen Replacement
Replacing your iPhone 11 screen is more than just fixing a cracked display. It restores your phone’s appearance, functionality, and touch sensitivity. A high-quality screen replacement ensures your device stays protected and works like new.
Gathering the Necessary Tools and Parts
Before starting, gather all required tools. You will need:
- Replacement screen compatible with iPhone 11
- Small Phillips screwdriver
- Plastic opening tools
- Suction cup
- Plastic pry tools
- Tweezers
- Sim card ejection tool
- Adhesive strips or glue
Having these ready helps to make the process smoother and quicker.
Preparing Your Workspace for Safe Repair
Choose a well-lit, dust-free workspace. Use an anti-static mat if available to prevent static damage. Keep your tools organized and avoid working on carpet to prevent losing small parts. Wearing gloves helps to avoid fingerprints and dirt on sensitive components.
Powering Off and Removing the SIM Card
Start by turning off your iPhone 11 completely. Use the SIM card ejection tool to remove the SIM tray. This step protects your data and prevents accidental damage during repair.
Removing the Screen Assembly
The next step is to carefully detach the screen from the phone body. Use a suction cup near the bottom edge to lift the screen gently. Insert a plastic opening tool into the gap to prevent scratching and slowly work around the edges to release adhesive.
Dealing with the Waterproof Seal
iPhone 11 has a waterproof seal that complicates screen removal. Use a heat gun or iOpener to soften the adhesive around the edges. Be cautious not to overheat, which can damage internal components.
Disconnecting the Display Connectors
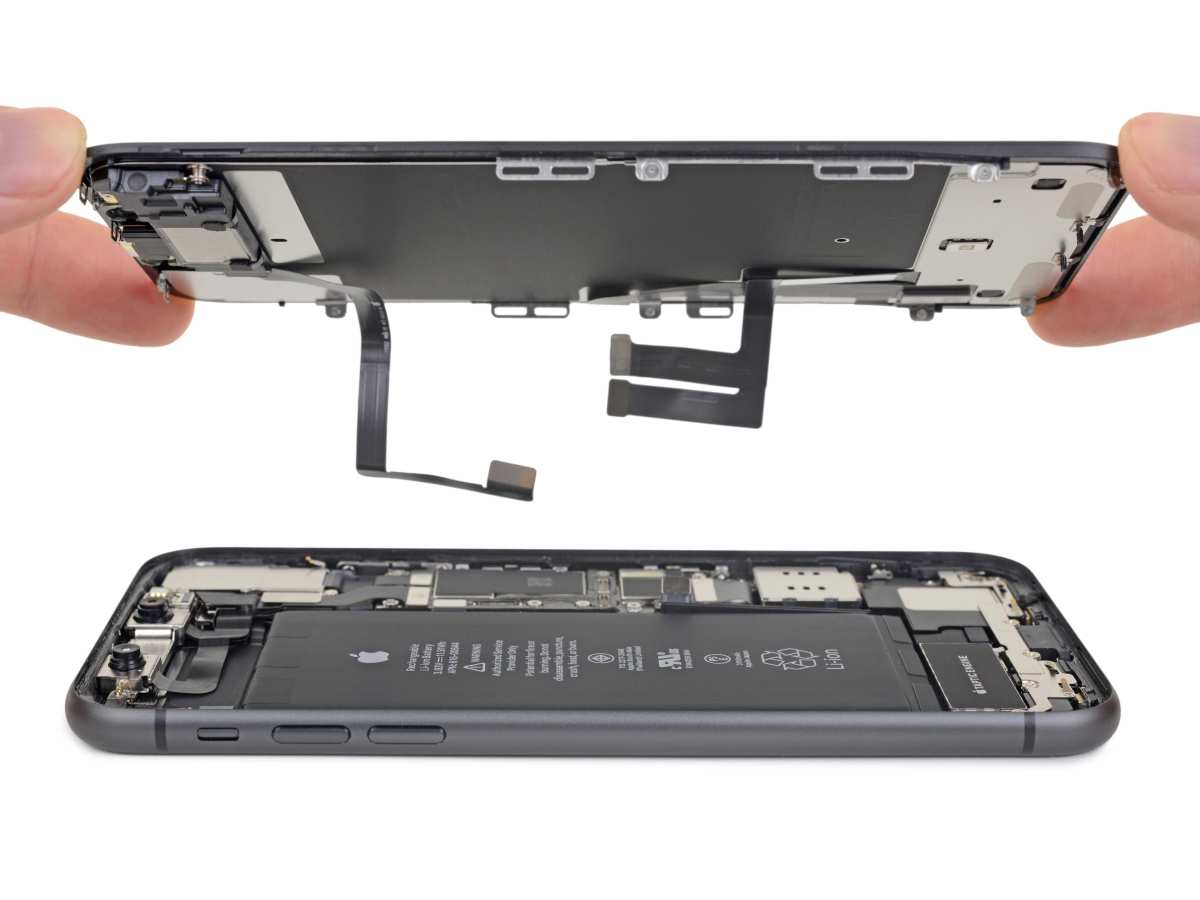
Once the screen is loosened, locate the display connectors inside the device. Use a Phillips screwdriver to remove screws securing the connector brackets. Carefully disconnect the display cables with plastic pry tools or tweezers.
Handling the Front Camera and Sensors
Before fully removing the screen, disconnect the front camera assembly and proximity sensor cables. These small connectors require delicate handling to prevent damage.
Removing the Broken or Damaged Screen
With all connectors detached, lift the old screen away from the device. Be gentle around the edges to avoid damaging internal parts or bending the frame.
Transferring Components to the New Screen
In some cases, you might need to transfer parts like the front camera or sensors from the old screen to the new one. Use a plastic pry tool and tweezers for precise removal and placement.
Testing the New Screen Before Final Installation
Connect the display temporarily to test if it functions correctly. Power on your device and check for touch responsiveness, display quality, and sensor performance. Confirm everything works properly before sealing the device.
Sealing the New Screen into Place
Apply new adhesive strips or a thin layer of glue to the frame. Carefully position the new screen, aligning it properly. Gently press around the edges to make sure the adhesive sticks well.
Reattaching Connectors and Components
Reconnect all display cables, front camera, and sensors in reverse order. Secure each with screws and ensure they are firmly connected to prevent display or sensor issues.
Reassembling Your iPhone 11
After all parts are connected, press the screen gently into the frame, ensuring the waterproof seal is intact. Replace any screws and reinsert the SIM card tray.
Final Checks and Powering On
Power on your iPhone 11 to verify the screen functions perfectly. Test touch sensitivity, display clarity, and sensor responsiveness. If any issues appear, recheck the connections and hardware placement.
Tips for a Successful iPhone 11 Screen Replacement
- Work patiently and avoid rushing to prevent damaging delicate parts.
- Use high-quality replacement screens for durability and clarity.
- Follow tutorials or guides specific to your model for detailed steps.
- Keep small parts organized to avoid losing anything during the process.
- Consider professional repair if you lack experience or confidence.
Common Challenges and How to Overcome Them
Replacing an iPhone 11 screen can be challenging due to its waterproof seal and delicate connectors. Applying gentle heat helps soften adhesive, making components easier to detach. Using proper tools prevents accidental damage to connectors or internal components.
Maintaining Your Repaired iPhone
Once your screen is replaced, consider applying a screen protector to prevent future cracks. Keep your device away from sharp objects and extreme temperatures. Regular cleaning helps maintain display clarity and touch accuracy.
When to Seek Professional Help
If you’re unsure or uncomfortable with the repair process, visit a certified repair shop. Professionals can ensure your iPhone 11 is repaired safely and correctly. Sometimes, a professional repair may be faster and more reliable than DIY.
Cost Considerations for iPhone 11 Screen Replacement
DIY replacements are usually less expensive but come with risks. Professional repairs typically cost more but provide guarantees. Comparing prices and reviews helps to choose the best option for your budget.
Replacing your iPhone 11 screen can be a manageable task with the right tools, patience, and careful steps. Taking your time to follow the process thoroughly ensures your device looks and works like new. Whether doing it yourself or seeking professional help, understanding each step makes the repair smoother and more successful.
iPhone 11 Screen Replacement: Fix Your Cracked Screen!
Frequently Asked Questions
What tools do I need to replace my iPhone 11 screen safely?
You will need a pentalobe screwdriver, a Phillips screwdriver, a plastic prying tool, a suction cup, tweezers, and a replacement screen compatible with the iPhone 11. Using the right tools helps prevent damage to your device and makes the process more manageable.
How can I avoid damaging the internal components during screen replacement?
Carefully disconnect the battery connector before removing or handling the display to prevent electrical shorts. Work on a clean, static-free surface and use plastic tools instead of metal ones to avoid scratching or puncturing internal parts. Follow a step-by-step guide to ensure you don’t inadvertently damage sensitive components.
Is there a way to test the new screen before fully reassembling the iPhone 11?
Yes, after disconnecting the old display but before sealing the device completely, connect the new screen temporarily to the device to check if it displays properly and responds to touch. This approach helps you confirm the installation’s success and avoid having to reopen the phone later.
Can I replace the iPhone 11 screen myself if I have no prior experience?
While it is possible to replace the screen on your own, it requires patience and attention to detail. If you’re new to phone repairs, consider practicing on a less valuable device first or seek help from professional repair services to ensure the job gets done safely and correctly.
What precautions should I take to avoid dust and debris during screen replacement?
Perform the repair in a clean, dust-free environment. Use a static-free work mat and keep the work area organized. Wear an anti-static wrist strap if available, and handle the new screen with clean hands or gloves to prevent fingerprints or dust from getting trapped between the display and the device.
Final Thoughts
To replace the iPhone 11 screen, start by turning off your device and removing the pentalobe screws. Use a suction cup and pry tools to carefully detach the screen without damaging internal components. Disconnect the battery before proceeding to separate the display assembly.
Properly handling tools and following precise steps ensures a successful replacement process. Practicing patience and careful movements minimizes risks of further damage.
In conclusion, learning how to iphone 11 screen replacement can save time and money. Focus on safety and accuracy, and you’ll restore your device’s functionality efficiently.

Similar Posts