How To Do Iphone Screen Replacement Step By Step

How to Do iPhone Screen Replacement: A Step-by-Step Guide
Understanding the Need for iPhone Screen Replacement
If your iPhone screen is cracked, shattered, or unresponsive, replacing it can restore your device’s appearance and functionality. Damaged screens not only look bad but can also cause further internal issues if not fixed promptly. Knowing how to replace your iPhone screen can save you money and prevent the need for costly repairs.Assessing the Damage and Choosing the Right Replacement Part
Before starting, carefully inspect your iPhone. Check if the screen is cracked or if the touch functionality is affected. It’s essential to choose a high-quality replacement screen that matches your iPhone model. Original Apple parts are ideal, but verified third-party screens can also work well. Confirm the compatibility by checking your device’s model number.Gathering the Necessary Tools and Materials
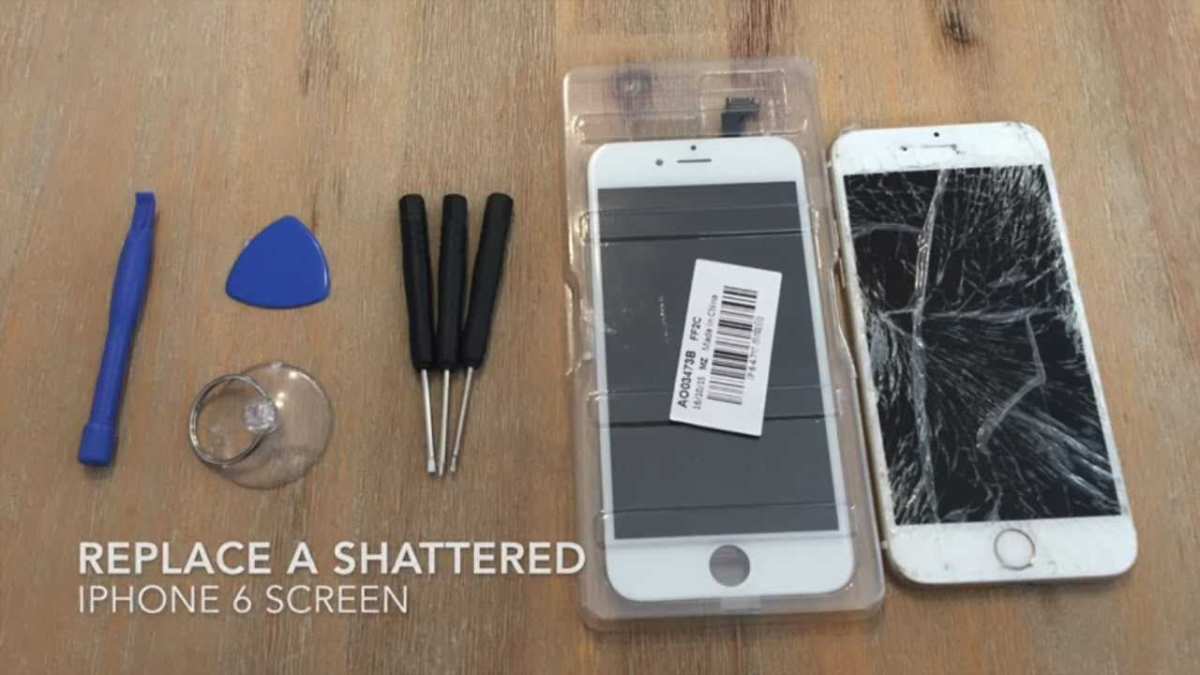
Having the right tools makes the repair process much easier. Essential items include:- Screwdrivers (pentalobe and Phillips)
- Plastic opening tools
- Suction cup
- Anti-static wrist strap
- Replacement screen
- Plastic prying tools
- Picks or spudgers
- Adhesive strips (if needed)
Preparing Your Workspace and Powering Off the Device
Choose a clean, well-lit workspace free of static. Power off your iPhone completely to avoid electrical shorts. Disconnect all cables and remove any cases or accessories before starting. Having a magnetic mat or small containers helps organize screws and tiny parts.Removing the Pentalobe Screws and Opening the iPhone
Use the pentalobe screwdriver to remove the screws at the bottom of the iPhone near the charging port. Place screws in a safe container. Gently place a suction cup on the lower edge of the screen, then pull gently to create a gap. Use plastic prying tools to carefully separate the screen from the device frame, working slowly to avoid damaging internal components.Careful Disconnection of the Screen
Once the screen is slightly lifted, remove the screws securing the display connectors with the Phillips screwdriver. Gently disconnect the display cables using plastic tools, noting their positions. Be cautious not to damage the delicate flex cables.Removing the Old Screen
With all connectors detached, lift the damaged screen away from the device. Some models may have additional adhesive strips. Carefully peel these away if necessary. Keep track of all screws and parts removed to ensure proper reassembly.Transferring Components from Old to New Screen
Most replacement screens come with pre-installed components like the front camera, earpiece, and sensors. If not, transfer these parts carefully from the old screen to the new one. Use the plastic tools to detach adhesive and avoid breaking fragile parts.Reconnecting the New Screen
Align the new screen carefully and reconnect all display cables to the logic board. Double-check connections for security. Once satisfied, gently press the screen into the frame, ensuring it sits flush.Securing the Screen and Screwing in the Pentalobe Screws
Replace the pentalobe screws at the bottom of your iPhone. Avoid overtightening to prevent damage. Confirm that the screen is properly aligned and seated.Powering On and Testing Your Repaired iPhone
Turn on your device to test the new screen. Check for proper touch response, display clarity, and responsiveness. Test features like Face ID, cameras, and buttons to ensure everything functions correctly.Applying Adhesive and Final Assembly
If your replacement screen did not come with adhesive strips, apply new adhesive carefully around the edges. Press the screen firmly to ensure a secure fit. Reassemble any remaining components or covers.Final Tips and Precautions
Work patiently and avoid rushing, as mishandling screws or components can cause damage. Use anti-static tools and grounding to prevent static discharge. If unsure at any point, consult professional repair guides or seek expert assistance. Remember, quality parts and proper technique guarantee the best results.Additional Tips for a Successful iPhone Screen Replacement
- Follow detailed tutorials specific to your iPhone model.
- Use appropriate tools to prevent scratching or breaking parts.
- Take photos during disassembly to aid in reassembly.
- Work in a dust-free environment to avoid debris under the screen.
- Be cautious with flex cables—they are delicate and easy to tear.
Related Topics
How to Repair Other Common iPhone Issues
Explore guides on replacing batteries, fixing charging ports, or correcting camera problems. These repairs follow similar disassembly procedures and require specific tools.When to Seek Professional Help
If your repair seems too complex or you lack the required tools, consider professional service. Sometimes, a certified technician offers more safety and guarantees a quality fix.Preventing Future Screen Damage
Use a tempered glass screen protector and a sturdy case to protect your iPhone. Avoid dropping or exposing your device to extreme conditions for longer device life. This comprehensive guide helps you understand each step involved in iPhone screen replacement. With patience and proper technique, you can restore your device’s look and functionality yourself.iPhone 11 Screen Replacement: Fix Your Cracked Screen!
Frequently Asked Questions
What tools do I need to replace an iPhone screen at home?
To replace an iPhone screen effectively, gather essential tools such as a P2 Pentalobe screwdriver, a Phillips screwdriver, a plastic opening tool, a suction cup, tweezers, a spudger, and a plastic pry tool. Having these tools ensures you can safely open the device, disconnect the display, and install the new screen without damaging internal components.
How can I safely disconnect the display cables during the replacement process?
Power off your iPhone before starting the repair. Use a proper pentalobe screwdriver to remove the screws securing the display assembly. Carefully heat the edges of the device to soften the adhesive, then use a suction cup near the edge to lift the screen slightly. Insert a plastic pry tool between the display and the body, gently working around the perimeter to loosen the clips. Once loosened, disconnect the display cables with a spudger, ensuring not to apply excessive force, which could damage the connectors.
What steps should I take to minimize dust and debris during screen replacement?
Perform the replacement in a clean, dust-free environment. Use an anti-static mat and work in a well-lit area. Before opening your iPhone, wash your hands thoroughly and clean your workspace. Keep the device and replacement screen in a clean, static-free container until ready to install. Carefully open the device and handle the components by the edges to avoid contaminating the adhesive or internal parts. After completing the replacement, reassemble the device promptly to prevent dust accumulation inside.
How can I test the new screen before fully reassembling my iPhone?
After connecting the new display cables but before replacing all screws and adhesive, turn on your iPhone to check the functionality of the new screen. Verify that the touch response, color display, and backlight work correctly. If everything functions properly, proceed with reassembling the device carefully. Testing before complete reassembly helps identify any issues early, saving time and effort.
What precautions should I take to avoid damaging internal components during the replacement?
Handle all internal parts gently and avoid excessive force. Use plastic tools instead of metal to pry or disconnect components, minimizing the risk of scratches or circuit damage. Keep track of screws and small parts, and avoid touching the internal circuitry directly. Follow a step-by-step guide suited for your iPhone model, and take your time to ensure each component remains intact throughout the process.
Final Thoughts
To do iPhone screen replacement, gather the necessary tools such as a pentalobe screwdriver, a plastic opening tool, and adhesive strips. Power off your device and carefully remove the screws to lift the screen. Use the opening tool to gently detach the display, avoiding damage to internal components. Clean and prepare the new screen before fitting it into the device. Secure the new screen with adhesive and reconnect all connectors properly. Finally, power on the device to ensure everything functions correctly. In conclusion, how to do iPhone screen replacement involves careful disassembly and precise reassembly. Follow these steps methodically to ensure a successful repair and restore your device’s functionality.
Similar Posts