Best Iphone Setting For Pictures: Tips For Great Photos
The best iPhone setting for pictures is to use the ProRAW format combined with HDR for vibrant, detailed images. Adjusting exposure and focus manually helps capture sharp, well-lit photos in various conditions. Tweaking these settings ensures your shots look professional without extra editing. Setting your camera this way simplifies capturing stunning images effortlessly. With a few quick tweaks, your iPhone can become a powerful tool for photography.

Best iPhone Settings for Pictures
When it comes to taking photos with your iPhone, the right settings can make a huge difference in how your pictures turn out. Knowing which settings to adjust and how to use them properly helps you capture sharp, beautiful images in a variety of situations. Whether you want to take casual snapshots or create stunning professional-looking photos, understanding the best iPhone settings for pictures will significantly improve your photography skills.
In this guide, we’ll explore the essential settings and tips to help you get the most out of your iPhone camera. From adjusting exposure to choosing the right mode, we’ll cover everything you need to know to take better photos every time you press the shutter button.
Understanding Your iPhone Camera Features
Before diving into specific settings, let’s get familiar with your iPhone’s camera features. Modern iPhones come packed with advanced camera technology, offering multiple lenses, sensors, and software features designed to enhance your photos.
Some key features include:
- Wide and ultra-wide lenses for different perspectives
- Night mode for capturing brighter photos in low light
- Portrait mode for professional-looking blurred backgrounds
- HDR (High Dynamic Range) for balanced highlights and shadows
- Live Photos for capturing moments with movement
- Adjustable focus and exposure controls
Getting comfortable with these features gives you a solid foundation to optimize your settings and capture stunning photos.
Adjusting Exposure for Perfect Brightness
Exposure controls how light or dark your photo appears. Even with the best camera hardware, adjusting exposure manually can help you avoid images that are too bright or too dark.
To adjust exposure on your iPhone:
- Open the Camera app and frame your shot.
- Tap on the focus point (usually where the subject is located). This brings up a yellow box.
- Slide your finger up or down on the screen to increase or decrease exposure. You’ll see a sun icon appear; moving it adjusts the brightness.
Tips for adjusting exposure:
- If the photo looks washed out, decrease the exposure.
- If the image is too dark, increase the exposure to brighten the scene.
- In high-contrast scenes, such as bright skies and dark foregrounds, manual exposure helps balance the lighting.
Remember, manual exposure adjustments are especially useful in challenging lighting conditions, like backlit scenes or indoor environments.
Using HDR for Well-Balanced Photos
High Dynamic Range (HDR) technology helps balance the light and dark areas of your photo, ensuring details are visible both in shadows and highlights. It’s particularly helpful in scenarios with uneven lighting, such as landscapes with bright skies or indoor shots with shaded areas.
How to activate HDR:
- Open your Camera app.
- Tap the HDR icon at the top of the screen (on newer iPhones, this might be set to Automatic or off by default). If you don’t see it, you can activate HDR in the settings menu.
- Choose between Auto, On, or Off depending on your needs. For most situations, Automatic works well.
Keep in mind, HDR processing takes a second longer to capture the photo, so avoid using it when photographing moving subjects.
Choosing the Right Shooting Mode for Different Situations
Your iPhone offers various shooting modes designed for specific scenarios. Using the right mode makes capturing great photos easier and more efficient.
**Standard Photo Mode**
Ideal for everyday shots, offering full control over focus and exposure. Use this mode for landscapes, portraits, and general photography.
**Portrait Mode**
Creates a depth-of-field effect (blurred background) that makes the subject stand out. Perfect for portraits and close-up shots. Always ensure the subject is within the recommended distance (usually 2-8 feet).
**Night Mode**
Automatically activates in low-light conditions. It captures multiple images over a few seconds, combining them for brighter, clearer photos. Hold steady to avoid blurriness.
**Panoramic Mode**
Use this for wide vistas or tall buildings. Slide your iPhone horizontally to capture a sweeping landscape.
**Video Mode**
Switch to video if you want to record moving scenes. Adjust settings like frame rate and resolution in the camera settings to match your need for quality or file size.
Optimizing Focus and Depth of Field
Getting sharp focus ensures your photos are crisp and clear. Your iPhone allows you to lock focus and exposure for more precise control.
Steps to control focus and exposure:
- Tap on your subject on the screen where you want the camera to focus.
- Hold your finger on the focus point until “AE/AF Lock” appears. This locks both auto-exposure and auto-focus.
- If you want to adjust the exposure after locking, slide up or down on the screen as described earlier.
Use this feature when shooting in tricky lighting or when you want to maintain focus during a burst of shots.
For achieving shallow depth of field (blurry background), Portrait Mode is your best option. It simulates a wide aperture by using software to create a bokeh effect, making your subject pop.
Enhancing Colors with Camera Settings
Color accuracy and vibrancy depend partly on the camera settings.
**Live Photos and Filters**
Live Photos can be edited afterward to tweak colors. You can also apply filters directly in the camera for creative effects.
**Adjusting White Balance**
While iPhones don’t allow direct white balance adjustments, you can influence it by changing the lighting mode or using editing apps afterward.
**Using Editing Tools for Better Colors**
Post-processing can enhance your photos:
- Adjust brightness, contrast, and saturation in your Photos app or third-party editing apps.
- Use filters to create mood or match a desired aesthetic.
Remember, subtle edits often produce the best results.
Managing Storage and File Formats
High-quality images take up storage space. Your iPhone allows you to choose formats that balance quality and file size.
**HEIF and JPEG**
Your iPhone defaults to HEIF format for photos, which offers high quality with smaller file sizes. Switch to JPEG if you need compatibility with older devices or apps:
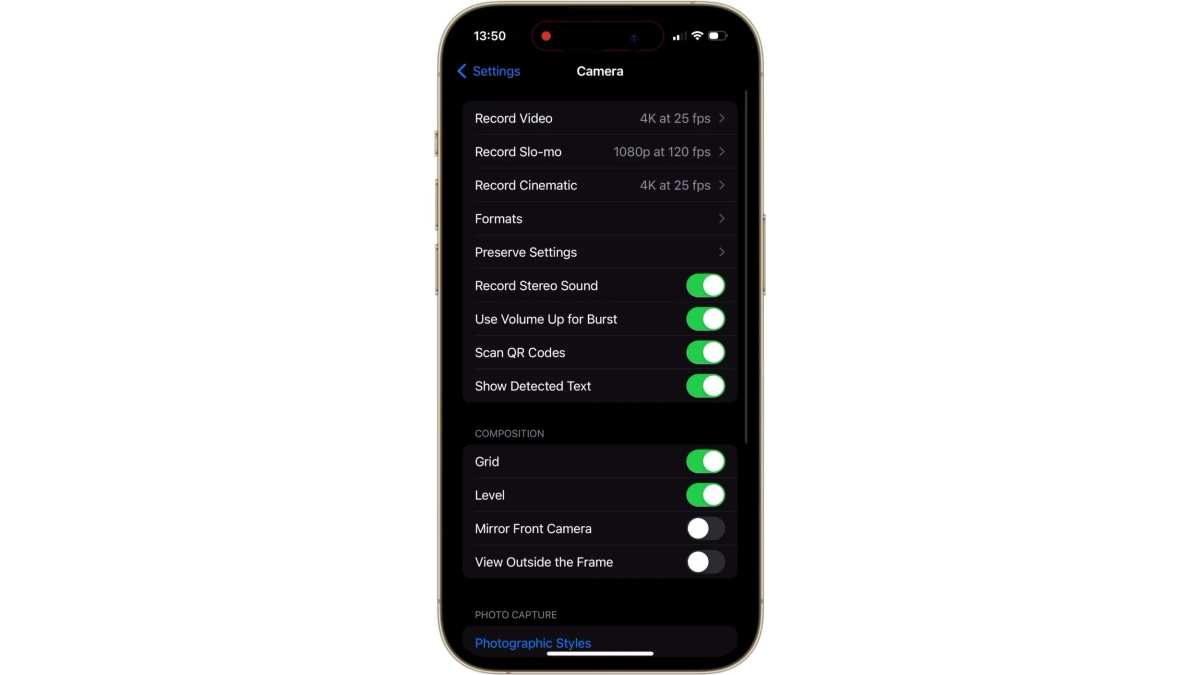
- Go to Settings > Camera > Formats.
- Select High Efficiency for HEIF or Most Compatible for JPEG.
**RAW Format for Professional Photos**
If you want to do advanced editing, shooting in RAW provides unprocessed image data. Access RAW with third-party camera apps such as Adobe Lightroom.
Stabilizing Your Shots for Clear Photos
Blurry photos often result from shaky hands. Follow these tips to keep your shots sharp:
- Use both hands to hold your iPhone firmly.
- If possible, stabilize your device on a steady surface or tripod.
- Use the timer function to avoid movement when pressing the shutter button.
- Enable gridlines in settings (Settings > Camera > Grid) to align your shot for better composition.
During low-light situations, stabilization becomes even more crucial. Using Night Mode and keeping your hands steady helps prevent motion blur.
Utilizing Additional Camera Accessories
While your iPhone camera is powerful on its own, accessories can enhance your photography:
- External lenses for macro or wide-angle shots
- Tripods for stability
- Remote shutters or timers to avoid shaking
- Lighting accessories like ring lights for portrait photography
These tools expand what you can achieve with your iPhone camera and help you capture high-quality images in more challenging conditions.
Final Tips for Taking Better iPhone Photos
– Always clean your lens before shooting to avoid blurry or hazy photos.
– Experiment with different angles and perspectives to find the most interesting shot.
– Use burst mode for capturing action or fast-moving subjects.
– Keep your camera app updated to access new features and improvements.
– Practice regularly to understand how different settings affect your photos.
By applying these tips and understanding your iPhone’s camera settings, you can create more stunning images effortlessly. Remember, a good photo isn’t just about the hardware but also about how you use the available features to tell your story visually. Keep practicing, and over time, you’ll notice a significant difference in the quality of your photos.
Frequently Asked Questions
How can I optimize my iPhone camera’s exposure settings for better photos?
To improve exposure, tap on the subject to focus, then slide the exposure control icon up or down to brighten or darken the image. Using the exposure slider allows you to adjust brightness precisely, ensuring your photos are neither too dark nor too bright even in challenging lighting conditions.
What is the best way to use HDR mode on my iPhone for high-quality pictures?
Activate HDR mode when shooting scenes with a wide range of light and dark areas. This setting captures multiple shots at different exposures and combines them to produce a balanced image with preserved details in both shadows and highlights. Use HDR especially in high-contrast environments like backlit scenes or sunsets.
How do I set the optimal resolution and format for capturing images on my iPhone?
Go to Settings > Camera > Formats and select ‘High Efficiency’ for HEIF/HEVC formats, which save space with minimal quality loss, or choose ‘Most Compatible’ for JPEG/H.264 formats. For the highest resolution, ensure your camera is set to record in the maximum supported quality, and avoid excessive compression to keep details sharp and vibrant.
Final Thoughts
The best iphone setting for pictures enhances your photography experience. Use HDR to balance light and shadow, capturing more detail in each shot. Adjust the grid to compose your images more precisely and follow the rule of thirds.
Enable the Live Photos feature to add depth and movement to your pictures. Switch to the highest resolution settings for clearer, sharper images. These adjustments make your photos more vibrant and professional-looking.
In conclusion, focusing on these key settings will help you take the best iphone setting for pictures. Fine-tune your camera for outstanding results every time.

Similar Posts