How to Make TextView Clickable in Android for Better UI
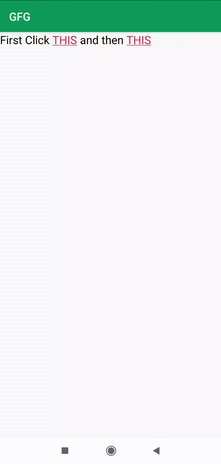
A static TextView is often a missed opportunity. In many Android apps, tapping on a piece of text should launch a link, open a new screen, or trigger an action—yet many developers leave text inert, hurting user experience. Learning how to make TextView clickable in Android for better UI is a simple but powerful way to turn passive text into interactive elements that guide users naturally.
This guide covers four distinct approaches—from making the entire TextView clickable to styling individual spans—with clear code examples, troubleshooting tips, and best practices. Whether you need a simple button-like TextView or a rich, multi-link paragraph, you’ll walk away with production-ready solutions.
Why Clickable TextViews Matter for UI
Clickable text reduces clutter. Instead of adding a separate button next to every label, you can embed actions directly into the text. This:
- Keeps layouts cleaner and more readable.
- Follows natural user intuition (e.g., tapping “Terms & Conditions” to read the full document).
- Improves accessibility when combined with proper focus and content descriptions.
By mastering clickable TextViews, you enhance both the visual design and the interactive flow of your app.
Method 1: Making the Entire TextView Clickable
The simplest use case: the whole TextView acts like a button. You do not need spans or movement methods.
Step-by-Step Implementation
1. Add attributes in XML (optional but recommended):
<TextView
    android:id="@+id/tvClickMe"
    android:layout_width="wrap_content"
    android:layout_height="wrap_content"
    android:text="Tap to proceed"
    android:clickable="true"
    android:focusable="true" />
2. Set an OnClickListener in your Activity or Fragment:
val textView: TextView = findViewById(R.id.tvClickMe)
textView.setOnClickListener {
    // Perform action
    Toast.makeText(this, "TextView clicked", Toast.LENGTH_SHORT).show()
}
Java equivalent:
TextView textView = findViewById(R.id.tvClickMe);
textView.setOnClickListener(new View.OnClickListener() {
    @Override
    public void onClick(View v) {
        Toast.makeText(MainActivity.this, "TextView clicked", Toast.LENGTH_SHORT).show();
    }
});
Important Notes
android:clickable="true"andandroid:focusable="true"are not strictly required in code if you use aClickableSpanorLinkMovementMethod, but setting them ensures consistent behavior across devices.- Do not set
android:autoLinktoweboremailif you want the whole TextView to respond to clicks;autoLinkcreates individual link spans that will intercept taps.
When to Use This Method
- Simple calls-to-action (e.g., “Skip”, “Learn More”).
- Custom button replacements where a full
Buttonwidget feels too heavy. - Fake links that navigate internally (no URL needed).
Method 2: Clickable Parts with SpannableString
Often you need only a portion of text to be interactive—for example, “By signing up, you agree to the Terms of Service.” This is where SpannableString plus ClickableSpan shines.
How It Works
SpannableString lets you attach spans to ranges of characters. ClickableSpan is a span that responds to taps. You must also set a MovementMethod on the TextView so it can intercept touch events.
Full Example: Clickable “Sign Up” Link
Code (Kotlin):
val textView = findViewById<TextView>(R.id.tvTerms)
val fullText = "By signing up, you agree to the Terms of Service."
val spannable = SpannableString(fullText)

val clickableSpan = object : ClickableSpan() {
    override fun onClick(widget: View) {
        val intent = Intent(Intent.ACTION_VIEW, Uri.parse("https://example.com/terms"))
        widget.context.startActivity(intent)
    }

    override fun updateDrawState(ds: TextPaint) {
        super.updateDrawState(ds)
        ds.color = ContextCompat.getColor(this@MainActivity, R.color.link_blue)
        ds.isUnderlineText = true
    }
}

// "Terms of Service" starts at index 27, length = 16
spannable.setSpan(clickableSpan, 27, 43, Spanned.SPAN_EXCLUSIVE_EXCLUSIVE)

textView.text = spannable
textView.movementMethod = LinkMovementMethod.getInstance()
Java equivalent (for clarity):
TextView textView = findViewById(R.id.tvTerms);
String fullText = "By signing up, you agree to the Terms of Service.";
SpannableString spannable = new SpannableString(fullText);

ClickableSpan clickableSpan = new ClickableSpan() {
    @Override
    public void onClick(@NonNull View widget) {
        Intent intent = new Intent(Intent.ACTION_VIEW, Uri.parse("https://example.com/terms"));
        widget.getContext().startActivity(intent);
    }

    @Override
    public void updateDrawState(@NonNull TextPaint ds) {
        super.updateDrawState(ds);
        ds.setColor(ContextCompat.getColor(getApplicationContext(), R.color.link_blue));
        ds.setUnderlineText(true);
    }
};

spannable.setSpan(clickableSpan, 27, 43, Spanned.SPAN_EXCLUSIVE_EXCLUSIVE);
textView.setText(spannable);
textView.setMovementMethod(LinkMovementMethod.getInstance());
Critical Checks
- Always call
setMovementMethod(LinkMovementMethod.getInstance())– without it, taps do nothing. - The indices in
setSpanare 0‑based. If your text changes, recount the positions. - Multiple spans can be added to the same
SpannableString. Each span must have a unique range.
Method 3: Multiple Clickable Regions in One TextView
A single paragraph may contain several interactive segments: “Visit our website or contact support.” Use the same approach as above but apply different ClickableSpan objects.
Example with Two Spans
val text = "Visit our website or contact support."
val spannable = SpannableString(text)

val websiteSpan = object : ClickableSpan() { /* open website */ }
val supportSpan = object : ClickableSpan() { /* open support activity */ }

spannable.setSpan(websiteSpan, 9, 16, Spanned.SPAN_EXCLUSIVE_EXCLUSIVE) // "website"
spannable.setSpan(supportSpan, 20, 35, Spanned.SPAN_EXCLUSIVE_EXCLUSIVE) // "contact support"

textView.text = spannable
textView.movementMethod = LinkMovementMethod.getInstance()
Avoid Overlapping Spans
Two spans cannot share the same character positions. If you need a character to be part of two actions, consider nesting views or using a different UI pattern.
Method 4: Using HTML in TextView (Alternative)
If you prefer a declarative approach, Html.fromHtml() converts HTML strings into Spanned text. By default, <a> tags become clickable if you set LinkMovementMethod and handle URLSpan accordingly.
Quick Example
val html = "Visit our <a href='https://example.com'>website</a> or <a href='contact://open'>contact support</a>."
textView.text = Html.fromHtml(html, Html.FROM_HTML_MODE_LEGACY)
textView.movementMethod = LinkMovementMethod.getInstance()
Then intercept URLSpan clicks by overriding the movement method or using a custom LinkMovementMethod. However, HTML parsing is less flexible for styling and is not recommended when you need precise control over colors, underlines, or custom actions beyond URLs.
Styling Clickable Text for Better UI
Making text clickable is pointless if users cannot visually identify the interactive regions. Follow these styling guidelines.
Visual Cues
| Cue | How to Implement |
|---|---|
| Color | Change ds.color inside updateDrawState() |
| Underline | Set ds.isUnderlineText = true (or false to remove) |
| Bold or italic | Use TypefaceSpan in addition to ClickableSpan |
| Background highlight | Use BackgroundColorSpan on the same range |
Example: Styled Link Without Underline
override fun updateDrawState(ds: TextPaint) {
    super.updateDrawState(ds)
    ds.color = Color.WHITE
    ds.bgColor = Color.parseColor("#6200EE")
    ds.isUnderlineText = false
}
Accessibility
- Add
contentDescriptionto your TextView (e.g., “Tap to view terms and conditions”). - Ensure sufficient color contrast between the clickable text and its background.
Common Pitfalls and Fixes
TextView Not Responding to Tap
- Forgot
LinkMovementMethod– this is the #1 cause. - Spans conflict with
autoLink– if you setandroid:autoLink="web"and also use a customClickableSpan, the auto‑generatedURLSpanmay override your span. Turn offautoLinkand handle everything manually. - Wrap content width/height – if the TextView has
layout_width="0dp"(in a constrained layout), ensure it is not collapsed.
Clickable Region Too Small or Too Large
- Use exact indices. Log the string length and verify your ranges.
- For multi‑word phrases, include spaces only if you want them part of the tap target.
Span Colors Not Applying
- The
updateDrawStatemethod must override the default link color. If your app theme sets a default link color, your span’s color takes precedence only if you callsuper.updateDrawState(ds)and then override.
Best Practices for Production-Ready Clickable TextViews
- Keep spans lightweight – Do not perform heavy operations inside
onClick. Use intents, navigation, or lightweight callbacks. - Extract string resources – Hard‑coded strings and indices are brittle. Instead, mark positions with custom placeholders and compute offsets at runtime.
- Use a helper function – If you have many clickable TextViews, write a utility that accepts a
CharSequenceand a map ofPair<IntRange, ClickableSpan>. - Test on different Android versions –
LinkMovementMethodworks from API 1, but styling behaviour may differ slightly on very old platforms. - Consider
MaterialButtonfor large actions – If the entire TextView acts like a primary button, aMaterialButtonmay be more appropriate for theming and accessibility.
Conclusion
Knowing how to make TextView clickable in Android for better UI transforms static text into a dynamic navigation tool. Whether you need a whole‑area tap or multi‑link paragraphs, the combination of android:clickable, OnClickListener, and SpannableString with ClickableSpan gives you full control.
Start with the whole‑TextView approach for simple buttons, then transition to SpannableString when you need precision. Always set LinkMovementMethod, style your spans clearly, and test on real devices. With these techniques, your app’s text becomes an intuitive, engaging part of the user interface—exactly what modern users expect.

Similar Posts