How To Use Preview App For Editing Pdfs And Images Effectively
Quick answer: Open your PDF or image with Preview, then use the toolbar options to edit, annotate, or crop your files easily. You can highlight text, add notes, insert shapes, or adjust the size and orientation in just a few clicks.
Looking to make quick edits to your PDFs or images without complicated software? The Preview app on Mac is your perfect solution. It’s user-friendly and packed with powerful features that allow you to annotate, crop, resize, and even rearrange pages effortlessly. Whether you need to highlight important sections or add a quick note, Preview offers a seamless editing experience right at your fingertips. In this guide, we’ll walk you through simple steps to get the most out of Preview for all your editing needs — no technical skills required! With just a few taps, you’ll be transforming your files into polished, professional-looking documents and images.

How to use Preview app for editing PDFs and images
The Preview app on Mac computers is a powerful tool that helps you quickly edit PDFs and images. It offers many features that can save you time and effort, making document management easier. This section will walk you through the most useful ways to edit PDFs and images using Preview, step by step.
Getting started with Preview: Opening your files
First, open your PDF or image file in Preview. You can do this by double-clicking the file, which usually opens it automatically in Preview. Alternatively, right-click on your file, select Open with, then choose Preview.
Once your file is open, take a moment to familiarize yourself with the toolbar. Most tools are available from the top or side menus, depending on your version of Preview. Knowing where these are helps you locate editing options quickly.
Basic editing tools for PDFs and images
Using the Markup Toolbar
- Show Markup Toolbar: Click on the toolbox icon to open the markup tools. This gives you access to a variety of editing options.
- Text tools: Add or modify text blocks in your PDFs or images. Click the Text button to insert a text box, then type your content.
- Shapes and lines: Use the shapes tool to insert rectangles, circles, or lines. These are useful for highlighting or annotating documents.
- Sketch and draw: Use the pencil or brush tool to draw freehand on your images or PDFs. Adjust the color and thickness as needed.
Adding text annotations
Click the Text button, then position the text box where you want it. Type your note or comment, and resize or move the box as necessary. You can also change the font, size, and color from the Text Style options.
Editing PDFs with Preview
Rearranging pages
Open your PDF and show the sidebar by clicking View >Thumbnails. Drag pages to reorder them, or select a page and press the delete key to remove it. To add pages, simply drag in a new PDF or image.
Annotating and highlighting
- Choose the Highlight tool from the toolbar to mark important sections.
- Click on the Underline or Strikethrough tools for different emphasis styles.
- Add sticky notes or comments for extra information by selecting Tools >Annotate.
Editing text directly in PDFs
To edit existing text within a PDF, click the Text Selection tool. If the PDF contains embedded editable text, click on the text and make your changes. If the text isn’t editable, consider adding a new text box instead.
Editing images with Preview
Resizing and cropping images
To resize, click Tools >Adjust Size. Enter new dimensions or scale the image proportionally. To crop an image, select the region with the mouse, then choose Tools >Crop.
Rotating and flipping images
- Use the rotate button in the toolbar to turn your image clockwise or counter-clockwise.
- Flipping horizontally or vertically can be added through Tools >Flip Horizontal or Flip Vertical.
Adjusting image colors and exposure
Click Tools >Adjust Colors to modify brightness, contrast, saturation, and more. Use sliders to fine-tune the visual appearance of your image.
Adding and removing elements in images and PDFs
Inserting images and other files
Drag and drop images or PDFs into your open document to insert new elements. Position them where needed and resize as necessary. This is especially useful for creating collages or combining documents.
Deleting unwanted objects
Select the element with your mouse, then press the delete key. For annotations or added elements, right-click and select Delete from the context menu.
Exporting and saving your edited files
Saving your work
To save changes, click File >Save. Use Save As if you want to keep the original and create a new version.
Exporting PDFs and images
- Select File >Export for options to choose formats like JPEG, PNG, TIFF, or PDF.
- Adjust image quality, resolution, or file format before saving.
Tips for efficient editing with Preview
- Use keyboard shortcuts for common actions like copying (Command+C) and pasting (Command+V).
- Customize the toolbar to include your most-used tools for quicker access.
- Undo changes easily with Command+Z, allowing you to experiment without worry.
- For complex edits, consider splitting large PDFs into smaller sections for easier management.
Related topics to explore in Preview
- Creating fillable PDFs using text boxes and forms.
- Combining multiple PDFs into one document.
- Using Preview to scan documents directly into digital files.
- How to password-protect PDFs for security purposes.
By understanding how to leverage Preview’s editing tools, you can handle a wide range of document and image editing tasks without needing additional software. Its intuitive interface makes it simple to annotate, modify, and organize your files efficiently, making your workflow smoother and more productive.
6 Tricks to Master Preview on the Mac
Frequently Asked Questions
How can I annotate PDFs using the Preview app?
You can add annotations to PDFs in Preview by selecting the markup toolbar. Use tools like the pen, highlighter, or text box to underline, highlight, or add comments directly onto the document. Simply click on the desired tool, adjust its settings if necessary, and then click or drag on the PDF where you want to add your annotations.
What steps should I follow to resize or crop images in Preview?
To resize an image, open it in Preview and select the entire image by clicking on the ‘Select All’ option. Then, go to the ‘Tools’ menu, choose ‘Adjust Size,’ and input your preferred dimensions. To crop, select the part of the image you want to keep with the selection tool, go to ‘Tools,’ and click on ‘Crop.’ Your image will be trimmed to the selected area.
How can I add or remove pages within a PDF using Preview?
Adding pages involves opening your PDF in Preview, then dragging additional PDF files into the sidebar where pages are listed. To remove pages, select the thumbnail of the page you want to delete, right-click, and choose ‘Delete.’ You can then save the updated PDF with your changes.
Is it possible to adjust the color and contrast of images in Preview?
Yes, you can modify the color and contrast of images in Preview. Open your image, go to ‘Tools’ > ‘Adjust Color,’ and move the sliders for exposure, contrast, saturation, and other settings. This allows you to enhance your images directly within the app to achieve your desired look.
How do I export or save edited PDFs and images in different formats?
After editing your PDF or image, click on ‘File’ > ‘Export.’ Choose the format you need, such as PDF, JPEG, or PNG, adjust the quality or resolution if necessary, and pick your destination folder. Click ‘Save’ to complete the process and keep your edited file in the preferred format.
Final Thoughts
How to use Preview app for editing PDFs and images is straightforward and efficient. You can quickly annotate, highlight, and add text to your PDFs with simple tools. For images, Preview allows cropping, resizing, and adjusting colors without extra software. Practice these features to enhance your workflow and handle documents seamlessly.
Related posts

New Iphone Setting Up: A Complete Guide For Beginners
**To set up a new iPhone quickly, follow a few simple steps to get started right away.** When…
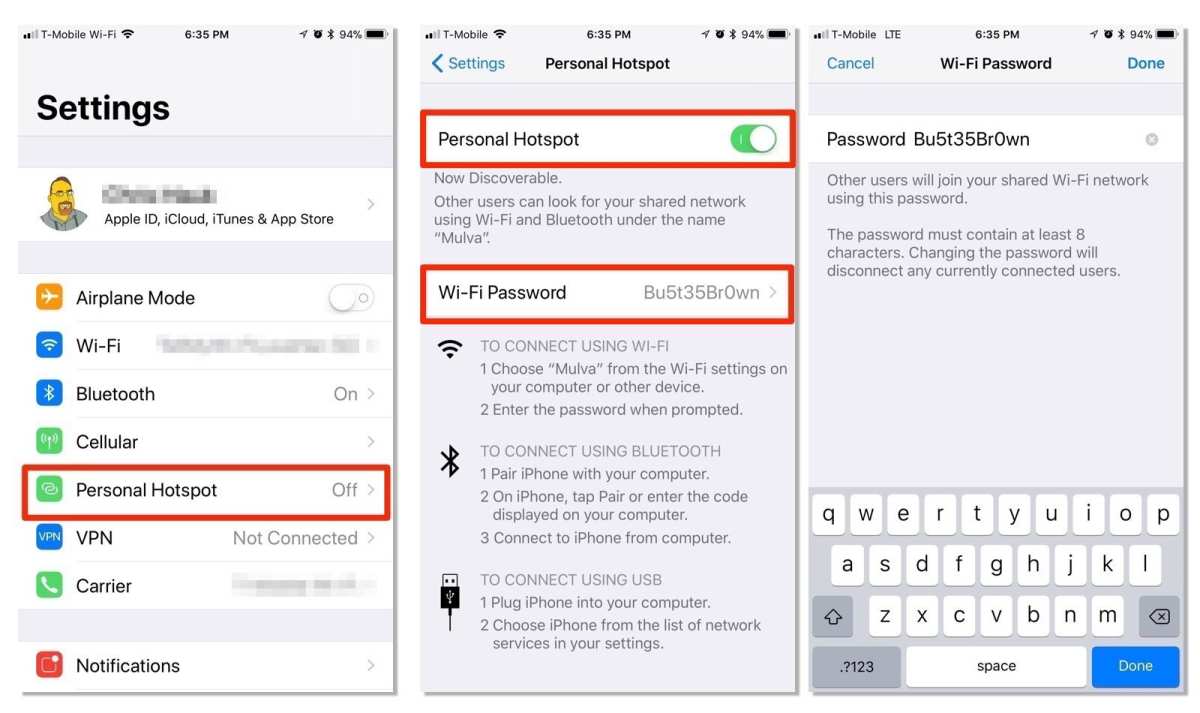
Iphone Setting Up Hotspot: Easy Steps To Connect Your Device
**To set up your iPhone as a hotspot, simply turn on Personal Hotspot in your settings.** If you’re…
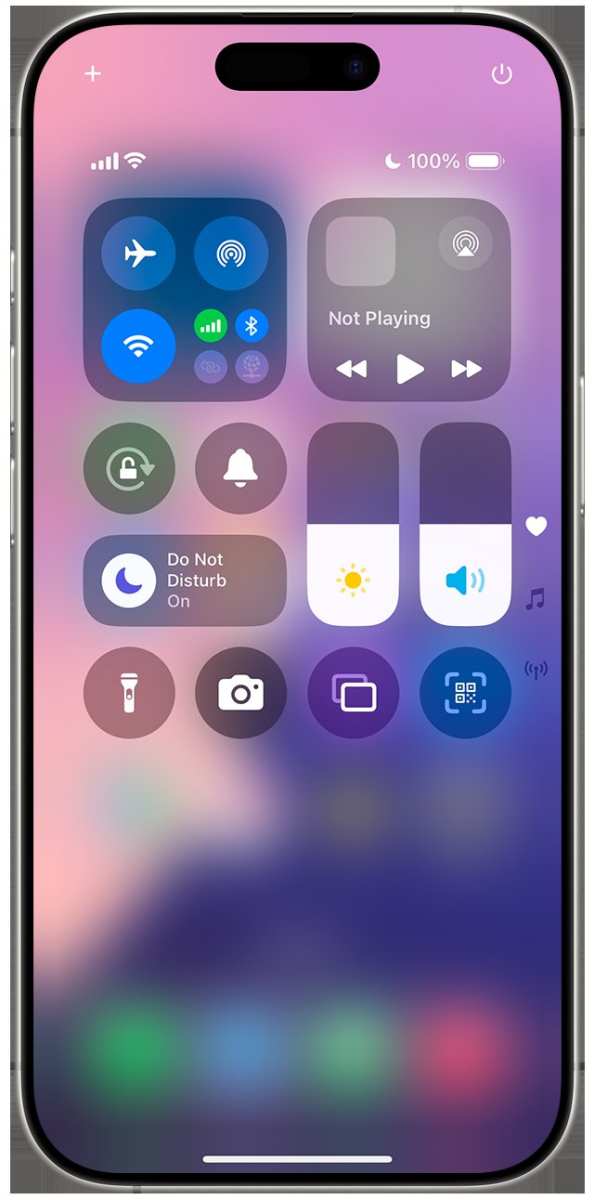
Effective Guide To The Do Not Disturb Iphone Setting
The ‘do not disturb iPhone setting’ instantly silences notifications, giving you peace when needed. If you want your…