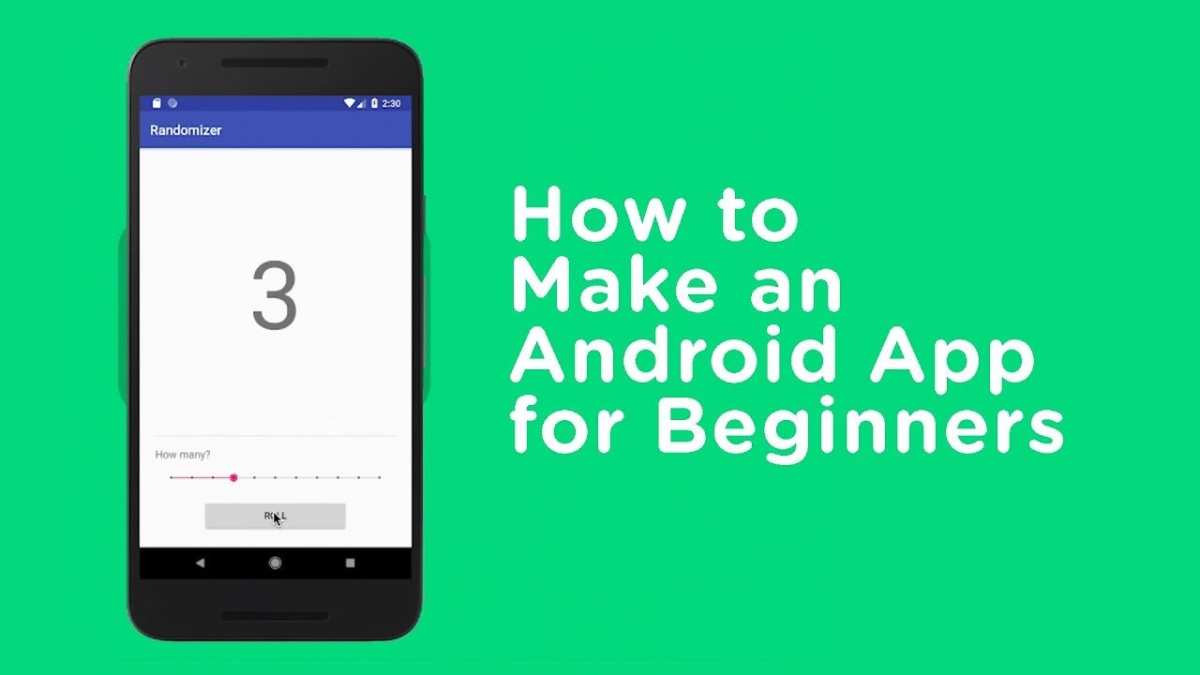
How To Make An App On Android: Simple Step-By-Step Guide
To make an app on Android, start by planning your idea and choosing the right development tools. **The key is using Android Studio, the official IDE for Android app creation.** Once you set up your environment, you can begin designing user interfaces and writing your code.
Knowing how to make an app on Android becomes easier with guided tutorials and practice. Keep experimenting, and soon you’ll have your own app up and running.
How to Make an App on Android
Creating an Android app might seem like a big task at first, but with clear steps and the right tools, you can develop your own app even if you’re a beginner. This process involves understanding what kind of app you want to build, learning the programming basics, designing your app, and finally, publishing it so others can use it. Let’s walk through each part in detail so you know exactly what steps to take.
Understanding the Basics of Android App Development
Before diving into building an app, it’s important to understand what Android development involves. Android apps are usually built using a programming language called Java or Kotlin, and they run on devices with the Android operating system.
Some key points to remember:
- Android Studio is the main tool used to develop Android apps. It’s a free software provided by Google.
- Apps are made of different parts such as layouts (what users see), activities (what happens when users interact), and resources (images, text, sounds).
- You need to learn about user interfaces so your app is easy and fun to use.
- Understanding the basics of programming helps you write code that makes your app work.
This foundation will help you plan and create your app efficiently, making the development process smoother.
Planning Your App
Every good app starts with a plan. Think about what kind of app you want to build. Is it a game, a calculator, a to-do list, or something else? Write down what you want your app to do and how you want it to look.
Here are some steps to plan your app:
- Identify the main purpose of your app.
- List all the features you want to include.
- Sketch basic designs of what the screens will look like.
- Think about how users will navigate through the app.
- Create a simple plan or diagram of how the app will work.
Planning helps you stay organized and makes coding easier because you know exactly what you want to build.
Setting Up Your Development Environment
To start programming, you need to set up your computer with the right tools.
Here’s how to do it:
- Download and install Android Studio. It is the official IDE for Android development.
- Make sure your computer meets the necessary system requirements for Android Studio.
- Open Android Studio and create a new project.
- Choose a template that matches the type of app you want to build, like a basic activity for simple apps.
- Configure your project by naming it and selecting your preferred programming language (Java or Kotlin).
Once your environment is ready, you can start writing code and designing your app.
Designing the User Interface
The user interface (UI) is what users see and interact with. Good UI design makes your app more enjoyable to use.
Here’s what you should do:
Using Layouts
Layouts organize how elements like buttons, text, and images appear on the screen. Android Studio provides different layout types like:
- LinearLayout: stacks elements vertically or horizontally.
- RelativeLayout: positions elements relative to each other.
- ConstraintLayout: offers flexible positioning by setting constraints.
Add Elements to Your Layout
You can add elements such as:
- Buttons for user actions
- TextViews for displaying text
- EditTexts for user input
- Images for visual appeal
Use the visual editor in Android Studio or edit XML files directly to arrange your UI.
Design Tips
– Keep the layout simple and clean.
– Use colors and fonts that are easy on the eyes.
– Make buttons large enough for easy tapping.
– Ensure labels are clear and descriptive.
Proper design improves user experience and encourages people to use your app.
Adding Functionality with Code
Once your design is ready, turn it into a working app by adding code.
Here’s how:
- Handle user interactions: write code for buttons, clicks, or text entries.
- Implement features based on your plan: like saving data, displaying information, or performing calculations.
- Use Android’s APIs to access device features, such as camera, GPS, or contacts.
For example, to make a button do something when clicked:
“`java
Button myButton = findViewById(R.id.my_button);
myButton.setOnClickListener(new View.OnClickListener() {
@Override
public void onClick(View v) {
// Action to perform
}
});
“`
Test your app regularly as you add new features. Debugging helps you fix problems before you finish.
Testing Your App
Testing ensures your app works on different devices and scenarios.
Here’s what to do:
- Use the built-in Android Emulator in Android Studio to simulate different devices and Android versions.
- Test your app on actual Android devices if available, connecting via USB or wireless debugging.
- Check every feature to make sure it functions correctly.
- Ask friends or family to try your app and give feedback.
Fix any bugs you find. Testing helps you improve your app before sharing it with others.
Publishing Your App
Once everything works well, it’s time to share your app with the world.
Follow these steps:
- Create a signed APK or App Bundle: Android Studio helps you package your app securely.
- Set up a developer account on the Google Play Console, which costs a small fee.
- Upload your app, add a description, screenshots, and choose your target countries.
- Publish your app and wait for Google’s review process to finish.
After approval, your app becomes available for millions of Android users to download and enjoy.
Tips for Success in Android App Development
To make your app the best it can be, remember these tips:
- Start small: build simple apps first and add more features later.
- Learn from tutorials and online courses to improve your coding skills.
- Read Android developer documentation to understand best practices.
- Keep your app updated based on user feedback.
- Stay patient and keep practicing; developing apps is a skill that gets better with time.
Creating an app on Android takes patience and practice, but it’s also a fun way to bring your ideas to life and share them with others.
As you continue to learn and experiment, you’ll become more confident and capable in building your own Android apps. Keep exploring new features, design ideas, and coding techniques to make your app stand out. Happy coding!
Frequently Asked Questions
What are the initial steps to create an Android application?
Begin by setting up your development environment. Install Android Studio, which is the official IDE for Android app development. Familiarize yourself with its interface and create a new project, choosing the appropriate templates and configurations. Outline your app’s core features and plan the user interface to ensure a smooth development process from the start.
How can I design an effective user interface for an Android app?
Focus on creating a clean and intuitive layout using Android’s XML layout files. Use standard UI components like buttons, text fields, and menus, and organize them logically to enhance usability. Test your design across various device sizes and screen orientations to ensure consistency and accessibility for all users.
What coding languages should I use to develop an Android app?
You can use Java or Kotlin to write your Android application. Kotlin is now the preferred language recommended by Google due to its concise syntax and modern features, but Java remains widely used. Choose the language that best aligns with your experience and project requirements to streamline your development process.
How do I test my Android app effectively during development?
Use Android Studio’s built-in emulator to simulate various device configurations and operating system versions. Additionally, test your app on real devices to identify any hardware-specific issues. Regular testing helps catch bugs early and improves overall app stability before publishing.
What steps are involved in publishing my Android app on the Google Play Store?
Prepare your app for release by optimizing it and generating a signed APK or App Bundle. Create a developer account on the Google Play Console, then upload your app along with detailed descriptions, screenshots, and other required assets. Follow Google’s guidelines to ensure a smooth submission process and successfully launch your app to users worldwide.
Final Thoughts
To make an app on android, start by defining your idea and setting clear goals. Choose the right development tools like Android Studio and familiarize yourself with Java or Kotlin programming languages. Design an intuitive user interface and test your app thoroughly on different devices.
By following these steps, you will gain the skills needed to create an effective Android application. Making an app on android becomes manageable when you stay organized and focus on user experience. Ultimately, creating a successful app involves continuous learning and iteration.
Similar Posts