

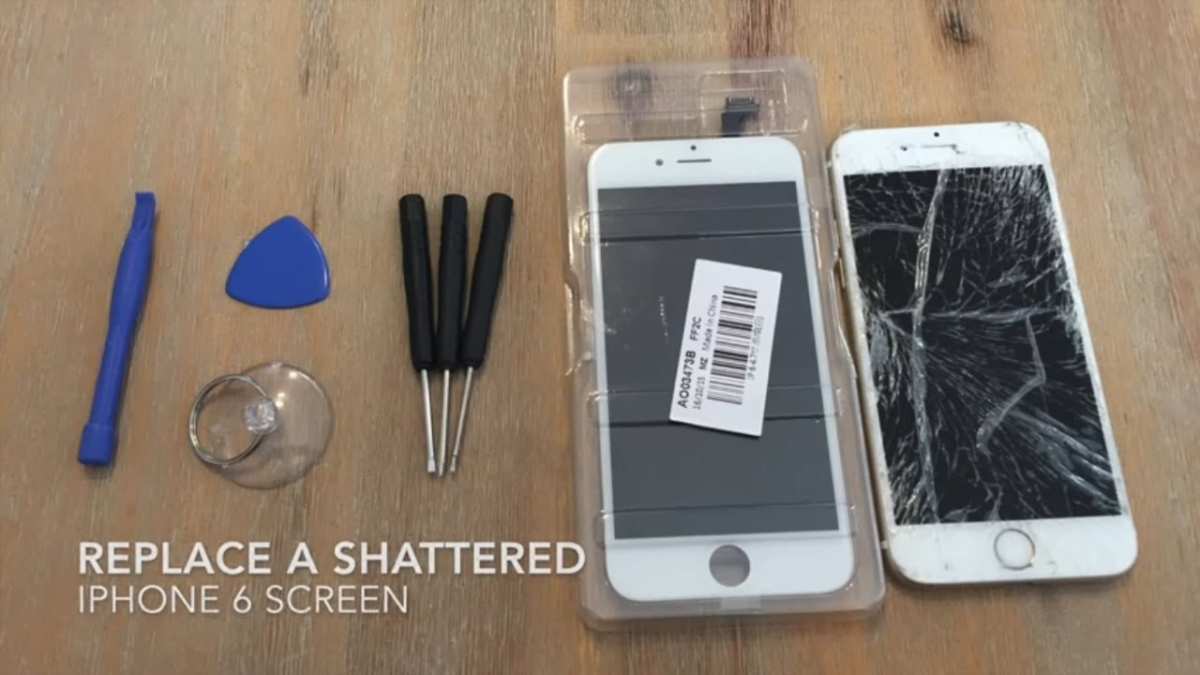
If your iPhone screen is cracked or unresponsive, replacing it is straightforward with the right guidance. **The best way to perform an iPhone screen replacement involves careful tools and step-by-step instructions.** Knowing how to iphone screen replacement can save you money and time compared to visiting a repair shop.
Start by turning off your device, then gather necessary tools like a pentalobe screwdriver and suction cup. Following precise steps ensures a smooth process and a restored screen.

How to iPhone Screen Replacement: Step-by-Step Guide
Replacing an iPhone screen might seem like a daunting task, but with the right tools, clear instructions, and patience, you can successfully do it yourself. Whether your screen has cracked, shattered, or stopped responding, knowing how to replace your iPhone screen can save you money and extend the life of your device. This guide breaks down the entire process into straightforward steps, making it as simple and comfortable as possible for anyone to follow.
Understanding When to Replace Your iPhone Screen
Before diving into the repair process, it’s essential to recognize when a screen replacement is necessary. Sometimes, problems might seem like a screen issue but could be related to software or other hardware components.
- Cracked or shattered glass: Visible damage that compromises the screen’s structural integrity.
- Touch responsiveness issues: If the screen doesn’t respond properly or responds intermittently, replacing it might help.
- Unresponsive display: When the display shows no image or has lines and flickering, a replacement can restore it to full function.
- Battery or other hardware damage: Sometimes, a broken screen also indicates underlying issues; replacing the screen can address both problems.
Keep in mind, if your iPhone experiences physical damage beyond the screen, such as water damage or internal hardware fault, additional repairs might be necessary.
Tools and Supplies Needed for iPhone Screen Replacement
To successfully replace your iPhone screen, gather the necessary tools beforehand. Having everything in place ensures a smoother process and minimizes the risk of damaging other components.
| Tool | Description |
|---|---|
| Precision screwdriver set | Includes pentalobe and Phillips screwdrivers tailored for iPhone screws. |
| Plastic opening tools | Help pry open the device without scratching or damaging the casing. |
| Spudger | A handy tool to disconnect cables and remove small components safely. |
| Suction cup | Assists in lifting the screen away from the device after loosening adhesive. |
| Tweezers | For handling tiny screws and delicate connectors. |
| Adhesive strips or glue | To secure the new screen properly after installation. |
In addition, make sure to have a clean, well-lit workspace and an anti-static mat or wrist strap to prevent static damage to sensitive components.
Preparing Your iPhone for Screen Replacement
Proper preparation makes the replacement process smoother and reduces the chance of complications. Follow these initial steps carefully:
Power Off Your Device
Always turn off your iPhone before starting. Press and hold the power button, then slide to power off. Cutting the power reduces electrical risks and prevents accidental taps or damage.
Remove SIM Card Tray
Use a SIM ejector tool or paperclip to remove the SIM card tray. This not only prevents dust particles from entering but also gives you better access to the sides of the device.
Gather Your Tools and Workspace
Ensure your workspace is organized and free of clutter. Gather all the tools listed earlier and ensure your work area is static-free.
Opening Your iPhone Without Damaging It
The next step involves carefully opening your iPhone to access the internal components. The challenge lies in separating the screen from the device without cracking the glass further or damaging internal cables.
Loosen the Pentalobe Screws
Use the appropriate screwdriver to remove the screws at the bottom of your iPhone, near the charging port. Keep these screws in a safe place and note their positions to ensure proper reassembly.
Applying the Suction Cup
Place the suction cup just above the home button or at the bottom edge of the screen. Gently pull on the cup to create a gap between the screen and the metal casing. Be careful not to apply excessive force.
Using Plastic Opening Tools
Insert a plastic opening tool into the gap created by the suction cup. Carefully slide it around the edges to loosen the adhesive seal. Work slowly and evenly to prevent cracking or bending the glass.
Disconnecting Internal Cables
Once the screen is loosened, open the device like a book. Use the spudger to disconnect the fragile display and touch cables located inside. Be gentle and ensure you’re disconnecting only the necessary cables.
Replacing the iPhone Screen
With the device opened, you can now replace the damaged screen with a new one. Follow these steps precisely:
Removing the Old Screen
Carefully lift the cracked or broken screen away. If it’s stubborn, recheck for any remaining adhesive or screws before applying more force.
Preparing the New Screen
Before installation, inspect your new screen for any defects. If needed, transfer small components like the ear speaker, front camera, and home button from the old screen to the new one, following manufacturer instructions.
Connecting the New Screen
Reconnect the display and touch cables to your iPhone’s logic board. Ensure each connector clicks into place securely. Avoid forcing connectors as they can be fragile.
Testing the Replacement
Power on your device before sealing it fully. Check for proper display operation, touch responsiveness, and the absence of dead pixels or lines. If everything looks good, proceed to sealing.
Sealing and Finishing the Repair
Once tested, it’s time to close your iPhone properly. Proper sealing ensures water resistance and maintains the device’s aesthetic.
Applying Adhesive
Use new adhesive strips or glue to secure the screen back in place. Carefully align the screen edges with the casing, pressing down gently to ensure a snug fit.
Replacing Pentalobe Screws
Screw back the bottom screws and make sure they’re tight but not over-tightened to avoid damaging the threads.
Reinstalling the SIM Card Tray
Insert your SIM tray back into its slot, ensuring it slides in smoothly.
Post-Repair Tips and Troubleshooting
After completing the repair, power on your iPhone and test all functions thoroughly. If the screen doesn’t respond or shows artifacts, double-check all cable connections. If issues persist, consider seeking professional help.
- Check for dust or debris: Clean the interior carefully before sealing.
- Test all functionalities: Touch responsiveness, display quality, and color accuracy.
- Keep the device dry: Avoid moisture during and after repair.
This process can take from 30 minutes to a few hours depending on your experience. Patience and meticulous work will lead to a successful screen replacement.
When to Seek Professional Help
Although DIY screen replacement is achievable, certain situations call for expert assistance:
- Complex internal damage: If your device has water damage or motherboard issues.
- Uncertain about disassembly: If you’re uncomfortable working with tiny components.
- Persistent problems after replacement: Issues like ghost touches or display flickering.
Visit a certified repair shop or Apple Store if you prefer a professional touch or lack the tools and confidence for a DIY fix.
Replacing your iPhone screen yourself offers a rewarding experience and saves money. By following detailed steps, using the right tools, and working patiently, you can bring your device back to life, ensuring it remains functional and attractive for years to come.
Frequently Asked Questions
What tools do I need to replace my iPhone screen safely?
To replace your iPhone screen safely, gather essential tools such as a precision screwdriver set, a plastic opening tool, a suction cup, tweezers, and a pentalobe screwdriver. Using a specialized screen replacement kit can simplify the process and minimize the risk of damaging internal components. Ensure you work on a clean, static-free surface and handle delicate parts with care.
How can I detach the broken screen without causing further damage?
Start by powering off your iPhone and removing the pentalobe screws at the bottom. Use a suction cup near the edge of the screen to gently lift it, employing a plastic opening tool to carefully prise the display away from the housing. Work slowly around the edges, applying even pressure, and avoid tugging on cables or connectors attached to the display. Patience is key to prevent cracking or damaging internal components.
Is it necessary to disconnect the battery before replacing the screen?
Yes, disconnecting the battery is a crucial step to ensure safety and prevent short circuits. After opening your iPhone, locate the battery connector and carefully disconnect it using a plastic tool. This step minimizes the risk of electric shock or accidental damage while handling internal parts. Always follow a proper disassembly guide specific to your iPhone model for best results.
How do I reconnect the new screen to ensure it functions properly?
Align the new screen’s connectors with the corresponding ports on your iPhone’s logic board. Gently press each connector into place, making sure they fit snugly without excessive force. Once connected, reattach the display firmly to the frame, secure all screws, and reconnect the battery. Power on your device to test the new screen’s responsiveness and display quality before sealing the device completely.
What steps should I take after replacing the screen to confirm it works correctly?
Turn on your iPhone and check the display for clarity, touch responsiveness, and color accuracy. Test basic functions such as unlocking the device, opening apps, and verifying the front camera and sensors. If you notice issues like unresponsive touch or display flickering, recheck your connections. If everything works correctly, reassemble the remaining components and secure the device back together.
Final Thoughts
Learning how to iPhone screen replacement allows you to save money and time. Gather the right tools and follow step-by-step guides to ensure a smooth process.
Carefully disconnect the battery and screen, then replace the damaged parts with new ones. Take your time and stay patient throughout the procedure.
In conclusion, knowing how to iPhone screen replacement empowers you to handle repairs confidently. Just remember to stay cautious and precise to achieve the best results.
