How To Protect Your Macbook With Filevault Encryption Effectively
To keep your MacBook secure from prying eyes, enabling FileVault encryption is a must. It encrypts all your data, making it nearly impossible for anyone to access your information without your password. Simply put, turning on FileVault adds a robust layer of protection to your device, ensuring your personal data stays private even if your Mac is lost or stolen.
Quick answer: Activate FileVault in your Mac’s Security & Privacy settings to encrypt your entire drive. Make sure to keep your login password secure and remember your Apple ID details in case you need to unlock your disk. This straightforward step dramatically boosts your data security with minimal effort.
Protecting your MacBook is essential in today’s digital world, where data breaches and theft are increasingly common. When you enable FileVault encryption, you safeguard sensitive files, personal photos, and confidential work documents from unauthorized access. The process is simple: it involves turning on encryption via your Mac’s System Preferences, and once enabled, it runs quietly in the background, ensuring your data remains safe. Even if someone physically gets hold of your device, they won’t be able to access your information without the encryption key. So, whether you’re commuting, traveling, or just leaving your Mac unattended, activating FileVault offers peace of mind and a robust barrier against potential threats.

How to protect your MacBook with FileVault encryption
Understanding why encryption matters for your MacBook
Encryption is a way to keep your data safe by converting it into a code that only you can decipher. If someone tries to access your MacBook without permission, encryption makes it very difficult for them to see your files. This is especially important if your MacBook gets lost or stolen.
Using encryption like FileVault ensures your sensitive information remains private. It acts as a digital lock that protects everything stored on your device. Think of it as a safe deposit box that only you can open with your password.
What is FileVault and how does it work?
FileVault is built into macOS and uses advanced encryption technology to protect your entire disk. When you enable FileVault, it encrypts all the data on your MacBook’s storage drive.
The encryption process converts your files into unreadable data until you enter your login password. Once unlocked, your MacBook decrypts the data so you can use it normally. This means your information stays protected even if someone removes your drive or tries to access it without your permission.
Steps to activate FileVault on your MacBook
Activating FileVault is simple, but it’s important to follow each step carefully. Here’s how you can turn it on:
- Click on the Apple menu and select System Preferences.
- Choose Security & Privacy.
- Go to the FileVault tab.
- Click on the padlock icon and enter your administrator password.
- Press Turn On FileVault.
Once you click this, your Mac will start encrypting your disk, which might take several hours depending on your storage size.
Choosing the right password for FileVault
Your password is the key to your encrypted data, so pick one that’s strong but memorable. Use a combination of uppercase and lowercase letters, numbers, and symbols.
Avoid using common words, birth dates, or simple sequences. Think of a phrase or a made-up word that’s easy for you to remember but hard for others to guess.
Remember, if you forget your password, it can be very difficult to recover your data. You can also set up a recovery key during the activation process, which can be used if you forget your password.
Setting up a recovery key and alternative recovery methods
During FileVault setup, your Mac might prompt you to create a recovery key. This key is a 24-character code that can help you regain access if you forget your password.
It’s best to store the recovery key in a safe place outside of your MacBook. You could write it down or save it in a secure password manager.
If you choose not to use a recovery key, make sure your Apple ID is linked to your account. This allows you to reset your password via your Apple ID if needed.
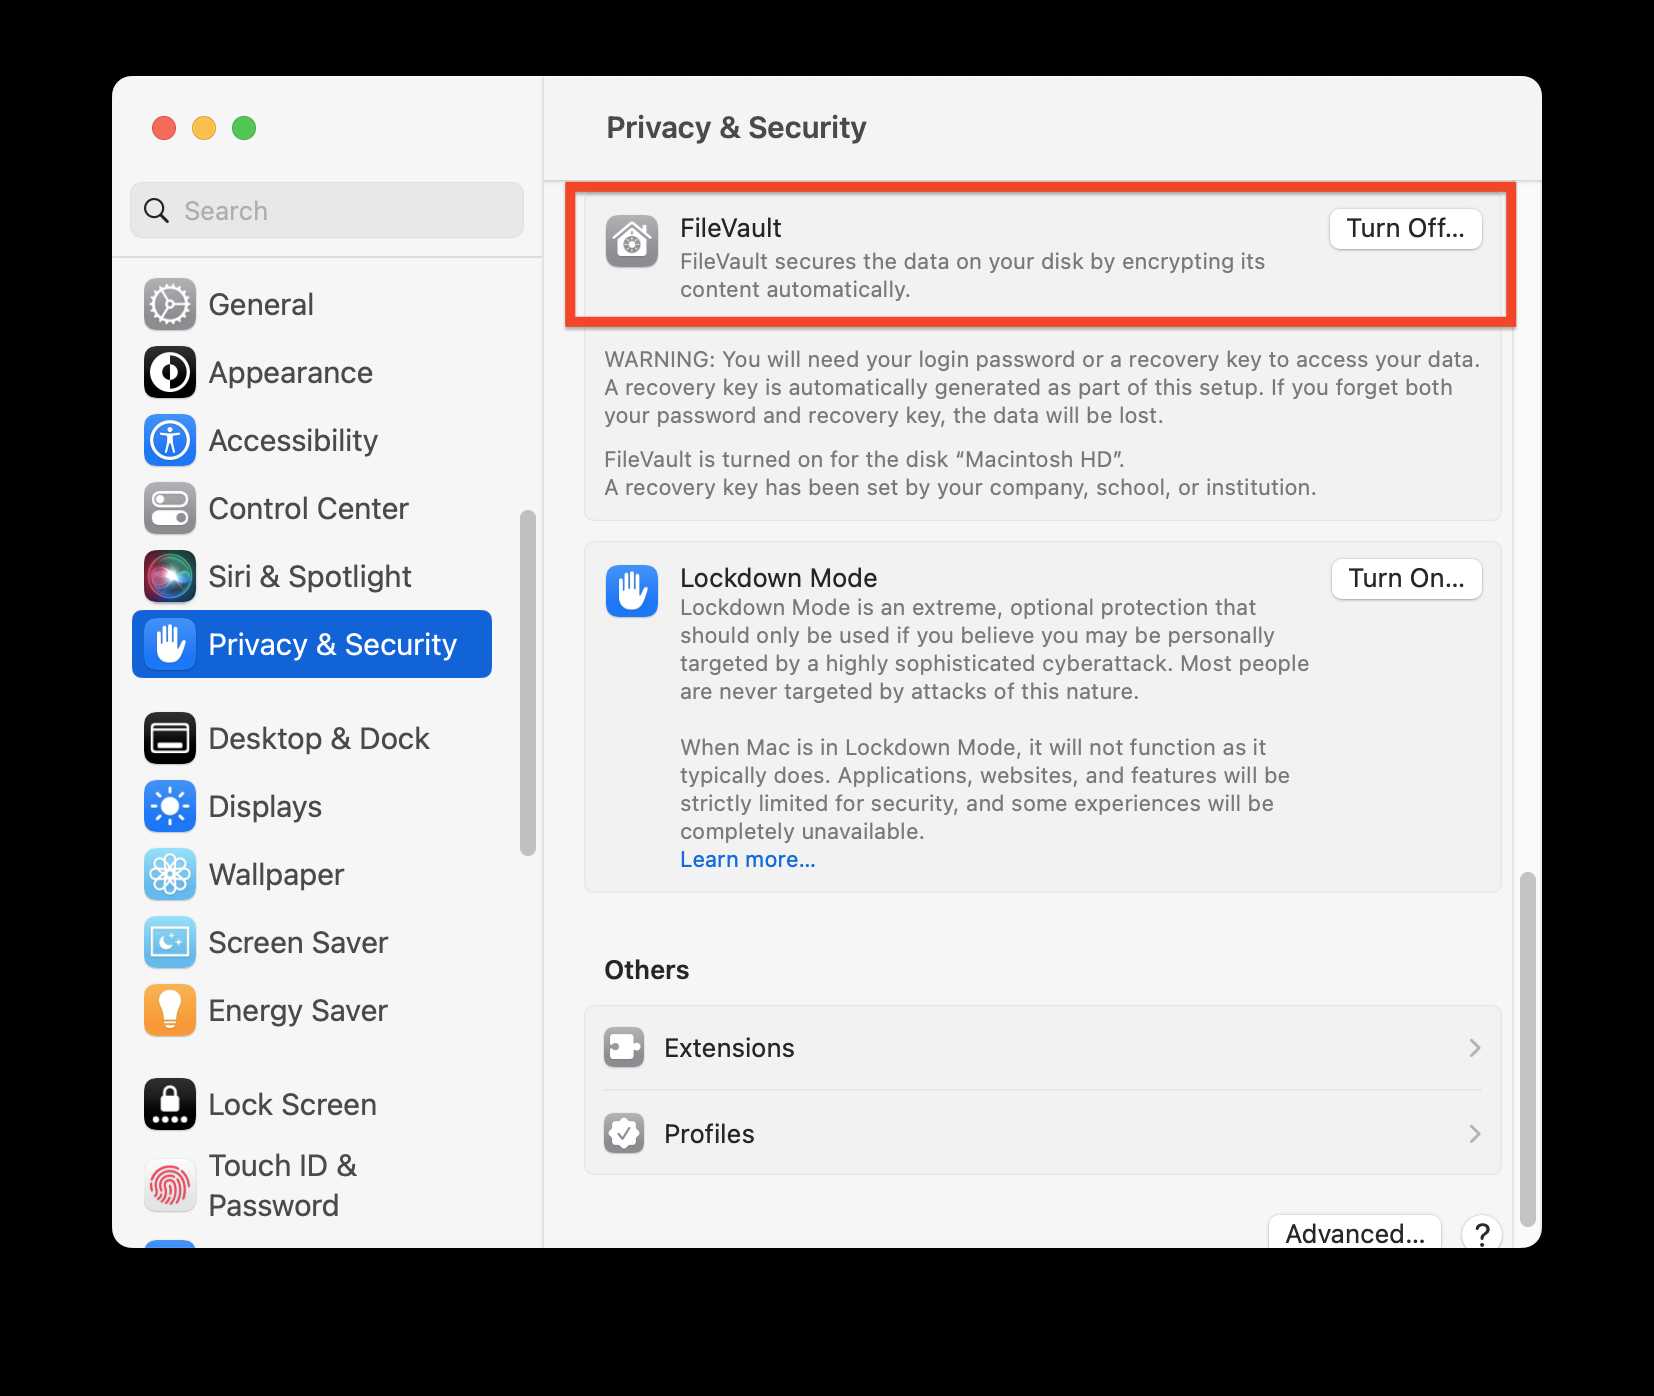
Managing FileVault status and progress
You can check if FileVault is enabled or see the encryption progress in the Security & Privacy section of System Preferences.
If encryption is in progress, it’s important to keep your Mac connected to power and avoid shutting it down. Once done, your Mac will show the status as Encryption Complete.
You can also pause or restart encryption if needed. Keeping an eye on the process helps ensure your data remains protected without interruption.
Additional tips for optimizing FileVault security
To get the most out of FileVault, consider these best practices:
- Enable automatic login only if you trust your device’s physical security.
- Use a long, complex password for your user account.
- Regularly update your macOS to ensure you’re protected against the latest security threats.
- Back up your data frequently using Time Machine or other backup tools.
- Keep your recovery key in a secure location separate from your Mac.
These steps will help you maintain high security while making it easy to access your data when needed.
Restoring access if you forget your password or recovery key
If you forget your login password, you may need to reset it using your Apple ID or recovery key.
For Apple ID reset, you will be prompted to verify your identity and set a new password. Using your recovery key involves entering the 24-character code during startup to unlock your data.
It’s essential to keep these recovery options updated and accessible to prevent losing access permanently.
Disabling FileVault when necessary
In some cases, you might want to turn off FileVault, such as during repairs or troubleshooting. To disable it:
- Go to System Preferences >Security & Privacy.
- Click the FileVault tab and enter your administrator password.
- Click Turn Off FileVault.
Your Mac will decrypt the disk, which could take some time. Remember, turning off encryption reduces your data security, so do this only when necessary.
Related security features to complement FileVault
While FileVault encrypts your disk, combining it with other security features can provide comprehensive protection:
- Two-factor authentication adds an extra layer of login security.
- Find My Mac helps locate, lock, or erase your device if lost.
- Firewall settings protect your Mac from unauthorized network access.
- Automatic software updates patch vulnerabilities and improve security.
Integrating these features ensures your MacBook remains safe from various threats.
Common mistakes to avoid when using FileVault
Avoid these pitfalls to maximize your data protection:
- Forget to create or store your recovery key securely.
- Share your password or recovery key with untrusted individuals.
- Disable FileVault without proper backups.
- Ignore software updates that patch security issues.
- Use weak passwords that are easy to guess.
Being cautious with these aspects helps maintain the effectiveness of your encryption.
Protecting your MacBook with FileVault encryption is a smart move to keep your personal information secure. By enabling FileVault, setting a strong password, and maintaining good security habits, you can prevent unauthorized access. Regularly monitor encryption status and keep backups to avoid data loss. Combining FileVault with other security tools will give your MacBook a strong defense against threats and theft.
FileVault: What Is It and Should I Enable It on My Mac?
Frequently Asked Questions
What are the initial steps to enable FileVault encryption on a MacBook?
To start using FileVault encryption on your MacBook, open the System Preferences and select Security & Privacy. Click on the FileVault tab and then click the lock icon to authenticate. Next, click “Turn On FileVault” and choose whether to allow your iCloud account to unlock your disk or create a recovery key. Follow the on-screen instructions to complete the setup, and your data will begin encrypting.
How can I ensure my recovery key is stored securely during encryption setup?
During the FileVault setup process, macOS provides a recovery key that can help regain access if you forget your password. You should store this key in a safe location separate from your MacBook, such as a secure password manager or a physical safe. Avoid saving it on your device or emailing it to yourself to prevent unauthorized access.
What precautions should I take after enabling FileVault on my MacBook?
After activating FileVault, ensure you remember your login password and keep a secure copy of your recovery key. Regularly back up your data to prevent loss in case of hardware failure or other issues. Also, avoid sharing your account credentials and be cautious when enabling remote access features to maintain your data security.
Can I temporarily disable FileVault encryption if needed?
Yes, you can turn off FileVault encryption at any time through System Preferences. Navigate to Security & Privacy, click the FileVault tab, then click the lock to authenticate. Select “Turn Off FileVault,” and the decryption process will start. Keep in mind that decrypting your disk may take some time and leave your data unprotected during the process.
How does FileVault encryption impact the system performance of my MacBook?
Enabling FileVault may cause a slight slowdown during the initial encryption process and when accessing protected files, as encryption and decryption require additional system resources. However, once the process completes, most users experience minimal performance impact, and the security benefits outweigh the minor slowdowns.
Final Thoughts
Protecting your MacBook with FileVault encryption is straightforward and essential. Enable FileVault in your System Preferences under Security & Privacy to secure your data. A strong login password further enhances security and prevents unauthorized access. Regularly update macOS to benefit from the latest security features. Taking these steps ensures your MacBook remains protected against potential threats and unauthorized use.
Similar Posts