

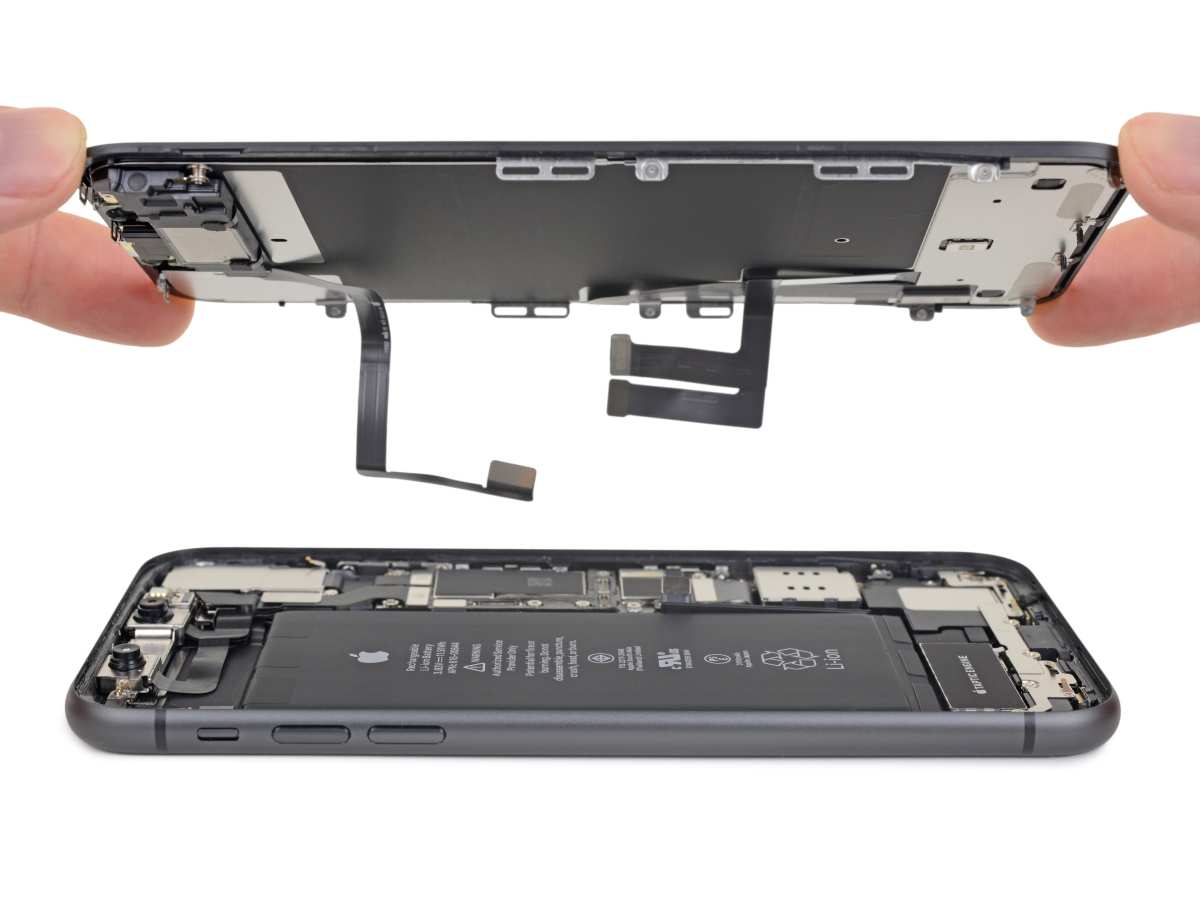
Replacing an iPhone 11 screen is straightforward if you follow the right steps. **You can do it yourself with the proper tools and patience.** Knowing how to iPhone 11 screen replacement saves time and money, especially if you’re comfortable with basic repairs.
Start by gathering the necessary tools, then carefully follow the detailed guide to avoid damaging other components. With a bit of focus, you’ll have your device looking and functioning like new in no time.

How to iPhone 11 Screen Replacement: A Step-by-Step Guide
Replacing the screen on your iPhone 11 might seem daunting at first, but with the right tools, patience, and a clear plan, you can do it yourself. Whether your screen is cracked, unresponsive, or showing distorted images, this guide will walk you through each step to help you restore your phone to its original condition. Let’s dive into the process and explore everything you need to know about how to replace an iPhone 11 screen effectively.
Understanding Why Replacing Your iPhone 11 Screen Matters
Before jumping into the repair process, it’s helpful to understand why replacing your iPhone 11 screen is crucial. When your screen gets damaged, it can affect the overall performance and usability of your device. Common issues caused by a broken screen include:
- Cracks and shattering that can worsen over time
- Touch function not working properly
- Display flickering or dead pixels
- Increased risk of further internal damage
Getting your screen fixed quickly prevents these problems from escalating and prolongs the lifespan of your device.
Tools and Materials Needed for the Screen Replacement
Having the right tools makes the process smoother and reduces the chance of damaging your phone further. Here’s a list of what you’ll need:
- Replacement iPhone 11 screen
- Small Phillips screwdriver
- Pentalobe screwdriver (for phone screws)
- Plastic opening tools
- Suction cup
- Spudger or plastic prying tool
- Tweezers
- Adhesive strips or glue for reassembling
- Antistatic wrist strap (optional but recommended)
Make sure you buy a high-quality replacement screen from a trusted supplier to ensure the best performance and durability.
Preparation Before Starting the Repair
Preparation is key to a successful screen replacement. Follow these steps to get your workspace and device ready:
Back Up Your Data
Always save your important files and photos before starting the repair. Use iCloud or connect your iPhone to a computer to create a full backup.
Power Down Your Device
Turn off your iPhone to prevent any accidental touches or short circuits during the repair process.
Work in a Clean, Well-Lit Area
Choose a workspace free of dust and static. Good lighting helps you see small components clearly and reduces errors.
Gather All Your Tools
Ensure every tool needed is within reach. Having everything prepared minimizes interruptions during the process.
Removing the Broken Screen
The removal process is delicate. Follow these steps carefully:
Remove the Pentalobe Screws
Using the Pentalobe screwdriver, take out the screws at the bottom of the phone near the charging port. These screws hold the screen in place.
Apply Heat to Loosen Adhesive
Gently heat the edges of your iPhone to soften the adhesive holding the screen. You can use an iOpener device or a warm, soft cloth. Be cautious to avoid overheating.
Apply the Suction Cup
Place the suction cup just above the home button area. Gently pull to create a gap between the screen and the frame.
Insert the Opening Tool
Carefully insert the plastic prying tool into the gap. Work around the edges to loosen the adhesive and detach the screen from the frame. Take your time, and do not force the screen if it resists.
Disconnect the Display Connectors
Once the screen is loosened, lift it slightly but do not remove it fully. Use your screwdriver and tweezers to disconnect the display cables attached to the logic board, ensuring no damage occurs.
Removing Internal Components
In some cases, you might need to transfer internal components from your old screen to the new one, such as the front camera or sensors.
Detach Internal Components
Use the right tools to disconnect and carefully remove components like the front camera, earpiece, and sensor brackets. Follow your repair guide or online tutorials to identify each part.
Transfer Components
If necessary, transfer the components to the new screen, ensuring they are securely connected for proper functioning.
Installing the New Screen
After removing the damaged screen, it’s time to install the new one:
Connect the Display Cables
Carefully attach the new display’s connectors to the logic board. Ensure each connector clicks into place. Double-check all connections before proceeding.
Secure Internal Components
Replace brackets and screws that held internal parts, ensuring everything is tightly and correctly installed.
Align and Attach the New Screen
Gently position the new screen onto the frame, making sure it aligns perfectly with all edges and openings.
Reattach the Pentalobe Screws
Secure the bottom screws to hold the screen firmly in place.
Testing Your Repaired iPhone 11
Before sealing everything completely, test your device:
- Power it on and check if the screen responds to touch
- Ensure the display looks clear without any dead pixels or flickering
- Test other functions such as the front camera, sensors, and earpiece
If everything works correctly, proceed to the final step.
Sealing and Final Assembly
After confirming the screen functions correctly:
Apply New Adhesive
Place fresh adhesive strips around the edges of the screen to secure it properly.
Reattach the Screen
Carefully press the screen into place, ensuring a snug fit. Remove any excess adhesive that may leak out.
Replace Screws and Final Checks
Screw back any remaining screws, then power on your device for a final test.
Tips for a Successful Screen Replacement
– Work slowly and patiently to avoid damaging delicate parts.
– Keep track of all screws and small components.
– Use proper lighting and magnification if needed.
– Consider watching tutorial videos to visualize each step.
– If unsure about any step, consult professional repair services.
When to Seek Professional Help
While DIY repairs can save money, certain situations may require professional intervention, such as:
– Extensive internal damage
– Difficulty disconnecting delicate connectors
– Lack of proper tools
– Concerns about voiding warranty
Choosing a certified technician ensures your iPhone 11 gets repaired correctly and safely.
Replacing your iPhone 11 screen can be a rewarding project if you follow the correct steps. Preparing thoroughly, working carefully, and using quality parts and tools help ensure a successful repair. Remember, patience makes perfect. With a little effort, you can bring your device back to life and enjoy its full functionality once again.
Frequently Asked Questions
What are the essential tools needed for iPhone 11 screen replacement?
Replacing the screen on an iPhone 11 requires several specialized tools. You will need a small Phillips screwdriver, a P2 Pentalobe screwdriver, a plastic opening tool, a suction cup, a pair of tweezers, and a spudger. Additionally, using a high-quality replacement screen and adhesive tape ensures a secure fit. Having an anti-static wrist strap can also help prevent damage to internal components during the process.
How can I safely disconnect the battery before replacing the screen?
To safely disconnect the battery, first power off your iPhone and remove the Pentalobe screws at the bottom of the device. Use a plastic opening tool to gently pry open the display assembly. Locate the battery connector and use a spudger to lift the connector from its socket carefully. Disconnecting the battery prevents electrical shorts and protects sensitive components during screen removal and installation.
What steps should I follow to ensure the new screen is properly aligned?
After removing the old screen, position the new display carefully, making sure the connectors align with their sockets. Use gentle pressure to snap the connectors into place without forcing them. Before sealing the device entirely, connect the screen temporarily and power on your iPhone to test the display and touch responsiveness. Once confirmed, secure the screen with adhesive tape and reassemble all screws to finish the repair.
Final Thoughts
To perform an iPhone 11 screen replacement, gather the necessary tools and follow detailed step-by-step instructions. Carefully power off your device and remove the screws securing the screen. Use a suction cup and opening tools to gently separate the screen from the body without damaging internal components.
Next, disconnect the display connectors and carefully remove the broken screen. Align the new screen and reconnect all connectors securely before reassembling. Take your time to ensure every part is correctly installed.
In conclusion, how to iPhone 11 screen replacement involves patience, proper tools, and precise steps. Following these guidelines ensures a successful repair and restores your phone’s functionality.
