

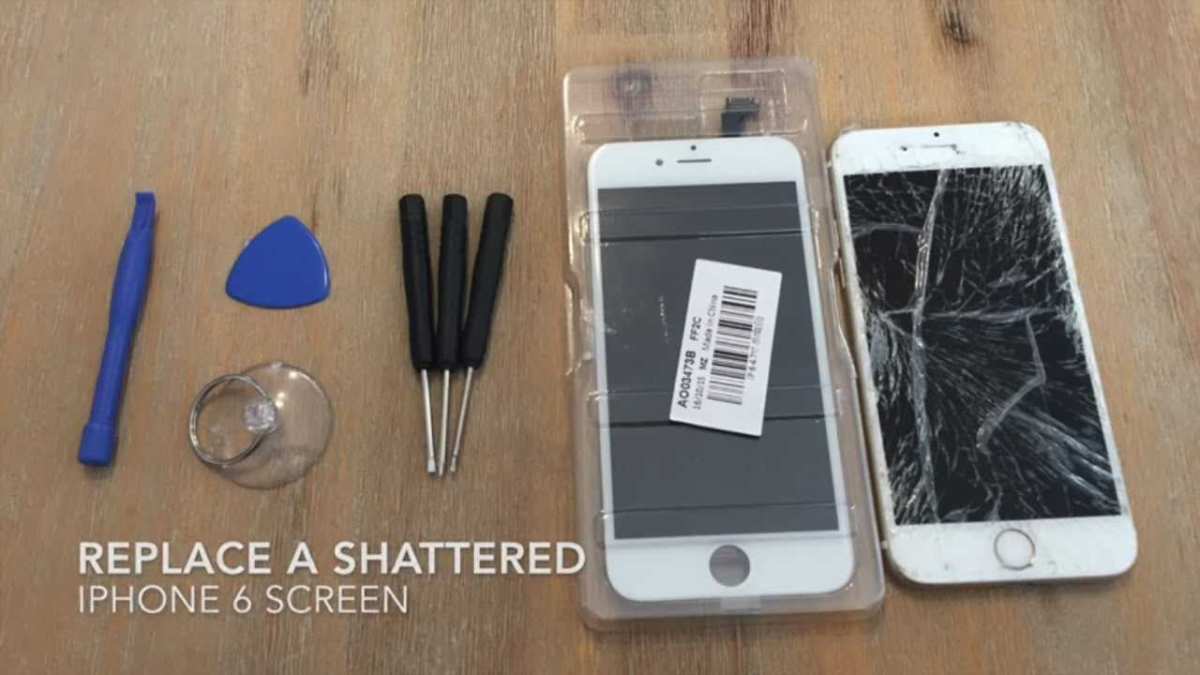
If your iPhone screen is cracked, don’t panic—there are simple ways to fix it. You can opt for a professional repair service or try fixing it yourself with a repair kit if you’re comfortable with DIY projects. Replacing the screen promptly will not only restore your device’s appearance but also prevent further damage.
To repair a cracked iPhone screen, you can take it to an authorized service center for professional help or purchase a screen replacement kit and follow detailed tutorials for a DIY fix. Make sure to back up your data before attempting any repairs to avoid losing important information.
Cracked screens on iPhones are frustrating, but they’re fixable. Whether you choose to visit a certified technician or attempt a do-it-yourself repair, knowing your options can save you time and money. The key is to act quickly before the damage worsens, ensuring your device remains functional and looking as good as new.

How to Repair iPhone Cracked Screen: A Complete Guide
If your iPhone screen has cracked, it can be frustrating and make your device less functional. Fixing a cracked screen might seem complicated, but with the right knowledge, you can handle it yourself or decide the best way to get it repaired. This guide provides all the essential steps and tips to help you learn how to repair iPhone cracked screen efficiently and safely.
Understanding When to Repair or Replace Your iPhone Screen
First, examine the severity of the crack. Minor cracks might not affect touch sensitivity or display quality but can worsen over time. Deep cracks can impair your ability to see or interact with your screen, making replacement necessary. Evaluate whether you feel comfortable repairing it yourself or if professional help is better.
Assessing the Damage
- Check for cracks that cover the entire screen or are concentrated in one corner.
- Test the responsiveness of the touch screen.
- Look for dead pixels or discoloration indicating internal damage.
Deciding Between DIY Repair and Professional Service
If you’re experienced with electronic repairs, you might consider fixing the screen yourself. For those unfamiliar, it’s safer to visit an Apple Store or authorized repair shop to avoid further damage.
Tools and Materials Needed for DIY iPhone Screen Repair
Before attempting a repair, gather all necessary tools. Having the right equipment ensures a smooth process and reduces the risk of damaging your phone further.
Essential Repair Kit Components
- Replacement screen compatible with your iPhone model
- Screwdriver set (usually Phillips and Pentalobe)
- Plastic opening tools and spudgers
- Heating pad or iOpener
- Suctions cup tool
- Tweezers
- Adhesive strips or glue for resealing
- Anti-static wrist strap (optional but recommended)
Additional Items for a Smooth Repair
- Clean workspace free of dust
- Microfiber cloths for cleaning
- Isopropyl alcohol for removing adhesive residues
Step-by-Step Guide to Repairing Your iPhone Cracked Screen
Following the correct steps helps minimize risks and increases the chances of a successful repair. Make sure to power off your device before starting.
Preparing Your Workstation
Set your workspace in a clean, well-lit area. Keep a container nearby to store small screws and parts to prevent losing them. Wear an anti-static wrist strap if available.
Removing the Broken Screen
- Power off your iPhone completely.
- Use a heating pad or iOpener to soften the adhesive around the screen for about 2-3 minutes.
- Apply the suction cup near the edge of the screen and gently lift to create a gap.
- Insert a plastic opening tool into the gap and carefully slide around the edges to detach the glass from the frame.
- Be cautious of internal cables connected to the screen; disconnect them carefully using tweezers or a spudger.
Installing the New Screen
- Reconnect any internal cables from the new screen to the main body of the iPhone.
- Align the new screen carefully and press gently to secure it into place.
- Reassemble the device by reversing the removal steps, ensuring all screws and parts are correctly installed.
- Apply new adhesive strips if necessary for a tight seal.
Testing Your iPhone After Repair
After reassembly, power on your iPhone. Test the new screen for responsiveness, clarity, and the absence of dead spots. Ensure touch sensitivity and display quality are restored. If issues appear, recheck connections or consider professional help.
Precautions to Keep in Mind During Repair
- Work in a dust-free environment to prevent particles from getting under the screen.
- Handle parts with care to avoid damaging delicate internal components.
- Use proper tools to prevent scratching or breaking parts.
- Be patient and avoid forcing components apart.
Cost Considerations for iPhone Screen Replacement
DIY repairs can save money, typically costing between $30 to $100 for parts, depending on the model. Professional repairs often range from $100 to $300, including labor. Weigh the costs based on your confidence and the extent of damage.
When to Seek Professional Help
If your repair attempts fail or you’re uncomfortable handling delicate parts, visiting authorized Apple service providers is the safest option. Certified technicians ensure your repair is done correctly and your warranty remains intact.
Preventing Future Cracks and Damage
Protect your iPhone with a high-quality case and a tempered glass screen protector. Avoid dropping your device and keep it away from sharp objects. Regular maintenance and careful handling can extend your iPhone’s lifespan.
Related Repair Topics
- How to replace an iPhone battery
- Fixing unresponsive home buttons
- Replacing a damaged charging port
Having the right knowledge and tools can make the process of learning how to repair iPhone cracked screen straightforward. Whether you opt for a DIY approach or professional service, the goal is to restore your device to optimal condition quickly and safely.
iPhone 11 Screen Replacement: Fix Your Cracked Screen!
Frequently Asked Questions
What steps should I take before attempting to repair my iPhone’s cracked screen myself?
Before starting any repair, back up your data to prevent loss. Power off your device to avoid electrical damage. Gather necessary tools such as a precision screwdriver, plastic pry tools, and adhesive strips. Work in a clean, static-free environment to prevent further damage. If you feel unsure about the process, consider consulting professional repair services to avoid causing additional issues.
How can I temporarily protect my iPhone screen from further damage after it cracks?
Apply a screen protector or a clear adhesive film over the cracked area to prevent glass shards from falling and to reduce injury risk. You can also place a piece of tape over the cracks for added protection. Avoid using the device extensively until you get the screen repaired to minimize the chances of dust or debris entering the device and worsening the damage.
Are there specific tools or materials I should use for removing and replacing an iPhone screen?
Yes, use specialized tools designed for iPhone repairs, including a pentalobe screwdriver, plastic opening tools, tweezers, and a suction cup. For reassembly, opt for high-quality adhesive strips to ensure the screen stays securely in place. Always follow detailed guides or tutorials suitable for your iPhone model to avoid damaging internal components during the process.
Final Thoughts
To repair an iPhone cracked screen, first power off your device and gather the necessary tools such as a pentalobe screwdriver, a plastic prying tool, and a new screen. Carefully remove the screws and gently lift the damaged display.
Follow precise steps to disconnect the cables and replace the broken glass with the new screen. Test the device before sealing it back together to ensure proper function.
In conclusion, knowing how to repair iPhone cracked screen involves patience and careful handling. With the right tools and guidance, you can restore your device effectively and safely.
