

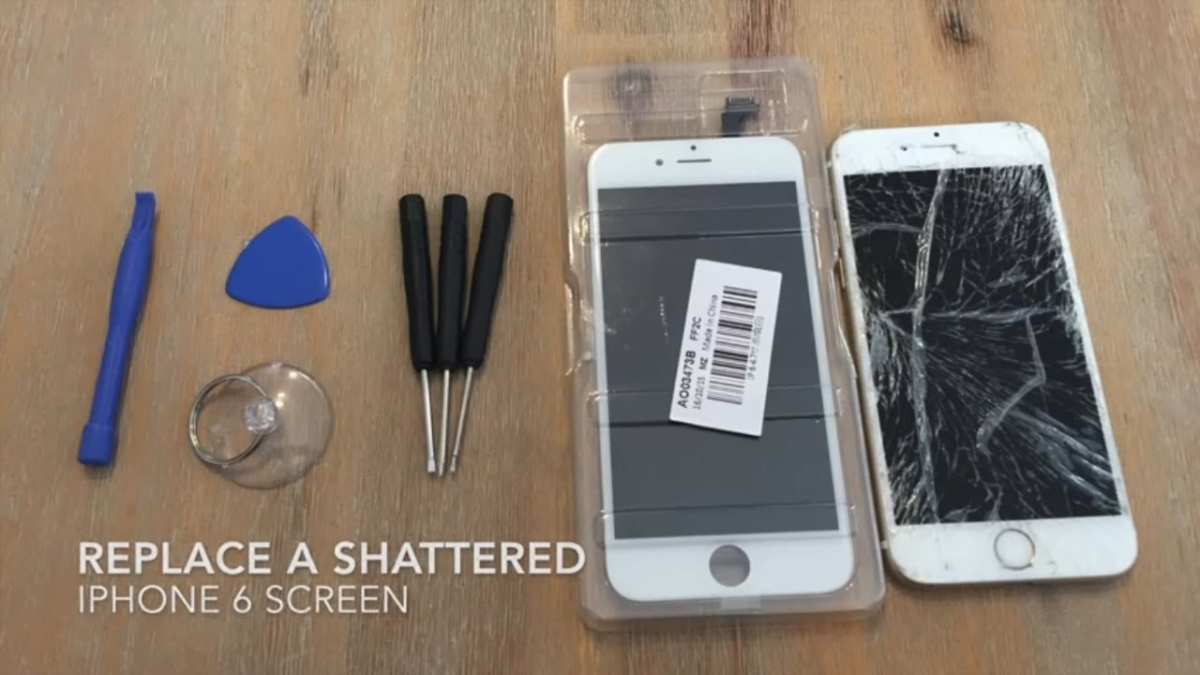
If your iPhone screen is cracked or unresponsive, the quickest fix is replacing the display or seeking professional repair. **To fix iPhone screen**, first identify whether the damage is hardware or software.
If it’s a hardware issue, visiting an authorized repair center ensures quality replacement. For minor software glitches, restarting your device might do the trick. Knowing how to fix iPhone screen efficiently helps you save time and avoid further damage.

How to Fix iPhone Screen
Having a broken or unresponsive iPhone screen can be frustrating. Whether the screen has cracked, is black, or isn’t responding to your touch, knowing how to fix it is essential. This guide will walk you through various methods to repair your iPhone screen, from simple DIY fixes to professional repairs. Let’s explore each step carefully so you can get your device back in working order quickly and safely.
Assessing the Damage
Before jumping into repairs, take a moment to evaluate your iPhone’s screen damage. This helps determine the best course of action, whether it’s a quick fix or a more involved repair.
Types of Screen Damage
- Cracked Screen: Visible fractures or shattered glass, often accompanied by dead pixels or touch issues.
- Unresponsive Touch: The screen doesn’t respond to touches or gestures, even if the display looks fine.
- Black or White Screen: The display is blank or showing strange colors, but the device might still vibrate or make sounds.
- Discolored or Blurry Display: Colors look off, or the display is fuzzy, which might point to internal damage.
Knowing what type of damage you face helps you decide whether to attempt a repair yourself or seek professional help.
Gathering the Necessary Tools and Parts
If you decide to fix the screen yourself, you need to gather specific tools and replacement parts to ensure a smooth repair process.
Tools You’ll Need
- Small Phillips screwdriver – for removing screws.
- Pentalobe screwdriver – specialized tool for iPhone screws.
- Plastic opening tools – to pry open the case without damaging it.
- Suction cup – aids in lifting the screen gently.
- Spudger or plastic pick – to disconnect delicate cables safely.
- Tweezers – for handling small components.
- Adhesive strips or glue – to secure the new screen in place.
Replacement Parts
- New iPhone screen – compatible with your iPhone model.
- Screen repair kit – sometimes includes tools and adhesive.
Always buy high-quality, genuine parts or trusted third-party components. Using subpar parts can cause further issues or reduce your iPhone’s performance.
Preparing Your Workspace
Create a clean, well-lit workspace free of static or dust. Use an anti-static mat if available, and keep track of all screws and small parts to prevent losing anything during repair.
Safety First
- Power off your iPhone completely before starting repairs.
- Work gently to avoid damaging internal components.
- Be patient; rushing can lead to accidental damage.
Step-by-Step Guide to Replacing an iPhone Screen
Now, let’s move into the core process: replacing your iPhone screen step by step.
Removing the Broken Screen
Power Down and Remove the Pentalobe Screws
Power off your device completely. Use the pentalobe screwdriver to remove the screws at the bottom of your iPhone near the charging port. Keep these screws safe for reassembly.
Use a Suction Cup to Gently Lift the Screen
Place the suction cup just above the charging port and gently pull to create a gap. Gently insert a plastic opening tool into this gap to pry the screen away from the body. Take your time and work around the edges carefully.
Disconnect the Display Cables
Once the screen is loose, you’ll see connector shields secured with screws. Remove these screws with your screwdriver. Then, carefully disconnect each display connector using a spudger. Be delicate; these connectors are fragile.
Installing the New Screen
Reconnect the Display Cables
Align and connect all display connectors to their respective ports on the logic board. Once secure, replace the connector shields and screw them back in place.
Reattach the Screen to the Device
Carefully align the new screen with your iPhone’s body. Press gently around the edges to ensure a snug fit. Avoid forcing it, as this can crack the new glass.
Secure the Pentalobe Screws
Finally, reinsert the bottom screws and tighten them securely but not overly tight to prevent stripping threads.
Testing Your iPhone After Repair
Before sealing everything completely, power on your device to check if the new screen responds properly. Test touch responsiveness, display clarity, and ensure no dead pixels or color issues appear.
Additional Tips and Troubleshooting
Even with careful work, some problems may arise after replacing the screen. Here are common issues and solutions:
Touch Responsiveness Problems
- Ensure all connectors are properly seated.
- Check for dust or debris in connector ports.
- Revisit calibration or consider replacing the digitizer if issues persist.
Vertical or Horizontal Lines on Screen
- Inspect the cable connections for damage.
- Confirm that the replacement screen is genuine and compatible.
- Test with different screens if available.
Screen Not Turning On
- Make sure the device is charged.
- Verify that connectors are firmly connected.
- If the problem continues, consider inspecting the internal hardware or seeking professional help.
When to Seek Professional Help
If you feel uncomfortable performing the repair yourself or if your attempts don’t resolve the issue, it’s best to contact a certified repair technician. Professionals can ensure that your iPhone gets the proper care, especially if internal hardware is damaged or if the repair requires specialized tools.
Preventive Measures to Protect Your iPhone Screen
Once your screen is fixed, consider taking steps to prevent future damage:
- Use a sturdy protective case.
- Apply a high-quality screen protector.
- Avoid dropping or bumping your device.
- Keep your iPhone away from water and extreme conditions.
Taking care of your device can extend its lifespan and reduce repair costs in the future.
Fixing your iPhone screen may seem challenging at first, but with the right tools, patience, and careful work, you can often restore your device on your own. Always weigh the cost and risk of DIY repairs against professional services, especially for newer or more complex models. Whether you choose to repair it yourself or consult a professional, prioritize safety and quality to ensure your iPhone remains in top condition.
Remember, a cracked or malfunctioning screen doesn’t have to ruin your day. With this guide, you now have the knowledge to handle most common iPhone screen issues confidently.
Frequently Asked Questions
How can I temporarily fix a cracked iPhone screen without professional repairs?
If your iPhone screen is cracked but still responsive, you can protect it from further damage by applying a screen protector or clear tape over the cracks. This prevents glass shards from falling out and reduces the risk of cuts. Avoid pressing too hard on the damaged area, and handle the device carefully. Keep the phone away from moisture and sharp objects to prevent additional damage until you can get it professionally repaired.
What steps should I take before replacing my iPhone screen on my own?
Before attempting a DIY screen replacement, power off your iPhone to prevent any electrical issues. Gather the necessary tools, such as a pentalobe screwdriver, plastic prying tools, and a new replacement screen compatible with your model. Carefully watch detailed tutorials or guides specific to your iPhone version. Take your time and work in a clean, well-lit area to avoid losing small components. Remember, working on your device may void warranty or cause further damage if not done properly.
When should I seek professional help instead of attempting a screen repair at home?
If your iPhone is still under warranty or covered by AppleCare+, visiting an authorized service provider is the safest option. Seek professional assistance if you lack experience with electronics repairs, if the screen has suffered extensive damage like deep cracks or internal damage, or if your device shows signs of other issues such as unresponsive touch or display malfunctions. Certified technicians can ensure the repair is safe and restore your device properly.
Final Thoughts
Pour réparer un écran d’iPhone, commencez par déterminer si le problème provient d’un simple écran fissuré ou d’un dysfonctionnement interne. Si le problème est mineur, le remplacement de la vitre ou la réinitialisation peut suffire. Pour des dégâts plus graves, il est souvent préférable de faire appel à un professionnel.
Utiliser des kits de réparation ou des outils appropriés facilite le processus, mais nécessitent de la précaution. Si vous n’êtes pas à l’aise, confiez la réparation à un technicien certifié pour éviter d’aggraver le problème.
En résumé, la meilleure façon de fixer un écran d’iPhone dépend de l’étendue des dommages. Savoir comment fixer un iPhone screen peut faire une différence durable.
