

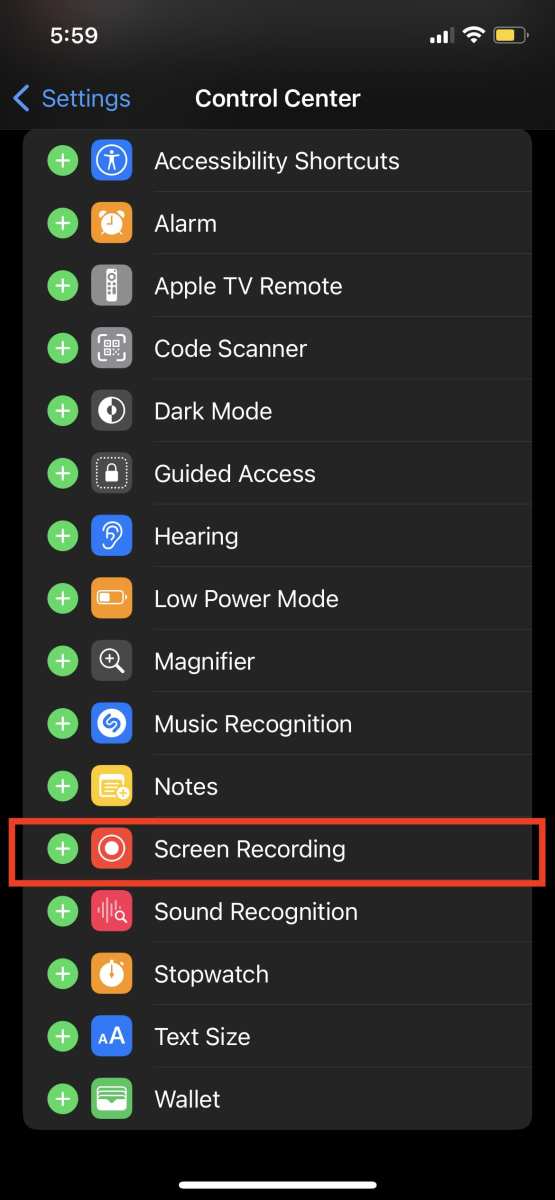
**To access screen recording on your iPhone, simply add it to the Control Center and tap to start recording.** If you’re unsure how to do this, the process is straightforward. The screen recording iPhone setting allows you to capture live footage of your screen effortlessly.
Start by opening your Settings app, then go to Control Center. From there, customize your controls to include Screen Recording. Once added, swipe to open the Control Center and tap the recording button to begin capturing.

Complete Guide to Screen Recording iPhone Settings
Does it seem tricky to figure out how to record your iPhone screen? Don’t worry! Setting up screen recording on your iPhone is pretty simple once you know the steps. Whether you want to save a funny video, record a tutorial, or capture a game, this guide will walk you through everything you need to know about screen recording iPhone settings.
Understanding the Basics of Screen Recording on iPhone
Screen recording is a feature that allows you to capture everything happening on your iPhone screen. It’s a great way to create tutorials, save videos from apps, or record gameplay. Starting with the basics helps you understand what options are available and how to access them easily.
What Do You Need to Use Screen Recording?
- An iPhone running iOS 11 or later
- Enough storage space to save the recording
- Access to the Control Center on your device
Most recent iPhones come equipped with the screen recording feature. If your phone runs on an older version of iOS, you’ll need to update your system first.
Why Use the Screen Recording Feature?
- Capture gameplay or app tutorials
- Save video calls or important messages
- Create instructional content for others
- Record moments for later sharing or review
How to Enable Screen Recording on Your iPhone
Before you can start recording, you must add the screen recording button to your Control Center. Here’s how you do it:
Step-by-step Instructions
- Open the Settings app on your iPhone.
- Scroll down and tap on Control Center.
- Tap on Customize Controls.
- Look for Screen Recording in the list of more controls.
- Tap the green plus (+) icon next to Screen Recording to add it to your Control Center.
Now, you will see the screen recording icon in your Control Center, ready for use whenever you want.
How to Record Your iPhone Screen
With the screen recording button added, you’re ready to start capturing your screen. Follow these simple steps:
Starting a Screen Recording
- Swipe down from the upper right corner of your iPhone (or swipe up from the bottom on older models) to open the Control Center.
- Tap the Screen Recording icon — it looks like a small circle within a circle.
- After tapping, you’ll see a countdown of three seconds before recording begins. This helps you prepare for the capture.
As soon as the countdown finishes, your iPhone starts recording everything on the screen. You’ll see the red status bar or a red recording indicator at the top of your screen to show recording is active.
Stopping the Recording
- Tap the red status bar at the top of your screen. A prompt will appear asking if you want to stop recording.
- Tap Stop to end the recording.
- The video automatically saves to your Photos app.
Accessing and Managing Your Screen Recordings
Once your recording is complete, find it quickly in the Photos app. You can edit, trim, or share your videos directly from there.
How to Find Your Screen Recordings in Photos
- Open the Photos app on your iPhone.
- Tap on the Albums tab at the bottom.
- Scroll down to find the Videos album — your screen recordings are saved here.
Basic Editing of Screen Recordings
If you want to cut parts of your video or trim unnecessary sections, you can do so directly in Photos:
- Open the video in Photos.
- Tap Edit in the top right corner.
- Use the trimming handles to select the section you want to keep.
- Tap Done to save the changes.
Optimizing Your Screen Recording Settings
Getting the best quality and functionality from your recordings involves tweaking some settings. Let’s explore how to customize your screen recording preferences.
Enabling Microphone Audio
If you want to record your voice or other external sounds along with the screen, activating the microphone is essential. Here’s how:
- Open the Control Center.
- Long press or force press the Screen Recording button.
- Tap the microphone icon to turn it on (it turns red when active).
- Start recording as usual, and your voice will be recorded along with the screen.
Adjusting Video Quality
While iOS doesn’t provide a lot of options to change resolution directly, maintaining good settings and enough storage space ensures clear recordings. For best results:
- Close background apps to improve performance.
- Make sure your device is adequately charged or plugged in.
- Keep storage space sufficient; delete unnecessary files.
Best Practices for Screen Recording
- Hide notifications by turning on Do Not Disturb mode to prevent unwanted pop-ups.
- Disable sounds or alerts in your settings if you prefer silent recordings.
- Be mindful of privacy and avoid recording sensitive information.
Additional Tips and Tricks for Screen Recording on iPhone
If you want to make your recordings even better, consider these handy tips:
Using Third-Party Apps for Enhanced Features
While the built-in screen recorder is quite capable, some apps offer additional editing tools, effects, or overlays. Popular options include:
- TechSmith Capture
- Record it! Screen Recorder
- DU Recorder
Remember to choose apps from reliable sources to protect your device and personal data.
Recording Longer Videos
Prolonged recordings might be limited by your device’s storage or battery life. To record longer videos:
- Ensure your iPhone has sufficient memory available.
- Keep your device plugged into power if recording for extended periods.
- Close unnecessary apps to optimize performance.
Sharing Your Screen Recordings
Once you’ve recorded and edited your video, sharing it is straightforward:
- Open Photos and select the video.
- Tap the Share icon (a box with an arrow pointing up).
- Choose how you want to share the video — via Messages, Mail, social media, or AirDrop.
Troubleshooting Common Issues with Screen Recording
If you face any problems when recording your iPhone screen, here are some tips to fix them:
Screen Recording Button Not Showing
If the button doesn’t appear in the Control Center after customization:
- Restart your iPhone.
- Ensure your iOS is updated to the latest version.
- Revisit the Control Center settings to add the feature again.
Recording Starts but No Sound
Make sure the microphone is enabled in the screen recording options. Also, check your volume settings and mute switch to confirm audio isn’t silenced.
Video Quality Is Poor
For crisp videos, avoid recording in low storage space and close background apps. Restart your device if needed to clear temporary glitches.
Setting up and using screen recording on your iPhone is a straightforward process that, once mastered, opens up many creative possibilities. Whether you’re capturing memorable moments, creating tutorials, or saving important communications, having this feature readily available makes sharing content easier than ever. Remember, practice makes perfect, so don’t hesitate to experiment with different settings and techniques to get the best results.
Frequently Asked Questions
How can I add the Screen Recording button to the Control Center on my iPhone?
Navigate to Settings, then tap Control Center. Scroll down to find Screen Recording and tap the green plus icon next to it. This action adds the Screen Recording button to your Control Center, allowing quick access whenever you need to start recording your screen.
What should I do if the screen recording option is not appearing in the Control Center?
Ensure your iPhone is running the latest version of iOS, as updates often fix bugs and improve features. If the option still doesn’t appear, restart your device and revisit Settings > Control Center to verify that Screen Recording is added. Resetting your settings may also resolve persistent issues.
How can I record internal audio during a screen recording session?
Before starting the recording, press and hold the Screen Recording button in the Control Center. Tap the microphone icon to enable audio recording. Once activated, tap Start Recording. Keep in mind that recording internal audio may be restricted by certain app policies or content protections.
Is it possible to customize the shortcuts in the Control Center for easier access to features like screen recording?
Yes, you can customize your Control Center by heading to Settings > Control Center. Tap Customize Controls, then add or remove controls based on your preferences. This allows you to prioritize features you use most often, including Screen Recording.
How do I stop a screen recording on my iPhone?
When you’re done recording, tap the red status bar at the top of your screen and select Stop. Alternatively, open the Control Center and tap the Screen Recording button again. The video will automatically save to your Photos app, where you can view or edit it.
Final Thoughts
The ‘screen recording iphone setting’ feature makes capturing your screen quick and simple. By customizing your Control Center, you can add the screen recording option for easy access. Adjusting settings ensures you record only what you need.
In conclusion, understanding the ‘screen recording iphone setting’ helps you record efficiently. With just a few taps, you can start capturing your screen effortlessly. This straightforward setup improves your overall experience.
