How To Make Your Sd Card Default Storage On Android
To make your SD card the default storage on Android, you need to adjust the settings directly on your device. **Navigate to Storage Settings and set your SD card as the preferred storage option.** This process helps your phone automatically save apps, photos, and files to the SD card instead of internal memory. Knowing how to make your SD card default storage on Android ensures your device runs smoothly and frees up space on your internal storage. Follow these simple steps to quickly switch your storage preference without hassle.

How to Make Your SD Card Default Storage on Android
Using an SD card as your default storage on Android devices can significantly increase your phone’s efficiency by freeing up internal storage for more important apps and data. Many Android users want to know how they can set their SD card as the primary location for app data, downloads, photos, and videos. In this comprehensive guide, you’ll find step-by-step instructions, tips, and important considerations to help you easily configure your device to use the SD card as the default storage.
Understanding Why You Might Want to Use Your SD Card as Default Storage
Before jumping into the how-to steps, it’s helpful to understand why making your SD card the default storage is beneficial:
- Increase internal storage space: Apps and data stored on the SD card do not occupy internal memory, which can speed up your device’s performance.
- Expand storage capacity: SD cards allow you to store more photos, videos, and files without worrying about running out of internal space.
- Ease of data management: Moving photos, videos, and app data to the SD card simplifies backing up and organizing your files.
However, note that not all Android devices support changing default storage to SD cards directly. Compatibility depends on your device model, manufacturer, and Android version.
Check Compatibility and Prepare Your Device
Before proceeding, ensure your device supports setting the SD card as default storage:
- Supported Devices: Most Android smartphones and tablets running Android 6.0 (Marshmallow) or higher support SD card usage for data storage. However, some manufacturers restrict this feature.
- SD Card Format: Use a fast, reliable SD card formatted as FAT32 or exFAT. You can format the SD card through your device settings or a computer before use.
- Backup Data: Always create a backup of your existing data before formatting or modifying storage settings. This prevents accidental data loss.
To prepare your SD card:
- Insert the SD card into your device’s SD card slot.
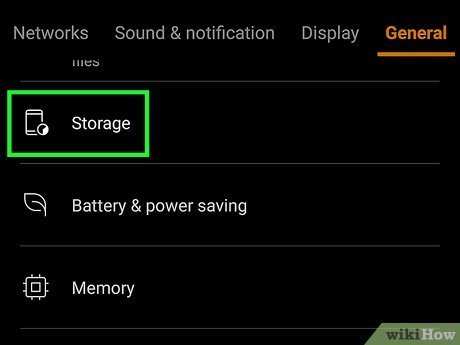
- Go to Settings > Storage.
- Select the SD card, then tap on Format (if needed). Follow the prompts to safely format the card.
Once formatted, your SD card is ready for data storage.
Setting the SD Card as Default Storage for Files and Media
Many Android devices allow you to choose where photos, videos, and downloads are saved:
Change Camera and Download Settings
To automate saving new media to your SD card:
- Camera App: Open your camera app, go to Settings, and look for an option like Save to or Storage location. Select SD Card if available.
- Downloads: For browser downloads and other app data, go to Settings > Apps > Downloads (or your browser app). Change the default save location to the SD card if the option exists.
Note that on some devices, these options might not be directly available, requiring additional steps or third-party apps.
Moving Apps and Data to Your SD Card
Most Android devices have a feature that allows you to move certain apps from internal storage to the SD card, freeing up space:
How to Move Apps to SD Card
Follow these steps:
- Navigate to Settings > Apps & notifications.
- Select the app you want to move.
- Tap on Storage.
- Check if the Change button is available—if yes, tap it.
- Choose SD Card as the new storage location.
Keep in mind that not all apps support moving to SD cards, especially system apps and those with security restrictions.
Using App-Specific Settings and Third-Party Tools
If your device doesn’t support moving apps to SD cards directly, consider third-party apps like “Link2SD” or “Apps2SD.” These tools help manage app data and move applications to the SD card. However, they often require root access, which can void your warranty and may pose security risks.
Configuring Default Storage for Photos and Videos
To make sure your camera and media apps store data on the SD card:
- Open your camera app, go to Settings, and select Storage location.
- Choose SD Card if the option is available.
- Similarly, for gallery and media apps, check if they allow setting the default save location.
For apps without such options, you might need to manually move files from internal storage to the SD card via a file manager app.
Using File Managers to Manually Move Data
A flexible way to transfer files is by using a file manager:
- Download a reputable file manager app from the Play Store, such as “Files by Google” or “Solid Explorer.”
- Open the app and navigate to internal storage.
- Select the files or folders you want to move—such as Photos, Downloads, or Videos.
- Choose the option to move or copy, then select the SD card as the destination.
- Confirm the transfer, and your files will now be stored on the SD card.
This method doesn’t change app behavior but helps manage data storage manually.
Special Considerations and Troubleshooting
While many users successfully set up their SD cards for default storage, some common issues can occur:
- App compatibility: Not all apps support moving or saving data to SD cards. If an app cannot be moved or set to save data on the SD card, you may need to uninstall and reinstall it or use alternative apps.
- SD card performance: Low-quality or slow SD cards can cause app crashes or slow data access. Invest in a high-speed SD card for better performance.
- File access permissions: Ensure your device’s security settings allow apps to access the SD card. You might need to grant permissions manually through Settings > Apps > > Permissions.
- Limitations on data transfer: Sometimes, Android restricts moving certain data types to SD cards. For these cases, manual transfer via file manager is the best solution.
If you experience persistent issues, consult your device manufacturer’s support resources or user community forums for device-specific advice.
Summary of Tips for Setting SD Card as Default Storage
To recap:
- Check if your device supports setting the SD card as default storage.
- Format your SD card properly before use.
- Change camera and download app settings to save on SD card.
- Move existing apps and data to the SD card where possible.
- Use file manager apps to manually transfer files.
- Be mindful of app compatibility and SD card speed.
Following these steps helps you maximize your device’s storage capacity and organize data efficiently.
Setting your SD card as the default storage on Android may seem complex at first, but once you understand your device’s capabilities and limitations, it becomes a straightforward process. Always stay cautious by backing up data before making significant changes, and choose high-quality SD cards to ensure smooth operation. With proper setup, you’ll enjoy more space for photos, videos, and apps, making your mobile experience more comfortable and efficient.
Frequently Asked Questions
Can I set my SD card as the default storage for all apps on Android?
Most Android devices do not allow users to set the SD card as the default storage for all apps globally. However, you can choose specific apps that support moving data to the SD card through their individual settings. For apps that do support this, navigate to the app’s storage settings and select the option to use the SD card as the storage location.
How do I move existing files and applications to my SD card?
To transfer files, open your file manager and select the files you wish to move, then choose the option to move or copy them to the SD card. For applications, go to Settings > Apps & notifications, select the app, and if available, tap on ‘Storage’ and then ‘Change’ to select the SD card as the storage location. Not all apps support this transfer, so check each app’s options.
What steps should I follow to format my SD card for use as internal storage?
Insert the SD card into your device, then go to Settings > Storage. Select your SD card and tap on the menu to find the option ‘Format as internal’ or ‘Adoptable storage.’ Confirm your choice and wait for the formatting process to complete. This process encrypts the card and integrates it with your device’s internal storage system, enabling the system to treat it as a part of internal memory.
Are there any risks involved in setting my SD card as default storage?
Using your SD card as internal storage can sometimes lead to issues such as slower data access speeds or potential data corruption if the card is not of good quality. Additionally, if you remove the SD card after formatting it as internal storage, your device might become unstable. Always back up important data before performing this process and use a high-quality SD card designed for extended use.
Final Thoughts
To make your SD card default storage on Android, start by inserting the SD card into your device. Then, navigate to Settings > Storage, and select your SD card. Tap the menu icon or the three dots, and choose “Format as internal” if available. Confirm your choices and restart your device if necessary.
In the case your device doesn’t support direct setting changes, use a third-party app like “FolderMount” or “SD Card Manager” for better control. Remember, making your SD card the default storage enhances your device’s capacity and keeps your files organized.
Making your SD card default storage on Android is straightforward. Follow these steps to simplify your storage management and ensure your data is stored efficiently.
Related posts

how to disable system update in android
So you want to stop those Android system update notifications, or maybe you're worried a new version will…

how to remove search bar from home screen android
So you just want the search bar gone. That little Google pill sitting on your home screen, taking…

how to send a gif in a text on android
Sending a GIF in a text on Android sounds simple, but the exact steps change depending on your…