

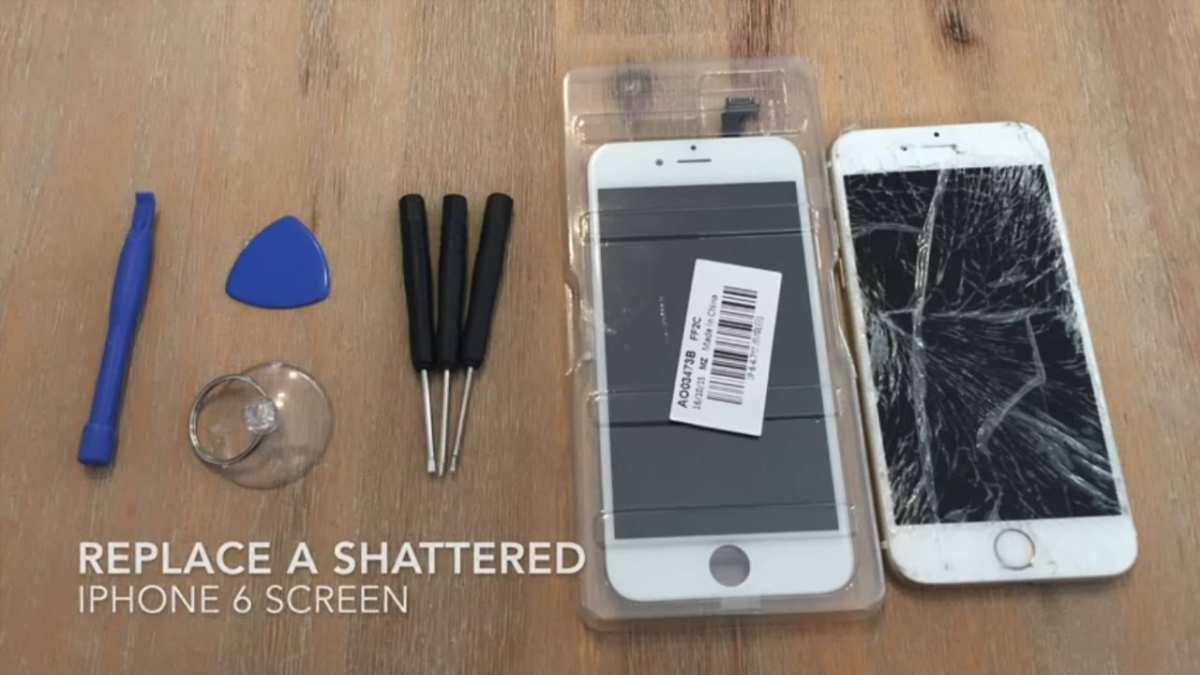
If your iPhone screen is cracked, the best immediate step is to replace it or seek professional repair. **To repair an iPhone cracked screen, you can either visit an authorized service center or attempt a DIY fix if you’re comfortable with small repairs.** Knowing how to repair iPhone cracked screen quickly can save you time and money. Whether you’re considering a kit or a professional, understanding your options helps you make the right choice for your device. Keep reading to find the straightforward ways to restore your iPhone’s clarity and functionality.

How to Repair iPhone Cracked Screen
When your iPhone screen gets cracked, it can feel like a huge hassle. The good news is, fixing it doesn’t always require a trip to the repair shop. Sometimes, you can do it yourself, especially if the damage isn’t too severe. Whether you want to save money or just enjoy the satisfaction of fixing your phone, knowing how to repair an iPhone cracked screen can come in handy. Let’s explore all the options, tools, and steps you need to know to fix that cracked screen and get your iPhone looking new again.
Assessing the Damage
Before jumping into repairs, it’s important to understand the extent of the damage to your iPhone screen. Not all cracks are the same, and knowing what kind you have will help you decide whether you can fix it yourself or if you need professional help.
Types of Screen Damage
Cracks can appear in different ways, and each type impacts how you approach the repair:
- Minor cracks or scratches: These are small lines that don’t affect the screen’s display or touch sensitivity. Often, they’re mostly cosmetic. If this is your case, a screen protector might hide the cracks, or you can consider a repair later.
- Moderate cracks with display issues: Larger cracks that start to interfere with viewing the screen or make it difficult to touch accurately. These usually require replacing the screen.
- Severe shattering: The glass is broken into many pieces, and the display may be damaged or unresponsive. Immediate repair is necessary to prevent further damage or injury.
Checking the Functionality of Your iPhone
Test your device to see if the touchscreen still responds, if the display is clear, and if there are any dead pixels or discoloration. If touch input feels off or the display is dark or flickering, you need to prioritize fixing or replacing the screen.
Gathering Necessary Tools and Parts
Preparing the proper tools makes the repair smoother and more successful. Here’s what you will need for most DIY screen repairs:
Essential Tools
- Precision screwdriver set: Usually includes P2 Pentalobe, Phillips, or Torx screwdrivers for iPhone screws.
- Plastic opening tools or pry tools: To gently lift the screen without damaging internal components.
- Suction cup: Helps lift the glass from the frame with minimal force.
- Tweezers: For handling small parts and connectors.
- Spudger: A firm but gentle tool for disconnecting cables.
- Adhesive strips or replacement glue: To secure the new screen in place.
Replacement Screen Parts
You can buy replacement screens that match your iPhone model. Be sure to select high-quality or OEM (original equipment manufacturer) parts. Cheap or incompatible screens can lead to issues with touch sensitivity or display quality.
Step-by-Step Guide to Repair Your iPhone Screen
Fixing an iPhone cracked screen involves careful disassembly, replacing the glass or entire display assembly, and proper reassembly. Let’s walk through the main steps:
Preparing Your Workspace
Ensure your workspace is clean, well-lit, and static-free. Gather all your tools and spare parts before starting. Power off your device completely and remove any case or accessories.
Removing the Broken Screen
Start by removing the pentalobe screws at the bottom of the iPhone near the charging port. Use a suction cup and plastic prying tools to gently lift the screen. Be patient—applying light, even pressure helps prevent further damage. Disconnect the display cables carefully using tweezers or a spudger to avoid tearing connectors.
Disassembling the Screen Assembly
Depending on your model, the screen may be secured with adhesive or screws. Carefully detach the broken glass or entire display assembly, keeping track of small parts and screws.
Installing the New Screen
Align the new display, reconnect all cables securely, and test the screen before sealing everything back. Remove any protective film from the new screen, and gently press it into place using adhesive strips or glue. Ensure the fit is snug and that no gaps or misalignments exist.
Reassembling the iPhone
Once you confirm the new screen works perfectly, reattach any remaining screws, replace the pentalobe screws at the bottom, and power the device back on. Conduct a quick functionality test to check responsiveness, display clarity, and touch sensitivity.
Professional Repair vs. DIY
While DIY repair can be rewarding and cost-saving, it’s not suitable for everyone. Here’s a quick comparison to help you decide:
Advantages of DIY Repair
- Lower cost compared to professional services
- Immediate repair without waiting for appointments
- Learning experience and sense of accomplishment
Risks of DIY Repair
- Potential to cause further damage if done improperly
- Voiding your warranty or AppleCare plan
- Injury risks from broken glass or small parts
When to Seek Professional Help
- If your iPhone is under warranty or AppleCare+
- If the damage is severe or the repair seems complex
- If you lack confidence or tools to undertake the repair safely
Tips for Maintaining Your iPhone After Repair
Once you replace your screen, consider the following tips to keep your device in good shape:
- Use a high-quality screen protector to prevent future cracks
- Invest in a sturdy case that absorbs shocks from drops
- Avoid placing your phone in risky spots like pockets with keys or corners of bags
- Keep your device away from extreme temperatures and moisture
Common Mistakes to Avoid
To ensure your repair goes smoothly, steer clear of these common pitfalls:
- Using low-quality replacement parts that can compromise performance
- Applying too much force when removing or installing components
- Skipping the proper disassembly steps, which can cause internal damage
- Not grounding yourself to prevent static electricity from harming internal parts
Additional Resources and Support
If you’re unsure about doing the repair yourself, plenty of tutorials and videos are available online, especially from reputable sources. Many tech stores sell repair kits with detailed instructions tailored to specific iPhone models. Remember, when in doubt, seeking professional assistance from authorized technicians ensures your device remains in good hands.
By understanding each step and being prepared, repairing your iPhone cracked screen can become a manageable task. Taking your time, following safety precautions, and carefully assembling your device will help your iPhone look and function like new again.
Frequently Asked Questions
What are the essential tools needed to replace an iPhone cracked screen at home?
To replace an iPhone cracked screen yourself, gather a set of precise tools including a small Phillips screwdriver, a pentalobe screwdriver, plastic opening tools, a suction cup, tweezers, and a spudger. Using high-quality tools ensures you won’t damage internal components during the repair process. Additionally, having a replacement screen compatible with your iPhone model is crucial for a successful repair.
How can I ensure the safety of my data before starting the screen repair?
Before beginning the repair, back up all your important data to iCloud or a computer. This step protects your information in case you accidentally damage your device or need to reset it. Turn off your iPhone completely before removing the screen to avoid short circuits or further damage. Taking these precautions ensures your data remains safe throughout the repair.
Are there alternative options if I’m not comfortable repairing the screen myself?
If repairing the screen by yourself feels overwhelming, consider visiting an authorized Apple service provider or a trusted repair shop. Certified technicians have the experience and tools necessary to replace your cracked screen efficiently. Choosing professional help often guarantees the quality of repair and maintains your device’s warranty, if applicable.
What steps should I follow to avoid further damage during the screen replacement?
To prevent additional damage, work on a clean, static-free surface and handle components carefully. Use the proper tools to avoid applying excessive force that could crack other parts. Keep track of screws and small parts to prevent loss. Following the step-by-step method carefully and working patiently can help you avoid causing further harm to your device.
How can I test my iPhone after replacing the cracked screen?
Once you complete the replacement, power on your iPhone and check the display for clarity, responsiveness, and touch sensitivity. Test functions like the Home button, front camera, and sensors to ensure everything works correctly. If you notice issues, revisit your steps or consult professional help to resolve any problems.
Final Thoughts
Pour réparer un écran d’iPhone fissuré, commencez par éteindre l’appareil pour éviter tout court-circuit. Utilisez des outils spécialisés pour retirer prudemment l’écran endommagé. Remplacez-le par un écran de qualité et assurez-vous que toutes les connexions sont bien reconnectées.
Savoir comment réparer iphone cracked screen peut sembler complexe, mais avec patience et précision, vous pouvez le faire vous-même ou confier votre appareil à un professionnel. Respectez chaque étape pour garantir un résultat optimal.
