

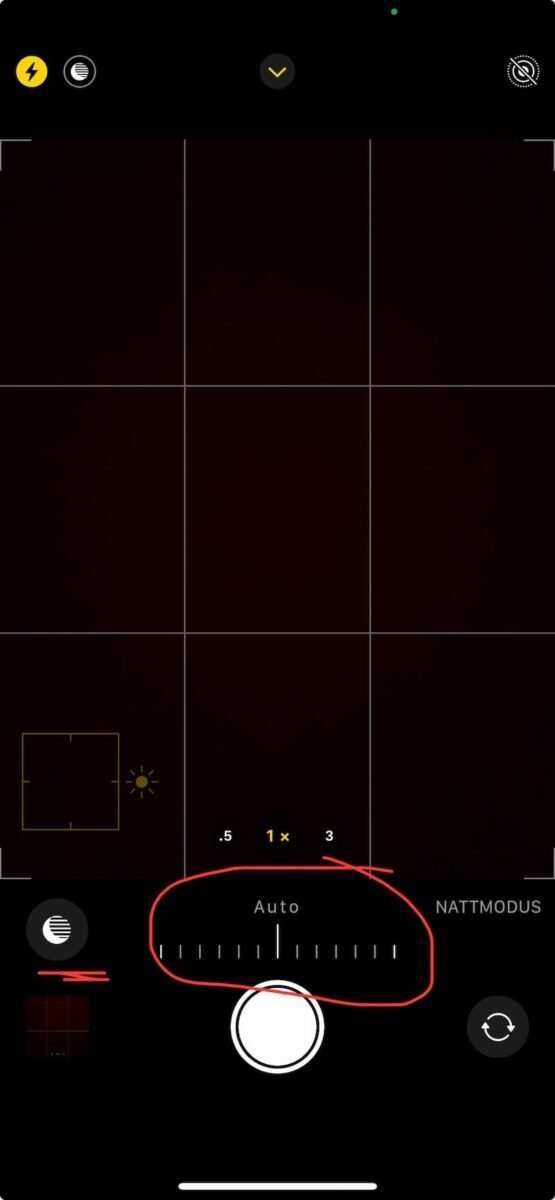
To capture the Northern Lights beautifully with your iPhone, using the right settings is essential. The **best iPhone setting for northern lights** involves turning on Night mode, increasing exposure time, and adjusting focus manually. These tweaks help your camera gather enough light to highlight the auroras vividly. With a steady hand or a tripod, you can produce stunning images that truly do justice to this natural wonder. Setting your iPhone properly makes all the difference when photographing the Northern Lights in low-light conditions.

Best iPhone Setting for Northern Lights
Capturing the magic of the northern lights with your iPhone can be both exciting and rewarding. To get stunning photos of this natural wonder, you need to use the right camera settings, timing, and techniques. In this guide, we will explore in detail the best iPhone settings for northern lights photography, so you can take clear, vibrant, and breathtaking images even in low-light conditions. Whether you’re a beginner or someone who wants to improve their night photography skills, this detailed explanation will help you maximize your iPhone’s capabilities.
Understanding the Challenges of Shooting the Northern Lights
Before diving into specific settings, it’s important to understand what makes photographing northern lights challenging:
- Low Light Conditions: Northern lights often appear at night, requiring your phone to work effectively in very dark environments.
- Moving Subject: The lights change shape and intensity rapidly, so capturing a clear image needs quick adjustments.
- Camera Limitations: Smartphone cameras, including iPhones, have smaller sensors compared to professional cameras, which makes capturing detail in low light more difficult.
Knowing these challenges helps you understand why specific camera settings and techniques are necessary to get the best shots.
Preparing Your iPhone for Northern Lights Photography
Proper preparation enhances your chances of capturing stunning images. Here are some steps to prepare:
- Charge Your Battery Fully: Night photography drains battery faster, especially in cold environments. Make sure your iPhone is fully charged before heading out.
- Clean Your Lens: Dust and fingerprints can blur your photos, so wipe your lens with a soft cloth.
- Use a Tripod or Stable Surface: Since long exposure shots are necessary, keeping your phone steady is critical. A small tripod or placing your iPhone on a stable surface can make a big difference.
- Enable Do Not Disturb Mode: Prevent interruptions or notifications during your shoot to avoid accidental touches that could ruin your photos.
Choosing the Right Camera App for Better Control
While the default Camera app on iPhone is good, sometimes using a third-party app gives you more control over settings like ISO, exposure, and focus. Some popular options include:
- ProCamera: Allows manual control over ISO, shutter speed, and focus.
- Halide: Offers advanced controls and real-time histograms.
- NightCap Camera: Designed specifically for low-light and night photography.
Using these apps can significantly improve your ability to fine-tune your settings for northern lights shots.
Optimizing iPhone Camera Settings for Northern Lights
Getting the perfect shot involves adjusting several key settings. Here’s a detailed breakdown:
Manual Focus
In low light, automatic focus can struggle, resulting in blurry images. Switch to manual focus mode in your chosen app and set the focus to infinity. This ensures the lights are sharp and clear.
ISO Settings
ISO controls the camera’s sensitivity to light. For northern lights, you want a higher ISO, but not too high to avoid noise:
- Start with ISO 800 and adjust as needed.
- If the image looks too grainy, lower the ISO slightly.
- If the lights appear dim, increase ISO gradually—up to 3200 if your app allows and noise remains manageable.
Shutter Speed
A longer exposure captures more light but can cause motion blur if not stabilized properly:
- Begin with a shutter speed of 10-15 seconds.
- If the lights are moving fast or the image is overexposed, reduce the exposure time.
- Use a timer or remote shutter release to prevent shake when pressing the shutter button.
Aperture
Most iPhone cameras have a fixed aperture, but newer models with larger apertures improve low-light performance. Keep in mind:
- Use the widest available aperture (f/1.8 or f/2.2) for maximum light intake.
Using the Camera’s Built-in Night Mode
Recent iPhone models feature Night Mode, which automatically adjusts settings for night photography. Here’s how to use it effectively:
- Enable Night Mode by tapping the moon icon.
- Adjust the exposure time manually if needed, typically between 3-10 seconds depending on ambient light and northern lights’ brightness.
- Keep your iPhone steady during the shot—use a tripod or stable surface.
Night Mode can be very effective for northern lights, especially when combined with manual focus and long exposure settings.
Enhancing Photos Post-Capture
After capturing your images, editing can make a significant difference:
- Adjust Brightness and Contrast: Brighten the lights without overexposing the sky.
- Reduce Noise: Use photo editing apps like Snapseed or Lightroom to minimize graininess caused by high ISO settings.
- Increase Saturation: Boost colors slightly to make the lights pop.
Remember, subtle adjustments often give the best, most natural-looking results.
Additional Tips for Perfect Northern Lights Shots
To maximize your success, consider these extra tips:
- Scout Your Location: Find a spot away from city lights for darker skies and better aurora visibility.
- Check Aurora Forecasts: Apps like My Aurora Forecast or websites can tell you when the northern lights are most active.
- Dress Warmly and Be Patient: Cold weather and patience are essential. The lights might appear suddenly, so stay ready.
- Take Multiple Shots: Experiment with different settings and exposures to increase your chances of capturing a stunning image.
Summary of Key Settings for Northern Lights Photography on iPhone
| Setting | Recommended Range |
|---|---|
| Focus | Manual, set to infinity |
| ISO | 800 to 3200 |
| Shutter Speed | 10-15 seconds |
| Night Mode Exposure | 3-10 seconds |
This table offers a quick reference for the essential settings to capture the beauty of northern lights with your iPhone.
Photographing the northern lights with an iPhone is all about patience and preparation. By understanding the unique challenges of night sky photography, choosing the right app, and adjusting your camera settings thoughtfully, you can capture beautiful images of this stunning natural display. Remember to keep your device steady, shoot during optimal aurora activity, and experiment with settings to see what works best in your environment. With practice, you will be able to create memorable photos that showcase the vibrant colors dancing across the night sky, all with your trusty iPhone.
Frequently Asked Questions
What iPhone camera settings should I use to capture the Northern Lights effectively?
Set your iPhone camera to manual mode if possible, and adjust the exposure time between 10 to 20 seconds to capture more light. Use the highest possible resolution and enable the grid to help frame your shot. Turning off image stabilization can sometimes improve night sky shots, and ensure your live photos are disabled to prevent unintended motion blur. A tripod or stable surface is essential to keep the camera steady during long exposures.
How can I optimize focus when photographing the Northern Lights with my iPhone?
To achieve sharp focus, tap on the brightest area of the sky or the Northern Lights on your screen to lock focus manually. If your iPhone has focus locking, use it to prevent shifts during the exposure. Adjust the focus slider if available, to ensure the lights are clear and detailed. Avoid using autofocus during long exposures, as it may hunt for focus and blur your image.
Are there any recommended filter settings or accessories for better Aurora photography on iPhone?
Using a portable neutral density (ND) filter or a dedicated night-sky filter can help manage the exposure and reduce overexposure from other sources of light. These accessories can improve contrast and color rendition in your images. Additionally, third-party camera apps that offer manual controls often provide better options for adjusting ISO and shutter speed, giving you more control over your shots of the Northern Lights.
What ISO and shutter speed settings should I consider for capturing the Northern Lights?
Set your ISO between 800 and 1600 to balance sensitivity and noise. Use a shutter speed ranging from 10 to 20 seconds, depending on the intensity of the lights and ambient light conditions. Keep in mind that higher ISO settings can introduce noise, so experiment to find the optimal balance for your specific environment. A longer exposure captures more light but may cause star trails if the movement is significant, so adjust accordingly.
Should I enable any specific camera features on my iPhone for nighttime aurora photography?
Turn off flash and HDR modes, as they interfere with long exposure shots. Use the Live Photos feature only if you plan to create short animations; otherwise, disable it to maximize image quality. Enable gridlines to help compose your shot and maintain symmetry. If your device supports it, activate the Night mode to automatically optimize settings for low-light conditions, but manually adjust exposure duration for best results.
Final Thoughts
The best iphone setting for northern lights involves adjusting exposure and ISO to capture the vibrant colors without overexposing. Use a tripod to keep the shot steady during long exposures. Set your camera to manual mode for precise control over settings.
Focus manually on a distant light source or the night sky to ensure sharp images. Enable grid lines to help compose your shot accurately.
In summary, for stunning northern lights photos, tweak your iPhone settings to optimize exposure, ISO, and focus. These steps will help you achieve the best iphone setting for northern lights.
